Ubuntu16.04系统+GTX1050TI显卡的tensorflow1.6(GPU版)安装-详细图文
前言
最近学习深度学习有一段时间了,遇到Google的tensorflow深度学习框架,实在是广大深度学习爱好者的福音啊,然而,在安装tensorflow框架的时候,我是踩坑无数,终于花了一天时间成功安装了Google的最新版1.6版本的tensorflow的框架啊
一.必备软硬件的下载
1.1 系统安装:Ubuntu16.04版(64位)
注意:切记一定要是64位,不然安装过程中会报异常
系统安装详情请自行百度
具体可参考百度经验:Ubuntu 16.04 安装基础入门教程
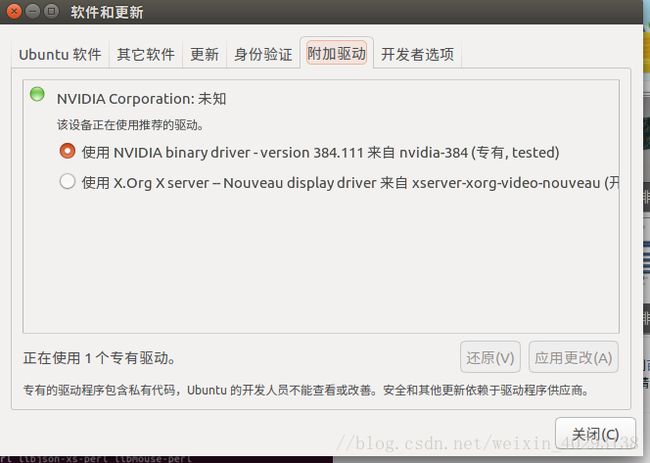
1.2 硬件驱动更新:NVIDA-384
显卡性能查看:https://developer.nvidia.com/cuda-gpus
sudo apt-get update2.系统设置->软件更新->附加驱动->选择nvidia最新驱动(384)->应用更改
3.更新完硬件驱动,重启电脑
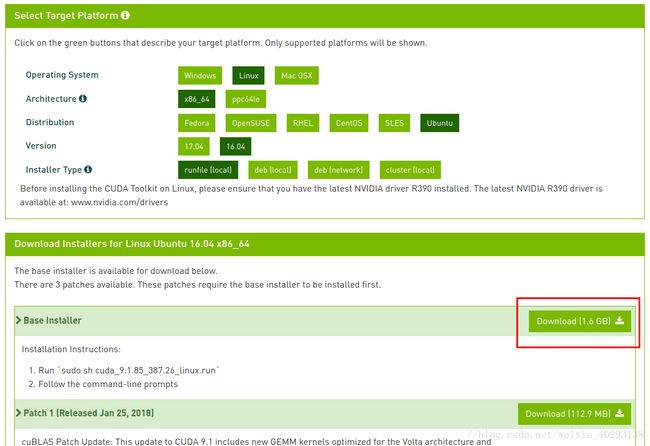
1.3 CUDA-9.0下载
tensorflow最新版本1.6版的,支持的比较好的搭配是CUDA-9.0+CUDNN7.0,切记一定要选好搭配,我曾将经踩坑,下了其他版本的CUDA和CUDNN,后面在安装tensorflow的时候,出现各种无厘头的BUG。
另外,CUDA一定要下载runfile格式的,切勿下载deb格式和其他格式的
CUDA-9.0下载地址:https://developer.nvidia.com/cuda-90-download-archive
1.4 CUDNN-7.0下载
刚才说了,tensorflow最新版本1.6版的,支持的比较好的搭配是CUDA-9.0+CUDNN7.0,因此,我们这里所要用到的CUDNN是CUDNN7.0版本的
CUDNN-7.0 下载地址:https://developer.nvidia.com/cudnn(需要注册登录)
说明:
(1)CUDNN的下载需要注册个账号,并填写相关问卷(问卷答案随你开心就好)
(2)一定要选择CUDN for LINUX版本的,不要选择CUDNN for Linux (Power8)版本的
(3)填写完毕点击 I Agree To 前面的小方框,出现如下:
二.安装过程
2.1 CUDA-9.0的安装
打开terminal,具体指令:
1. cd 切换到刚才下载CUDA-9.0的目录
cd /home/***(自己的用户名)/download/ 2.执行安装命令 ,其中cuda_9.0.103_384.59_linux.run,改为你自己下载的cuda版本
sudo sh cuda_9.0.103_384.59_linux.run3.执行安装指令后,一直按回车键,你也可以按CTRL+C,跳过安装说明
4.接下来,会有一系列的安装提示让您去确认,要注意的是有个让你选择是否安装nvidia361驱动时,一定要选择否
Install NVIDIA Accelerated Graphics Driver for Linux-x86_64 367.48?因为前面我们已经安装了更加新的显卡驱动nvidia384,所以这里不要选择安装。其余的都直接默认或者选择是即可。
Using more to view the EULA.
End User License Agreement
--------------------------


Preface
-------

The following contains specific license terms and conditions
for four separate NVIDIA products. By accepting this
agreement, you agree to comply with all the terms and
conditions applicable to the specific product(s) included
herein.


NVIDIA CUDA Toolkit


Description

The NVIDIA CUDA Toolkit provides command-line and graphical
tools for building, debugging and optimizing the performance
of applications accelerated by NVIDIA GPUs, runtime and math
libraries, and documentation including programming guides,
user manuals, and API references. The NVIDIA CUDA Toolkit
License Agreement is available in Chapter 1.


Default Install Location of CUDA Toolkit

Windows platform:

Do you accept the previously read EULA?
accept/decline/quit: accept

Install NVIDIA Accelerated Graphics Driver for Linux-x86_64 367.48?
(y)es/(n)o/(q)uit: n

Install the CUDA 8.0 Toolkit?
(y)es/(n)o/(q)uit: y

Enter Toolkit Location
 [ default is /usr/local/cuda-8.0 ]:

Do you want to install a symbolic link at /usr/local/cuda?
(y)es/(n)o/(q)uit: y

Install the CUDA 8.0 Samples?
(y)es/(n)o/(q)uit: y

Enter CUDA Samples Location
 [ default is /home/kinny ]:

Installing the CUDA Toolkit in /usr/local/cuda-8.0 ...
Missing recommended library: libXmu.so

Installing the CUDA Samples in /home/kinny ...
Copying samples to /home/kinny/NVIDIA_CUDA-8.0_Samples now...
Finished copying samples.

===========
= Summary =
===========

Driver:   Not Selected
Toolkit:  Installed in /usr/local/cuda-8.0
Samples:  Installed in /home/kinny, but missing recommended libraries

Please make sure that
 -   PATH includes /usr/local/cuda-8.0/bin
 -   LD_LIBRARY_PATH includes /usr/local/cuda-8.0/lib64, or, add /usr/local/cuda-8.0/lib64 to /etc/ld.so.conf and run ldconfig as root

To uninstall the CUDA Toolkit, run the uninstall script in /usr/local/cuda-8.0/bin

Please see CUDA_Installation_Guide_Linux.pdf in /usr/local/cuda-8.0/doc/pdf for detailed information on setting up CUDA.

***WARNING: Incomplete installation! This installation did not install the CUDA Driver. A driver of version at least 361.00 is required for CUDA 8.0 functionality to work.
To install the driver using this installer, run the following command, replacing  with the name of this run file:
    sudo .run -silent -driver

Logfile is /tmp/cuda_install_17494.log
2.2 设置环境变量
打开terminal,具体指令如下:
1.打开~/.bashrc:
sudo gedit ~/.bashrc2.在~/.bashrc文件末尾添加环境变量设置
export LD_LIBRARY_PATH="$LD_LIBRARY_PATH:/usr/local/cuda-9.0/lib64:/usr/local/cuda/extras/CUPTI/lib64"
export CUDA_HOME=/usr/local/cuda-9.0
3.关闭~/.bashrc文件,输入指令让其生效:
source ~/.bashrc2.3测试CUDA是否生效
打开terminal,依次输入以下指令,如果显示一些关于GPU的信息则说明安装成功
cd /usr/local/cuda-9.0/samples/1_Utilities/deviceQuery  #由cuda-9.0由自己的版本决定
sudo make
sudo ./deviceQuery
2.4 安装CUDNN-7.0
1.打开terminal,切换到刚才安装CUDNN-7.0的目录
cd /home/***(自己的用户名)/download/ 2.解压刚才下载的CUDNN的压缩文件
tar xvzf cudnn-9.0-linux-x64-v7.tgz3.复制解压后的文件,其中cuda-9.0可改为自己的版本
sudo cp cuda/include/cudnn.h /usr/local/cuda-9.0/include
sudo cp cuda/lib64/libcudnn* /usr/local/cuda-9.0/lib64
4.修改复制后的文件权限
sudo chmod a+r /usr/local/cuda-9.0/include/cudnn.h /usr/local/cuda-9.0/lib64/libcudnn*2.5 python3 版本的pip安装与升级
1.安装
sudo apt-get install python3-pip2.升级
sudo pip3 install --upgrade pip2.6 tensorflow1.6 (GPU)的安装
sudo pip3 install tensorflow-gpu2.7 tensorflow测试是否安装成功
$ python3
...
>>> import tensorflow as tf
>>> hello = tf.constant('Hello, TensorFlow!')
>>> sess = tf.Session()
>>> print(sess.run(hello))
Hello, TensorFlow!
>>> a = tf.constant(10)
>>> b = tf.constant(32)
>>> print(sess.run(a + b))
42
>>>


