面试准备--线程池队列 SynchronousQueue 详解
今天介绍另一个线程池的阻塞队列–SynchronousQueue。该队列是在 jdk1.5 的时候出现,和前面写的 LinkedBlockingQueue 和 ArrayBlockingQueue 队列相比,SynchronousQueue 没有数据缓存的空间。
我们先来看看类图:
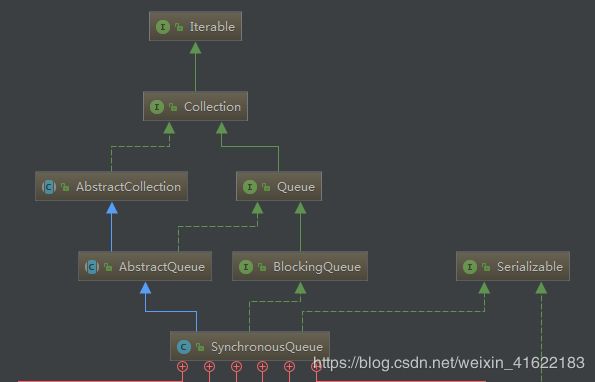
SynchronousQueue 特点:
- 没有缓存数据,SynchronousQueue 队列中没有任何缓存的数据,可以理解为容量为 0。我们可以尝试往队列中加入元素,然后调用 size() 方法发现不管怎么加入都是 0。
- SynchronousQueue 提供两种实现方式,分别是 栈 和 队列 的方式实现。这两种实现方式中,栈 是属于非公平的策略,队列 是属于公平策略。
下面我们先写个小 demo 来看看具体情况:
/**
 * @Auther: Gentle
 * @Date: 2019/4/10 17:50
 * @Description:
 */
public class TestSynchronousQueue {
    public static void main(String[] args) throws Exception {
        //使用非公平策略
//        SynchronousQueue synchronousQueue= new SynchronousQueue();
        //使用公平策略
        SynchronousQueue synchronousQueue= new SynchronousQueue(true);
        new Thread(()-> {
            try {
                synchronousQueue.put("A");
            } catch (InterruptedException e) {
                e.printStackTrace();
            }
        }).start();
        //休眠一下,让异步线程完成
        Thread.sleep(1000);
        new Thread(()-> {
            try {
                synchronousQueue.put("B");
            } catch (InterruptedException e1) {
                e1.printStackTrace();
            }
        }).start();
        //休眠一下,让异步线程完成
        Thread.sleep(1000);
        new Thread(()-> {
            try {
                Object take = synchronousQueue.take();
                System.out.println(take);
            } catch (InterruptedException e1) {
                e1.printStackTrace();
            }
        }).start();
        //休眠一下,让异步线程完成
        Thread.sleep(1000);
        //不管如何输出,都是 0
        System.out.println(synchronousQueue.size());
    }
}
公平策略结果:

非公平策略结果:

为什么会出现这种情况?我们这里先不解释,先继续学习。
这里我们先看下构造方法:
//默认构造,false 为非公平策略
public SynchronousQueue() {
        this(false);
    }

//可选策略。可以看出使用的是不同形式的实现。
public SynchronousQueue(boolean fair) {
        transferer = fair ? new TransferQueue<E>() : new TransferStack<E>();
    }
TransferQueue 类和 TransferStack 都是内部类的形式实现,下面我们来看看方法的抽象类:
 abstract static class Transferer<E> {
  		//内部类,后面实现基本需要该接口
        abstract E transfer(E e, boolean timed, long nanos);
    }
核心方法
阻塞入队:
 public void put(E e) throws InterruptedException {
 		//入队时判断是否传入元素为空
        if (e == null) throw new NullPointerException();
        //入队
        if (transferer.transfer(e, false, 0) == null) {
            Thread.interrupted();
            throw new InterruptedException();
        }
    }
阻塞出队:
 public E take() throws InterruptedException {
 		//出队穿个 null 就说明这个是出队
        E e = transferer.transfer(null, false, 0);
        if (e != null)
            return e;
        Thread.interrupted();
        throw new InterruptedException();
    }
我们可以看到上面有三个常量,分别是 REQUEST,DATA 和 FULFILLING。实际判断是入队还出队的方式是是否有值。
- REQUEST:表示这是个请求节点,从队列中取数据的标识(方法有 take,poll)
- DATA:表示这个是数据节点,插入数据到队列中的标识(方法有 offer,put)
- FULFILLING:这个表示配对成功,只有一消费者和生产者进行配对成功后,才会更改为该状态
下面我们来看看栈结构队列:
栈结构
这里我们先看看栈结构的队列(省略部分代码)
static final class TransferStack<E> extends Transferer<E> {
      	/** 表示这是个请求节点 */
        static final int REQUEST    = 0;
        /** 数据节点 */
        static final int DATA       = 1;
        /** 匹配成功后设置的节点 */
        static final int FULFILLING = 2;

        /** 内部维护的 SNode 类 */
        static final class SNode {
            volatile SNode next;        // next node in stack
            volatile SNode match;       // the node matched to this
            volatile Thread waiter;     // to control park/unpark
            Object item;                // data; or null for REQUESTs
            int mode;  //0表示请求节点,1表示数据节点
            SNode(Object item) {
                this.item = item;
            }
        //栈顶部指针
        volatile SNode head;
上面代码就是实现方式,相信大家根据注释看一下就懂了。下面才是核心方法的开始。
由于入队出队没太大区别。代码都是调用同一个方法,唯一的不同是传入的值是否为空。下面看看该 transfer 方法:
E transfer(E e, boolean timed, long nanos) {
     		//空节点
            SNode s = null; // constructed/reused as needed
            //判断是请求节点还是数据节点
            int mode = (e == null) ? REQUEST : DATA;

            for (;;) {
            	//拿到头指针
                SNode h = head;
                //头指针为空,h.mode 默认是0,判断是否一致
                if (h == null || h.mode == mode) {  // empty or same-mode
                	//判断是否为有设置超时时间
                    if (timed && nanos <= 0) {      // can't wait
                    	//
                        if (h != null && h.isCancelled())
                            casHead(h, h.next);     // pop cancelled node
                        else
                            return null;
                    // 将当前节点压入栈
                    } else if (casHead(h, s = snode(s, e, h, mode))) {
                    	//进行线程堵塞
                        SNode m = awaitFulfill(s, timed, nanos);
                        if (m == s) {               // wait was cancelled
                        	//清除该节点
                            clean(s);
                            return null;
                        }
                        /**
                        * 线程池被唤醒后,这里需要 cas 设置一下头指针,配合出队线程
                        * 这里难理解,下面会用图解的形式解析
                        */
                        if ((h = head) != null && h.next == s)
                            casHead(h, s.next);     // help s's fulfiller
                        //返回配对的值
                        return (E) ((mode == REQUEST) ? m.item : s.item);
                    }
                 /**
                 * 这里表示的是出队操作
                 * 如果是入队操作走到这一步,说明压栈失败,继续 CAS 吧
                 */
                } else if (!isFulfilling(h.mode)) { // try to fulfill
                	//判断线程是否中断
                    if (h.isCancelled())            // already cancelled
                        casHead(h, h.next);         // pop and retry
                    //将当前节点压入栈
                    else if (casHead(h, s=snode(s, e, h, FULFILLING|mode))) {
                        for (;;) { // loop until matched or waiters disappear
                        	//拿到原来的栈头指针指向的节点
                            SNode m = s.next;       // m is s's match
                            //如果为空,说明被其他线程抢走了,重新 CAS 吧
                            if (m == null) {        // all waiters are gone
                                casHead(s, null);   // pop fulfill node
                                s = null;           // use new node next time
                                break;              // restart main loop
                            }
                            //这里拿到配对的数据节点
                            SNode mn = m.next;
                            //尝试去匹配
                            if (m.tryMatch(s)) {
                                casHead(s, mn);     // pop both s and m
                                //匹配成功返回数据节点的值
                                return (E) ((mode == REQUEST) ? m.item : s.item);
                           //匹配失败
                            } else                  // lost match
                                s.casNext(m, mn);   // help unlink
                        }
                    }
                //有其他线程在配对
                } else {                            // help a fulfiller
                    SNode m = h.next;               // m is h's match
                    if (m == null)                  // waiter is gone
                        casHead(h, null);           // pop fulfilling node
                    else {
                        SNode mn = m.next;
                        //尝试和其它线程竞争匹配
                        if (m.tryMatch(h))          // help match
                        //配对成功就一起离开
                            casHead(h, mn);         // pop both h and m
                        else                        // lost match
                        	//匹配失败,肯定要擦屁股,将链接置空吧
                            h.casNext(m, mn);       // help unlink
                    }
                }
            }
        }
看完上面的方法,我们还需要看下线程是如何被阻塞的
SNode awaitFulfill(SNode s, boolean timed, long nanos) {

            final long deadline = timed ? System.nanoTime() + nanos : 0L;
            Thread w = Thread.currentThread();
            //计算自旋次数
            int spins = (shouldSpin(s) ?
                         (timed ? maxTimedSpins : maxUntimedSpins) : 0);
            for (;;) {
            	//判断是否中断
                if (w.isInterrupted())
                    s.tryCancel();
                //拿到匹配的节点
                SNode m = s.match;
                if (m != null)
                    return m;
                if (timed) {
                    nanos = deadline - System.nanoTime();
                    if (nanos <= 0L) {
                        s.tryCancel();
                        continue;
                    }
                }
                //判断自旋次数是否大于 0 了
                if (spins > 0)
                    spins = shouldSpin(s) ? (spins-1) : 0;
                //如果没有匹配的节点,就保存当前阻塞的线程
                else if (s.waiter == null)
                    s.waiter = w; // establish waiter so can park next iter
                else if (!timed)
                	//阻塞当前线程
                    LockSupport.park(this);
                else if (nanos > spinForTimeoutThreshold)
                    LockSupport.parkNanos(this, nanos);
            }
        }
仅仅是注释,可能很难看懂,接下来我们使用画图的形式进行理解。
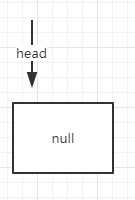
队列的初始状态:初始状态下,头部指针指向空。
假设来了一条线程 A,数据也是 A,头指针指向位置为空且我们使用是不会超时的 put 方法,那么会将数据压入栈中,并将指针指向栈顶,并将线程阻塞,如下图:

接下来再来一条线程 B,带的数据也是 B。那么还是会将数据压入栈中,并将该节点的 next 节点指向最先入栈的节点,并将头指针指向栈顶(也就是我们的数据 B),最后将线程阻塞。

如果我们在来一条线程 C,C 是出队线程。操作是一样的,这时,我们会将该取出节点压入栈中,将头指针指向出队的那个节点。结果图如下:
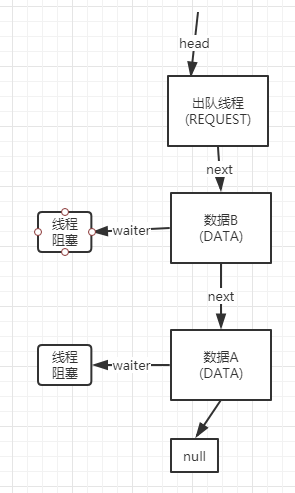
接下来,就是线程 C 要进行匹配了。这时,非公平策略的 坑爹之处 就出来了。它会和待匹配的线程进行匹配,但是我们知道栈的数据结构是先进后出,所以它就找了数据 B,为匹配对象,唤醒线程 B,线程 B 唤醒后继续走如下代码:
if ((h = head) != null && h.next == s)
casHead(h, s.next); // help s’s fulfiller
return (E) ((mode == REQUEST) ? m.item : s.item);
而出队的线程 C 则走如下代码:
if (m.tryMatch(s)) {
casHead(s, mn); // 将两个节点弹出栈
return (E) ((mode == REQUEST) ? m.item : s.item);
}
线程 C 拿到数据直接返回,线程 B 也直接返回。上述中 **casHead(s, mn); ** 就将头指针指向栈顶,也是就我们的线程 A。而线程 B 和线程 C 就 携手双飞 了,一起弹出栈。最后数据结果如下:

栈队列小总结
队列中非公平策略坑爹有一点,假设没有和它配对,或者每一次来一个配对对象时,都被另一个节点抢了,那就很悲催,一直呆在最底层没人要。
队列结构
说完了栈结构的队列详情,我们接下来看看队列结构是如何实现的。
static final class TransferQueue<E> extends Transferer<E> {
        /** Node class for TransferQueue. */
        static final class QNode {
        	//下一个节点
            volatile QNode next;          // next node in queue
            //数据
            volatile Object item;         // CAS'ed to or from null
            //等待线程
            volatile Thread waiter;       // to control park/unpark
            //判断数据类型
            final boolean isData;

            QNode(Object item, boolean isData) {
                this.item = item;
                this.isData = isData;
            }

        /** 头指针 */
        transient volatile QNode head;
        /** 尾指针 */
        transient volatile QNode tail;

        transient volatile QNode cleanMe;
		//初始化时就构建了一个空节点
        TransferQueue() {
            QNode h = new QNode(null, false); // initialize to dummy node.
            head = h;
            tail = h;
        }
队列结构的实现方式和栈结构的有很大不同,下面我们来看看具体实现。
E transfer(E e, boolean timed, long nanos) {

            QNode s = null; // constructed/reused as needed
            boolean isData = (e != null);

            for (;;) {
            	//尾节点
                QNode t = tail;
                //头结点
                QNode h = head;
                //没有初始化时都为空
                if (t == null || h == null)         // saw uninitialized value
                    continue;                       // spin
				//判断节点类型,头节点为空或是入队类型才可入
                if (h == t || t.isData == isData) { // empty or same-mode
                    QNode tn = t.next;
                    //判断尾节点是否有改变(可能有其他线程操作)
                    if (t != tail)                  // inconsistent read
                        continue;
                    //判断是否有其他线程添加了新节点
                    if (tn != null) {               // lagging tail
                    	//如果有就要设置一下尾节点指针
                        advanceTail(t, tn);
                        continue;
                    }
                    //时间的,这里可以不理会
                    if (timed && nanos <= 0)        // can't wait
                        return null;
                    //构建一个节点
                    if (s == null)
                        s = new QNode(e, isData);
                    //将节点加入队列中
                    if (!t.casNext(null, s))        // failed to link in
                        continue;
					//设置尾节点
                    advanceTail(t, s);              // swing tail and wait
                    //线程阻塞
                    Object x = awaitFulfill(s, e, timed, nanos);
                    //判断线程有没被中断,中断就清除节点
                    if (x == s) {                   // wait was cancelled
                        clean(t, s);
                        return null;
                    }
					//判断节点是否已经离开队列
                    if (!s.isOffList()) {           // not already unlinked
                    	//设置头指针
                        advanceHead(t, s);          // unlink if head
                        if (x != null)              // and forget fields
                            s.item = s;
                        //阻塞线程置空
                        s.waiter = null;
                    }
                    //返回存储的值
                    return (x != null) ? (E)x : e;
				//这里就是出队操作
                } else {                            // complementary-mode
                    QNode m = h.next;               // node to fulfill
                    if (t != tail || m == null || h != head)
                        continue;                   // inconsistent read
					//拿到头节点下的下一个节点
                    Object x = m.item;
                    //判断是否被另一个线程匹配过了
                    if (isData == (x != null) ||    // m already fulfilled
                        x == m ||                   // m cancelled
                        !m.casItem(x, e)) {         // lost CAS
                        advanceHead(h, m);          // dequeue and retry
                        continue;
                    }
					//匹配成功就重新设置头指针
                    advanceHead(h, m);              // successfully fulfilled
                    //线程唤醒
                    LockSupport.unpark(m.waiter);
                    //返回值
                    return (x != null) ? (E)x : e;
                }
            }
        }
下面是线程阻塞方式的实现:
Object awaitFulfill(QNode s, E e, boolean timed, long nanos) {
            /* Same idea as TransferStack.awaitFulfill */
            final long deadline = timed ? System.nanoTime() + nanos : 0L;
            Thread w = Thread.currentThread();
            //计算要自旋的次数
            int spins = ((head.next == s) ?
                         (timed ? maxTimedSpins : maxUntimedSpins) : 0);
            for (;;) {
                if (w.isInterrupted())
                    s.tryCancel(e);
                Object x = s.item;
                if (x != e)
                    return x;
                if (timed) {
                    nanos = deadline - System.nanoTime();
                    if (nanos <= 0L) {
                        s.tryCancel(e);
                        continue;
                    }
                }
                //计算自旋次数
                if (spins > 0)
                    --spins;
                    //保存阻塞线程
                else if (s.waiter == null)
                    s.waiter = w;
                else if (!timed)
                	//线程阻塞
                    LockSupport.park(this);
                else if (nanos > spinForTimeoutThreshold)
                    LockSupport.parkNanos(this, nanos);
            }
        }
配合代码和注释,可能还是有一些模糊,下面我们用图来解析一下公平策略下队列中元素是怎么操作的。
首先,我们在 new SynchronousQueue 队列使用公平策略的时候就已经构建了一个空节点。

对应的代码如下:
TransferQueue() {
QNode h = new QNode(null, false); // initialize to dummy node.
head = h;
tail = h;
}
接下来我们来了线程 A,线程 A 携带的数据也是 A。这时我们调用 put 方法入队,经过一大堆的判断,我们将数据入队成功,将尾节点指针指向数据 A 的节点,并且将线程阻塞,等待被消费,结果如下:

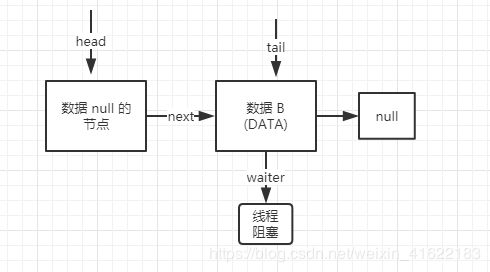
我们可以看到头节点一直为一个空节点,目的是为了等待消费线程进来后,和最先入队的元素进行匹配。接下来线程 B 带着数据 B 又进来了,经过一大堆的判断,我们将数据入队成功,数据 A 的 next 指向数据 B,将尾节点指针指向数据 B 的节点,并且将线程阻塞,等待被消费,结果如下:

这样,我们就入队了两个节点了,接下来来了一条出队线程 C,C 来了却不是入队了,而是找最先入队的那个节点。找到入队节点后,会尝试进行配对,假设配对成功,那会将配对成功的线程 A 出队,返回数据 A,被唤醒的线程 A 会继续走余下的代码,上面解释过,原理差不多就不解释了。最后结果图如下:
执行的出队的代码如下:
 {                            // complementary-mode
                    QNode m = h.next;               // node to fulfill
                    if (t != tail || m == null || h != head)
                        continue;                   // inconsistent read
					//拿到头节点下的下一个节点
                    Object x = m.item;
                    //判断是否被另一个线程匹配过了
                    if (isData == (x != null) ||    // m already fulfilled
                        x == m ||                   // m cancelled
                        !m.casItem(x, e)) {         // lost CAS
                        advanceHead(h, m);          // dequeue and retry
                        continue;
                    }
					//匹配成功就重新设置头指针
                    advanceHead(h, m);              // successfully fulfilled
                    //线程唤醒
                    LockSupport.unpark(m.waiter);
                    //返回值
                    return (x != null) ? (E)x : e;
                }
队列结构小结
队列结构和栈结构是类似的,都是需要配对进行离开,基本原理差不多。不同之处就是现进先出和先进后出的问题。
总结
又一个队列原理解析写完了,剩下的队列没多少了。队列写完估计会开始写原子类或者显示锁吧。当然,有空补充一下其他内容。有兴趣的同学可以关注一下公众号,一起学习。
