五、SpringBoot源码分析
一、starter起步依赖源码分析。
        org.springframework.boot
        spring-boot-starter-parent
        2.2.1.RELEASE
1、按住Ctrl点击pom.xml中的spring-boot-starter-parent,跳转到了spring-boot-starter-parent的pom.xml,xml配置如下
部分源码
看到了一些yaml文件,这是编写配置文件的。后面文章会专门讲。
  4.0.0

    org.springframework.boot
    spring-boot-dependencies
    2.2.1.RELEASE
    ../../spring-boot-dependencies

  spring-boot-starter-parent
  pom
  Spring Boot Starter Parent

#此处为Resources文件夹下需要我自己手动创建的配置文件


        true
        ${basedir}/src/main/resources

          **/application*.yml
          **/application*.yaml
          **/application*.properties


        ${basedir}/src/main/resources

          **/application*.yml
          **/application*.yaml
          **/application*.properties
2、按住Ctrl点击pom.xml中的spring-boot-starter-dependencies,跳转到了spring-boot-starter-dependencies的pom.xml,xml配置如下(只摘抄了部分重点配置):
我们看到了Propertis中有很多熟悉的Jar包版本,其实这就是帮我们在进行Jar的版本控制,以前在写SSM工程时总是会遇到Jar版本冲突,springboot为我们在源码中设计了互相匹配的版本。
  4.0.0
  org.springframework.boot
  spring-boot-dependencies
  2.2.1.RELEASE
  pom
  Spring Boot Dependencies
  Spring Boot Dependencies
  https://projects.spring.io/spring-boot/#


      Apache License, Version 2.0
      https://www.apache.org/licenses/LICENSE-2.0


      Pivotal
      [email protected]
      Pivotal Software, Inc.
      https://www.spring.io


    https://github.com/spring-projects/spring-boot


    5.15.10
    2.7.7
    1.9.76

    6.0.8
    2.3.29
    3.0.1
    3.0.3
    2.3.2
    2.5.8
    2.8.6
    1.4.200
    2.1
    3.12.4
    1.3.2
    5.4.8.Final
    6.0.18.Final
    3.4.1
    5.5.2
    2.3.1
    1.3.50
    1.3.2
    5.2.1.RELEASE
    3.8.0
    2.12.1
    1.2.3
    1.7.29
    2.2.1.RELEASE
    2.0.6.RELEASE
    Moore-SR1
    5.2.1.RELEASE
    1.0.1.RELEASE
    5.2.1.RELEASE
    2.3.3.RELEASE
    5.2.1.RELEASE
     .........
3、下面就帮我们引入了很多的依赖。这也就是Springboot可以让程序员添加很少的依赖运行项目 的原因。
        org.springframework.boot
        spring-boot-starter-data-jdbc
        2.2.1.RELEASE


        org.springframework.boot
        spring-boot-starter-data-jpa
        2.2.1.RELEASE


        org.springframework.boot
        spring-boot-starter-data-ldap
        2.2.1.RELEASE


        org.springframework.boot
        spring-boot-starter-data-mongodb-reactive
        2.2.1.RELEASE

 ............
4、在众多的依赖中我们抽个奖,选择spring-boot-starter-json,就它了
点击spring-boot-starter-json。
      org.springframework.boot
      spring-boot-starter-json
      2.2.1.RELEASE
      compile
5、来到了spring-boot-starters-2.2.1.RELEASE中
我们看到了一些依赖。这些依赖很形象的说明了,Maven的传递依赖这个特征。
      org.springframework
      spring-web
      5.2.1.RELEASE
      compile


      com.fasterxml.jackson.core
      jackson-databind
      2.10.0
      compile


      com.fasterxml.jackson.datatype
      jackson-datatype-jdk8
      2.10.0
      compile
以上就是对starter起步依赖的分析。
二、自动配置分析
自动配置其实就是将一些默认的设置,提前配置了。
1、@SpringBootApplication 按住Ctrl点击查看启动类MySpringBootApplication上的注解@SpringBootApplication
@Target({ElementType.TYPE})
@Retention(RetentionPolicy.RUNTIME)
@Documented
@Inherited
@SpringBootConfiguration
@EnableAutoConfiguration
@ComponentScan(
    excludeFilters = {@Filter(
    type = FilterType.CUSTOM,
    classes = {TypeExcludeFilter.class}
), @Filter(
    type = FilterType.CUSTOM,
    classes = {AutoConfigurationExcludeFilter.class}
)}
)
public @interface SpringBootApplication {
我们看到@SpringBootConfiguration 。点击@SpringBootConfiguration
@Target({ElementType.TYPE})
@Retention(RetentionPolicy.RUNTIME)
@Documented
@Configuration
public @interface SpringBootConfiguration {
    @AliasFor(
        annotation = Configuration.class
    )
    boolean proxyBeanMethods() default true;
}
可以看到他的底层就是一个@Configuration 既标注该类是Spring的一个配置类。
2、@ComponentScan 组件扫描
我们在纯Spring 开发中一般都会配置@ComponentScan,但是在SpringBoot中就不需要了。
原因是,SpringBoot中@ComponentScan的扫描规则是,当前引导类,也就是被@SpringBootApplication所修饰的类,所在的包,及其子包中的所有的Bean,交给SpringIOC容器管理。
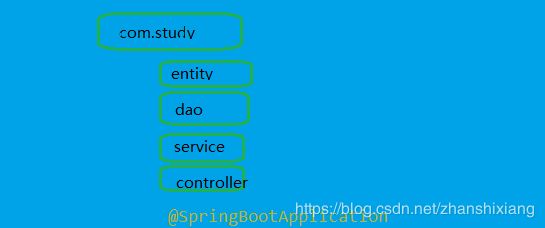
com.study和@SpringBootApplication是处于同一级包。所以com.study下的所有子类全都会被扫描到,加载进SpringIOC容器。
3、@EnableAutoConfiguration:SpringBoot自动配置功能开启
按住Ctrl点击查看注解@EnableAutoConfiguration
从单词意思我们可以理解为开启自动配置。点进去我们看到了源码。
@Target({ElementType.TYPE})
@Retention(RetentionPolicy.RUNTIME)
@Documented
@Inherited
@AutoConfigurationPackage
@Import({AutoConfigurationImportSelector.class})
public @interface EnableAutoConfiguration {
String ENABLED_OVERRIDE_PROPERTY = "spring.boot.enableautoconfiguration";
Class[] exclude() default {};
String[] excludeName() default {};
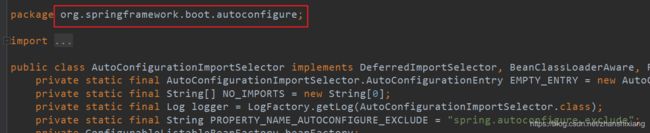
}在学习Spring时我们@Import可以导入其他配置类,当然在SpringBoot中它也可以用来导入其他配置类。按住Ctrl点击AutoConfigurationImportSelector.class。看到源码
public class AutoConfigurationImportSelector implements DeferredImportSelector, BeanClassLoaderAware, ResourceLoaderAware, BeanFactoryAware, EnvironmentAware, Ordered {
    private static final AutoConfigurationImportSelector.AutoConfigurationEntry EMPTY_ENTRY = new AutoConfigurationImportSelector.AutoConfigurationEntry();
    private static final String[] NO_IMPORTS = new String[0];
    private static final Log logger = LogFactory.getLog(AutoConfigurationImportSelector.class);
    private static final String PROPERTY_NAME_AUTOCONFIGURE_EXCLUDE = "spring.autoconfigure.exclude";
    private ConfigurableListableBeanFactory beanFactory;
    private Environment environment;
    private ClassLoader beanClassLoader;
    private ResourceLoader resourceLoader;

    public AutoConfigurationImportSelector() {
    }

    public String[] selectImports(AnnotationMetadata annotationMetadata) {
        if (!this.isEnabled(annotationMetadata)) {
            return NO_IMPORTS;
        } else {
            AutoConfigurationMetadata autoConfigurationMetadata = AutoConfigurationMetadataLoader.loadMetadata(this.beanClassLoader);
            AutoConfigurationImportSelector.AutoConfigurationEntry autoConfigurationEntry = this.getAutoConfigurationEntry(autoConfigurationMetadata, annotationMetadata);
            return StringUtils.toStringArray(autoConfigurationEntry.getConfigurations());
        }
    }

    protected AutoConfigurationImportSelector.AutoConfigurationEntry getAutoConfigurationEntry(AutoConfigurationMetadata autoConfigurationMetadata, AnnotationMetadata annotationMetadata) {
        if (!this.isEnabled(annotationMetadata)) {
            return EMPTY_ENTRY;
        } else {
            AnnotationAttributes attributes = this.getAttributes(annotationMetadata);
            List configurations = this.getCandidateConfigurations(annotationMetadata, attributes);
            configurations = this.removeDuplicates(configurations);
            Set exclusions = this.getExclusions(annotationMetadata, attributes);
            this.checkExcludedClasses(configurations, exclusions);
            configurations.removeAll(exclusions);
            configurations = this.filter(configurations, autoConfigurationMetadata);
            this.fireAutoConfigurationImportEvents(configurations, exclusions);
            return new AutoConfigurationImportSelector.AutoConfigurationEntry(configurations, exclusions);
        }
    }
此类实现了很多的接口,看到selectImports( AnnotationMetadata annotationMetadata)方法中的this.getAutoConfigurationEntry(autoConfigurationMetadata, annotationMetadata)方法。点击它就在此方法下。在getAutoConfigurationEntry(...)方法中我们看到getCandidateConfigurations(annotationMetadata, attributes) 获取候选配置这个方法的返回值是一个List集合,且是String类型的。经常挖源码的人会有经验的判断这是去找此类的全包名。点击getCandidateConfigurations(annotationMetadata, attributes);看到方法引用。
protected List getCandidateConfigurations(AnnotationMetadata metadata, AnnotationAttributes attributes) {
        List configurations = SpringFactoriesLoader.loadFactoryNames(this.getSpringFactoriesLoaderFactoryClass(), this.getBeanClassLoader());
        Assert.notEmpty(configurations, "No auto configuration classes found in META-INF/spring.factories. If you are using a custom packaging, make sure that file is correct.");
        return configurations;
    }
看到此句,我大体意思理解为SpringFactory工厂根据名字去加载一些Bean。
List configurations = SpringFactoriesLoader.loadFactoryNames(this.getSpringFactoriesLoaderFactoryClass(), this.getBeanClassLoader()); 接下来看到以下这句:
Assert.notEmpty(configurations, "No auto configuration classes found in META-INF/spring.factories. If you are using a custom packaging, make sure that file is correct.");断言,当Bean工厂通过名字去加载一些配置Bean出现问题时,就会报在 META-INF/spring.factories中找不到自动配置类。如果使用自定义打包,请确保文件正确无误。(在META-INF/spring.factories中找不到自动配置类。如果使用自定义打包,请确保文件正确无误。)
那么去哪找呢,它说在META-INF/spring.factories,可是我们有很多的Jar包啊,他们中间都有META-INF/spring.factories这个文件夹,那么这里默认情况下是在当前所在类,所在包的META-INF/spring.factories在。
回到顶部类声明的地方,查看当前包路径。
点击此处查看所有的依赖。

找到了org.springframework.boot.autoconfigure包,也找到了spring.factories 。

点击spring.factories查看 发现是跟properties一样的配置文件。部分源码如下:
org.springframework.boot.autoconfigure.web.reactive.function.client.ClientHttpConnectorAutoConfiguration,\
org.springframework.boot.autoconfigure.web.reactive.function.client.WebClientAutoConfiguration,\
org.springframework.boot.autoconfigure.web.servlet.DispatcherServletAutoConfiguration,\
org.springframework.boot.autoconfigure.web.servlet.ServletWebServerFactoryAutoConfiguration,\
org.springframework.boot.autoconfigure.web.servlet.error.ErrorMvcAutoConfiguration,\
org.springframework.boot.autoconfigure.web.servlet.HttpEncodingAutoConfiguration,\
org.springframework.boot.autoconfigure.web.servlet.MultipartAutoConfiguration,\
org.springframework.boot.autoconfigure.web.servlet.WebMvcAutoConfiguration,\
org.springframework.boot.autoconfigure.websocket.reactive.WebSocketReactiveAutoConfiguration,\
org.springframework.boot.autoconfigure.websocket.servlet.WebSocketServletAutoConfiguration,\
org.springframework.boot.autoconfigure.websocket.servlet.WebSocketMessagingAutoConfiguration,\
org.springframework.boot.autoconfigure.webservices.WebServicesAutoConfiguration,\
org.springframework.boot.autoconfigure.webservices.client.WebServiceTemplateAutoConfiguration
.......................
上面配置文件存在大量的以Configuration为结尾的类名称,这些类就是存有自动配置信息的类,而SpringApplication在获取这些类名后再加载 。
我们以ServletWebServerFactoryAutoConfiguration为例来分析源码:
@Configuration(
    proxyBeanMethods = false
)
@AutoConfigureOrder(-2147483648)
@ConditionalOnClass({ServletRequest.class})
@ConditionalOnWebApplication(
    type = Type.SERVLET
)
@EnableConfigurationProperties({ServerProperties.class})
@Import({ServletWebServerFactoryAutoConfiguration.BeanPostProcessorsRegistrar.class, EmbeddedTomcat.class, EmbeddedJetty.class, EmbeddedUndertow.class})
public class ServletWebServerFactoryAutoConfiguration {
    public ServletWebServerFactoryAutoConfiguration() {
    }
...................
其中@EnableConfigurationProperties({ServerProperties.class}) 代表加载ServerProperties服务器配置属性类
进入ServerProperties.class源码如下:
@ConfigurationProperties(
    prefix = "server",
    ignoreUnknownFields = true
)
public class ServerProperties {
    private Integer port;
    private InetAddress address;
    @NestedConfigurationProperty
    private final ErrorProperties error = new ErrorProperties();
    private ServerProperties.ForwardHeadersStrategy forwardHeadersStrategy;
    private String serverHeader;
    private DataSize maxHttpHeaderSize;
    private Duration connectionTimeout;
    @NestedConfigurationProperty
    private Ssl ssl;
    @NestedConfigurationProperty
    private final Compression compression;
    @NestedConfigurationProperty
    private final Http2 http2;
..................
其中,我们发现有@ConfigurationProperties 将它声明为一个配置信息Properties。
它是通过前缀server.配置属性="需要配置的值" 例如server.port=8081,将端口改成8081的。
打开这个Json文件夹。

Ctrl+F 搜索 server.port
    {
      "name": "server.netty.connection-timeout",
      "type": "java.time.Duration",
      "description": "Connection timeout of the Netty channel.",
      "sourceType": "org.springframework.boot.autoconfigure.web.ServerProperties$Netty"
    },
    {
      "name": "server.port",
      "type": "java.lang.Integer",
      "description": "Server HTTP port.",
      "sourceType": "org.springframework.boot.autoconfigure.web.ServerProperties",
      "defaultValue": 8080
    },
    {
      "name": "server.server-header",
      "type": "java.lang.String",
      "description": "Value to use for the Server response header (if empty, no header is sent).",
      "sourceType": "org.springframework.boot.autoconfigure.web.ServerProperties"
    },
看到一些Porperties键值对,并且看到我们熟悉的8080.当我们不对SpringBoot的端口进行改变时,我们的默认端口就是8080,SpringBoot就是在这配置的。
好了。我们回过头来倒推回去看一下SpringBoot是怎么加载这些配置文件的。
1、Properties端口配置文件被ServerProperties.class读取。
2、ServerProperties.class被 ServletWebServerFactoryAutoConfiguration.class @EnableConfigurationProperties({ServerProperties.class})自动导入。
3、ServletWebServerFactoryAutoConfiguration.class 被WebSocketServletAutoConfiguration.class自动导入@AutoConfigureBefore({ServletWebServerFactoryAutoConfiguration.class})
4、WebSocketServletAutoConfiguration.class由spring.factories配置文件配置。
org.springframework.boot.autoconfigure.websocket.servlet.WebSocketServletAutoConfiguration,\5、spring.factories由 AutoConfigurationImportSelector.class源码中的getCandidateConfigurations(....)方法加载
6、AutoConfigurationImportSelector.class由 @interface EnableAutoConfiguration的@Import({AutoConfigurationImportSelector.class}),
引入。
7、 @interface EnableAutoConfiguration由@SpringBootApplication的@EnableAutoConfiguration自动配置所配置。
这是一个倒叙的顺序哦。
以上就是SpringBoot自动配置的部分源码分析。
三、自动配置实战。
编写Controller
@Controller
@RequestMapping("/Spring")
public class HelloController {

    @ResponseBody
    @RequestMapping("/hello")
    public String hello(){

        return "Hello SpringBoot";
    }
}
在刚刚挖源码的过程中,我们看到了properties中有很多的配置项。
打开POM文件 按住Ctrl 点击
        true
        ${basedir}/src/main/resources

          **/application*.yml
          **/application*.yaml
          **/application*.properties
*代表任意匹配。
在工程的Resources文件夹,右击New ——》File。我们选择使用.properties,名字一般习惯都是application。
摘抄.json源码文件中"name":"server.port"
在我们没配置前控制台输出的是

application.yaml配置 后
server.port=8081输出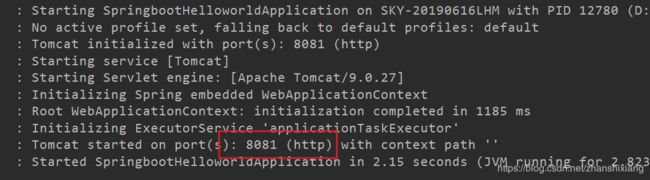
再加一个项目名字。
server.servlet.context-path=/springboot
