OpenGL ES 之 LUT(滤镜基准图)
前言
Look Up Table(简称LUT,查找表)。输入一个值,然后通过查找表来得到一个输出值。
在调色领域中,称为颜色查找表,查找表的分量为R、G、B,是一种降低GPU运算量的技术,通过将颜色值存储在一张表中,在需要的时候通过索引在这张表上找到对应的颜色值。
这是一种使用空间换时间的算法。
LUT分为1D和3D,本质的区别在于索引的输出所需要的索引数
从RGB色彩讲起
我们知道光的三原色是红(Red)、绿(Green)、蓝(Blue),也就是RGB,我们将这三种光按不同比例混合就可以得到丰富的色彩。
我们规定R、G、B三者的取值范围为[0, 255],0表示不发光,255表示发出最强的光,因此RGB(255, 0, 0)表示纯红色,同理RGB(0, 255, 0)表示纯绿色,RGB(0, 0, 255)纯蓝色。
3D LUT
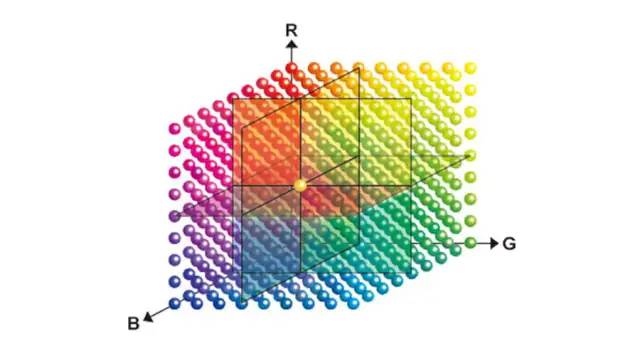
在滤镜的LUT效果应用中,通常是将用3D LUT预存效果的RGB值。
在 8bit 的 RGB 色域空间中,每个分量的取值范围为[0, 255],一张完整的色域空间就为 256 * 256 * 256 = 16581375bit = 16M。
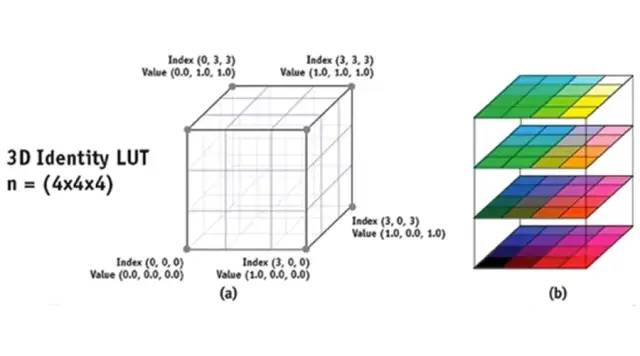
但实际上并不需要那么多颜色,通常会列举节点来储存,两个节点之间的颜色通过线性插值得出。
1、表现形式
3D LUT的储存就是一堆RGB数据,它可以使用以下三种方式进行表示:
1、三维数组
2、颜色方块
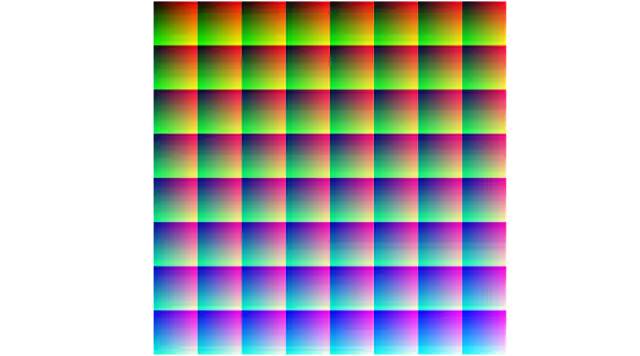
3、颜色图片
2、颜色图片
颜色图片的本质就是将颜色方块进行二维化处理。上述颜色图片分辨率为512512,里面有88的大格子,每个大格子中存有64*64个小格子,用来存储色彩像素点。
每个小格子如下图所示,X轴表示[0, 255]的R通道,Y轴表示[0, 255]的G通道。B通道分量放在了8*8的大格子中,从左到右从上到下,最后将RGB三个分量叠加
一张颜色图片一功能储存64 * 64 * 64 = 512 * 512 = 262144种色彩
3、输出一张标准LUT图片
1、创建RGBA原始数据
RGBA rgba[8 * 64][8 * 64];

for (int by = 0; by < 8; by++) {
    for (int bx = 0; bx < 8; bx++) {
        for (int g = 0; g < 64; g++) {
            for (int r = 0; r < 64; r++) {
                // 将RGB[0, 255]分成64份,每份相差4个单位, +0.5做四舍五入运算
                int rr = (int)(r * 255.0 / 63.0 + 0.5);
                int gg = (int)(g * 255.0 / 63.0 + 0.5);
                int bb = (int)((bx + by * 8) * 255.0 / 63.0 + 0.5);
                int aa = 255.0;
                int x = r + bx * 64;
                int y = g + by * 64;

                rgba[y][x] = (RGBA){rr, gg, bb, aa};
            }
        }
    }
}
2、写入数据,生成图片
int width = 8 * 64;
int height = 8 * 64;

size_t bufferLength = width * height * 4;
CGDataProviderRef dataProviderRef = CGDataProviderCreateWithData(NULL, &rgba, bufferLength, NULL);
CGColorSpaceRef colorSpaceRef = CGColorSpaceCreateDeviceRGB();

CGBitmapInfo bitmapInfo = kCGBitmapByteOrderDefault;
CGColorRenderingIntent renderingIntent = kCGRenderingIntentDefault;

CGImageRef imageRef = CGImageCreate(width, height, 8, 32, width * 4, colorSpaceRef, bitmapInfo, dataProviderRef, NULL, YES, renderingIntent);

uint32_t *pixels = (uint32_t *)malloc(bufferLength);

CGContextRef contextRef = CGBitmapContextCreate(pixels, width, height, 8, 32, colorSpaceRef, kCGImageAlphaPremultipliedLast);
CGContextDrawImage(contextRef, CGRectMake(0, 0, width, height), imageRef);
UIImage *image = nil;
if ([UIImage respondsToSelector:@selector(imageWithCGImage:scale:orientation:)]) {
    float scale = [UIScreen mainScreen].scale;
    image = [UIImage imageWithCGImage:imageRef scale:scale orientation:UIImageOrientationUp];
} else {
    image = [UIImage imageWithCGImage:imageRef];
}

CGImageRelease(imageRef);
CGContextRelease(contextRef);
CGDataProviderRelease(dataProviderRef);
CGColorSpaceRelease(colorSpaceRef);
free(pixels);
使用 GLSL 实现 LUT 滤镜
制作滤镜基准图
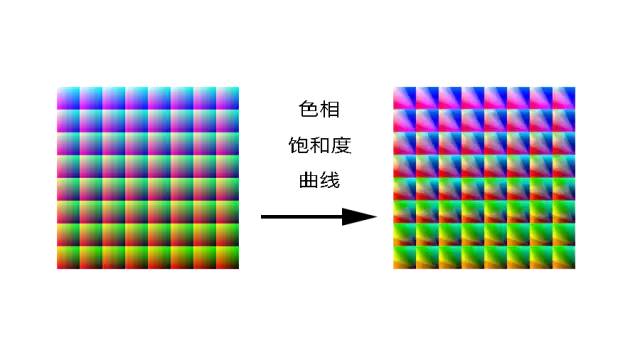
将上述的LUT图片和需要上效果的图片拖进Photoshop
隐藏LUT图片,进行色彩调整,这里进行了色相、自然饱和度的调整,并调整了曲线,拉高阴影处的曲线。
隐藏上效果图片,导出LUT图片
Coding
输入双纹理,InputImageTexture为输入的需要应用效果的图片纹理,InputImageTexture2为基准图纹理。
// glsl.fsh
precision mediump float;

uniform sampler2D InputImageTexture2;
uniform sampler2D InputImageTexture;
uniform lowp float intensity;

varying vec2 TextureCoordinate;

void main() {
    // 取出当前像素的纹素
    highp vec4 textureColor = texture2D(InputImageTexture, TextureCoordinate);

    highp float blueColor = textureColor.b * 63.0;

    // 计算B通道,看使用哪个像素色块(这里分别对计算结果向上,向下取整,然后再对两者进行线性计算,减小误差)
    highp vec2 quad1;
    quad1.y = floor(floor(blueColor) / 8.0);
    quad1.x = floor(blueColor) - (quad1.y * 8.0);

    highp vec2 quad2;
    quad2.y = floor(ceil(blueColor) / 8.0);
    quad2.x = ceil(blueColor) - (quad2.y * 8.0);

    // 计算R、G通道
    highp vec2 texPos1;
    texPos1.x = (quad1.x * 0.125) + 0.5/512.0 + ((0.125 - 1.0/512.0) * textureColor.r);
    texPos1.y = (quad1.y * 0.125) + 0.5/512.0 + ((0.125 - 1.0/512.0) * textureColor.g);

    highp vec2 texPos2;
    texPos2.x = (quad2.x * 0.125) + 0.5/512.0 + ((0.125 - 1.0/512.0) * textureColor.r);
    texPos2.y = (quad2.y * 0.125) + 0.5/512.0 + ((0.125 - 1.0/512.0) * textureColor.g);

    // 根据转换后的纹理坐标,在基准图上取色
    lowp vec4 newColor1 = texture2D(InputImageTexture2, texPos1);
    lowp vec4 newColor2 = texture2D(InputImageTexture2, texPos2);

    // 对计算出来的两个色值,线性求平均(fract:取小数点后值)
    lowp vec4 newColor = mix(newColor1, newColor2, fract(blueColor));

    // intensity 按需计算滤镜透明度,混合计算前后的色值
    gl_FragColor = mix(textureColor, vec4(newColor.rgb, textureColor.w), intensity);
}
注意
坐标系
UIKit坐标系Y轴朝下,CoreGraphics、OpenGL坐标系Y轴朝上,两者颠倒,所以在做图片生成纹理的时候要注意坐标系变换。
为了正确渲染图片到UIKit上,图片生成纹理的时候在CoreGraphics做了Transform转换操作。然而我们基准图在生成纹理的时候不需要做转换操作,否则会导致基准图颠倒,色值查找错误。
- (GLuint)texture:(BOOL)needTransform {
    CGImageRef imageRef = self.CGImage;

    GLint width = (GLint)CGImageGetWidth(imageRef);
    GLint height = (GLint)CGImageGetHeight(imageRef);
    CGRect rect = CGRectMake(0, 0, width, height);

    CGColorSpaceRef colorSpaceRef = CGColorSpaceCreateDeviceRGB();
    void * imageData = malloc(width * height * 4);
    CGContextRef contextRef = CGBitmapContextCreate(imageData, width, height, 8, 4 * width, colorSpaceRef, kCGImageAlphaPremultipliedLast | kCGBitmapByteOrder32Big);

    CGColorSpaceRelease(colorSpaceRef);

    if (needTransform) {
        CGContextTranslateCTM(contextRef, 0, height);
        CGContextScaleCTM(contextRef, 1.0, -1.0);
    }
    CGContextDrawImage(contextRef, rect, imageRef);

    GLuint textureID;
    glGenBuffers(1, &textureID);
    glBindTexture(GL_TEXTURE_2D, textureID);

    glTexImage2D(GL_TEXTURE_2D, 0, GL_RGBA, width, height, 0, GL_RGBA, GL_UNSIGNED_BYTE, imageData);
    glTexParameteri(GL_TEXTURE_2D, GL_TEXTURE_MIN_FILTER, GL_LINEAR);
    glTexParameteri(GL_TEXTURE_2D, GL_TEXTURE_MAG_FILTER, GL_LINEAR);
    glTexParameteri(GL_TEXTURE_2D, GL_TEXTURE_WRAP_S, GL_CLAMP_TO_EDGE);
    glTexParameteri(GL_TEXTURE_2D, GL_TEXTURE_WRAP_T, GL_CLAMP_TO_EDGE);

    glBindTexture(GL_TEXTURE_2D, 0);

    CGContextRelease(contextRef);
    free(imageData);

    return textureID;
}
为了解决渲染图片方向问题,我们可以有两种方式解决:
图片纹理可以进行Transform,基准图纹理不Transform
// glsl.vsh
attribute vec4 Position;
attribute vec2 InputTextureCoordinate;

varying vec2 TextureCoordinate;
uniform mat4 MVP;

void main (void) {
    gl_Position = MVP * Position;
    TextureCoordinate = InputTextureCoordinate;
}
图片和基准图都不进行Transform,使用转换矩阵MVP
// 模型矩阵
GLKMatrix4 model = GLKMatrix4MakeScale(1.0, -1.0, 0.0);
// 观察矩阵
GLKMatrix4 view = GLKMatrix4MakeLookAt(0.0, 0.0, 3.0, 0.0, 0.0, 0.0, 0.0, 1.0, 0.0);
// 正交投影矩阵
GLKMatrix4 project = GLKMatrix4MakeOrtho(-1.0, 1.0, -1.0, 1.0, 0.1, 100);

GLKMatrix4 mvp = GLKMatrix4Identity;
mvp = GLKMatrix4Multiply(mvp, project);
mvp = GLKMatrix4Multiply(mvp, view);
mvp = GLKMatrix4Multiply(mvp, model);

glUniformMatrix4fv(_mvpUniform, 1, GL_FALSE, (GLfloat *)&mvp);
最终效果
源码地址
https://github.com/dpplh/OpenGL_ES_DEMO
作者:dpplh
来源:https://juejin.im/post/5eeb83b76fb9a0584d4f24da
![]()
技术交流,欢迎加我微信:ezglumes ,拉你入技术交流群。
![]()
推荐阅读:
音视频面试基础题
OpenGL ES 学习资源分享
一文读懂 YUV 的采样与格式
OpenGL 之 GPUImage 源码分析
推荐几个堪称教科书级别的 Android 音视频入门项目
觉得不错,点个在看呗~
![]()


