CPU配置 学习
昨天学习了内存配置,今天来学习CPU配置,以下是学习练习
CPU配置
在QEMU中,“-smp”参数是为了配置客户机的SMP系统。在命令行中,配置SMP系统的参数
-smp [cpus=n][,maxcpus=cpus][,cores=cores][,threads=threads][,sockets=sockets]
- cpus : 用来设置客户机中使用的逻辑CPU的数量(默认值是1);
- maxcpus : 用来设置客户机的最大CPU的数量,最多支持255个CPU。其中,包含启动时处于下线状态的CPU数目
- cores : 用来设置在一个socket上CPU core的数量;
- threads : 用来设置在一个CPU core上线程的数量;
- sockets : 用来设置客户机中看到的总socket的数量。
练习实例
例1:不加smp参数,使用其默认值1,模拟了只有一个逻辑CPU的客户机系统。
root@ubuntu:/home/img# qemu-system-x86_64 ubuntu14.04.img -vnc :1 -monitor stdio
1、在宿主机的qemu monitor中查看所有cpu信息
info cpus
* CPU #0: pc=0x00005583dd16cf57 thread_id=1889
实验得出,不加-smp参数,默认为1
2、在宿主机中使用ps命令查看QEMU进程和线程
xyc@ubuntu:~$ ps -efL | grep qemu
root       1886   1868   1886  0    4 21:44 pts/0    00:00:05 qemu-system-x86_64 ubuntu14.04.img -vnc :1 -monitor stdio
root       1886   1868   1887  0    4 21:44 pts/0    00:00:00 qemu-system-x86_64 ubuntu14.04.img -vnc :1 -monitor stdio
root       1886   1868   1889 15    4 21:44 pts/0    00:01:33 qemu-system-x86_64 ubuntu14.04.img -vnc :1 -monitor stdio
root       1886   1868   1890  0    4 21:44 pts/0    00:00:00 qemu-system-x86_64 ubuntu14.04.img -vnc :1 -monitor stdio
xyc        1921   1912   1921  0    1 21:54 pts/1    00:00:00 grep --color=auto qemu
实验得出 客户机的进程ID是1886
ps命令 主要用于监控后台进程的工作情况,
-e 参数:指定选择所有进程和环境变量,
-f 参数:指定选择打印出完全的各列,
-L 参数:指定打印出线程的ID和线程的个数。
3、在客户机中查看cpu信息
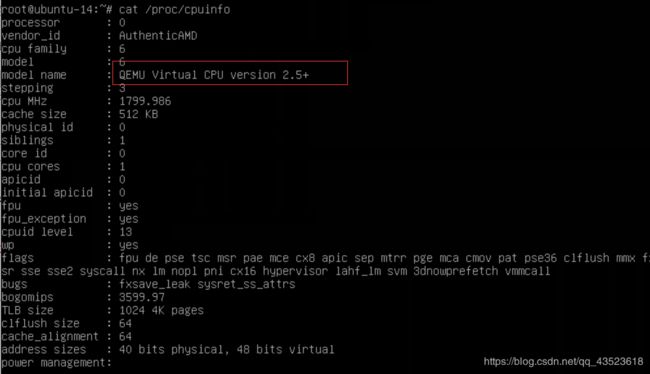
方法一: 查看 /proc/cpuinfo文件中cpu的信息

方法二:查看/sys/devices/system/cpu/目录下
![]()
得出结论,客户机系统识别到一个QEMU模拟的CPU。
例2:使用smp参数,模拟有两个逻辑CPU的客户机系统。
root@ubuntu:/home/img# qemu-system-x86_64 -smp 2,maxcpus=4 ubuntu14.04.img -vnc :1 -monitor stdio
-smp 2代表分配两个虚拟cpu,maxcpus=4客户机最大可以使用4个cpu
1、在宿主机的qemu monitor中查看所有cpu信息
(qemu) info cpus
* CPU #0: pc=0xffffffff8105d2b6 (halted) thread_id=2001
  CPU #1: pc=0xffffffff8105d2b6 (halted) thread_id=1998
2、在宿主机中使用ps命令查看QEMU进程和线程
xyc@ubuntu:~$ ps -efL |grep qemu
root       1998   1868   1998  1    4 22:13 pts/0    00:00:03 qemu-system-x86_64 -smp 2,maxcpus=4 ubuntu14.04.img -vnc :1 -monitor stdio
root       1998   1868   1999  0    4 22:13 pts/0    00:00:00 qemu-system-x86_64 -smp 2,maxcpus=4 ubuntu14.04.img -vnc :1 -monitor stdio
root       1998   1868   2001 28    4 22:13 pts/0    00:01:32 qemu-system-x86_64 -smp 2,maxcpus=4 ubuntu14.04.img -vnc :1 -monitor stdio
root       1998   1868   2002  0    4 22:13 pts/0    00:00:00 qemu-system-x86_64 -smp 2,maxcpus=4 ubuntu14.04.img -vnc :1 -monitor stdio
xyc        2013   1912   2013  0    1 22:19 pts/1    00:00:00 grep --color=auto qemu
3、在客户机中查看cpu信息
例3:使用smp参数,模拟有8个逻辑CPU的客户机系统,共有2个CPU socket,每个socket有两个核,每个核有两个线程。
root@ubuntu:/home/img# qemu-system-x86_64 -smp 8,sockets=2,cores=2,threads=2 ubuntu14.04.img -vnc :1 -monitor stdio
1、在宿主机的qemu monitor中查看所有cpu信息
(qemu) info cpus
* CPU #0: pc=0xffffffff8105d2b6 (halted) thread_id=2037
  CPU #1: pc=0xffffffff8104c72d thread_id=2034
  CPU #2: pc=0xffffffff8105d2b6 (halted) thread_id=2034
  CPU #3: pc=0xffffffff8105d2b6 (halted) thread_id=2034
  CPU #4: pc=0xffffffff813c3b57 thread_id=2034
  CPU #5: pc=0xffffffff8105d2b6 (halted) thread_id=2034
  CPU #6: pc=0xffffffff8105d2b6 (halted) thread_id=2034
  CPU #7: pc=0xffffffff8105d2b6 (halted) thread_id=2034
结论:不是每个CPU都在启动,有一些不用时会停止
2、在客户机中查看cpu信息
查看 /proc/cpuinfo文件中cpu的信息

实验得出:在客户机中有8个逻辑CPU,分别是cpu0-cpu7,共有2个CPU socket,每个socket有两个核,启用了超线程,每个核有两个线程。
在客户机中,使用“cat /proc/cpuinfo | more”命令查看cpu数据:
第一个cpu数据

第二个cpu数据

。。。。。等
例4:使用smp参数,模拟有4个逻辑CPU的客户机系统,共有2个CPU socket,每个socket有两个核。
root@ubuntu:/home/img# qemu-system-x86_64 -smp 4,sockets=2,cores=2 ubuntu14.04.img -vnc :1 -monitor stdio
1、在宿主机的qemu monitor中查看所有cpu信息
(qemu) info cpus
* CPU #0: pc=0xffffffff8105d2b6 (halted) thread_id=2140
  CPU #1: pc=0xffffffff8134a0f8 thread_id=2137
  CPU #2: pc=0xffffffff8104c72d thread_id=2137
  CPU #3: pc=0xffffffff813b29e9 thread_id=2137
在客户机中,使用“cat /proc/cpuinfo | more”命令查看cpu数据:
第一个cpu数据

第二个cpu数据

第三个cpu数据

第四个cpu数据

CPU模型
每一种虚拟机监视器都定义了自己的策略,让客户机有一个默认的CPU模型。
有的VMM会简单的将宿主机中的CPU类型和特性直接传递给客户机使用。
在默认情况下,QEMU会为客户机提供一个名为qemu64或qemu32的基本CPU模型。
虚拟机监视器的这种策略不但可以为CPU特性提供一些高级的过滤功能,还可以将物理平台根据基本CPU模型进行分组,使得客户机在同一组硬件平台上的动态迁移更加平滑和安全。
例5:查看当前的QEMU支持的所有CPU模型。
root@ubuntu:/home/img# qemu-system-x86_64 -cpu ?
x86           qemu64  QEMU Virtual CPU version 2.5+
x86           phenom  AMD Phenom(tm) 9550 Quad-Core Processor
x86         core2duo  Intel(R) Core(TM)2 Duo CPU     T7700  @ 2.40GHz
x86            kvm64  Common KVM processor
x86           qemu32  QEMU Virtual CPU version 2.5+
x86            kvm32  Common 32-bit KVM processor
x86          coreduo  Genuine Intel(R) CPU           T2600  @ 2.16GHz
x86              486
x86          pentium
x86         pentium2
x86         pentium3
x86           athlon  QEMU Virtual CPU version 2.5+
x86             n270  Intel(R) Atom(TM) CPU N270   @ 1.60GHz
x86           Conroe  Intel Celeron_4x0 (Conroe/Merom Class Core 2)
x86           Penryn  Intel Core 2 Duo P9xxx (Penryn Class Core 2)
x86          Nehalem  Intel Core i7 9xx (Nehalem Class Core i7)
x86     Nehalem-IBRS  Intel Core i7 9xx (Nehalem Core i7, IBRS update)
x86         Westmere  Westmere E56xx/L56xx/X56xx (Nehalem-C)
x86    Westmere-IBRS  Westmere E56xx/L56xx/X56xx (IBRS update)
x86      SandyBridge  Intel Xeon E312xx (Sandy Bridge)
x86 SandyBridge-IBRS  Intel Xeon E312xx (Sandy Bridge, IBRS update)
x86        IvyBridge  Intel Xeon E3-12xx v2 (Ivy Bridge)
x86   IvyBridge-IBRS  Intel Xeon E3-12xx v2 (Ivy Bridge, IBRS)
x86    Haswell-noTSX  Intel Core Processor (Haswell, no TSX)
x86 Haswell-noTSX-IBRS  Intel Core Processor (Haswell, no TSX, IBRS)
x86          Haswell  Intel Core Processor (Haswell)
x86     Haswell-IBRS  Intel Core Processor (Haswell, IBRS)
x86  Broadwell-noTSX  Intel Core Processor (Broadwell, no TSX)
x86 Broadwell-noTSX-IBRS  Intel Core Processor (Broadwell, no TSX, IBRS)
x86        Broadwell  Intel Core Processor (Broadwell)
x86   Broadwell-IBRS  Intel Core Processor (Broadwell, IBRS)
x86       Opteron_G1  AMD Opteron 240 (Gen 1 Class Opteron)
x86       Opteron_G2  AMD Opteron 22xx (Gen 2 Class Opteron)
x86       Opteron_G3  AMD Opteron 23xx (Gen 3 Class Opteron)
x86       Opteron_G4  AMD Opteron 62xx class CPU
x86       Opteron_G5  AMD Opteron 63xx class CPU
x86             host  KVM processor with all supported host features (only available in KVM mode)
在x86-64平台上编译和运行的QEMU,如果不加“-cpu”参数启动,默认采用“qemu64”作为CPU模型。
例6:不加“-cpu”参数来启动客户机。
root@ubuntu:/home/img# qemu-system-x86_64 ubuntu14.04.img -vnc :1 -monitor stdio
在QEMU中,除了使用默认的CPU模型之外,还可以用“-cpu cpu_model”来指定在客户机中的CPU模型。
例7:在启动客户机时指定了CPU模型为Penryn。
root@ubuntu:/home/img# qemu-system-x86_64 ubuntu14.04.img -cpu Penryn -vnc :1 -monitor stdio

