unbuntu运行VINS-MONO实验总结
ubuntu16.04运行VINS-ONO实验总结——初探
- 简介
- 1.环境配置
- 2. 运行Euroc数据集
- 3. 小觅摄像头运行vins-mono
简介
VINS-Mono是香港科技大学沈劭劼团队开源的单目视觉惯导SLAM方案。前端KLT稀疏光流法跟踪图片中的特征点,后端基于优化和滑动窗口算法,使用IMU预积分构建紧耦合框架,如下图所示。它具备自动初始化,在线外参标定,重定位,闭环检测,以及全局位姿图优化功能。本篇笔记记录的是初次成功运行vins-mono的过程。
注:此博客中间的环境配置过程参考了其他博客,我附上了参考链接,感谢社区其他小伙伴的贡献。
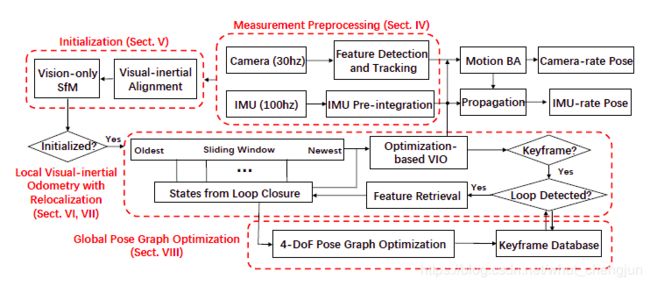
- 实验平台 :S1030-IR小觅摄像头+CORE i5 16G内存笔记本
- 实验场景 :室内
- 运行环境 :运行环境ROS Ubuntu16.04 Kinetic
注:我电脑用的是双系统"untu16.04+window10",双系统安装过程可参考这篇博客win10下安装Ubuntu16.04双系统
1.环境配置
1.1 Ubuntu16.04 ROS Kinetic安装:此过程在这篇博客:ROS 不能再详细的安装教程中有详细介绍。大概过程如下:
1)选择版本
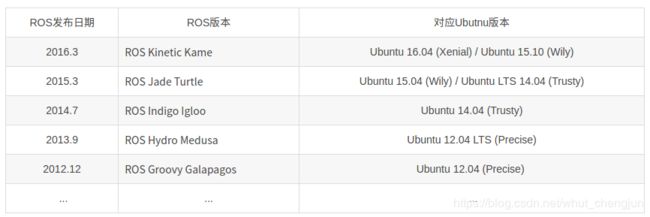 2) 添加源
$ sudo sh -c 'echo "deb http://packages.ros.org/ros/ubuntu $(lsb_release -sc) main" > /etc/apt/sources.list.d/ros-latest.list'
3)设置密钥
$ sudo apt-key adv --keyserver hkp://ha.pool.sks-keyservers.net:80 --recv-key 0xB01FA116
4)更新
$ sudo apt-get update
5)安装全功能版本的ros
$ sudo apt-get install ros-kinetic-desktop-full
6)初始化
$ sudo rosdep init
$ rosdep update
7)测试ROS:
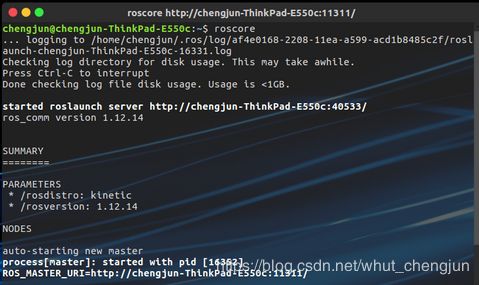
$ roscore
如果终端打印如下信息,说明安装成功
抑或运行一个小海龟的demo
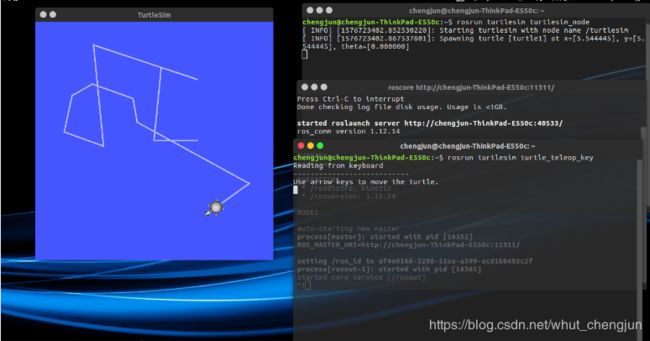
分别打开三个终端,输入如下命令:
$ roscore
$ rosrun turtlesim turtlesim_node
$ rosrun turtlesim turtle_teleop_key
键盘能成功控制小海龟移动说明安装成功,截图如下:
1.2 Ceres Solver 安装:按照 Ceres Installation步骤安装即可。
1) 开始安装所有的依赖项(#后面的是注释)
# CMake
sudo apt-get install cmake
# google-glog + gflags
sudo apt-get install libgoogle-glog-dev
# BLAS & LAPACK
sudo apt-get install libatlas-base-dev
# Eigen3
sudo apt-get install libeigen3-dev
# SuiteSparse and CXSparse (optional)
# - If you want to build Ceres as a *static* library (the default)
#   you can use the SuiteSparse package in the main Ubuntu package
#   repository:
# - 如果要将Ceres构建为* static *库(默认),您可以在主Ubuntu软件包#storage中使用SuiteSparse软件包:
sudo apt-get install libsuitesparse-dev
# - However, if you want to build Ceres as a *shared* library, you must
#   add the following PPA:
# - 但是,如果要将Ceres构建为* shared *库,则必须添加以下PPA:
sudo add-apt-repository ppa:bzindovic/suitesparse-bugfix-1319687
sudo apt-get update
sudo apt-get install libsuitesparse-dev
现在我们可以安装和测试ceres了:
安装:
tar zxf ceres-solver-1.14.0.tar.gz
mkdir ceres-bin
cd ceres-bin
cmake ../ceres-solver-1.14.0
make -j3
make test
make install
测试:
bin/simple_bundle_adjuster ../ceres-solver-1.14.0/data/problem-16-22106-pre.txt
终端打印结果如下:
iter      cost      cost_change  |gradient|   |step|    tr_ratio  tr_radius  ls_iter  iter_time  total_time
   0  4.185660e+06    0.00e+00    1.09e+08   0.00e+00   0.00e+00  1.00e+04        0    1.05e-01    2.76e-01
   1  1.062590e+05    4.08e+06    8.99e+06   5.36e+02   9.82e-01  3.00e+04        1    2.16e-01    4.93e-01
   2  4.992817e+04    5.63e+04    8.32e+06   3.19e+02   6.52e-01  3.09e+04        1    2.00e-01    6.93e-01
   3  1.899774e+04    3.09e+04    1.60e+06   1.24e+02   9.77e-01  9.26e+04        1    2.01e-01    8.94e-01
   4  1.808729e+04    9.10e+02    3.97e+05   6.39e+01   9.51e-01  2.78e+05        1    2.01e-01    1.10e+00
   5  1.803399e+04    5.33e+01    1.48e+04   1.23e+01   9.99e-01  8.33e+05        1    2.00e-01    1.29e+00
   6  1.803390e+04    9.02e-02    6.35e+01   8.00e-01   1.00e+00  2.50e+06        1    2.02e-01    1.50e+00

Solver Summary (v 1.12.0-eigen-(3.2.10)-lapack-suitesparse-(4.4.6)-openmp)

                                     Original                  Reduced
Parameter blocks                        22122                    22122
Parameters                              66462                    66462
Residual blocks                         83718                    83718
Residual                               167436                   167436

Minimizer                        TRUST_REGION

Dense linear algebra library            EIGEN
Trust region strategy     LEVENBERG_MARQUARDT

                                        Given                     Used
Linear solver                     DENSE_SCHUR              DENSE_SCHUR
Threads                                     1                        1
Linear solver threads                       1                        1
Linear solver ordering              AUTOMATIC                22106, 16

Cost:
Initial                          4.185660e+06
Final                            1.803390e+04
Change                           4.167626e+06

Minimizer iterations                        7
Successful steps                            7
Unsuccessful steps                          0

Time (in seconds):
Preprocessor                           0.1706

  Residual evaluation                  0.1236
  Jacobian evaluation                  0.6082
  Linear solver                        0.5844
Minimizer                              1.4403

Postprocessor                          0.0049
Total                                  1.6158

Termination:                      CONVERGENCE (Function tolerance reached. |cost_change|/cost: 1.769759e-09 <= 1.000000e-06)
1.3 Opencv 安装:
官网推荐3.3.1版本,不过可以自己去opencv的官网下载其他版本。截止目前官网已经更新到4.1.2版本了。
1)安装依赖项:
$ sudo apt-get install libavcodec-dev libavformat-dev libswscale-dev libv4l-dev
$ sudo apt-get install libxvidcore-dev libx264-dev
$ sudo apt-get install libatlas-base-dev gfortran
- 解压安装包,并安装编译
tar -xzvf opencv-3.3.1.tar.gz
cd opencv-3.3.1/
cd ..
mkdir build
cd build
cmake ..
make -j4  # make -jx 表示开x个线程来进行编译,要想编译快点可以把x更改得大一些,不过也要看你电脑的性能了
make install
2. 运行Euroc数据集
- 在ros系统中构建vins-mono
    cd ~/vins_mono_ws/src //ros工作空间需要先构建好
    git clone https://github.com/HKUST-Aerial-Robotics/VINS-Mono.git
    cd ../
    catkin_make
    source ~/catkin_ws/devel/setup.bash
- 打开三个终端分别运行如下命令:
    roslaunch vins_estimator euroc.launch
    roslaunch vins_estimator vins_rviz.launch
    rosbag play /media/chengjun/Passport/Eurocdaset/MH_01_easy.bag
注:打开终端需要先source一下再输入命令,每个人数据集路径不一样,需要自己设定。
3. 小觅摄像头运行vins-mono
- 运行 mynteye 节点
cd [path of mynteye-s-sdk]
make ros
source ./wrappers/ros/devel/setup.bash
roslaunch mynt_eye_ros_wrapper mynteye.launch
2)打开另一个命令行运行 VINS-MONO
cd ~/VINS-MONO_ws

source devel/setup.bash

roslaunch vins_estimator mynteye.launch
这里需要自己先构建两个启动文件
文件1:在~/VINS-MONO_ws/src/VINS-Mono-master/vins_estimator/launch下新建一个mynteye.launch文件。
文件2 :在~/VINS-MONO_ws/src/VINS-Mono-master/config文件下建立一个名为mynteye的文件夹,并新建mynteye_config.yaml文件。
两个文件内容分别如下:
mynteye.launch :
<launch>
	<arg name="config_path" default = "$(find feature_tracker)/../config/mynteye/mynteye_config.yaml" />
	    <arg name="vins_path" default = "$(find feature_tracker)/../config/../" />
	<node name="feature_tracker" pkg="feature_tracker" type="feature_tracker" output="log">
	    <param name="config_file" type="string" value="$(arg config_path)" />
	    <param name="vins_folder" type="string" value="$(arg vins_path)" />
	</node>


	<node name="vins_estimator" pkg="vins_estimator" type="vins_estimator" output="screen">
	   <param name="config_file" type="string" value="$(arg config_path)" />
	   <param name="vins_folder" type="string" value="$(arg vins_path)" />
	</node>

	<node name="pose_graph" pkg="pose_graph" type="pose_graph" output="screen">
	    <param name="config_file" type="string" value="$(arg config_path)" />
	    <param name="visualization_shift_x" type="int" value="0" />
	    <param name="visualization_shift_y" type="int" value="0" />
	    <param name="skip_cnt" type="int" value="0" />
	    <param name="skip_dis" type="double" value="0" />
	</node>

	<node name="rvizvisualisation" pkg="rviz" type="rviz" output="log" args="-d $(find vins_estimator)/../config/vins_rviz_config.rviz" />
</launch>
mynteye_config.yaml:
%YAML:1.0
#common parameters
imu_topic: "/mynteye/imu/data_raw"
image_topic: "/mynteye/left/image_raw"
output_path: "/home/chengjun/VINS-MONO_ws/src/VINS-Mono-master/mynt_output"

use_mynteye_adapter: 1
mynteye_imu_srv: "s1"

# camera calibration, please replace it with your own calibration file.
# model_type: MEI
# camera_name: camera
# image_width: 640
# image_height: 400
# mirror_parameters:
#   xi: 0
# distortion_parameters:
#   k1: 0
#   k2: 0
#   p1: 0
#   p2: 0
# projection_parameters:
#   gamma1: 1.1919574208429231e+03
#   gamma2: 1.1962419519374005e+03
#   u0: 3.9017559066380522e+02
#   v0: 2.5308889949771191e+02

model_type: PINHOLE
camera_name: camera
image_width: 752
image_height: 480
distortion_parameters:
   k1: -3.0825216120347504e-01
   k2: 8.4251305214302186e-02
   p1: -1.5009319710179576e-04
   p2: 2.0170689406091280e-04
projection_parameters:
   fx: 3.5847442850029023e+02
   fy: 3.5952665535350462e+02
   cx: 3.8840661559633401e+02
   cy: 2.5476941553631312e+02

# model_type: PINHOLE
# camera_name: camera
# image_width: 640
# image_height: 400
# distortion_parameters:
#    k1: 0
#    k2: 0
#    p1: 0
#    p2: 0
# projection_parameters:
#    fx: 3.5847442850029023e+02
#    fy: 3.5952665535350462e+02
#    cx: 3.8840661559633401e+02
#    cy: 2.5476941553631312e+02

# Extrinsic parameter between IMU and Camera.
estimate_extrinsic: 1   # 0  Have an accurate extrinsic parameters. We will trust the following imu^R_cam, imu^T_cam, don't change it.
                        # 1  Have an initial guess about extrinsic parameters. We will optimize around your initial guess.
                        # 2  Don't know anything about extrinsic parameters. You don't need to give R,T. We will try to calibrate it. Do some rotation movement at beginning.
#If you choose 0 or 1, you should write down the following matrix.
#Rotation from camera frame to imu frame, imu^R_cam

extrinsicRotation: !!opencv-matrix
   rows: 3
   cols: 3
   dt: d
   data: [-0.00703616, -0.99995328, -0.00662858,
           0.99994059, -0.00709095, 0.00827845,
           -0.00832506, -0.00656994, 0.99994376]
#Translation from camera frame to imu frame, imu^T_cam
extrinsicTranslation: !!opencv-matrix
   rows: 3
   cols: 1
   dt: d
   data: [0.00352007,-0.04430543, 0.02124595]

#feature traker paprameters
max_cnt: 150            # max feature number in feature tracking
min_dist: 30            # min distance between two features
freq: 10                # frequence (Hz) of publish tracking result. At least 10Hz for good estimation. If set 0, the frequence will be same as raw image
F_threshold: 1.0        # ransac threshold (pixel)
show_track: 1           # publish tracking image as topic
equalize: 1             # if image is too dark or light, trun on equalize to find enough features
fisheye: 0              # if using fisheye, trun on it. A circle mask will be loaded to remove edge noisy points

#optimization parameters
max_solver_time: 0.04  # max solver itration time (ms), to guarantee real time
max_num_iterations: 8   # max solver itrations, to guarantee real time
keyframe_parallax: 10.0 # keyframe selection threshold (pixel)

#imu parameters       The more accurate parameters you provide, the better performance
acc_n: 0.0268014618074          # accelerometer measurement noise standard deviation. #0.599298904976
gyr_n: 0.00888232829671        # gyroscope measurement noise standard deviation.     #0.198614898699
acc_w: 0.00262960861593         # accelerometer bias random work noise standard deviation.  #0.02
gyr_w: 0.000379565782927       # gyroscope bias random work noise standard deviation.     #4.0e-5

#imu parameters       The more accurate parameters you provide, the better performance
#acc_n: 7.6509e-02           # accelerometer measurement noise standard deviation. #0.599298904976
#gyr_n: 9.0086e-03          # gyroscope measurement noise standard deviation.     #0.198614898699
#acc_w: 5.3271e-02        # accelerometer bias random work noise standard deviation.  #0.02
#gyr_w: 5.5379e-05        # gyroscope bias random work noise standard deviation.     #4.0e-5

g_norm: 9.81007     # gravity magnitude

#loop closure parameters
loop_closure: 1                    # start loop closure
load_previous_pose_graph: 0        # load and reuse previous pose graph; load from 'pose_graph_save_path'
fast_relocalization: 0             # useful in real-time and large project
pose_graph_save_path: "/home/chengjun/VINS-MONO_ws/src/VINS-Mono-master/mynt_output/pose_graph/" # save and load path

#unsynchronization parameters
estimate_td: 1                      # online estimate time offset between camera and imu
td: 0.0                             # initial value of time offset. unit: s. readed image clock + td = real image clock (IMU clock)

#rolling shutter parameters
rolling_shutter: 0                  # 0: global shutter camera, 1: rolling shutter camera
rolling_shutter_tr: 0               # unit: s. rolling shutter read out time per frame (from data sheet).

#visualization parameters
save_image: 1                   # save image in pose graph for visualization prupose; you can close this function by setting 0
visualize_imu_forward: 0        # output imu forward propogation to achieve low latency and high frequence results
visualize_camera_size: 0.4      # size of camera marker in RVIZ
运行截图如下:
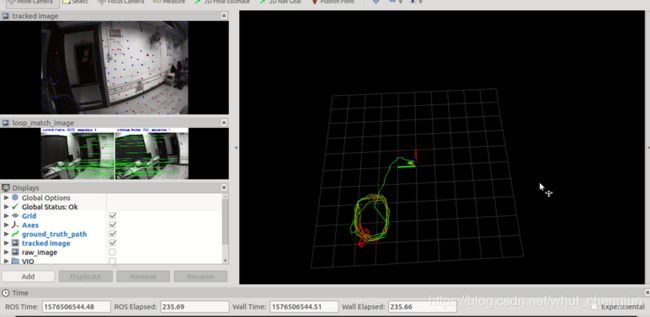
本次在笔记本上运行vins-mono,总结如下:
1.因为是单目vio系统的原因,系统初始化过程中需要移动摄像头才能定位成功;
2.在实时实验过程中轨迹有段时间飘的比较厉害,不过又迅速的定位回来了,而且回环的效果很不错
3.具体定位精度还没有评价,不过系统鲁棒性似乎比orb-slam2更高。
4.下一步准备在TX2上运行试试,看效果如何。
附上运行视屏
vinsmono+mynteye+ubuntu16.04
