前言
Spring Boot 是由 Pivotal 团队提供的全新框架,其设计目的是用来简化新 Spring 应用的初始搭建以及开发过程。该框架使用了特定的方式来进行配置,从而使开发人员不再需要定义样板化的配置。
正好公司最近做一个新项目,就考虑把原来的传统框架改造成Spring Boot的框架,以下为改造过程记录。
1.修改pom.xml依赖
Spring Boot工程的父依赖必须为spring-boot-starter-parent,而且它引入的依赖也相当简洁,如下所示:
    org.springframework.boot
    spring-boot-starter-parent
    2.0.1.RELEASE
war
    UTF-8
    1.8
Spring Boot 2 JDK必须至少为1.8,Tomcat为7.0.78,Redis本地为3.2.9(现网为2.8.3)
    org.springframework.boot
    spring-boot-starter-web


            org.springframework.boot
            spring-boot-starter-logging


    org.springframework.boot
    spring-boot-starter-tomcat
    provided


    org.mybatis.spring.boot
    mybatis-spring-boot-starter
    1.3.2


    redis.clients
    jedis
    system
    ${basedir}/lib/jedis-2.9.0.jar


    org.springframework.boot
    spring-boot-starter-data-redis


    org.springframework.boot
    spring-boot-starter-log4j2
添加web,mybatis和redis支持,去除内嵌的tomcat以及默认的log,采用log4j2。另外,私服上的jedis包有问题,虽然看源代码没有问题,但实际的jar是有问题的,最后从公服上下了jar,放在lib下,直接引用。
    familydoctor-webapp-v2


            org.springframework.boot
            spring-boot-maven-plugin
            1.4.2.RELEASE


            org.mybatis.generator
            mybatis-generator-maven-plugin
            1.3.2

                true
2.修改配置文件
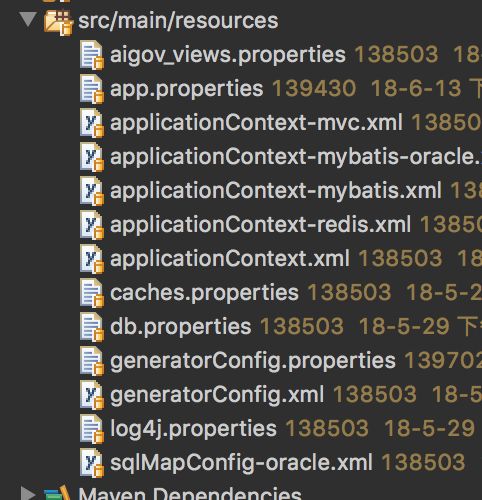
这也是本次改造工程的关键,修改前的配置文件如下所示:
2.1新增FamilyDoctorApplication
FamilyDoctorApplication是Spring Boot的入口文件,该文件一般放在包的根目录下,代码如下:
package com.asiainfo.aigov;

import org.springframework.boot.autoconfigure.SpringBootApplication;
import org.springframework.boot.builder.SpringApplicationBuilder;
import org.springframework.boot.web.servlet.support.SpringBootServletInitializer;

@SpringBootApplication
public class FamilyDoctorApplication extends SpringBootServletInitializer {

    protected SpringApplicationBuilder configure(SpringApplicationBuilder application) {
        return application.sources(FamilyDoctorApplication.class);
    }

}
2.2删除web.xml
2.3删除applicationContext-mvc.xml,新增MyMvcConfigurer
之所以选择实现WebMvcConfigurer,而不是选择继承WebMvcConfigurationSupport,是因为继承WebMvcConfigurationSupport会导致原先默认的自动配置无效,而实现WebMvcConfigurer只会新增新的配置,不会使原先默认的自动配置无效。
MyMvcConfigurer如下所示:
package com.asiainfo.aigov.config;

import com.alibaba.druid.support.http.StatViewServlet;
import com.alibaba.druid.support.http.WebStatFilter;
import com.asiainfo.aigov.system.interceptor.AppUserInterceptor;
import com.asiainfo.aigov.system.resolver.UserSessionArgumentResolver;
import com.asiainfo.aigov.system.web.servlet.InitServlet;
import com.asiainfo.aigov.system.web.session.UserSessionFilter;
import com.asiainfo.frame.servlet.ImageServlet;
import com.fasterxml.jackson.databind.ObjectMapper;
import com.google.common.collect.Lists;

import org.springframework.boot.web.servlet.FilterRegistrationBean;
import org.springframework.boot.web.servlet.ServletRegistrationBean;
import org.springframework.context.annotation.Bean;
import org.springframework.context.annotation.Configuration;
import org.springframework.context.annotation.EnableAspectJAutoProxy;
import org.springframework.http.MediaType;
import org.springframework.http.converter.HttpMessageConverter;
import org.springframework.http.converter.json.MappingJackson2HttpMessageConverter;
import org.springframework.web.method.support.HandlerMethodArgumentResolver;
import org.springframework.web.multipart.commons.CommonsMultipartResolver;
import org.springframework.web.servlet.config.annotation.InterceptorRegistry;
import org.springframework.web.servlet.config.annotation.ResourceHandlerRegistry;
import org.springframework.web.servlet.config.annotation.ViewResolverRegistry;
import org.springframework.web.servlet.config.annotation.WebMvcConfigurer;
import org.springframework.web.servlet.view.InternalResourceViewResolver;

import java.text.SimpleDateFormat;
import java.util.HashMap;
import java.util.List;
import java.util.Map;

/**
 * 代替原先的applicationContext-mvc.xml
 * @author pany
 *
 */
@Configuration
@EnableAspectJAutoProxy
public class MyMvcConfigurer implements WebMvcConfigurer {

    public void addArgumentResolvers(List argumentResolvers) {
        argumentResolvers.add(new UserSessionArgumentResolver());
    }

    @Bean
    public MappingJackson2HttpMessageConverter mappingJackson2HttpMessageConverter() {
        MappingJackson2HttpMessageConverter converter = new MappingJackson2HttpMessageConverter();
        ObjectMapper objectMapper = new ObjectMapper();
        SimpleDateFormat sdf = new SimpleDateFormat("yyyy-MM-dd HH:mm:ss");
        objectMapper.setDateFormat(sdf);
        converter.setObjectMapper(objectMapper);
        converter.setSupportedMediaTypes(Lists.newArrayList(MediaType.TEXT_HTML, MediaType.APPLICATION_JSON_UTF8, MediaType.APPLICATION_FORM_URLENCODED));
        return converter;
    }

    public void configureMessageConverters(List> converters) {
        converters.add(mappingJackson2HttpMessageConverter());
    }

    @Bean
    public InternalResourceViewResolver internalResourceViewResolver() {
        InternalResourceViewResolver internalResourceViewResolver = new InternalResourceViewResolver();
        internalResourceViewResolver.setPrefix("/WEB-INF/views/");
        internalResourceViewResolver.setSuffix(".jsp");
        return internalResourceViewResolver;
    }

    public void configureViewResolvers(ViewResolverRegistry registry) {
        registry.viewResolver(internalResourceViewResolver());
    }

    public void addInterceptors(InterceptorRegistry registry) {
        registry.addInterceptor(new AppUserInterceptor());
    }

    /**
     * 默认的/**是映射到/static,需改成/
     */
    public void addResourceHandlers(ResourceHandlerRegistry registry) {
        registry.addResourceHandler("/**").addResourceLocations("/");
        // /META-INF/resources/下的资源可以直接读取,但为了兼容旧的/resources/写法,需做以下配置
        registry.addResourceHandler("/resources/**").addResourceLocations("classpath:/META-INF/resources/");
    }

    @Bean
    public FilterRegistrationBean userSessionFilter() {
        FilterRegistrationBean userSessionFilter = new FilterRegistrationBean<>(new UserSessionFilter());
        userSessionFilter.addUrlPatterns("/*");
        userSessionFilter.setOrder(1);
        return userSessionFilter;
    }

    @Bean
    public FilterRegistrationBean webStatFilter() {
        FilterRegistrationBean webStatFilter = new FilterRegistrationBean<>(new WebStatFilter());
        webStatFilter.addInitParameter("exclusions", "*.js,*.gif,*.jpg,*.png,*.css,*.ico,/druid/*");
        webStatFilter.addUrlPatterns("/*");
        webStatFilter.setOrder(2);
        return webStatFilter;
    }

    @Bean
    public ServletRegistrationBean initServlet() {
        ServletRegistrationBean initServlet = new ServletRegistrationBean<>(new InitServlet(), false);
        initServlet.setLoadOnStartup(1);
        return initServlet;
    }

    @Bean
    public ServletRegistrationBean statViewServlet() {
        ServletRegistrationBean statViewServlet = new ServletRegistrationBean<>(new StatViewServlet(), "/druid/*");
        return statViewServlet;
    }

    @Bean
    public ServletRegistrationBean imageServlet() {
        ServletRegistrationBean imageServlet = new ServletRegistrationBean<>(new ImageServlet(), "/imageServlet");
        Map initParameters = new HashMap<>();
        initParameters.put("imgWidth", "120");
        initParameters.put("imgHeight", "48");
        initParameters.put("codeCount", "4");
        initParameters.put("fontStyle", "Times New Roman");
        imageServlet.setInitParameters(initParameters);
        return imageServlet;
    }

}
2.4新增application.properties
包含数据源与Redis配置,删除对应的配置文件(applicationContext-mybatis-oracle.xml、applicationContext-mybatis.xml、applicationContext-redis.xml、applicationContext.xml、db.properties)
spring.datasource.oracle.url=jdbc:oracle:thin:@10.63.80.240:1521:devdb
spring.datasource.oracle.username=familydoctor
spring.datasource.oracle.password=f2r22s2_c33Srfrmm
spring.datasource.oracle.driver-class-name=oracle.jdbc.driver.OracleDriver

spring.redis.host=127.0.0.1
spring.redis.port=6379

server.servlet.context-path=/familydoctor-webapp
server.port=8080
#server.servlet.session.timeout=60 会话超时时间,最小为60秒

logging.level.root=INFO 不使用log4j2,采用默认的日志并设置级别
# 屏蔽o.a.tomcat.util.scan.StandardJarScanner : Failed to scan错误
logging.level.org.apache.tomcat.util.scan.StandardJarScanner=ERROR
# 相对路径,默认输出的日志文件名为spring.log
#logging.path=log

spring.profiles.active=dev

#debug=true
2.5新增OracleDSConfig
数据源采用Java Config配置
package com.asiainfo.aigov.config;

import org.apache.ibatis.session.SqlSessionFactory;
import org.mybatis.spring.SqlSessionFactoryBean;
import org.mybatis.spring.SqlSessionTemplate;
import org.mybatis.spring.annotation.MapperScan;
import org.springframework.beans.factory.annotation.Qualifier;
import org.springframework.beans.factory.annotation.Value;
import org.springframework.context.annotation.Bean;
import org.springframework.context.annotation.Configuration;
import org.springframework.context.annotation.Primary;
import org.springframework.core.io.support.PathMatchingResourcePatternResolver;
import org.springframework.jdbc.core.JdbcTemplate;
import org.springframework.jdbc.datasource.DataSourceTransactionManager;

import com.alibaba.druid.pool.DruidDataSource;

import javax.sql.DataSource;

@Configuration
@MapperScan(basePackages = "com.asiainfo.aigov.**.dao", sqlSessionTemplateRef  = "oracleSqlSessionTemplate")
public class OracleDSConfig {

    @Value("${spring.datasource.oracle.url}")
    private String url;

    @Value("${spring.datasource.oracle.username}")
    private String username;

    @Value("${spring.datasource.oracle.password}")
    private String password;

    @Value("${spring.datasource.oracle.driver-class-name}")
    private String driverClassName;

    @Bean
    @Primary
    public DataSource oracleDataSource() {
            DruidDataSource dataSource = new DruidDataSource();
            dataSource.setUrl(url);
            dataSource.setUsername(username);
            dataSource.setPassword(password);
            dataSource.setDriverClassName(driverClassName);
        return dataSource;
    }

    @Bean
    @Primary
    public SqlSessionFactory oracleSqlSessionFactory(@Qualifier("oracleDataSource") DataSource dataSource) throws Exception {
        SqlSessionFactoryBean bean = new SqlSessionFactoryBean();
        bean.setDataSource(dataSource);
        bean.setConfigLocation(new PathMatchingResourcePatternResolver().getResource("classpath:sqlMapConfig-oracle.xml"));
        bean.setMapperLocations(new PathMatchingResourcePatternResolver().getResources("classpath*:com/asiainfo/aigov/**/oracle/*Mapper.xml"));
        return bean.getObject();
    }

    @Bean
    @Primary
    public DataSourceTransactionManager oracleTransactionManager(@Qualifier("oracleDataSource") DataSource dataSource) {
        return new DataSourceTransactionManager(dataSource);
    }

    @Bean
    @Primary
    public SqlSessionTemplate oracleSqlSessionTemplate(@Qualifier("oracleSqlSessionFactory") SqlSessionFactory sqlSessionFactory) throws Exception {
        return new SqlSessionTemplate(sqlSessionFactory);
    }

    @Bean
    @Primary
    public JdbcTemplate jdbcTemplate(@Qualifier("oracleDataSource") DataSource dataSource) {
            return new JdbcTemplate(dataSource);
    }

}
2.6覆盖RedisGenerator
Spring Boot默认配置的RedisTemplate有两个,一个是RedisTemplate,一个是StringRedisTemplate,我们使用的是RedisTemplate。之所以要覆盖,是因为原先的spring-session-data-redis是1.2.2.RELEASE版本,而Spring Boot 2的是2.0.2.RELEASE版本。这样的话,原先编译出来的RedisGenerator里的redisTemplate的delete方法的签名和Spring Boot 2就会不一致,从而导致调用的时候报错。
Java类调用的方法的签名是编译的时候就确定的,所以编译的版本要和运行的版本一致。
package com.asiainfo.aigov.system.cache;

import org.springframework.dao.DataAccessException;
import org.springframework.data.redis.connection.RedisConnection;
import org.springframework.data.redis.core.RedisCallback;
import org.springframework.data.redis.core.RedisTemplate;
import org.springframework.data.redis.core.ValueOperations;

import com.asiainfo.frame.utils.ApplicationContextUtil;

public class RedisGenerator {

    private RedisTemplate redisTemplate;

    private ValueOperations valueOps;

    protected static RedisGenerator redisGenerator = null;

    public static RedisGenerator getInstance() {
        if (redisGenerator == null) {
            redisGenerator = new RedisGenerator();
        }
        return redisGenerator;
    }

    @SuppressWarnings("unchecked")
    private RedisGenerator() {
        this.redisTemplate = (RedisTemplate)ApplicationContextUtil.getInstance().getBean("redisTemplate");
        this.valueOps = this.redisTemplate.opsForValue();
    }

    /**
     * @param key
     * @return
     */
    public Object get(String key) {
        return this.valueOps.get(key);
    }

    /**
     * @param key
     * @param value
     */
    public void add(String key, Object value) {
        this.valueOps.set(key, value);
    }

    /**
     * @param key
     */
    public void remove(String key) {
        this.redisTemplate.delete(key);
    }

    @SuppressWarnings({ "unchecked", "rawtypes" })
    public void removeAll() {
        // 删除当前数据库中的所有Key
        // flushdb
        this.redisTemplate.execute(new RedisCallback() {
            public String doInRedis(RedisConnection connection) throws DataAccessException {
                connection.flushDb();
                return "ok";
            }
        });
    }

}
2.7日志管理
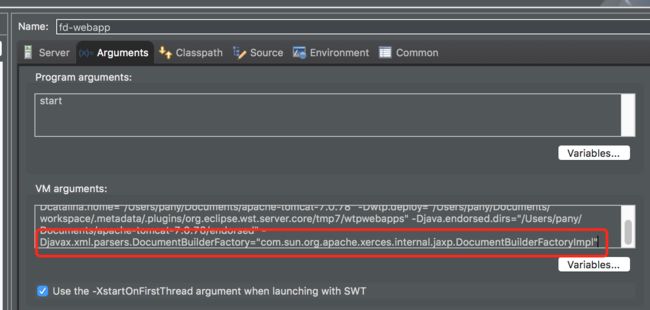
原先代码是采用log4j来写日志,而Spring Boot 2不支持log4j,支持的是log4j2。为了让新旧日志都能打印,加入log4j2.xml。同时,Tomcat的启动参数为增加-Djavax.xml.parsers.DocumentBuilderFactory="com.sun.org.apache.xerces.internal.jaxp.DocumentBuilderFactoryImpl",以免刚开始启动的时候会报错。
打印日志的时候要用org.apache.commons.logging提供的日志类,这样无论是用log4j还是log4j2,都可以打印出日志。代码如下:
import org.apache.commons.logging.Log;
import org.apache.commons.logging.LogFactory;

private static Log logger = LogFactory.getLog(InitServlet.class);
log4j2.xml
3.结束语
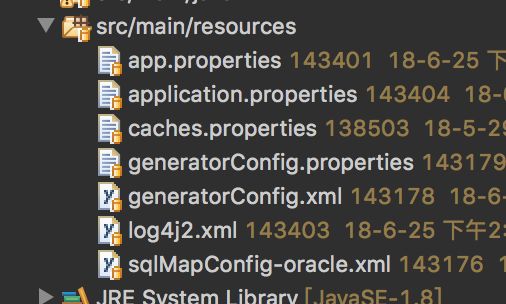
修改后的配置文件如下所示:
和原来相比减少了6个配置文件,因为是改造老框架,为了兼容,还是留下了部分的配置文件(如app.properties、caches.properties等)。
另外,在改造的过程中有出现访问JSP页面白屏的问题,后面发现ServletRegistrationBean和FilterRegistrationBean的默认urlMappings都是/*,像InitServlet这样如果注册的时候没有配urlMappings,而实际上它的urlMappings就默认为/*,这样就会把原先映射到DispatcherServlet的请求映射到InitServlet上,从而导致页面白屏。解决方法是在创建ServletRegistrationBean的时候设置alwaysMapUrl为false。
ServletRegistrationBean initServlet = new ServletRegistrationBean<>(new InitServlet(), false);
最终工程启动成功,登录和退出也正常,改造工作算是告一段落。


