使用Rational Application Developer为IBM Workload Deployer开发虚拟应用程序模式
关于本教程
这个多部分文章系列的第5部分向您介绍IBM Rational Application Developer中的工具和开发实践,用于在IBM Workload Deployer上开发和测试虚拟应用程序模式。
该系列的前几篇文章探讨了IBMPureApplication®System和可帮助您评估,准备企业应用程序并将其迁移到虚拟系统模式的技术。 在评估现有企业应用程序或设计新应用程序时,您可能决定使用虚拟应用程序模式而不是虚拟系统模式。
注: IBM Rational Application Developer中与IBM Workload Deployer一起使用的所有功能也将与IBM PureApplication System一起使用。
开发虚拟应用程序模式不仅仅是将诸如企业应用程序,Web应用程序,OSGi应用程序和数据库之类的组件连接在一起。 它还涉及使用普通软件开发人员熟悉的语言和工具来实现那些组件的业务逻辑。 例如,Web应用程序组件的业务逻辑可能包含Java™类,OSGi包,HTML页面,JavaScript函数和CSS样式表。 这些是软件开发人员在正常工作日内编辑,运行和测试的工件的类型。 至关重要的是,向虚拟应用程序模式的过渡不会破坏开发人员的生命。
用于WebSphere®软件的IBM Rational Application Developer已经丰富了各种工具,这些工具将编写代码的学科与组装虚拟应用程序模式的学科联系起来。
在本教程中,您将学习如何:
- 创建并使用Workload Deployer服务器配置。
- 创建虚拟应用程序模式并将其发布到Workload Deployer。
- 从Workload Deployer到Rational Application Developer中获取虚拟应用程序模式。
- 使虚拟应用程序模式在Workload Deployer和Rational Application Developer之间保持同步。
- 从Rational Application Developer部署虚拟应用程序模式。
- 从Workload Deployer中分离并删除虚拟应用程序模式。
- 导出和导入虚拟应用程序模式。
- 使用Workload Deployer工具首选项。
先决条件
本教程是为Rational Application Developer V8.0.4和IBM Workload Deployer V3.1编写的。 您必须访问至少定义了一个环境配置文件的Workload Deployer V3.1或更高版本。 您在Workload Deployer上的用户帐户需要以下权限。 要检查您的权限,请从Workload Deployer仪表板中选择“ 系统” >“ 用户 ”,然后找到并选择您的用户帐户。 仪表板显示用户帐户的特征,包括您的权限,即您有权或不有权执行的活动。 选择用户帐户后,请确认至少存在以下权限并选中。
权限:
- 在云中部署模式
- 创建新模式
- 云管理(只读视图)
- 设备管理(只读视图)
- 审核(只读视图)
系统要求
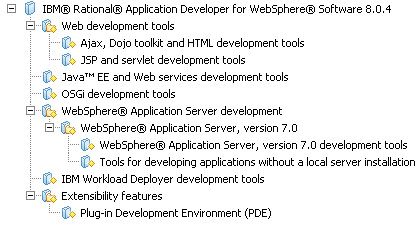
您必须安装具有以下功能的Rational Application Developer V8.0.4或更高版本,如Installation Manager中所示(请参见图1):
- Web开发工具
- Ajax,Dojo工具箱和HTML开发工具
- JSP和Servlet开发工具
- Java™EE和Web服务开发工具
- OSGi开发工具
- WebSphere Application Server开发
- WebSphere Application Server版本7.0
- WebSphere Application Server V7.0开发工具
- 无需安装本地服务器即可开发应用程序的工具
- WebSphere Application Server版本7.0
注:如果您在本地安装了WebSphere Application Server V7.0,则可以跳过此功能。
- IBM Workload Deployer开发工具
- 扩展功能
- 插件开发环境(PDE)
图1.必需的功能
持续时间
本教程大约需要3个小时才能完成。
第1部分。入门
注意:本教程的所有资源都可以从Rational Application Developer信息中心获得 。
首先,在新的工作空间上启动Rational Application Developer,然后将“ OSGi Hello World”和“ Ajax Hello World”样本导入您的工作空间。
启动Rational Application Developer
- 启动Rational Application Developer。 例如,在Windows®上,选择开始>程序> IBM软件交付平台> Rational Application Developer 8.0> Rational Application Developer 。
- 在“工作空间启动器”对话框的“ 工作空间”字段中,输入新工作空间的路径名,然后单击“ 确定” 。
- 如果出现“欢迎”视图,请关闭它。
导入OSGi Hello World示例
此示例演示了基本的OSGi应用程序。 您将在本教程的后面部分将其用作应用程序模式组件的实现。
- 从Rational Application Developer主菜单中,选择“ 帮助”>“帮助目录”以打开“帮助”窗口。
- 在帮助窗口的目录下,展开并选择样本> OSGi> OSGi Hello World 。
- 在样本的结果信息页面中,选择Import the Sample 。
- 片刻之后,将出现一个导入向导。 接受所有默认值,然后单击Finish 。
- 如果出现“打开关联透视图”对话框,询问您是否要切换到Java EE透视图,请单击“ 否” 。
- 在企业资源管理器中,确认以下项目已添加到您的工作区:
-
HelloWorld -
HelloWorld.app
-
导入Ajax Hello World示例
该样本是基于Dojo和Ajax技术的基本Web应用程序。 您将在本教程的后面部分将其用作应用程序模式组件的实现。
- 在“帮助”窗口的“目录”下,展开并选择“ 样本” >“ Web” >“ Ajax Hello World” 。
- 在样本的结果信息页面中,选择Import Sample 。
注意:该示例的信息页可能会指出“要使用此示例,必须安装Feature Pack for Web 2.0”。 您可以忽略此。
- 片刻之后,将出现导入向导。 接受所有默认设置,然后单击“ 完成” 。
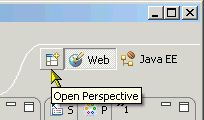
- 如果出现“打开关联的透视图”对话框,询问您是否要切换到Web透视图,请单击“ 是” 。 如果未出现对话框,请确认Web透视图已打开。 如果未打开Web透视图,请选择Open Perspective > Other ,如图2所示,选择Web ,然后单击OK 。
图2.打开Web透视图
- 在企业资源管理器中,确认以下项目已添加到您的工作区:
-
AjaxHello -
AjaxHello_WEB
-
- 关闭“帮助”窗口。
创建一个Web应用程序项目
您的工作区中还需要一个项目,以便在本教程的后面部分使用。 就本教程而言,该项目不需要包含任何源代码。 您不必导入另一个示例,而只需创建一个新的空Web项目。
- 从Rational Application Developer主菜单中,选择File> New> Project以打开New Project向导。
- 展开并选择Web>动态Web项目 。
- 单击“ 下一步”进入“动态Web项目”页面。
- 在项目名称字段中,输入
Webby。 - 在EAR成员下 ,清除将项目添加到EAR 。
- 接受所有其他默认设置,然后选择完成 。
- 如果“技术快速入门”视图打开,请关闭它。
- 在企业资源管理器中,确认已将项目
Webby添加到您的工作区中。
第2部分。探索Workload Deployer服务器
在Rational Application Developer中, 服务器 (也称为服务器配置或服务器适配器 )是代表托管测试环境的应用程序的逻辑对象,例如HTTP预览服务器,IBM Mashup Server,WebSphere Application Server概要文件或服务器。工作负载部署程序。 您不需要Workload Deployer服务器即可开发Java企业,Web或OSGi应用程序。 但是,在开始使用应用程序模式之前,应该已经定义了Workload Deployer服务器,并且必须定义了Workload Deployer服务器才能将应用程序模式从Rational Application Developer 发布和部署到Workload Deployer。 通常,您需要早于晚些时候创建Workload Deployer服务器。
在本部分的教程中,您将创建一个Workload Deployer服务器,并通过Rational Application Developer 服务器视图学习如何使用它。
创建服务器
- 在Rational Application Developer中,选择Servers选项卡以显示Servers视图。 如果出于某种原因看不到“服务器”选项卡,请从Rational Application Developer主菜单中选择“ 窗口”>“显示视图”>“其他” ,选择“ 服务器”>“服务器” ,然后选择“ 确定” 。
- 在“服务器”视图中的任何位置,右键单击并选择“ 新建”>“服务器”以打开“新建服务器”向导。
- 选择服务器类型Workload Deployer ,如图3所示。
图3.创建新的Workload Deployer服务器
- 在服务器的主机名字段中,输入Workload Deployer的主机名或IP地址。 服务器名称字段被赋予默认名称。 您不需要更改它。
注: Rational Application Developer允许您使用相同的主机名或地址创建多个Workload Deployer服务器。 通常,每个Workload Deployer只需一台服务器配置就足够了,但是在某些情况下,多于一台服务器可能是有用的。 例如,如果您打算将应用程序部署到同一Workload Deployer,但是部署到不同的环境配置文件或云组,则可以使用不同的环境配置文件和云组选择来创建不同的服务器配置。
- 单击下一步 。
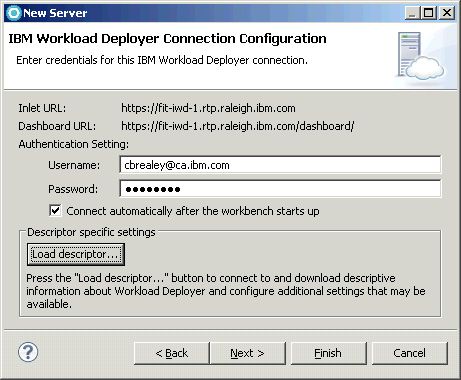
- 在“ 用户名”字段中,输入您的Workload Deployer用户ID(请参见图4)。
图4.配置Workload Deployer服务器
- 在“ 密码”字段中,输入您的Workload Deployer密码。
- 选中“工作台启动后自动连接” 。
- 单击加载描述符 。
Rational Application Developer花一点时间联系并检索有关您在向导上一页中指定的Workload Deployer的信息,包括其版本以及任何已定义的环境概要文件和云组的名称。
如果Rational Application Developer无法联系Workload Deployer,请确保您在上一页中输入了正确的主机名或IP地址,并确保Rational Application Developer与Workload Deployer之间具有网络连接。 如果需要,请咨询网络管理员以获取帮助。
一旦Rational Application Developer从Workload Deployer成功加载了所需的信息,新的控件就会出现在向导页面上,供您选择环境概要文件和云组。
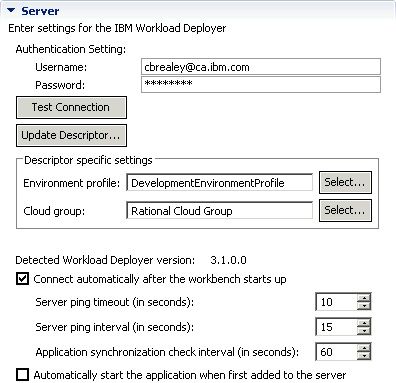
- 如果存在“ 环境配置文件”字段,请单击其“ 选择”按钮,如图5所示,以打开“选择环境配置文件”对话框。 选择一个适当的环境配置文件,然后单击“ 确定” 。
图5.描述符特定的设置
注意:在环境配置文件下部署虚拟应用程序模式的支持已添加到Workload Deployer V3.1中。 以早期版本的Workload Deployer为目标时,Rational Application Developer不会显示用于选择环境概要文件的控件。
- 如果存在“ 云组”字段,请单击其“ 选择”按钮以打开“选择云组”对话框。 选择一个合适的云组,然后单击“ 确定” 。
注意:将云应用程序模式部署到PureApplication System时,不允许使用云组。 在PureApplication System中定位Workload Deployer时,Rational Application Developer不会显示用于选择云组的控件。
- 单击完成以关闭向导。 新的Workload Deployer服务器配置将显示在“服务器”视图中,如图6所示。
图6.服务器视图
片刻之后,服务器状态更改为Connected ,并且调度了一个简短的后台作业( Building server descriptor ),该作业从Workload Deployer中检索更多信息。
在“服务器”视图中浏览Workload Deployer服务器
在Workload Deployer服务器上有几种操作可用。 如果您熟悉使用Rational Application Developer为WebSphere Application Server开发,那么其中一些操作看起来很熟悉。 其他是Workload Deployer服务器所独有的。
- 在“服务器”视图中,右键单击您在上面创建的Workload Deployer服务器,以打开上下文菜单并查看其若干操作。 此时不要选择任何操作。
请注意,通常可用于其他类型的服务器的“ Start ,“ Stop,和“ Restart操作为灰色。 诸如WebSphere Application Server之类的传统服务器是从Rational Application Developer启动和停止的软件过程。 相比之下,Workload Deployer和PureApplication System是物理设备,连接到电源,配备了电源开关,并且很可能已部署供许多人使用。 无法从Rational Application Developer远程关闭或启动Workload Deployer。
表1显示了上下文菜单中的操作,并说明了它们的作用。
表1. Workload Deployer服务器上下文菜单操作
| 行动 | 说明 |
|---|---|
| 打开 | 打开服务器编辑器。 |
| 发布 | 将工作区中对虚拟应用程序模式的未决更改发布到Workload Deployer。 应用程序模式及其工件会根据需要进行更新。 如果已经从Rational Application Developer部署了模式,则根据更改的性质,还将更新或替换已部署的虚拟应用程序。 |
| 添加和删除... | 打开“添加和删除”对话框,该对话框用于在Workload Deployer中添加(发布)和删除虚拟应用程序模式。 |
| 连接 | 将Rational Application Developer连接到Workload Deployer。 Rational Application Developer通过定期ping通以确保它可以通过网络访问,从而维护了到Workload Deployer的被动连接。 |
| 断开 | 将Rational Application Developer与Workload Deployer断开连接。 Rational Application Developer停止对Workload Deployer进行ping操作,并将其视为无法访问,即使它仍在运行并且可以通过网络使用。 |
| 更新服务器描述符... | 确定Rational Application Developer保留的关于Workload Deployer的描述性信息是否是最新的。 如果信息已过期,那么Rational Application Developer会提供更新信息。 |
| 检查应用程序同步 | 确定从Rational Application Developer发布或获取到Rational Application Developer的应用程序模式是否已在Workload Deployer上更改。 |
| 获取云应用 | 在Workload Deployer上将应用程序模式获取到Rational Application Developer工作空间中。 |
| 启动仪表板 | 在浏览器中打开Workload Deployer仪表板。 |
探索服务器编辑器
- 在“服务器”视图中,右键单击Workload Deployer并选择“ 打开” ,或双击服务器以打开服务器编辑器。 不要做任何更改。 相反,请花一些时间来了解编辑器的功能,这些功能分为四个部分:常规信息,服务器,发布和超时。
- 浏览General Information部分,如图7所示。
图7.服务器编辑器的“常规信息”部分
在此部分中,您可以查看或更改主机名或IP地址或服务器的名称。
- 浏览“服务器”部分,如图8所示。
图8.服务器编辑器的“服务器”部分
本节包含服务器的Workload Deployer类型所独有的大多数控件,其中一些控件的作用与它们在“新建服务器”向导中的名称相同。
“测试连接”按钮将验证您的主机名和凭据是否正常运行。
更新描述符按钮确定自上次更新以来,有关Rational Application Developer重要的Workload Deployer的信息(例如其版本,插件列表和受支持的组件类型)是否已更改。 如果有,则可以选择加载更新的信息。
Rational Application Developer通过定期ping通它来保持与Workload Deployer的连接。 服务器ping间隔和超时值控制Rational Application Developer对Workload Deployer进行ping的频率,以及Rational Application Developer在宣布服务器断开连接之前等待对每个ping的响应的时间。
提示:取消选中首次添加到服务器时自动启动应用程序的选项。 在Workload Deployer中,创建(发布)应用程序模式与部署它之间有区别。 差异反映在Rational Application Developer中。 缺省情况下,当您将虚拟应用程序模式添加到Workload Deployer服务器时,Rational Application Developer在Workload Deployer中发布(创建)该模式,但不进行部署。 您可以在以后任何时候通过使用Enterprise Explorer中的“运行方式”>“在服务器上运行”操作或“服务器”视图中的“ 启动”操作来部署模式。
如果选中“ 自动启动 ”选项,Rational Application Developer在发布模式后立即部署模式。 通常,在部署模式之前,您想在Workload Deployer中使用Virtual Application Builder编辑模式。 因此,由于部署需要花费几分钟,因此您完全可以控制何时部署应用程序模式。
- 浏览“发布”部分,如图9所示。
图9.服务器编辑器的发布部分
Workload Deployer服务器的发布设置具有与WebSphere Application Server相同的目的和作用。 默认情况下,自动发布处于关闭状态。 您可以启用自动发布,并控制Rational Application Developer检查要发布的更改的时间间隔。
提示:保留“ 从不发布自动检查”选项。 根据您对应用程序所做更改的性质,将更改发布到Workload Deployer可能需要几秒钟到几分钟。 从不自动发布选项可以让您控制何时将更改发布到Workload Deployer。
在选择发布操作控制不相关的工作负载部署服务器。
- 探索“超时”部分,如图10所示。
图10.服务器编辑器的超时部分
对于Workload Deployer服务器,这些值控制Rational Application Developer等待操作开始或停止完成应用程序模式的部署完成的时间。 如果超过了超时值,那么Rational Application Developer会引发错误,指出虚拟应用程序模式的部署或终止未在分配的时间内完成。
请注意,这些超时值与WebSphere Application Server的含义稍有不同,在WebSphere Application Server中,它们适用于服务器(而不是应用程序)的启动和关闭。
第3部分。在Rational Application Developer中创建应用程序模式
有两种方法可以在Rational Application Developer和Workload Deployer之间创建应用程序模式。 您可以基于工作空间中选择的Java企业,Web或OSGi应用程序项目,在Rational Application Developer中创建新的骨架应用程序模式,并将其发布到Workload Deployer。 或者,您可以在Workload Deployer中创建一个应用程序模式,并将其获取到Rational Application Developer工作空间中。 后一种方法在这两种方法中较为常见,在第5部分中介绍。在Workload Deployer中创建应用程序模式。 两种方法都可以创建一个应用程序模式,该模式可以有效地驻留在Workload Deployer仓库和Rational Application Developer工作空间中。
在本部分的教程中,您将使用Rational Application Developer创建新的骨架虚拟应用程序模式,以准备将其发布到Workload Deployer。
创建一个项目以包含虚拟应用程序模式
虚拟应用程序模式由工作空间中的普通文件表示。 它们可以保存在任何类型的项目中。 但是,最好将它们放在一个专门用于保存虚拟应用程序模式的项目中。
注意: “新建云应用程序文件”向导警告您不要在特定类型的项目(包括Java EE,Web和OSGi应用程序项目)中存储虚拟应用程序模式文件。 发出此警告的最简单原因是,虚拟应用程序模式文件在此类项目中没有意义。 如果在这些项目类型之一中创建或修改了虚拟应用程序模式文件,则可能会不必要地标记该项目以进行重新发布。 请记住,虚拟应用程序模式文件由Java EE,Web和OSGi应用程序项目组成-并非相反。
- 从Rational Application Developer主菜单中,选择File> New> Project以打开New Project向导。
- 选择常规>项目 。
- 单击下一步 。
- 在项目名称字段中,输入Cloud apps 。 实际上,任何名称都可以。
- 接受所有其他默认设置,然后单击“ 完成” 。
创建虚拟应用程序模式
- 在企业资源管理器中,右键单击项目Cloud apps,然后选择“ 新建”>“其他”以打开“新建”向导。
- 选择“ 云应用程序”>“云应用程序” 。
- 单击下一步转到“云应用程序”页面。
- 如果尚未选择云应用程序项目,请选择它。
- 在文件名字段中,输入Webby.json 。
- 单击“ 下一步”转到“选择工作负载部署程序描述符”页面。
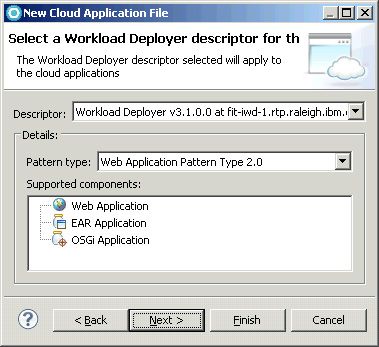
- 选择Descriptor组合框以查看选择(请参见图11),但不要更改其默认设置,该默认设置应为在第2部分中创建的Workload Deployer服务器的名称。浏览Workload Deployer服务器。
图11.选择一种模式类型
在这种情况下, 描述符实际上是对实际或典型Workload Deployer关键功能的描述。 您选择的描述符与工具其他方面的行为有关。
例如,如果选择版本3.0的实际或典型Workload Deployer的描述符,则Web应用程序模式类型2.0将从“模式类型”组合框中排除,因为该模式类型仅在Workload Deployer V3.1或更高版本中可用。
实际的描述符对应于Rational Application Developer中定义的Workload Deployer服务器配置的主机名或IP地址。 实际描述符中存储的信息是从Workload Deployer下载的。
典型的描述符已预加载到Rational Application Developer中。 它们代表标准安装的Workload Deployer的功能。 如果您需要开始在Rational Application Developer中开发虚拟应用程序模式,但是没有实际的Workload Deployer可以使用,那么典型的描述符就很有用。
- 模式类型组合框默认设置为“ Web应用程序模式类型2.0”。 保持默认设置,但首先选择“ 图案类型”组合框以查看其他选择。
Rational Application Developer V8.0.4支持两种模式类型:
- Web应用程序模式类型2.0:适用于OSGi应用程序和Java EE 6或更低版本的应用程序。 Workload Deployer依靠WebSphere Application Server V8.0来托管Java EE,Web和OSGi应用程序组件。
- WebApp模式类型1.0:适用于OSGi应用程序和Java EE 5或更低版本的应用程序。 Workload Deployer依靠WebSphere Application Server V7.0来承载Java EE,Web和OSGi应用程序组件。
- 查看支持的组件列表。 这仅是信息,它告诉您在上面的“描述符”字段中标识的Rational Application Developer和Workload Deployer都支持哪些类型的组件。 在列表中选择项目无效。
- 单击“ 下一步”进入“关联应用程序模型”页面。
- 单击Add打开New Component and Project Association对话框,如图12所示。
图12.选择一个要关联的项目
- 接受默认的组件名称 。
注意 :实际上,通常为您的组件选择一个更具描述性的名称,但是出于本教程的目的,默认名称是可以接受的。
- 从应用程序项目列表中选择Webby 。
此列表显示工作空间中的所有项目,可用于实现Rational Application Developer和Workload Deployer支持的组件类型,即Web应用程序(WAR),Java EE企业应用程序(EAR)和OSGi应用程序(EBA)项目。
筛选器复选框控制列表中显示哪些类型的项目。 例如,如果取消选中EAR和OSGi复选框,则应用程序项目列表将缩小以仅显示
AjaxHello_WEB,HelloWorld和Webby。 - 单击OK返回到Associate Application Model页面,如图13所示。
图13.关联的Web项目
- 确认在“组件”的“关联”表中只有一个条目,键入WAR和项目Webby。
请注意,“ 编辑”和“ 删除”按钮可用于更改关联。 现在不要使用它们。
- 点击完成 。
Rational Application Developer将新的虚拟应用程序模式JSON文件Webby.json生成到Cloud apps项目中名为applicationModels的预定文件夹中。 在企业资源管理器中,展开Cloud apps项目,然后展开其applicationModels文件夹以显示文件Webby.json。
- Rational Application Developer在JSON编辑器中打开虚拟应用程序模式JSON文件。 关闭编辑器。
重要:打开编辑器主要是为了提供信息。 除非您是高级用户,否则请在Workload Deployer虚拟应用程序构建器中而不是 Rational Application Developer中的JSON编辑器中执行虚拟应用程序模式的所有编辑。
探索虚拟应用程序模式上可用的操作
虚拟应用程序模式JSON文件是常规的工作区文件资源。 因此,在上下文菜单中可以使用几种标准动作。 这些操作中只有两个是特定于文件的Workload Deployer性质的。
- 在企业资源管理器中,展开并右键单击云应用程序> applicationModels> Webby.json以打开上下文菜单。
- 选择“ 关联应用程序模型”以打开“关联应用程序模型”对话框。
该对话框使您可以管理工作空间中的项目与虚拟应用程序模式的组件之间的关联。
- 不要做任何更改。 单击“ 取消”关闭对话框。
- 再次右键单击Webby.json ,然后选择“ 属性”以打开Webby.json的“属性”对话框。
- 选择Workload Deployer描述符 。
通过Workload Deployer描述符属性页面,您可以更改用于指导虚拟应用程序模式开发的描述符。 页面的“详细信息”部分仅供参考。 您使用“样式”类型或“支持”组件控件进行的任何更改或选择都将被忽略。
- 不要做任何更改。 单击“ 取消”关闭对话框。
探索云应用程序项目属性
第一次将虚拟应用程序模式JSON文件添加到给定项目时,Rational Application Developer为该项目配备IBM Workload Deployer Application构面。
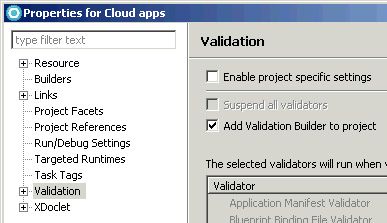
- 在Enterprise Explorer中,右键单击项目Cloud apps,然后选择Properties以打开Cloud apps项目的Properties对话框,如图14所示。
图14.云应用程序项目属性
- 选择验证以显示“验证属性”页面。
- 选中将验证生成器添加到项目 。 如果不存在此控件,请跳过此步骤。
默认情况下,常规项目(例如您在本教程此部分开始时创建的项目)不包括验证构建器。 Rational Application Developer中的验证器将忽略没有验证构建器的项目,如“ 首选项”>“验证”下所示,包括Cloud Application Validator。
- 选择项目构面以显示“项目构面”页面。
- 观察已检查IBM Workload Deployer应用程序构面。 不要做任何更改。
第一次将虚拟应用程序模式JSON文件添加到给定项目时,Rational Application Developer会为该项目配备此方面。 该方面可帮助Rational Application Developer工作负载部署程序工具快速识别包含虚拟应用程序模式的项目。
- 单击“ 确定”关闭“属性”对话框。
第4部分。将应用程序模式发布到Workload Deployer
在开发应用程序模式期间,您会发现自己编辑了两种工件-虚拟应用程序模式和模式中组件的源代码。 Rational Application Developer提供了用于编辑源代码的集成开发环境。 Workload Deployer提供了Virtual Application Builder,用于编辑虚拟应用程序模式。 要编辑在Rational Application Developer中创建的应用程序模式,必须将应用程序模式发布到Workload Deployer。 这完成了两个关键任务:
- 应用程序模式和关联的组件项目以其可以使用和管理的形式导出并交付给Workload Deployer。
- Rational Application Developer将工作空间中的应用程序模式链接到其在Workload Deployer中的对应模式,以便针对Rational Application Developer中的模式采取的操作可以反映在Workload Deployer中,反之亦然。
请注意,发布与部署不同。 当您在Rational Application Developer中将应用程序模式发布到Workload Deployer时,该模式将添加到Workload Deployer仓库中的虚拟应用程序模式集。 缺省情况下,Rational Application Developer不部署应用程序模式的实例(尽管可以使用该选项的一个选项)。
在教程的此部分中,您将应用程序模式发布到Workload Deployer,并在Rational Application Developer服务器视图和Workload Deployer仪表板中观察效果。
发布应用程序模式
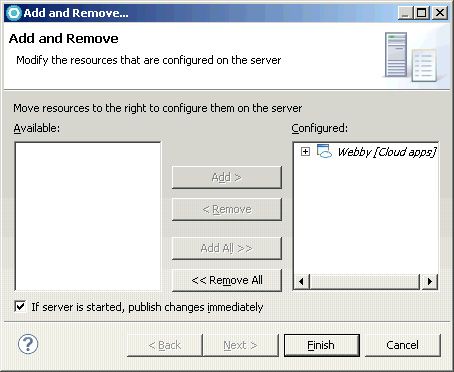
- 在“服务器”视图中,右键单击Workload Deployer服务器,然后选择“ 添加和删除”以打开“添加和删除”对话框,如图15所示。
图15.添加和删除对话框
- 在可用资源列表下,选择Webby [Cloud apps] 。
- 单击添加>将虚拟应用程序模式移至已配置资源列表。
- 点击完成 。
Rational Application Developer调度一个后台作业以导出虚拟应用程序模式并将其发布到Workload Deployer。
- 在“服务器”视图中,新添加的虚拟应用程序模式作为Workload Deployer服务器的子代立即显示在树中,但没有状态。
几秒钟后,Workload Deployer服务器的状态将变为
[Connected, Publishing...]并在Rational Application Developer发布应用程序时保持这种状态。After a few more seconds, provided publication is successful, the state and status of the Workload Deployer server changes to
[Connected, Synchronized], and the state and status of the Webby application appears as[Stopped, Synchronized], as shown in Figure 16.Figure 16. The Servers view after adding the application pattern
The status of "Synchronized" indicates that the virtual application pattern in the Rational Application Developer workspace and on Workload Deployer is in sync with each other. The application state of "Stopped" indicates that Rational Application Developer has published, but not deployed, the virtual application pattern.
Note: You can expand the virtual application pattern to reveal the associated application projects and their constituent modules. However, this is for information purposes only.
Explore the actions available on applications in the servers view
Several actions are available on an application under a Workload Deployer server in the Servers view. If you are familiar with using Rational Application Developer to develop for the WebSphere Application Server, some of the actions look familiar. Others are unique to Workload Deployer applications.
In the Servers view, right-click on the published virtual application pattern to open the context menu and review several of its actions. Do not select any of the actions at this time. Table 2 shows the actions in the context menu of an application under a Workload Deployer server and explains what they do.
Table 2. Workload Deployer application context menu actions
| 行动 | 说明 |
|---|---|
| 开始 | Deploys the application pattern on Workload Deployer. |
| 停止 | Terminates the application instance that was previously deployed from Rational Application Developer. |
| 重新开始 | Restarts a Rational Application Developer deployed application pattern. |
| 去掉 | Removes an application pattern from Workload Deployer, and is equivalent to using the Add and Remove dialog. If there exists a virtual application instance previously deployed from Rational Application Developer, the instance is terminated. |
| 重新获取 | Reacquires an application pattern from Workload Deployer into the Rational Application Developer workspace. |
| Detach | Severs the tie between the application pattern in Rational Application Developer and on Workload Deployer. |
| Get information | Opens a dialog with information about the published or deployed application pattern on Workload Deployer. |
Explore the Workload Deployer dashboard
- In the Servers view, right-click on the Workload Deployer server and select Launch Dashboard . Depending upon your preferred browser under Window > Web Browser , Rational Application Developer may open the Workload Deployer dashboard in the Rational Application Developer embedded browser, or in a stand-alone browser.
- In the Workload Deployer dashboard, select Patterns > Virtual Applications .
- Under Virtual Application Patterns, select Web Application Pattern Type 2.0 if it is not already selected as shown in Figure 17.
Figure 17. Virtual application patterns
- Beneath Web Application Pattern Type 2.0 is a list of application patterns. Confirm that "Webby" appears in the list.
Note: The other applications in the list may differ from what is shown here.
- Select Webby to review the details of the virtual application pattern.
- From the list of actions for the Webby application pattern as shown in Figure 18, click Open to open the Virtual Application Builder.
Figure 18. Virtual application patterns actions

Depending upon your preferred browser, the Virtual Application Builder opens in a new browser tab or a new browser window.
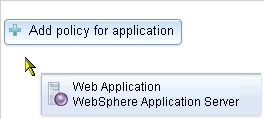
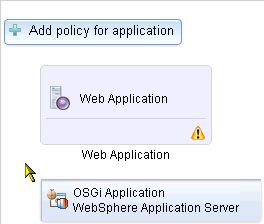
- Select the Web Application component located in the upper left corner of the Virtual Application Builder canvas. The name of the component, "Web Application", may be obscured by an Add policy for application control. Optionally, drag the component away from the corner of the canvas to reveal its name.
- In the properties pane for the component, observe that the WAR File field is defined with the name of a WAR file artifact as shown in Figure 19.
Figure 19. The Web Application component
- Close the Virtual Application Builder. If the browser asks you to confirm leaving the tab or window, do so. Leave the Workload Deployer dashboard open.
Part 5. Creating application patterns in Workload Deployer
In the previous two parts of the tutorial, you created a skeletal application pattern in Rational Application Developer and published it to Workload Deployer. While this is a convenient way to quickly wrap a new application pattern around existing projects in your workspace, it is more common to create application patterns in Workload Deployer with the full power of the Virtual Application Builder.
In this part of the tutorial, you create a new web application pattern in Workload Deployer.
Create an application pattern with the Virtual Application Builder
- In the Workload Deployer dashboard under Virtual Application Patterns, click the New button to open the Create Application dialog and begin creating a new application pattern.
- In the Create Application dialog, select Web Application Pattern Type 2.0 .
- Select Blank Application .
- Click Start Building . After a few moments, the Virtual Application Builder opens.
- In the Virtual Application Builder, under the Assets pane, expand Application Components if it is not already expanded.
- Drag and drop the Web Application component from the Assets pane onto the canvas as shown in Figure 20.
Figure 20. Creating a new Web Application Component
- In the properties pane for the new component, observe the WAR File field is blank. Leave it and the other controls as they are.
- Click Save to open the Save Application dialog.
- In the Name field, replace any default text by the name of
AjaxHelloWeb. - 单击确定 。
- Close the Virtual Application Builder. Leave the Workload Deployer dashboard open.
Part 6. Acquiring application patterns into Rational Application Developer
Just as publishing an application pattern created in Rational Application Developer to Workload Deployer establishes a link between the pattern in your workspace and the pattern on Workload Deployer, so does acquiring an application pattern created in Workload Deployer into Rational Application Developer. Publication and acquisition also have the effect of synchronizing the application pattern between Rational Application Developer and Workload Deployer. The pivotal difference is in the direction of the synchronization.
- When you publish or republish an application pattern from Rational Application Developer to Workload Deployer, the application pattern model and its artifacts are updated with content from the Rational Application Developer workspace.
- When you acquire or reacquire an application pattern into Rational Application Developer from Workload Deployer, the application pattern model in Rational Application Developer is updated with content from Workload Deployer.
Note: Unlike for publication, Rational Application Developer does not support the acquisition of component artifacts. It only supports the acquisition of the application pattern model.
In this part of the tutorial, you acquire the application you created in Part 5. Creating application patterns in Workload Deployer into Rational Application Developer .
Acquire the application pattern into Rational Application Developer
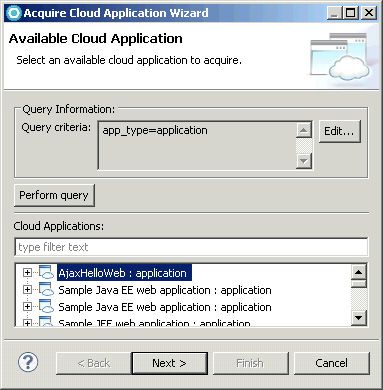
- In Rational Application Developer, in the Servers view, right-click on the Workload Deployer server and select Acquire Cloud Application to open the Acquire Cloud Application wizard.
- Click Perform query .
A progress dialog appears for a few moments while Rational Application Developer retrieves from Workload Deployer the list of virtual application patterns you are permitted to read. The application you created in the previous part of the tutorial, AjaxHelloWeb, appears near the top of the list of Cloud Applications.
- Select AjaxHelloWeb : application from the list as shown in Figure 21.
Figure 21. Querying application patterns
- 单击下一步 。
- Under "Select a project", select the Cloud apps project.
- In the File name field, replace
appmodel.jsonwith the nameAjaxHelloWeb.json. - 单击下一步 。
- Observe that a Web Application component of type WAR appears is in the table of associations, but without an associated project location as shown in Figure 22. Ordinarily, this is a good opportunity to associate workspace projects to components. However, for the purposes of this tutorial, leave the component without an associated project for now.
Figure 22. An unassociated component
- 点击完成 。
- In the Servers view, observe that the AjaxHelloWeb application has appeared as a new child of the Workload Deployer server.
Identify and correct the validation warning
The Rational Application Developer tools for Workload Deployer include a validator that detects a small number of significant warning and error conditions. Near the end of the previous set of steps, you did not associate a project to the Web Application component. As an example, one of the conditions the validator detects is the presence of components of types recognized by Rational Application Developer that do not have associated projects.
- In Rational Application Developer, select the Problems view.
- Expand Warnings as shown in Figure 23.
Figure 23. The Problems view
- Near the top of the list of warnings, you see a warning for the AjaxHelloWeb.json resource that reads:
Component Web Application does not have an association.Explanation: Rational Application Developer is calling to your attention that you have a component without an associated project. In practice, this may indicate a problem, or it may not. For example, if one of your colleagues is responsible for providing the associated project, then it is likely you neither have nor need the project in your workspace and you can ignore the warning.
- In the Enterprise Explorer view, under Cloud apps > applicationModels , right-click on AjaxHelloWeb.json and select Associate Application Model to open the Associate Application Model dialog.
- In the table of associations, select component Web Application . Notice the associated project location field is still blank.
- Click Edit to open the Edit Association dialog.
- The dialog should show you the three Web projects in your workspace as shown in Figure 24. Select project AjaxHello_WEB .
Figure 24. Associating a project
- Click OK to return to the Associate Application Model dialog. Notice the associated project location field now shows the associated project location,
AjaxHello_WEB. - Click OK to apply the association and close the dialog.
- In the Problems view, confirm that the validation warning has vanished.
- By associating a project with a component, you have effectively changed the application pattern and should publish the change to Workload Deployer so that Rational Application Developer and Workload Deployer are in sync. In the Servers view, right-click on the Workload Deployer server and select Publish .
Rational Application Developer dispatches a background job to export and publish the updated virtual application pattern to Workload Deployer. After a few moments, the publication job completes normally, and the state and status of the AjaxHelloWeb virtual application pattern change to [Stopped, Synchronized] .
Part 7. Changing application patterns
After you have published an application pattern, it is available in the Workload Deployer storehouse for you and possibly others to access or update. For example, you may use the Virtual Application Builder to wire components together or configure policies. A teammate may acquire your application pattern into another Rational Application Developer workspace, then publish updates back to the pattern in the storehouse. Because the development of application patterns and their components is shared between Rational Application Developer and Workload Deployer, Rational Application Developer includes a few features to help keep application patterns synchronized between the Rational Application Developer workspace and the Workload Deployer storehouse.
In this part of the tutorial, you edit the application pattern that you created in Part 5. Creating application patterns in Workload Deployer, detect the change from Rational Application Developer, then reacquire the application pattern into the Rational Application Developer workspace to bring it into sync with the pattern on Workload Deployer.
Edit the application pattern with the Virtual Application Builder
- In the Workload Deployer dashboard, under Virtual Application Patterns, click the Refresh button to refresh the list of patterns. AjaxHelloWeb appears in the list.
- Select AjaxHelloWeb .
- Click Open to open the application in the Virtual Application Builder.
- In the Virtual Application Builder, under the Assets pane, expand OSGi Components if it is not already expanded.
- Drag and drop the OSGi Application component from the Assets pane onto the canvas as shown in Figure 25.
Figure 25. Creating a new OSGi Application component
- In the properties pane for the new component, observe the EBA File field is blank. Leave it and the other controls as they are.
- 点击保存 。
Detect and reacquire the change from within Rational Application Developer
By default, Rational Application Developer checks every 60 seconds for changes to published or acquired virtual application patterns, but you can change or disable this interval, or manually initiate a check.
Note: Rational Application Developer V8.0.4 does not detect changes to the component artifacts of an application pattern.
- In Rational Application Developer, in the Servers view, right-click on the Workload Deployer server and select Check Application Synchronization to have Rational Application Developer check the corresponding application pattern on Workload Deployer for any changes.
- Once the operation completes, the state and status of the Workload Deployer server and the AjaxHelloWeb application pattern changes to
[Stopped, Reacquire].The status of Reacquire (Figure 26) indicates that the virtual application pattern has changed in some way on Workload Deployer since the last time it was synchronized with (for example, published from or acquired into) Rational Application Developer. We recommend that you reacquire the application pattern into Rational Application Developer to get it back into sync.
Figure 26. The Reacquire status
- In the Servers view, right-click on AjaxHelloWeb and select Reacquire to open the Reacquire Application and Association wizard as shown in Figure 27.
Figure 27. Reacquiring an application pattern
The wizard detects two components in the virtual application pattern:
- Component
Web Applicationexisted in Rational Application Developer before, and remains associated to project AjaxHello_WEB. - Component
OSGi Applicationis new to Rational Application Developer, and does not yet have an associated project.
- Component
- Select OSGi Application .
- Click Edit to open the Edit Association dialog. The dialog shows all available OSGi application projects in your workspace. There should be only one: HelloWorld.app.
- Select HelloWorld.app .
- Click OK to return to the Reacquire Cloud Application Wizard.
- 点击完成 。
Republish the application pattern
Like at the end of Part 6. Acquiring application patterns into Rational Application Developer , you have just associated a workspace project to a component, effectively changing the application pattern. Therefore, publish the application pattern with the newly associated OSGi application project back to Workload Deployer.
- In the Servers view, right-click on the Workload Deployer server and select Publish .
Rational Application Developer dispatches a background job to export and publish the updated virtual application pattern to Workload Deployer. After a few moments, the publication job completes normally, and the state and status of the AjaxHelloWeb virtual application pattern change to
[Stopped, Synchronized]. - In the Workload Deployer dashboard, under Virtual Application Patterns, select AjaxHelloWeb .
- Click the Open button to open the application in the Virtual Application Builder.
- Due to the publication process from Rational Application Developer, both components of the application pattern (Web Application and OSGi Application) may have been relocated to the upper left corner of the canvas. Drag them away from the corner, and from each other, to better reveal their details.
- Select component OSGi Application if it is not already selected.
- In the properties pane, observe that the EBA File field now has a value.
- Close the Virtual Application Builder without saving.
Part 8. Deploying application pattern instances
In Workload Deployer, if a virtual application pattern is like the blueprint for an application workload, then a virtual application instance is the completed house. Up to this point in the tutorial, you have used Rational Application Developer and Workload Deployer to work with virtual application patterns. The distinction between the pattern and the instance of the pattern is expressed in Rational Application Developer in terms of the actions you can take.
In this part of the tutorial, you deploy (or start, or run) the AjaxHelloWeb virtual application pattern, resulting in the creation on Workload Deployer of a virtual application instance.
Deploy an application
In Rational Application Developer, in the Servers view, right-click on AjaxHelloWeb and select Start .
Rational Application Developer dispatches an operation to Workload Deployer to deploy a new virtual application instance from the virtual application pattern. This operation takes several minutes to complete while Workload Deployer provisions and configures the virtual application instance and supporting middleware (see Figure 28). After deployment completes normally, the state and status of the AjaxHelloWeb virtual application pattern should change to [Started, Synchronized] .
Figure 28. Deployment progress
测试应用
- In the Servers view, right-click on AjaxHelloWeb and select Get Information to open the Cloud Application Information Dialog as shown in Figure 29.
Figure 29. The Information dialog
It may take a moment for the dialog to open while Rational Application Developer retrieves information about the published and deployed application from Workload Deployer.
The dialog is divided into two sections. The
Applicationsection has information about the published virtual application pattern. TheDeploymentsection has information about the deployed virtual application instance, if any.The
Applicationsection shows the name, unique identifier, pattern type, description of the virtual application pattern, and information about the creation and most recent update to the pattern.The Deployment section shows the name, unique identifier, status, and creation details of the virtual application instance. Depending on the nature of the components deployed with the pattern, various application endpoint URLs may be listed. Because AjaxHelloWeb includes a WAR component, one of the endpoints is the root of the resulting Web application.
Note: You can also open the dialog for virtual application patterns that have not been deployed (such as in the stopped state), in which case the Deployment section of the dialog is intentionally left blank.
- In the Cloud Application Information dialog, click on the endpoint URL in the form http://.../AjaxHello_WEB/ . Rational Application Developer opens your preferred browser on the endpoint, showing you the index.html page of the AjaxHello_WEB application as shown in Figure 30.
Figure 30. The Web application sample
- In Rational Application Developer, click OK to close the Cloud Application Information dialog. Leave the browser open.
Part 9. Updating the source code
In this part of the tutorial, you make a normal change to a normal source file, then publish the change to Workload Deployer.
Change the application
- In Rational Application Developer, in the Enterprise Explorer, expand and right-click on AjaxHello_WEB > WebContent > index.html and select Open to open the Page Designer as shown in Figure 31.
Figure 31. Editing the Web application
- In the Page Designer, make a change to any visible aspect of the HTML page.
For example, delete the first couple words of the title (
Ajax: Hello!), then select the remaining title text and press Ctrl-i to apply italics. - Select File > Save or press Ctrl-s to save your changes.
- In the Rational Application Developer servers view, confirm the state and status of AjaxHelloWeb changes to
[Started, Republish]. - Right-click on the Workload Deployer server and select Publish .
Rational Application Developer dispatches operations to Workload Deployer to update Web Application component of the virtual application pattern and the deployed virtual application instance. This takes several seconds to complete, although the capacity of your cloud hardware pool has a bearing on how rapidly the update operations complete. On completion, the state and status of AjaxHelloWeb changes to
[Started, Synchronized]. - In the browser, refresh the Web page for the AjaxHelloWeb application, and confirm that your changes to the title text appear.
Part 10. Detaching and removing applications
In this part of the tutorial, you detach one of the published applications, remove the other application, and observe the effects on Rational Application Developer and Workload Deployer.
Detach an application
- In Rational Application Developer, in the Servers view, right click on AjaxHelloWeb and select Detach .
- Confirm AjaxHelloWeb vanishes from the Servers view. Only the Webby virtual application pattern remains.
Remove an application
- In the servers view, right click on Webby and select Remove .
- Confirm Webby vanishes from the Servers view.
Review the Workload Deployer dashboard
- In the Workload Deployer dashboard main menu, select Patterns > Virtual Applications .
- Confirm that AjaxHelloWeb is in the list of virtual application patterns.
- Confirm that Webby is not in the list of virtual application patterns.
Remove AjaxHelloWeb from Workload Deployer
- In the Workload Deployer dashboard main menu, select Instances > Virtual Applications .
- Select AjaxHelloWeb .
- Click the Stop button to stop the virtual application instance. If asked to confirm, click Yes .
The status of the instance changes from "Running" to "Terminating" and remains that way for a few minutes while Workload Deployer dismantles the virtual application instance.
- Once the status changes from "Terminating" to "Terminated", click the Delete button to delete the virtual application instance. If asked to confirm, click Yes .
- In the Workload Deployer dashboard main menu, select Patterns > Virtual Applications .
- Under Virtual Application Instances, select AjaxHelloWeb .
- Click the Delete button to delete the virtual application pattern. If asked to confirm, click Yes .
Part 11. Exporting and importing application patterns
In the normal course of developing and unit testing your application pattern, you publish and deploy your application pattern to Workload Deployer using the Rational Application Developer server tools. From time to time, you may need to extract a copy of your application pattern out of your workspace and onto your local file system for some other purpose. For example, you may need to email an application pattern archive to a colleague, or you may need to store an application pattern archive in a definitive software library such as Rational Asset Manager, or you may need to import the application pattern into Workload Deployer via its dashboard or command line interface (CLI).
If you are the recipient of an application pattern archive, you can use the corresponding import wizard to bring a copy of the pattern into your workspace.
In this part of the tutorial, you experiment with exporting and importing application patterns.
Export an application pattern
- In Rational Application Developer, in the Enterprise Explorer, expand and right-click on Cloud apps > applicationModels > AjaxHelloWeb.json and select Export to open the Export wizard.
- Select Cloud Application > Cloud Application .
- Click Next to proceed to the Export cloud application to the filesystem page.
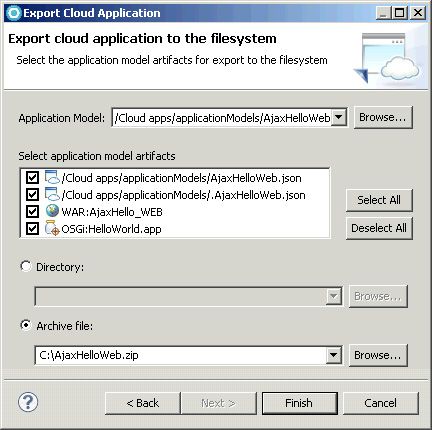
- Confirm the Application Model field is set to the workspace path name of AjaxHelloWeb.json as shown in Figure 32.
Figure 32. The Export wizard
- In the list of application model artifacts, confirm that the four resources are shown and are all checked.
- Select the Archive file radio button.
- In the Archive file field, enter an absolute path name of the archive file to be created by the Export wizard, such as
C:\AjaxHelloWeb.zip. - 点击完成 。
- As appropriate for your operating system, use a command prompt, shell, file system explorer, or equivalent utility to confirm that the AjaxHelloWeb.zip archive file was successfully created and contains the following resources:
- appmodel.json
- .appmodel.json
- artifacts/HelloWorld.app.eba
- artifacts/AjaxHello_WEB.war
Import an application pattern
It is unusual to import a virtual application pattern into the same workspace from which it was exported. The Import wizard raises various errors as files and projects within the archive to be imported collide with existing files and projects in the workspace. In this section of the tutorial, you open a new Rational Application Developer workspace and import into it the virtual application pattern archive that you exported above.
- From the Rational Application Developer main menu, select File > Switch Workspace > Other to open the Workspace Launcher dialog.
- In the Workspace field of the dialog, enter a path name of a new workspace.
- 单击确定 。 The current Rational Application Developer window closes. After a few moments, a new Rational Application Developer window opens.
- If the Welcome view appears, close it.
- Start a second instance of Rational Application Developer. For example, on Windows, select Start > Programs > IBM Software Delivery Platform > Rational Application Developer 8.0 > Rational Application Developer .
- In the Workspace Launcher dialog, in the Workspace field, enter a different path name of a new workspace that you entered in Part 1. Getting started , then click OK .
- Close the Welcome view.
- From the Rational Application Developer main menu, select File > New > Project to open the New Project wizard.
- Select General > Project .
- 单击下一步 。
- In the Project name field, enter
Cloud apps. - 点击完成 。
- In the Enterprise Explorer, right-click on project Cloud apps and select Properties to open the Properties for Cloud apps dialog.
- Select Project Facets .
- Select Convert to faceted form .
- In the list of project facets, check the IBM Workload Deployer Application facet.
- Click OK to close the Properties for Cloud apps dialog.
- Right-click on project Cloud apps and select New > Folder .
- In the Folder name field, enter
applicationModels. 单击确定 。 - Right-click on project Cloud apps and select Import .
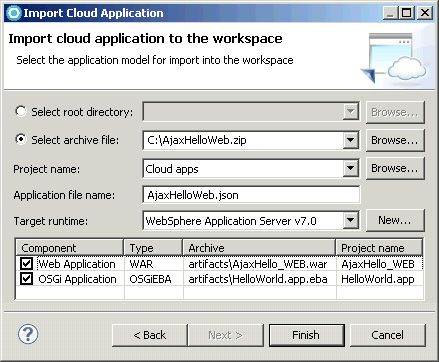
- From the Rational Application Developer main menu, select File > Import to open the Import wizard as shown in Figure 33.
Figure 33. The Import wizard
- Select Cloud Application > Cloud Application .
- Click Next to proceed to the next page of the wizard.
- Select the Select archive file radio button. In the associated field, enter the absolute path name of the archive file you exported earlier in this part of the tutorial, for example,
C:\AjaxHelloWeb.zip. - In the Project name field, select project Cloud apps .
- In the Application file name field, enter
AjaxHelloWeb.json. - In the Target runtime field, select WebSphere Application Server v7.0 .
- Components Web Application and OSGi Application appear in the table of components and are checked by default.
- 点击完成 。 The Import wizard spends a few moments importing the virtual application pattern, including the enterprise projects that its components are associated to.
Part 12. Exploring preferences
In this part of the tutorial, you review the preferences in Rational Application Developer for customizing the behavior of the Workload Deployer tools.
Explore the Workload Deployer Preferences
- From the Rational Application Developer main menu, select Window > Preferences to open the Preferences dialog .
- Select Workload Deployer .
- Explore the available preferences as shown in Figure 34.
Figure 34. The Preferences page
In the General settings section, you can change the default project relative folder in which virtual application model JSON files are stored. You can also change the default search filter used by the Acquire Cloud Application wizard.
In the Server settings and Time-outs sections, you can change several default values used when creating new Workload Deployer server configurations with the New Server wizard.
In the Import and Export settings section, you can change default values used by the Import Cloud Application and Export Cloud Application wizards.
结论
In this tutorial, you learned how to use Rational Application Developer together with IBM Workload Deployer to develop virtual application patterns. You learned how to create and manage Workload Deployer servers, then use a combination of the Virtual Application Builder in Workload Deployer and the wizards and editors of Rational Application Developer to work with virtual application patterns, their components, and the projects and source code that implement them. All the tools in IBM Rational Application Developer that work with Workload Deployer also work with IBM PureApplication System.
翻译自: https://www.ibm.com/developerworks/websphere/tutorials/1204_brealey/index.html
