HSF简单实现记录(基于 Pandora Boot 开发)
文章目录
- 声明
- 注意
- 安装轻量配置中心
- 启动轻量配置中心
- 配置 hosts
- 结果验证
- 开发工具准备
- 在 Maven 中配置 EDAS 的私服地址
- 验证配置是否成功
- 开发
- demo下载
- 服务注册与发现
- 创建服务提供者
- 创建一个 Maven 工程,命名为sc-hsf-provider(服务提供者)。
- 在pom.xml中引入需要的依赖.
- 定义服务接口,创建一个接口类 com.aliware.edas.EchoService。
- 添加服务提供者的具体实现类EchoServiceImpl,并通过注解方式发布服务。
- 在resources目录下的application.properties文件中配置应用名和监听端口号。
- 添加服务启动的 main 函数入口。
- 发布服务
- 创建服务消费者
- 创建一个 Maven 工程,命名为 sc-hsf-consumer。
- 在 pom.xml 中引入需要的依赖内容:
- 将服务提供者所发布的 API 服务接口(包括包名)拷贝到本地,com.aliware.edas.EchoService。
- 通过注解的方式将服务消费者的实例注入到 Spring 的 Context 中。
- 为了便于测试,通过一个 SimpleController 来暴露一个 /hsf-echo/* 的 http 接口,/hsf-echo/* 接口内部实现调用了 HSF 服务提供者。
- 在 resources 目录下的 application.properties 文件中配置应用名与监听端口号。
- 添加服务启动的 main 函数入口。
- 本地开发调试
- 启动轻量级配置中心
- 启动应用
- 演示
- 小问题
声明
本文十分感谢:https://help.aliyun.com/document_detail/99943.html?spm=a2c4g.11186623.6.607.1e112385pAFx19
在文章的基础上,经过了测试。
注意
自己犯的错误总结:
本地hosts必须配成127.0.0.1 不能使localhost
必须把注册中心安装在本地。
maven在idea中配置成自己修改了私服的maven地址
不行就重启idea,重启mac
安装轻量配置中心
轻量配置中心安装包
启动轻量配置中心
进入解压目录(edas-config-center),启动配置中心。
Windows 操作系统:请双击 startup.bat。
Unix 操作系统:请在当前目录下执行 sh startup.sh 命令。
配置 hosts
对于需要使用轻量配置中心的开发机器,请在本地 DNS(hosts 文件)中,将 jmenv.tbsite.net 域名指向启动了 EDAS 配置中心的机器 IP。
hosts 文件的路径如下:
Windows 操作系统:C:\Windows\System32\drivers\etc\hosts
Unix 操作系统:/etc/hosts
示例
如果您在 IP 为 192.168.1.100 的机器上面启动了 EDAS 配置中心,则所有开发者只需要在机器的 hosts 文件里加入如下一行即可。
192.168.1.100 jmenv.tbsite.net
结果验证
绑定轻量配置中心的 host 之后,打开浏览器,在地址栏输入 jmenv.tbsite.net:8080,回车。
即可看到轻量配置中心首页:
轻量配置中心首页

如果可以正常显示,说明轻量配置中心配置成功。
如果不能正常显示,请根据之前的步骤一步步排查问题所在。
开发工具准备
本页目录
在 Maven 中配置 EDAS 的私服地址
基于 Pandora Boot 开发,需要配置如下开发环境:
在 Maven 中配置 EDAS 的私服地址:目前 Spring Cloud for Aliware 的第三方包只发布在 EDAS 的私服中,所以需要在 Maven 中配置 EDAS 的私服地址。
配置轻量配置中心:本地开发调试时,需要启动轻量级配置中心。轻量级配置中心包含了 EDAS 服务发现和配置管理功能的轻量版。
在 Maven 中配置 EDAS 的私服地址
只有配置了私服,下面的代码中pom.xml中的
<dependency>
            <groupId>org.springframework.cloud</groupId>
            <artifactId>spring-cloud-starter-hsf</artifactId>
            <version>1.3</version>
        </dependency>
        <dependency>
            <groupId>org.springframework.cloud</groupId>
            <artifactId>spring-cloud-starter-pandora</artifactId>
            <version>1.3</version>
        </dependency>
才能正常下载
注意: Maven 版本要求 3.x 及以上,请在你的 Maven 配置文件 settings.xml 中,加入 EDAS 私服地址。
添加私服配置
找到 Maven 所使用的配置文件,一般在 ~/.m2/settings.xml 中,在 settings.xml 中加入如下配置:
<profiles>
    <profile>
        <id>nexus</id>
        <repositories>
            <repository>
                <id>central</id>
                <url>http://repo1.maven.org/maven2</url>
                <releases>
                    <enabled>true</enabled>
                </releases>
                <snapshots>
                    <enabled>true</enabled>
                </snapshots>
            </repository>
        </repositories>
        <pluginRepositories>
            <pluginRepository>
                <id>central</id>
                <url>http://repo1.maven.org/maven2</url>
                <releases>
                    <enabled>true</enabled>
                </releases>
                <snapshots>
                    <enabled>true</enabled>
                </snapshots>
            </pluginRepository>
        </pluginRepositories>
    </profile>
    <profile>
        <id>edas.oss.repo</id>
        <repositories>
            <repository>
                <id>edas-oss-central</id>
                <name>taobao mirror central</name>
                <url>http://edas-public.oss-cn-hangzhou.aliyuncs.com/repository</url>
                <snapshots>
                    <enabled>true</enabled>
                </snapshots>
                <releases>
                    <enabled>true</enabled>
                </releases>
            </repository>
            </repositories>
        <pluginRepositories>
            <pluginRepository>
                <id>edas-oss-plugin-central</id>
                <url>http://edas-public.oss-cn-hangzhou.aliyuncs.com/repository</url>
                <snapshots>
                    <enabled>true</enabled>
                </snapshots>
                <releases>
                    <enabled>true</enabled>
                </releases>
            </pluginRepository>
        </pluginRepositories>
    </profile>
</profiles>
<activeProfiles>
    <activeProfile>nexus</activeProfile>
    <activeProfile>edas.oss.repo</activeProfile>
</activeProfiles>
实例文件
<!--
 ========================================================================
-->
<!--  settings.xml for maven users  -->
<!--  Version: 2  -->
<!--  Auhtor: Shawn.Qian  -->
<!--
 $Id: settings.xml 43697 2010-05-12 09:47:57Z yiping.luoyp $
-->
<!--
 ========================================================================
-->
<settings>
 <!--
 ========================================================================
-->
 <!--  Accounts for SCM ONLY  -->
 <!--
 ========================================================================
-->
 <!--
 <localRepository>/Users/../.m2/repository</localRepository>
-->
 <!--
 ========================================================================
-->
 <!--  Profiles  -->
 <!--
 ========================================================================
-->
<profiles>
<profile>
<id>nexus</id>
 <!--
Enable snapshots for the built in central repo to direct
-->
 <!-- all requests to nexus via the mirror  -->
<repositories>
<repository>
<id>central</id>
<url> http://repo1.maven.org/maven2</url>
<releases>
<enabled>true</enabled>
</releases>
<snapshots>
<enabled>true</enabled>
</snapshots>
</repository>
</repositories>
<pluginRepositories>
<pluginRepository>
<id>central</id>
<url> http://repo1.maven.org/maven2</url>
<releases>
<enabled>true</enabled>
</releases>
<snapshots>
<enabled>true</enabled>
</snapshots>
</pluginRepository>
</pluginRepositories>
</profile>
<profile>
<id>edas.oss.repo</id>
<repositories>
<repository>
<id>edas-oss-central</id>
<name>taobao mirror central</name>
<url>
http://edas-public.oss-cn-hangzhou.aliyuncs.com/repository
</url>
<snapshots>
<enabled>true</enabled>
</snapshots>
<releases>
<enabled>true</enabled>
</releases>
</repository>
</repositories>
<pluginRepositories>
<pluginRepository>
<id>edas-oss-plugin-central</id>
<url>
http://edas-public.oss-cn-hangzhou.aliyuncs.com/repository
</url>
<snapshots>
<enabled>true</enabled>
</snapshots>
<releases>
<enabled>true</enabled>
</releases>
</pluginRepository>
</pluginRepositories>
</profile>
</profiles>
<activeProfiles>
<activeProfile>nexus</activeProfile>
<activeProfile>edas.oss.repo</activeProfile>
</activeProfiles>
</settings>
验证配置是否成功
在命令行执行如下命令 mvn help:effective-settings 。
可能会报错:
[ERROR] Failed to execute goal org.apache.maven.plugins:maven-help-
plugin:3.1.1:effective-settings (default-cli) on project standalone-pom:
Execution default-cli of goal org.apache.maven.plugins:maven-help-
plugin:3.1.1:effective-settings failed: Plugin org.apache.maven.plugins:maven-
help-plugin:3.1.1 or one of its dependencies could not be resolved: Could not
find artifact org.sonatype.aether:aether-impl:jar:1.7 in edas-oss-plugin-central
(http://edas-public.oss-cn-hangzhou.aliyuncs.com/repository) -> [Help 1]
类似于这种错误,应该是因为我们从私服下载的 ,所以可能出现网络或者其他问题,不能讲jar包下载的完全完整或者正确,找到里面的关键字 org.sonatype.aether:aether-impl:jar:1.7 从maven仓库中删除,重新执行上面的命令。
后面可能还有其他的包也会有类似的错误,也用这个方法。
直到
[INFO] ------------------------------------------------------------------------
[INFO] BUILD SUCCESS
[INFO] ------------------------------------------------------------------------
[INFO] Total time:  4.080 s
[INFO] Finished at: 2019-03-05T15:07:23+08:00
[INFO] ------------------------------------------------------------------------
无报错,表明 setting.xml 文件格式没问题。
profiles 中包含 edas.oss.repo 这个 profile,表明私服已经配置到 profiles 中。
在 activeProfiles 中 包含 edas.oss.repo 属性,表明 edas.oss.repo 私服已激活。
说明:如果在命令行执行 Maven 打包命令无问题,IDE 仍无法下载依赖,请关闭 IDE 重新打开试试,或自行查找 IDE 配置 Maven 的相关资料。
注意:idea中配置的maven应该修改为你进行了配置的maven,保持一致。
开发
demo下载
provider
consumer
服务注册与发现
创建服务提供者
创建一个 Maven 工程,命名为sc-hsf-provider(服务提供者)。
在pom.xml中引入需要的依赖.
<parent>
     <groupId>org.springframework.boot</groupId>
     <artifactId>spring-boot-starter-parent</artifactId>
     <version>1.5.8.RELEASE</version>
     <relativePath/>
 </parent>
 <dependencies>
     <dependency>
         <groupId>org.springframework.cloud</groupId>
         <artifactId>spring-cloud-starter-hsf</artifactId>
         <version>1.3</version>
     </dependency>
     <dependency>
         <groupId>org.springframework.cloud</groupId>
         <artifactId>spring-cloud-starter-pandora</artifactId>
         <version>1.3</version>
     </dependency>
     <dependency>
         <groupId>org.springframework.boot</groupId>
         <artifactId>spring-boot-starter-web</artifactId>
     </dependency>
 </dependencies>
 <dependencyManagement>
     <dependencies>
         <dependency>
             <groupId>org.springframework.cloud</groupId>
             <artifactId>spring-cloud-dependencies</artifactId>
             <version>Dalston.SR4</version>
             <type>pom</type>
             <scope>import</scope>
         </dependency>
     </dependencies>
 </dependencyManagement>
虽然 HSF 服务框架并不依赖于 Web 环境,但是 EDAS 管理应用的生命周期过程中需要使用到 Web 相关的特性,所以需要添加spring-boot-starter-web 的依赖。
如果您的工程不想将parent设置为spring-boot-starter-parent,也可以通过如下方式添加dependencyManagement,设置scope=import,来达到依赖版本管理的效果。
<dependencyManagement>
     <dependencies>
         <dependency>
             <groupId>org.springframework.boot</groupId>
             <artifactId>spring-boot-dependencies</artifactId>
             <version>1.5.8.RELEASE</version>
             <type>pom</type>
             <scope>import</scope>
         </dependency>
     </dependencies>
 </dependencyManagement>
定义服务接口,创建一个接口类 com.aliware.edas.EchoService。
public interface EchoService {
     String echo(String string);
 }
HSF 服务框架基于接口进行服务通信,当接口定义好之后,生产者将通过该接口实现具体的服务并发布,消费者也是基于此接口去订阅和消费服务。
接口com.aliware.edas.EchoService提供了一个echo方法,也可以理解成服务com.aliware.edas.EchoService将提供一个echo方法。
添加服务提供者的具体实现类EchoServiceImpl,并通过注解方式发布服务。
@HSFProvider(serviceInterface = EchoService.class, serviceVersion = "1.0.0")
 public class EchoServiceImpl implements EchoService {
     @Override
     public String echo(String string) {
         return string;
     }
 }
除了接口名serviceInterface之外, HSF 还需要serviceVersion(服务版本)才能唯一确定一个服务,这里将注解HSFProvider里的serviceVersion属性设置为 “1.0.0”。于是我们发布的服务就可以通过 接口名 com.aliware.edas.EchoService 和 服务版本 1.0.0 这两者结合来确定了。
HSFProvider 注解中的配置拥有最高的优先级,如果在 HSFProvider 注解中没有配置,服务发布时会优先在 resources/application.properties 文件中查找这些属性的全局配置。如果前两项都没有配置,则会使用 HSFProvider 注解中的默认值。
在resources目录下的application.properties文件中配置应用名和监听端口号。
spring.application.name=hsf-provider
 server.port=18081
 spring.hsf.version=1.0.0
 spring.hsf.timeout=3000
最佳实践: 建议统一将服务版本、服务超时都统一配置在application.properties中。
添加服务启动的 main 函数入口。
@SpringBootApplication
 public class HSFProviderApplication {
     public static void main(String[] args) {
         // 启动 Pandora Boot 用于加载 Pandora 容器
         PandoraBootstrap.run(args);
         SpringApplication.run(ServerApplication.class, args);
         // 标记服务启动完成,并设置线程 wait。防止业务代码运行完毕退出后,导致容器退出。
         PandoraBootstrap.markStartupAndWait();
     }
 }
发布服务
- 配置hosts
上面已经将轻量化配置中心解压并安装了,需要在provider运行的机器配置hosts,经过我的测试,目前我只能将“127.0.0.1 jmenv.tbsite.net”配置为127.0.0.1,即只能在本地进行安装,即安装轻量配置中心和provider必须是同一个机器。 - 正式发布
找到HSFProviderApplication这个类,直接运行main函数即可。当然还有其他方法,在下面的consumer中介绍的方法在这里同样适用。这种方法我感觉相对简单一点。
在运行的过程中可能报错,就是因为hosts的问题,可能发布的地址找不到,注意配置正确。 - 查看结果

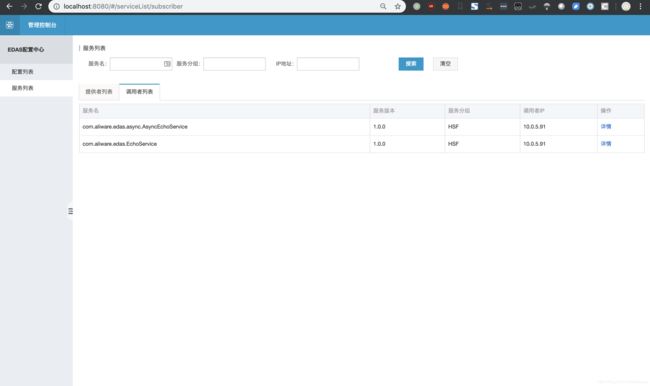
则表示成功了
创建服务消费者
这个例子中,我们将创建一个服务消费者,消费者通过 HSFProvider 所提供的 API 接口去调用服务提供者。
创建一个 Maven 工程,命名为 sc-hsf-consumer。
在 pom.xml 中引入需要的依赖内容:
HSFConsumer 和 HSFProvider 的 Maven 依赖是完全一样的。
 <parent>
     <groupId>org.springframework.boot</groupId>
     <artifactId>spring-boot-starter-parent</artifactId>
     <version>1.5.8.RELEASE</version>
     <relativePath/>
 </parent>
 <dependencies>
     <dependency>
         <groupId>org.springframework.cloud</groupId>
         <artifactId>spring-cloud-starter-hsf</artifactId>
         <version>1.3</version>
     </dependency>
     <dependency>
         <groupId>org.springframework.cloud</groupId>
         <artifactId>spring-cloud-starter-pandora</artifactId>
         <version>1.3</version>
     </dependency>
     <dependency>
         <groupId>org.springframework.boot</groupId>
         <artifactId>spring-boot-starter-web</artifactId>
     </dependency>
 </dependencies>
 <dependencyManagement>
     <dependencies>
         <dependency>
             <groupId>org.springframework.cloud</groupId>
             <artifactId>spring-cloud-dependencies</artifactId>
             <version>Dalston.SR4</version>
             <type>pom</type>
             <scope>import</scope>
         </dependency>
     </dependencies>
 </dependencyManagement>
将服务提供者所发布的 API 服务接口(包括包名)拷贝到本地,com.aliware.edas.EchoService。
 public interface EchoService {
     String echo(String string);
 }
通过注解的方式将服务消费者的实例注入到 Spring 的 Context 中。
 @Configuration
 public class HsfConfig {
     @HSFConsumer(clientTimeout = 3000, serviceVersion = "1.0.0")
     private EchoService echoService;
 }
最佳实践:在 Config 类里配置一次 @HSFConsumer ,然后在多处通过 @Autowired 注入使用。通常一个 HSF Consumer 需要在多个地方使用,但并不需要在每次使用的地方都用 @HSFConsumer 来标记。只需要写一个统一的 Config 类,然后在其它需要使用的地方,直接通过 @Autowired 注入即可。
为了便于测试,通过一个 SimpleController 来暴露一个 /hsf-echo/* 的 http 接口,/hsf-echo/* 接口内部实现调用了 HSF 服务提供者。
@RestController
 public class SimpleController {
     @Autowired
     private EchoService echoService;
     @RequestMapping(value = "/hsf-echo/{str}", method = RequestMethod.GET)
     public String echo(@PathVariable String str) {
         return echoService.echo(str);
     }
 }
在 resources 目录下的 application.properties 文件中配置应用名与监听端口号。
 spring.application.name=hsf-consumer
 server.port=18082
 spring.hsf.version=1.0.0
 spring.hsf.timeout=1000
最佳实践: 建议统一将服务版本、服务超时都统一配置在 application.properties 中。
添加服务启动的 main 函数入口。
@SpringBootApplication
 public class HSFConsumerApplication {
     public static void main(String[] args) {
         PandoraBootstrap.run(args);
         SpringApplication.run(HSFConsumerApplication.class, args);
         PandoraBootstrap.markStartupAndWait();
     }
 }
本地开发调试
启动轻量级配置中心
本地开发调试时,需要使用轻量级配置中心,轻量级配置中心包含了 EDAS 服务注册发现服务端的轻量版,详细文档请参见轻量级配置中心。
启动应用
本地启动应用可以通过两种方式。
- 在 IDE 中启动
通过 VM options 配置启动参数 -Djmenv.tbsite.net={KaTeX parse error: Expected 'EOF', got '}' at position 3: IP}̲,通过 main 方法直接启动…IP} 为 启动轻量级配置中心服务的那台机器的地址。比如本机启动轻量级配置中心,则 {$IP} 为 127.0.0.1。
您也可以不配置 JVM 的参数,而是直接通过修改 hosts 文件将 jmenv.tbsite.net 绑定到启动轻量级配置中心服务的那台机器的 IP。详情见轻量级配置中心。
- 通过 FatJar 启动
- 添加 FatJar 打包插件。
使用 Maven 将 Pandora Boot 工程打包成 FatJar, 需要在 pom.xml 中添加如下插件。
为避免与其他打包插件发生冲突,请勿在 build 的 plugin 中添加其他 FatJar 插件。
试用
build>
     <plugin>
         <groupId>com.taobao.pandora</groupId>
         <artifactId>pandora-boot-maven-plugin</artifactId>
         <version>2.1.9.1</version>
         <executions>
             <execution>
                 <phase>package</phase>
                 <goals>
                     <goal>repackage</goal>
                 </goals>
             </execution>
         </executions>
     </plugin>
</build>
-
添加完插件后,在工程的主目录下,使用 maven 命令 mvn clean package 进行打包,即可在 target 目录下找到打包好的 FatJar 文件。
-
通过 Java 命令启动。
java -Djmenv.tbsite.net=127.0.0.1 -Dpandora.location=/Users/{$username}/.m2/repository/com/taobao/pandora/taobao-hsf.sar/dev-SNAPSHOT/taobao-hsf.sar-dev-SNAPSHOT.jar -jar sc-hsf-provider-0.0.1-SNAPSHOT.jar
演示
小问题
- 上面的提供的下载demo,包括上面提供的代码有点小问题(毕竟不是我写的)
consumer中的EchoService这个类不能被autowire,需要加上@Service注解。 - 目前我只能在本地安装这个轻量化配置的时候能够发布服务,如果用局域网中公司的服务器,不能成功发不上去,consumer自然也无法调用。

