(8)图像增强(Image Enhancement)- 常用空间域、频率域滤波算法
温习基本概念请移步博客:https://blog.csdn.net/yangtrees/article/details/8740933
常用空间域滤波算法:
- 均值滤波
- 中值滤波
常用频率域滤波算法:
- 理想低通滤波
- 高通滤波
- 巴特沃斯低通滤波
- DCT滤波
- 双边滤波
均值滤波算法:
#####################################################################


#####################################################################

import cv2
import math

#####################################################################

keep_processing = True;
camera_to_use = 0; # 0 if you have one camera, 1 or > 1 otherwise

#####################################################################

# this function is called as a call-back everytime the trackbar is moved
# (here we just do nothing)

def nothing(x):
    pass

#####################################################################

# define video capture object

cap = cv2.VideoCapture();

# define display window name

windowName = "Live Camera Input"; # window name
windowName2 = "Mean Filtering"; # window name
windowName3 = "Non-Local Means (NLM) Filtering"; # window name

# if command line arguments are provided try to read video_name
# otherwise default to capture from attached H/W camera

if cap.open(camera_to_use):

    # create window by name

    cv2.namedWindow(windowName, cv2.WINDOW_AUTOSIZE);
    cv2.namedWindow(windowName2, cv2.WINDOW_AUTOSIZE);
    cv2.namedWindow(windowName3, cv2.WINDOW_AUTOSIZE);

    # add some track bar controllers for settings

    neighbourhood = 3;
    cv2.createTrackbar("neighbourhood, N", windowName2, neighbourhood, 25, nothing);

    while (keep_processing):

        # if video file successfully open then read frame from video

        if (cap.isOpened):
            ret, frame = cap.read();

        # get parameters from track bars

        neighbourhood = cv2.getTrackbarPos("neighbourhood, N", windowName2);

        neighbourhood = max(3, neighbourhood);

        # in opencv blur() performs filtering with a NxN kernel where each element has a weight of
        # 1 / (N^2) - this is mean filtering

        mean_img = cv2.blur(frame, (neighbourhood,neighbourhood), borderType=cv2.BORDER_DEFAULT);

        # display image

        cv2.imshow(windowName, frame);
        cv2.imshow(windowName2, mean_img);

        # start the event loop - essential

        # cv2.waitKey() is a keyboard binding function (argument is the time in milliseconds).
        # It waits for specified milliseconds for any keyboard event.
        # If you press any key in that time, the program continues.
        # If 0 is passed, it waits indefinitely for a key stroke.
        # (bitwise and with 0xFF to extract least significant byte of multi-byte response)

        key = cv2.waitKey(40) & 0xFF; # wait 40ms (i.e. 1000ms / 25 fps = 40 ms)

        # It can also be set to detect specific key strokes by recording which key is pressed

        # e.g. if user presses "x" then exit

        if (key == ord('x')):
            keep_processing = False;

    # close all windows

    cv2.destroyAllWindows()

else:
    print("No usable camera connected.")


#####################################################################
中值滤波算法:
import cv2
import math

#####################################################################

keep_processing = True;
camera_to_use = 1; # 0 if you have one camera, 1 or > 1 otherwise

#####################################################################

# this function is called as a call-back everytime the trackbar is moved
# (here we just do nothing)

def nothing(x):
    pass

#####################################################################

# define video capture object

cap = cv2.VideoCapture();

# define display window name

windowName = "Live Camera Input"; # window name
windowName2 = "Median Filtering"; # window name

# if command line arguments are provided try to read video_name
# otherwise default to capture from attached H/W camera

if cap.open(camera_to_use):

    # create window by name

    cv2.namedWindow(windowName, cv2.WINDOW_AUTOSIZE);
    cv2.namedWindow(windowName2, cv2.WINDOW_AUTOSIZE);

    # add some track bar controllers for settings

    neighbourhood = 3;
    cv2.createTrackbar("neighbourhood, N", windowName2, neighbourhood, 40, nothing);

    while (keep_processing):

        # if video file successfully open then read frame from video

        if (cap.isOpened):
            ret, frame = cap.read();

        # get parameter from track bars

        neighbourhood = cv2.getTrackbarPos("neighbourhood, N", windowName2);

        # check it is greater than 3 and odd

        neighbourhood = max(3, neighbourhood);
        if not(neighbourhood % 2):
            neighbourhood = neighbourhood + 1;


        # perform median filtering using NxN neighbourhood

        median_img = cv2.medianBlur(frame, neighbourhood);

        # display image

        cv2.imshow(windowName, frame);
        cv2.imshow(windowName2, median_img);

        # start the event loop - essential

        # cv2.waitKey() is a keyboard binding function (argument is the time in milliseconds).
        # It waits for specified milliseconds for any keyboard event.
        # If you press any key in that time, the program continues.
        # If 0 is passed, it waits indefinitely for a key stroke.
        # (bitwise and with 0xFF to extract least significant byte of multi-byte response)

        key = cv2.waitKey(40) & 0xFF; # wait 40ms (i.e. 1000ms / 25 fps = 40 ms)

        # It can also be set to detect specific key strokes by recording which key is pressed

        # e.g. if user presses "x" then exit

        if (key == ord('x')):
            keep_processing = False;

    # close all windows

    cv2.destroyAllWindows()

else:
    print("No usable camera connected.")


#####################################################################
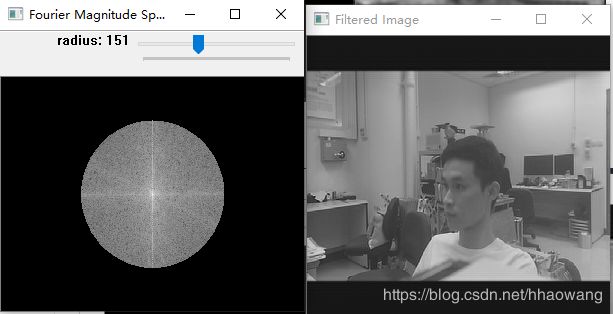
理想低通滤波算法:
#####################################################################

import cv2
import sys
import numpy as np
import math

#####################################################################

keep_processing = True;
camera_to_use = 1; # 0 if you have one camera, 1 or > 1 otherwise

#####################################################################

# create a simple low pass filter

def create_low_pass_filter(width, height, radius):
    lp_filter = np.zeros((height, width, 2), np.float32);
    cv2.circle(lp_filter, (width / 2, height / 2), radius, (1,1,1), thickness=-1)
    return lp_filter

#####################################################################

# this function is called as a call-back everytime the trackbar is moved
# (here we just do nothing)

def nothing(x):
    pass

#####################################################################

# define video capture object

cap = cv2.VideoCapture();

# define display window name

windowName = "Live Camera Input"; # window name
windowName2 = "Fourier Magnitude Spectrum"; # window name
windowName3 = "Filtered Image"; # window name

# if command line arguments are provided try to read video_name
# otherwise default to capture from attached H/W camera

if (((len(sys.argv) == 2) and (cap.open(str(sys.argv[1]))))
    or (cap.open(camera_to_use))):

    # create windows by name (as resizable)

    cv2.namedWindow(windowName, cv2.WINDOW_NORMAL);
    cv2.namedWindow(windowName2, cv2.WINDOW_NORMAL);
    cv2.namedWindow(windowName3, cv2.WINDOW_NORMAL);

    # add some track bar controllers for settings

    radius = 25;
    cv2.createTrackbar("radius", windowName2, radius, 400, nothing);

    # if video file successfully open then read frame from video

    if (cap.isOpened):
        ret, frame = cap.read();

    # convert to grayscale

    gray_frame = cv2.cvtColor(frame, cv2.COLOR_BGR2GRAY);

    # use this single frame to set up optimized DFT settings

    hieght,width = gray_frame.shape;
    nheight = cv2.getOptimalDFTSize(hieght);
    nwidth = cv2.getOptimalDFTSize(width);

    while (keep_processing):

        # if video file successfully open then read frame from video

        if (cap.isOpened):
            ret, frame = cap.read();

        # start a timer (to see how long processing and display takes)

        start_t = cv2.getTickCount();

         # convert to grayscale

        gray_frame = cv2.cvtColor(frame, cv2.COLOR_BGR2GRAY);

        # Performance of DFT calculation, via the FFT, is better for array sizes of power of two.
        # Arrays whose size is a product of 2's, 3's, and 5's are also processed quite efficiently.
        # Hence ee modify the size of the array tothe optimal size (by padding zeros) before finding DFT.

        pad_right = nwidth - width;
        pad_bottom = nheight - hieght;
        nframe = cv2.copyMakeBorder(gray_frame,0,pad_bottom,0,pad_right,cv2.BORDER_CONSTANT, value = 0);

        # perform the DFT and get complex output

        dft = cv2.dft(np.float32(nframe),flags = cv2.DFT_COMPLEX_OUTPUT);

        # shift it so that we the zero-frequency, F(0,0), DC component to the center of the spectrum.

        dft_shifted = np.fft.fftshift(dft);

        # perform low pass filtering

        radius = cv2.getTrackbarPos("radius",windowName2);
        hp_filter = create_low_pass_filter(nwidth, nheight, radius);

        dft_filtered = cv2.mulSpectrums(dft_shifted, hp_filter, flags=0);

        # shift it back to original quaderant ordering

        dft = np.fft.fftshift(dft_filtered);

        # recover the original image via the inverse DFT

        filtered_img = cv2.dft(dft, flags = cv2.DFT_INVERSE);

        # normalized the filtered image into 0 -> 255 (8-bit grayscale) so we can see the output

        minVal, maxVal, minLoc, maxLoc = cv2.minMaxLoc(filtered_img[:,:,0]);
        filtered_img_normalized = filtered_img[:,:,0] * (1.0/(maxVal-minVal)) + ((-minVal)/(maxVal-minVal));
        filtered_img_normalized = np.uint8(filtered_img_normalized * 255);

        # calculate the magnitude spectrum and log transform + scale it for visualization

        magnitude_spectrum = np.log(cv2.magnitude(dft_filtered[:,:,0],dft_filtered[:,:,1]));

        # create a 8-bit image to put the magnitude spectrum into

        magnitude_spectrum_normalized = np.zeros((nheight,nwidth,1), np.uint8);

        # normalized the magnitude spectrum into 0 -> 255 (8-bit grayscale) so we can see the output

        cv2.normalize(np.uint8(magnitude_spectrum), magnitude_spectrum_normalized, alpha=0, beta=255, norm_type=cv2.NORM_MINMAX);

        # display images

        cv2.imshow(windowName,gray_frame);
        cv2.imshow(windowName2,magnitude_spectrum_normalized);
        cv2.imshow(windowName3,filtered_img_normalized);

        # stop timer and convert to ms. (to see how long processing and display takes)

        stop_t = ((cv2.getTickCount() - start_t)/cv2.getTickFrequency()) * 1000;

        # start the event loop - essential

        # cv2.waitKey() is a keyboard binding function (argument is the time in milliseconds).
        # It waits for specified milliseconds for any keyboard event.
        # If you press any key in that time, the program continues.
        # If 0 is passed, it waits indefinitely for a key stroke.
        # (bitwise and with 0xFF to extract least significant byte of multi-byte response)

        # here we use a wait time in ms. that takes account of processing time already used in the loop

        key = cv2.waitKey(max(2, 40 - int(math.ceil(stop_t)))) & 0xFF; # wait 40ms (i.e. 1000ms / 25 fps = 40 ms)

        # It can also be set to detect specific key strokes by recording which key is pressed

        # e.g. if user presses "x" then exit

        if (key == ord('x')):
            keep_processing = False;

    # close all windows

    cv2.destroyAllWindows()

else:
    print("No video file specified or camera connected.")

#####################################################################
效果图:

修改低通滤波器阈值:

DCT低通滤波器:
#####################################################################

#  perform low pass filterings in DCT space of image frame
# from a video file specified on the command line (e.g. python FILE.py
# video_file) or from an attached web camera

#####################################################################

import cv2
import sys
import numpy as np
import math

#####################################################################

keep_processing = True;
camera_to_use = 0; # 0 if you have one camera, 1 or > 1 otherwise

#####################################################################

# create a simple low pass filter - DCT version (top left corner)

def create_low_pass_filter(width, height, radius):
    lp_filter = np.zeros((height, width), np.float32);
    cv2.circle(lp_filter, (0, 0), radius, (1,1,1), thickness=-1)
    return lp_filter

#####################################################################

# "Currently dct supports even-size arrays (2, 4, 6 ...). For data
# analysis and approximation, you can pad the array when necessary.
# Also, the function performance depends very much, and not
# monotonically, on the array size (see getOptimalDFTSize() ). In the
# current implementation DCT of a vector of size N is calculated
# via DFT of a vector of size N/2 . Thus, the optimal DCT
# size N1 >= N can be calculated as:" - OpenCV manual 3.0


def getOptimalDCTSize(N):
    return (2* cv2.getOptimalDFTSize(math.floor((N+1)/2)))


#####################################################################

# this function is called as a call-back everytime the trackbar is moved
# (here we just do nothing)

def nothing(x):
    pass

#####################################################################

# define video capture object

cap = cv2.VideoCapture();

# define display window name

windowName = "Live Camera Input"; # window name
windowName2 = "DCT Co-efficients Spectrum"; # window name
windowName3 = "Filtered Image"; # window name

# if command line arguments are provided try to read video_name
# otherwise default to capture from attached H/W camera

if (((len(sys.argv) == 2) and (cap.open(str(sys.argv[1]))))
    or (cap.open(camera_to_use))):

    # create windows by name (as resizable)

    cv2.namedWindow(windowName, cv2.WINDOW_NORMAL);
    cv2.namedWindow(windowName2, cv2.WINDOW_NORMAL);
    cv2.namedWindow(windowName3, cv2.WINDOW_NORMAL);

    # if video file successfully open then read frame from video

    if (cap.isOpened):
        ret, frame = cap.read();

    # convert to grayscale

    gray_frame = cv2.cvtColor(frame, cv2.COLOR_BGR2GRAY);

    # use this single frame to set up optimized DFT settings

    hieght,width = gray_frame.shape;
    nheight = getOptimalDCTSize(hieght);
    nwidth = getOptimalDCTSize(width);

    # add some track bar controllers for settings

    radius = 25;
    cv2.createTrackbar("radius", windowName2, radius, max(nheight,nwidth) * 2, nothing);

    while (keep_processing):

        # if video file successfully open then read frame from video

        if (cap.isOpened):
            ret, frame = cap.read();

        # start a timer (to see how long processing and display takes)

        start_t = cv2.getTickCount();

         # convert to grayscale

        gray_frame = cv2.cvtColor(frame, cv2.COLOR_BGR2GRAY);

        # Performance of DCT calculation, via the DFT/FFT, is better for array sizes of power of two.
        # Arrays whose size is a product of 2's, 3's, and 5's are also processed quite efficiently.
        # Hence ee modify the size of the array tothe optimal size (by padding zeros) before finding DCT.

        pad_right = nwidth - width;
        pad_bottom = nheight - hieght;
        nframe = cv2.copyMakeBorder(gray_frame,0,pad_bottom,0,pad_right,cv2.BORDER_CONSTANT, value = 0);

        # perform the DCT

        dct = cv2.dct(np.float32(nframe));

        # perform low pass filtering

        radius = cv2.getTrackbarPos("radius",windowName2);
        lp_filter = create_low_pass_filter(nwidth, nheight, radius);

        dct_filtered = cv2.multiply(dct, lp_filter);

        # recover the original image via the inverse DCT

        filtered_img = cv2.dct(dct_filtered, flags = cv2.DCT_INVERSE);

        # normalized the filtered image into 0 -> 255 (8-bit grayscale) so we can see the output

        minVal, maxVal, minLoc, maxLoc = cv2.minMaxLoc(filtered_img);
        filtered_img_normalized = filtered_img * (1.0/(maxVal-minVal)) + ((-minVal)/(maxVal-minVal));
        filtered_img_normalized = np.uint8(filtered_img_normalized * 255);

        # calculate the DCT spectrum for visualization

        # create a 8-bit image to put the magnitude spectrum into

        dct_spectrum_normalized = np.zeros((nheight,nwidth,1), np.uint8);

        # normalized the magnitude spectrum into 0 -> 255 (8-bit grayscale) so we can see the output

        cv2.normalize(np.uint8(dct_filtered), dct_spectrum_normalized, alpha=0, beta=255, norm_type=cv2.NORM_MINMAX);

        # display images

        cv2.imshow(windowName,gray_frame);
        cv2.imshow(windowName2,dct_spectrum_normalized);
        cv2.imshow(windowName3,filtered_img_normalized);

        # stop timer and convert to ms. (to see how long processing and display takes)

        stop_t = ((cv2.getTickCount() - start_t)/cv2.getTickFrequency()) * 1000;

        # start the event loop - essential

        # cv2.waitKey() is a keyboard binding function (argument is the time in milliseconds).
        # It waits for specified milliseconds for any keyboard event.
        # If you press any key in that time, the program continues.
        # If 0 is passed, it waits indefinitely for a key stroke.
        # (bitwise and with 0xFF to extract least significant byte of multi-byte response)

        # here we use a wait time in ms. that takes account of processing time already used in the loop

        key = cv2.waitKey(max(2, 40 - int(math.ceil(stop_t)))) & 0xFF; # wait 40ms (i.e. 1000ms / 25 fps = 40 ms)

        # It can also be set to detect specific key strokes by recording which key is pressed

        # e.g. if user presses "x" then exit

        if (key == ord('x')):
            keep_processing = False;

    # close all windows

    cv2.destroyAllWindows()

else:
    print("No video file specified or camera connected.")

#####################################################################

巴德沃斯低通滤波器:
#####################################################################

# Example : perform butterworth low pass filtering in fourier space of
# image frame from a video file specified on the command line
# (e.g. python FILE.py video_file) or from an attached web camera

#####################################################################

import cv2
import sys
import numpy as np
import math

#####################################################################

keep_processing = True;
camera_to_use = 1; # 0 if you have one camera, 1 or > 1 otherwise

recompute_filter = True;

#####################################################################

# create a butterworth low pass filter

def create_butterworth_low_pass_filter(width, height, D, n):
    lp_filter = np.zeros((height, width, 2), np.float32);
    centre = (width / 2, height / 2);

    # based on the forumla in lecture 8 (2015 version)
	# see also HIPR2 on-line

    for i in range(0, lp_filter.shape[1]): # image width
        for j in range(0, lp_filter.shape[0]): # image height
            radius = max(1, math.sqrt(math.pow((i - centre[0]), 2.0) + math.pow((j - centre[1]), 2.0)));
            lp_filter[j,i] = 1 / (1 + math.pow((radius / D), (2 * n)));

    return lp_filter


#####################################################################

# this function is called as a call-back everytime the trackbar is moved
# to signal we need to reconstruct the filter

def reset_butterworth_filter(_):
    global recompute_filter;
    recompute_filter = True;
    return;

#####################################################################

# define video capture object

cap = cv2.VideoCapture();

# define display window name

windowName = "Live Camera Input"; # window name
windowName2 = "Fourier Magnitude Spectrum"; # window name
windowName3 = "Filtered Image"; # window name
windowName4 = "Butterworth Filter"; # window name

# if command line arguments are provided try to read video_name
# otherwise default to capture from attached H/W camera

if (((len(sys.argv) == 2) and (cap.open(str(sys.argv[1]))))
    or (cap.open(camera_to_use))):

    # create windows by name (as resizable)

    cv2.namedWindow(windowName, cv2.WINDOW_NORMAL);
    cv2.namedWindow(windowName2, cv2.WINDOW_NORMAL);
    cv2.namedWindow(windowName3, cv2.WINDOW_NORMAL);
    cv2.namedWindow(windowName4, cv2.WINDOW_NORMAL);

    # add some track bar controllers for settings

    radius = 5;
    cv2.createTrackbar("radius", windowName4, radius, 100, reset_butterworth_filter);
    order = 1;
    cv2.createTrackbar("order", windowName4, order, 10, reset_butterworth_filter);

    # if video file successfully open then read frame from video

    if (cap.isOpened):
        ret, frame = cap.read();

    # convert to grayscale

    gray_frame = cv2.cvtColor(frame, cv2.COLOR_BGR2GRAY);

    # use this single frame to set up optimized DFT settings

    hieght,width = gray_frame.shape;
    nheight = cv2.getOptimalDFTSize(hieght);
    nwidth = cv2.getOptimalDFTSize(width);

    while (keep_processing):

        # if video file successfully open then read frame from video

        if (cap.isOpened):
            ret, frame = cap.read();

        # start a timer (to see how long processing and display takes)

        start_t = cv2.getTickCount();

         # convert to grayscale

        gray_frame = cv2.cvtColor(frame, cv2.COLOR_BGR2GRAY);

        # Performance of DFT calculation, via the FFT, is better for array sizes of power of two.
        # Arrays whose size is a product of 2's, 3's, and 5's are also processed quite efficiently.
        # Hence ee modify the size of the array tothe optimal size (by padding zeros) before finding DFT.

        pad_right = nwidth - width;
        pad_bottom = nheight - hieght;
        nframe = cv2.copyMakeBorder(gray_frame,0,pad_bottom,0,pad_right,cv2.BORDER_CONSTANT, value = 0);

        # perform the DFT and get complex output

        dft = cv2.dft(np.float32(nframe),flags = cv2.DFT_COMPLEX_OUTPUT);

        # shift it so that we the zero-frequency, F(0,0), DC component to the center of the spectrum.

        dft_shifted = np.fft.fftshift(dft);

        # perform low pass filtering

        radius = cv2.getTrackbarPos("radius",windowName4);
        order = cv2.getTrackbarPos("order",windowName4);

        # butterworth is slow to construct so only do it when needed (i.e. trackbar changes)

        if (recompute_filter):
            lp_filter = create_butterworth_low_pass_filter(nwidth, nheight, radius, order);
            recompute_filter = False;

        dft_filtered = cv2.mulSpectrums(dft_shifted, lp_filter, flags=0);

        # shift it back to original quaderant ordering

        dft = np.fft.fftshift(dft_filtered);

        # recover the original image via the inverse DFT

        filtered_img = cv2.dft(dft, flags = cv2.DFT_INVERSE);

        # normalized the filtered image into 0 -> 255 (8-bit grayscale) so we can see the output

        minVal, maxVal, minLoc, maxLoc = cv2.minMaxLoc(filtered_img[:,:,0]);
        filtered_img_normalized = filtered_img[:,:,0] * (1.0/(maxVal-minVal)) + ((-minVal)/(maxVal-minVal));
        filtered_img_normalized = np.uint8(filtered_img_normalized * 255);

        # calculate the magnitude spectrum and log transform + scale it for visualization

        magnitude_spectrum = np.log(cv2.magnitude(dft_filtered[:,:,0],dft_filtered[:,:,1]));

        # create a 8-bit image to put the magnitude spectrum into

        magnitude_spectrum_normalized = np.zeros((nheight,nwidth,1), np.uint8);

        # normalized the magnitude spectrum into 0 -> 255 (8-bit grayscale) so we can see the output

        cv2.normalize(np.uint8(magnitude_spectrum), magnitude_spectrum_normalized, alpha=0, beta=255, norm_type=cv2.NORM_MINMAX);

        # display images

        cv2.imshow(windowName,gray_frame);
        cv2.imshow(windowName2,magnitude_spectrum_normalized);
        cv2.imshow(windowName3,filtered_img_normalized);
        cv2.imshow(windowName4,lp_filter[:,:,0] * 255);

        # stop timer and convert to ms. (to see how long processing and display takes)

        stop_t = ((cv2.getTickCount() - start_t)/cv2.getTickFrequency()) * 1000;

        # start the event loop - essential

        # cv2.waitKey() is a keyboard binding function (argument is the time in milliseconds).
        # It waits for specified milliseconds for any keyboard event.
        # If you press any key in that time, the program continues.
        # If 0 is passed, it waits indefinitely for a key stroke.
        # (bitwise and with 0xFF to extract least significant byte of multi-byte response)

        # here we use a wait time in ms. that takes account of processing time already used in the loop

        key = cv2.waitKey(max(2, 40 - int(math.ceil(stop_t)))) & 0xFF; # wait 40ms (i.e. 1000ms / 25 fps = 40 ms)

        # It can also be set to detect specific key strokes by recording which key is pressed

        # e.g. if user presses "x" then exit

        if (key == ord('x')):
            keep_processing = False;

    # close all windows

    cv2.destroyAllWindows()

else:
    print("No video file specified or camera connected.")

#####################################################################
高通滤波器:
#####################################################################

import cv2
import sys
import numpy as np
import math

#####################################################################

keep_processing = True;
camera_to_use = 1; # 0 if you have one camera, 1 or > 1 otherwise

#####################################################################

# create a simple high pass filter

def create_high_pass_filter(width, height, radius):
    hp_filter = np.ones((height, width, 2), np.float32);
    cv2.circle(hp_filter, (width / 2, height / 2), radius, (0,0,0), thickness=-1)
    return hp_filter

#####################################################################

# this function is called as a call-back everytime the trackbar is moved
# (here we just do nothing)

def nothing(x):
    pass

#####################################################################

# define video capture object

cap = cv2.VideoCapture();

# define display window name

windowName = "Live Camera Input"; # window name
windowName2 = "Fourier Magnitude Spectrum"; # window name
windowName3 = "Filtered Image"; # window name

# if command line arguments are provided try to read video_name
# otherwise default to capture from attached H/W camera

if (((len(sys.argv) == 2) and (cap.open(str(sys.argv[1]))))
    or (cap.open(camera_to_use))):

    # create windows by name (as resizable)

    cv2.namedWindow(windowName, cv2.WINDOW_NORMAL);
    cv2.namedWindow(windowName2, cv2.WINDOW_NORMAL);
    cv2.namedWindow(windowName3, cv2.WINDOW_NORMAL);

    # add some track bar controllers for settings

    radius = 25;
    cv2.createTrackbar("radius", windowName2, radius, 200, nothing);

    # if video file successfully open then read frame from video

    if (cap.isOpened):
        ret, frame = cap.read();

    # convert to grayscale

    gray_frame = cv2.cvtColor(frame, cv2.COLOR_BGR2GRAY);

    # use this single frame to set up optimized DFT settings

    hieght,width = gray_frame.shape;
    nheight = cv2.getOptimalDFTSize(hieght);
    nwidth = cv2.getOptimalDFTSize(width);

    while (keep_processing):

        # if video file successfully open then read frame from video

        if (cap.isOpened):
            ret, frame = cap.read();

        # start a timer (to see how long processing and display takes)

        start_t = cv2.getTickCount();

         # convert to grayscale

        gray_frame = cv2.cvtColor(frame, cv2.COLOR_BGR2GRAY);

        # Performance of DFT calculation, via the FFT, is better for array sizes of power of two.
        # Arrays whose size is a product of 2's, 3's, and 5's are also processed quite efficiently.
        # Hence ee modify the size of the array tothe optimal size (by padding zeros) before finding DFT.

        pad_right = nwidth - width;
        pad_bottom = nheight - hieght;
        nframe = cv2.copyMakeBorder(gray_frame,0,pad_bottom,0,pad_right,cv2.BORDER_CONSTANT, value = 0);

        # perform the DFT and get complex output

        dft = cv2.dft(np.float32(nframe),flags = cv2.DFT_COMPLEX_OUTPUT);

        # shift it so that we the zero-frequency, F(0,0), DC component to the center of the spectrum.

        dft_shifted = np.fft.fftshift(dft);

        # perform high pass filtering

        radius = cv2.getTrackbarPos("radius",windowName2);
        hp_filter = create_high_pass_filter(nwidth, nheight, radius);

        dft_filtered = cv2.mulSpectrums(dft_shifted, hp_filter, flags=0);

        # shift it back to original quaderant ordering

        dft = np.fft.fftshift(dft_filtered);

        # recover the original image via the inverse DFT

        filtered_img = cv2.dft(dft, flags = cv2.DFT_INVERSE);

        # normalized the filtered image into 0 -> 255 (8-bit grayscale) so we can see the output

        minVal, maxVal, minLoc, maxLoc = cv2.minMaxLoc(filtered_img[:,:,0]);
        filtered_img_normalized = filtered_img[:,:,0] * (1.0/(maxVal-minVal)) + ((-minVal)/(maxVal-minVal));
        filtered_img_normalized = np.uint8(filtered_img_normalized * 255);

        # calculate the magnitude spectrum and log transform + scale it for visualization

        magnitude_spectrum = np.log(cv2.magnitude(dft_filtered[:,:,0],dft_filtered[:,:,1]));

        # create a 8-bit image to put the magnitude spectrum into

        magnitude_spectrum_normalized = np.zeros((nheight,nwidth,1), np.uint8);

        # normalized the magnitude spectrum into 0 -> 255 (8-bit grayscale) so we can see the output

        cv2.normalize(np.uint8(magnitude_spectrum), magnitude_spectrum_normalized, alpha=0, beta=255, norm_type=cv2.NORM_MINMAX);

        # display images

        cv2.imshow(windowName,gray_frame);
        cv2.imshow(windowName2,magnitude_spectrum_normalized);
        cv2.imshow(windowName3,filtered_img_normalized);

        # stop timer and convert to ms. (to see how long processing and display takes)

        stop_t = ((cv2.getTickCount() - start_t)/cv2.getTickFrequency()) * 1000;

        # start the event loop - essential

        # cv2.waitKey() is a keyboard binding function (argument is the time in milliseconds).
        # It waits for specified milliseconds for any keyboard event.
        # If you press any key in that time, the program continues.
        # If 0 is passed, it waits indefinitely for a key stroke.
        # (bitwise and with 0xFF to extract least significant byte of multi-byte response)

        # here we use a wait time in ms. that takes account of processing time already used in the loop

        key = cv2.waitKey(max(2, 40 - int(math.ceil(stop_t)))) & 0xFF; # wait 40ms (i.e. 1000ms / 25 fps = 40 ms)

        # It can also be set to detect specific key strokes by recording which key is pressed

        # e.g. if user presses "x" then exit

        if (key == ord('x')):
            keep_processing = False;

    # close all windows

    cv2.destroyAllWindows()

else:
    print("No video file specified or camera connected.")

#####################################################################
双边滤波器:
#####################################################################

# Example : gaussian and bi-lateral filtering on an image from an attached web camera


#####################################################################

import cv2

#####################################################################

keep_processing = True;
camera_to_use = 0;  # 0 if you have one camera, 1 or > 1 otherwise


#####################################################################

# this function is called as a call-back everytime the trackbar is moved
# (here we just do nothing)

def nothing(x):
    pass


#####################################################################

# define video capture object

cap = cv2.VideoCapture();

# define display window name

windowName = "Live Camera Input";  # window name
windowName2 = "Gaussian Smoothing";  # window name
windowName3 = "Bilaterial Filtering";  # window name

# if command line arguments are provided try to read video_name
# otherwise default to capture from attached H/W camera

if cap.open(camera_to_use):

    # create window by name

    cv2.namedWindow(windowName, cv2.WINDOW_AUTOSIZE);
    cv2.namedWindow(windowName2, cv2.WINDOW_AUTOSIZE);
    cv2.namedWindow(windowName3, cv2.WINDOW_AUTOSIZE);

    # add some track bar controllers for settings Gaussian smoothing

    neighbourhood = 3;  # kernel_size = 3x3
    cv2.createTrackbar("neighbourhood, N", windowName2, neighbourhood, 40, nothing);
    sigma = 1;
    cv2.createTrackbar("sigma", windowName2, sigma, 10, nothing);

    # add some track bar controllers for settings bilateral smoothing

    sigmaS = 10;
    cv2.createTrackbar("sigmaS", windowName3, sigmaS, 25, nothing);
    sigmaR = 10;
    cv2.createTrackbar("sigmaR", windowName3, sigmaR, 25, nothing);

    while (keep_processing):

        # if video file successfully open then read frame from video

        if (cap.isOpened):
            ret, frame = cap.read();

        # get parameter from track bars - Gaussian

        neighbourhood = cv2.getTrackbarPos("neighbourhood, N", windowName2);
        sigma = cv2.getTrackbarPos("sigma", windowName2);

        # get parameter from track bars - bilateral

        sigmaS = cv2.getTrackbarPos("sigmaS", windowName3);
        sigmaR = cv2.getTrackbarPos("sigmaR", windowName3);

        # check neighbourhood is greater than 3 and odd

        neighbourhood = max(3, neighbourhood);
        if not (neighbourhood % 2):
            neighbourhood = neighbourhood + 1;

        # perform Gaussian smoothing using NxN neighbourhood

        smoothed_img = cv2.GaussianBlur(frame,
                                        (neighbourhood, neighbourhood),
                                        sigma,
                                        sigma,
                                        borderType=cv2.BORDER_REPLICATE);

        # perform bilateral filtering using a neighbourhood
        # calculated automatically from sigmaS

        filtered_img = cv2.bilateralFilter(frame,
                                           -1,
                                           sigmaR,
                                           sigmaS,
                                           borderType=cv2.BORDER_REPLICATE);

        # display image

        cv2.imshow(windowName, frame);
        cv2.imshow(windowName2, smoothed_img);
        cv2.imshow(windowName3, filtered_img);

        # start the event loop - essential

        # cv2.waitKey() is a keyboard binding function (argument is the time in milliseconds).
        # It waits for specified milliseconds for any keyboard event.
        # If you press any key in that time, the program continues.
        # If 0 is passed, it waits indefinitely for a key stroke.
        # (bitwise and with 0xFF to extract least significant byte of multi-byte response)

        key = cv2.waitKey(40) & 0xFF;  # wait 40ms (i.e. 1000ms / 25 fps = 40 ms)

        # It can also be set to detect specific key strokes by recording which key is pressed

        # e.g. if user presses "x" then exit

        if (key == ord('x')):
            keep_processing = False;

    # close all windows

    cv2.destroyAllWindows()

else:
    print("No usable camera connected.")

#####################################################################