使用TypeScript编写React
缘由
最近在业余学习React,本身接触的egret一年多了,接触TypeScript时间还算有段时间,非常喜欢TypeScript。学习了TypeScript 就再也不想写JavaScript了。看了找了好些教程都是直接用JavaScript来写React,比较痛苦。今天找到了一篇比较好的教程。于是就想翻译一下,这里是 原始博客链接 ,于是就有了这篇博客。
简单的介绍使用TypeScript 和 Atom 来开发 React 应用。
我们准备从 TodoMVC 项目开始,使用React 和 TypeScript 来开发著名的TODO App.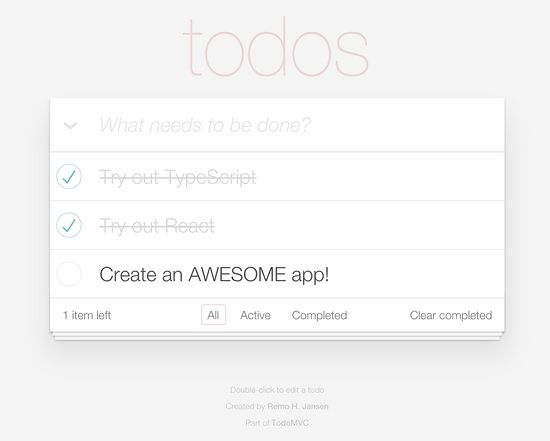
在这篇文章中你将学习到如下内容:
- 1.搭建开发环境
- 2.设置项目
- 3.React 基础组件
- 4.使用TypeScript 开发 React组件
- 5.编译应用
- 6.运行应用
搭建开发环境
我们将开始搭建开发环境
- 下载并安装node.js https://nodejs.org/en/
- 使用npm 安装 TypeScript
$ npm install -g typescript tsd
说明:如果你使用的是OSX系统,请在命令行前面加上 sudo
- 下载并安装 Atom https://atom.io/
- 为Atom安装 atom-typescript插件
$ apm install atom-typescript
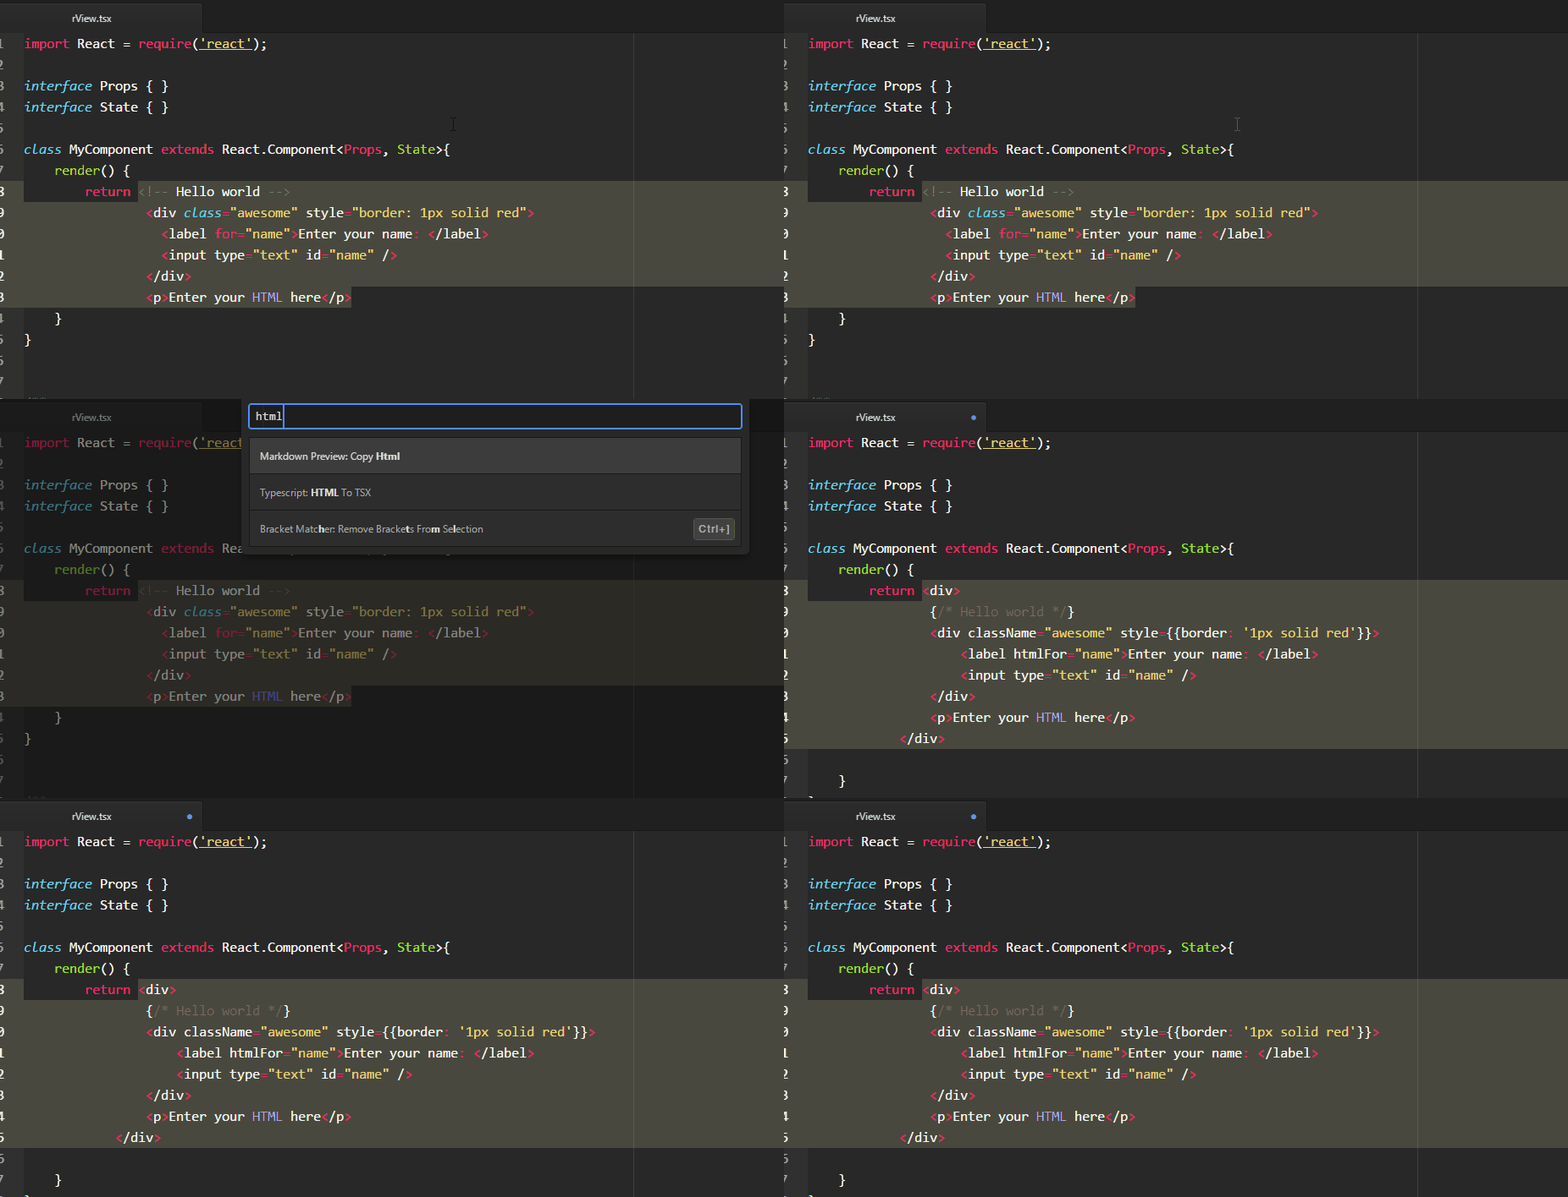
这个插件有一些很酷的功能,如HTML 转换成 TSX:
或依赖视图:
如果你感兴趣,请到 project’s page on Github 查看该插件更多的功能。
- 安装 React的谷歌开发插件
这个插件方便我们调试React应用 可以查看属性值和所选组件的状态。
设置项目
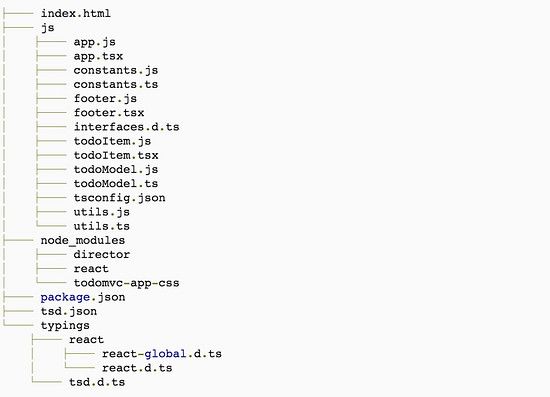
到本教程结束时,该项目的结构类似下面的一个:
让我们从创建应用的根目录开始
$ mkdir typescript-react
$ cd typescript-react
然后在项目的根目录里面创建 package.json 文件
{
	private: true,
  	dependencies: {
    director: "^1.2.0",
    react: "^0.13.3",
    todomvc-app-css: "^2.0.0"
  }
}
再然后你可以使用npm来安装项目所依赖的文件
// 在项目的根目录文件
$ npm install
这个命令会在项目的根目录生成一个 node_modules 文件夹,在 node_modules 文件夹下会包含有三个文件,分别是 director , react 和 todomvc-app-css 。
我们现在开始安装一些TypeScript类型定义文件
类型定义文件通常用于定义公用的第三方库文件API接口,比如React。在一些IDE中使用TypeScript开发应用,IDE可以通过这些接口提供一些代码提示,方便项目的开发。
类型定义文件也用于编译器来确保我们正确地使用第三方库。
我们现在需要React 的类型定义文件,我们可以通过下面的命令来创建他们。
//在应用的根目录
$ tsd init
$ tsd install react --save
以上命令会在应用的根目录创建一个 tsd.json 文件和 typings 文件夹,在 typings 文件夹中包含 react 文件夹
我们也需要 下载 然后取名为 global.d.ts 保存到 typings/react 文件夹下。
我们现在到应用根目录创建 index.html 文件
<html lang="en" data-framework="typescript">
  <head>
    <meta charset="utf-8">
    <title>React • TodoMVCtitle>
    <link rel="stylesheet"
          href="node_modules/todomvc-common/base.css">
    <link rel="stylesheet"
          href="node_modules/todomvc-app-css/index.css">
  head>
  <body>
    <section class="todoapp">section>
    <footer class="info">
      <p>Double-click to edit a todop>
      <p>
        Created by
        <a href="http://github.com/remojansen/">Remo H. Jansena>
      p>
      <p>Part of <a href="http://todomvc.com">TodoMVCa>p>
    footer>
    <script type="text/javascript"
            src="node_modules/react/dist/react-with-addons.js">
    script>
    <script type="text/javascript"
            src="node_modules/director/build/director.js">
    script>
    <script type="text/javascript" src="js/constants.js">script>
    <script type="text/javascript" src="js/utils.js">script>
    <script type="text/javascript" src="js/todoModel.js">script>
    <script type="text/javascript" src="js/todoItem.js">script>
    <script type="text/javascript" src="js/footer.js">script>
    <script type="text/javascript" src="js/app.js">script>
  body>
html>
此时,你的应用目录结构应该是这样的
你可能注意到在 index.html 文件中有些JavaScript文件是缺少的,我们接下来将解决这个问题。
React 基础组件
组件是React的主要应用程序块,一个组件表示一个自包含的用户界面,组件通常会显示一些数据,并且能够处理一些用户交互。
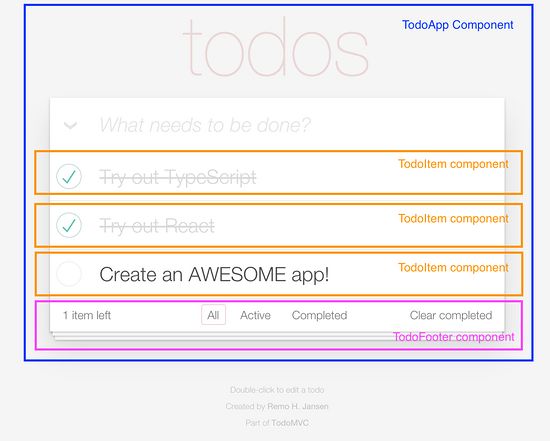
组件可以包含子组件。我们即将开发的应用程序是非常小的,所以我们只会开发一个顶级组件取名TodoApp。
TodoApp 组件将有多个组件组成,包含一个TodoFooter组件和一些TodoItem组件。
组件区分不同的数据集: 属性和状态 。
属性
属性(短的属性)是一个组件的配置,它的选项,如果你可以。它们是从上面接收到的,并且是不可改变的,因为接收它们的组件是有关的。
组件不能更改其属性,但它负责将其子组件的属性放在一起。
状态
该状态从一个组件安装时开始,并在时间(主要是用户事件产生的情况下)遭受突变。这是一个序列化表示在时间快照一点
组件管理其自己的内部,除了设置初始状态与它的孩子的状态不改。你可以说内部是私有的。
当我们使用TypeScript定义一个新的React组件的时候,我们必须申明接口的属性和状态,如下:
class SomeComponent extends React.Component, ISomeComponentState> {
  // ...
}
现在,我们有我们的项目结构的地方,我们知道的基本知识,现在开始开发我们的组件。
使用TypeScript 开发 React组件
我们在应用根目录下创建一个名为js的文件夹,然后我们将创建如下图的目录结构文件
当我们创建完成之后,我们可以随意的修改它们。
interfaces.d.ts
我们将把我们应用中的所有接口都定义在此文件中。我们使用的扩展。d.ts(这也是由类型定义文件使用)代替。TS因为这个文件不会编译成为JavaScript文件。在我们编程过程中,此文件不会被编译,因为TypeScript接口不会编译成JavaScript。
// Defines the interface of the structure of a task
interface ITodo {
  id: string,
  title: string,
  completed: boolean
}


// Defines the interface of the properties of the TodoItem component
interface ITodoItemProps {
  key : string,
  todo : ITodo;
  editing? : boolean;
  onSave: (val: any) => void;
  onDestroy: () => void;
  onEdit: ()  => void;
  onCancel: (event : any) => void;
  onToggle: () => void;
}


// Defines the interface of the state of the TodoItem component
interface ITodoItemState {
  editText : string
}


// Defines the interface of the properties of the Footer component
interface ITodoFooterProps {
  completedCount : number;
  onClearCompleted : any;
  nowShowing : string;
  count : number;
}

// Defines the TodoModel interface
interface ITodoModel {
  key : any;
  todos : Array;
  onChanges : Array<any>;
  subscribe(onChange);
  inform();
  addTodo(title : string);
  toggleAll(checked);
  toggle(todoToToggle);
  destroy(todo);
  save(todoToSave, text);
  clearCompleted();
}

// Defines the interface of the properties of the App component
interface IAppProps {
  model : ITodoModel;
}

// Defines the interface of the state of the App component
interface IAppState {
  editing? : string;
  nowShowing? : string
}
常量
这个文件用于定义一些常量。通常用于保存一些键盘的常量和一些事件。
我们也可以用一些值来区分一些任务的当前状态:
- COMPLETED_TODOS 用于完成任务时
- ACTIVE_TODOS 用于没有完成任务时
- ALL_TODOS 用于显示所有任务时使用
namespace app.constants {
  export var ALL_TODOS = 'all';
  export var ACTIVE_TODOS = 'active';
  export var COMPLETED_TODOS = 'completed';
  export var ENTER_KEY = 13;
  export var ESCAPE_KEY = 27;
}
实用工具
这个文件包含一个叫 Utils 的类。这个类不仅仅包含是一些静态方法。
namespace app.miscelanious {

  export class Utils {

    // generates a new Universally unique identify (UUID)
    // the UUID is used to identify each of the tasks
    public static uuid() : string {
      /*jshint bitwise:false */
      var i, random;
      var uuid = '';

      for (i = 0; i < 32; i++) {
        random = Math.random() * 16 | 0;
        if (i === 8 || i === 12 || i === 16 || i === 20) {
          uuid += '-';
        }
        uuid += (i === 12 ? 4 : (i === 16 ? (random & 3 | 8) : random))
          .toString(16);
      }

      return uuid;
    }

    // adds 's' to the end of a given world when count > 1
    public static pluralize(count, word) {
      return count === 1 ? word : word + 's';
    }

    // stores data using the localStorage API
    public static store(namespace, data?) {
      if (data) {
        return localStorage.setItem(namespace, JSON.stringify(data));
      }

      var store = localStorage.getItem(namespace);
      return (store && JSON.parse(store)) || [];
    }

    // just a helper for inheritance
    public static extend(...objs : any[]) : any {
      var newObj = {};
      for (var i = 0; i < objs.length; i++) {
        var obj = objs[i];
        for (var key in obj) {
          if (obj.hasOwnProperty(key)) {
            newObj[key] = obj[key];
          }
        }
      }
      return newObj;
    }

  }
}
模型
TodoModel 是一个通用 “model” 对象。由于这个应用程序是非常小的,它甚至可能不值得把这个逻辑分开,但我们这样做是为了演示一种方式来分离你的应用程序的部分。
/// ; // a list of tasks
public onChanges : Array; // a list of events
constructor(key) {
this.key = key;
this.todos = app.miscelanious.Utils.store(key);
this.onChanges = [];
}
// the following are some methods
// used to manipulate the list of tasks
public subscribe(onChange) {
this.onChanges.push(onChange);
}
public inform() {
app.miscelanious.Utils.store(this.key, this.todos);
this.onChanges.forEach(function (cb) { cb(); });
}
public addTodo(title : string) {
this.todos = this.todos.concat({
id: app.miscelanious.Utils.uuid(),
title: title,
completed: false
});
this.inform();
}
public toggleAll(checked) {
// Note: it's usually better to use immutable
// data structures since they're easier to
// reason about and React works very
// well with them. That's why we use
// map() and filter() everywhere instead of
// mutating the array or todo items themselves.
this.todos = this.todos.map((todo : ITodo) => {
return app.miscelanious.Utils.extend(
{}, todo, {completed: checked}
);
});
this.inform();
}
public toggle(todoToToggle) {
this.todos = this.todos.map((todo : ITodo) => {
return todo !== todoToToggle ?
todo :
app.miscelanious.Utils.extend(
{}, todo, {completed: !todo.completed}
);
});
this.inform();
}
public destroy(todo) {
this.todos = this.todos.filter(function (candidate) {
return candidate !== todo;
});
this.inform();
}
public save(todoToSave, text) {
this.todos = this.todos.map(function (todo) {
return todo !== todoToSave ? todo : app.miscelanious.Utils.extend({}, todo, {title: text});
});
this.inform();
}
public clearCompleted() {
this.todos = this.todos.filter(function (todo) {
return !todo.completed;
});
this.inform();
}
}
}
页脚
这个文件使用 .tsx 扩展代替 .ts ,因为它包含一些TSX 代码。
TSX 是 JSX的一种超集。我们将使用TSX代替客户端HTML模板因为TSX和JSX是用来生成一个在DOM状态存储。当组件的属性或者状态发生变化时,React会从最有效率的方式去更新DOM状态存储,并且同时把这些改变及时应用于DOM的真实展现。这个过程React非常高效的及时更新DOM内容。
说明:我们需要一些额外的编译选项来编译 .tsx 文件。我们将在这篇文章结尾介绍更多关于这方面的内容
这个页脚组件允许用户去根据状态去删选任务列表和显示一些任务数。这个组件没有状态(注意如何通过将其传递给该接口的状态)但是有一些继承于父亲组件(TodoApp组件)的属性。
/// todoItem
TodoItem 组件代表一个任务列表中的一个任务。 这个组件不仅有属性( ITodoItemProps )而且还有状态( ITodoItemState )。
这个组件初始化状态是在构造函数里面设置同时属性是通过父亲组件传递过来的构造函数的参数来设置组件的( TodoApp 组件)
/// (this.refs["editField"]);
node.focus();
node.setSelectionRange(node.value.length, node.value.length);
}
}
public render() {
return (
this.props.todo.completed,
editing: this.props.editing
})}>
"view">
"toggle"
type="checkbox"
checked={this.props.todo.completed}
onChange={this.props.onToggle}
/>
"editField"
className="edit"
value={this.state.editText}
onBlur={ e => this.handleSubmit(e) }
onChange={ e => this.handleChange(e) }
onKeyDown={ e => this.handleKeyDown(e) }
/>
);
}
}
}
#### app模块
此文件包含应用程序的入口点,这是该应用程序只有顶层组件的todoapp组件声明。
/// (this.refs["newField"]).value.trim();
if (val) {
this.props.model.addTodo(val);
React.findDOMNode(this.refs["newField"]).value = '';
}
}
public toggleAll(event) {
var checked = event.target.checked;
this.props.model.toggleAll(checked);
}
public toggle(todoToToggle) {
this.props.model.toggle(todoToToggle);
}
public destroy(todo) {
this.props.model.destroy(todo);
}
public edit(todo) {
this.setState({editing: todo.id});
}
public save(todoToSave, text) {
this.props.model.save(todoToSave, text);
this.setState({editing: null});
}
public cancel() {
this.setState({editing: null});
}
public clearCompleted() {
this.props.model.clearCompleted();
}
// the JSX syntax is quite intuitive but check out
// https://facebook.github.io/react/docs/jsx-in-depth.html
// if you need additional help
public render() {
var footer;
var main;
var todos = this.props.model.todos;
var shownTodos = todos.filter(function (todo) {
switch (this.state.nowShowing) {
case app.constants.ACTIVE_TODOS:
return !todo.completed;
case app.constants.COMPLETED_TODOS:
return todo.completed;
default:
return true;
}
}, this);
var todoItems = shownTodos.map(function (todo) {
return (
this.toggle.bind(this, todo)}
onDestroy={this.destroy.bind(this, todo)}
onEdit={this.edit.bind(this, todo)}
editing={this.state.editing === todo.id}
onSave={this.save.bind(this, todo)}
onCancel={ e => this.cancel() }
/>
);
}, this);
var activeTodoCount = todos.reduce(function (accum, todo) {
return todo.completed ? accum : accum + 1;
}, 0);
var completedCount = todos.length - activeTodoCount;
if (activeTodoCount || completedCount) {
footer =
this.state.nowShowing}
onClearCompleted={ e=> this.clearCompleted() }
/>;
}
if (todos.length) {
main = (
"main">
"toggle-all"
type="checkbox"
onChange={ e => this.toggleAll(e) }
checked={activeTodoCount === 0}
/>
"todo-list">
{todoItems}
);
}
return (
"header">
todos
"newField"
className="new-todo"
placeholder="What needs to be done?"
onKeyDown={ e => this.handleNewTodoKeyDown(e) }
autoFocus={true}
/>
{main}
{footer}
);
}
}
}
var model = new TodoModel('react-todos');
var TodoApp = app.components.TodoApp;
function render() {
React.render(
,
document.getElementsByClassName('todoapp')[0]
);
}
model.subscribe(render);
render();
确保其中的 this 在所有的时候都指向正确的元素。例如,你应用使用箭头函数: onKeyDown = { e => this.handleNewTodoKeyDown(e) } 代替 onKeyDown = { this.handleNewTodoKeyDown }
确保 this 指向 handleNewTodoKeyDown 函数内部的组件。
编译应用程序
为了编译我们的应用程序,我们需要在 js 文件夹下添加一个 tsconfig.json 文件。
{
    "compilerOptions": {
        "target": "es5",
        "module": "commonjs",
        "moduleResolution": "node",
        "isolatedModules": false,
        "jsx": "react",
        "experimentalDecorators": true,
        "emitDecoratorMetadata": true,
        "declaration": false,
        "noImplicitAny": false,
        "removeComments": true,
        "noLib": false,
        "preserveConstEnums": true,
        "suppressImplicitAnyIndexErrors": true
    },
    "filesGlob": [
        "**/*.ts",
        "**/*.tsx",
        "!node_modules/**"
    ],
    "files": [
        "constants.ts",
        "interfaces.d.ts",
        "todoModel.ts",
        "utils.ts",
        "app.tsx",
        "footer.tsx",
        "todoItem.tsx"
    ],
    "exclude": []
}
如果我们认真阅读了 TypeScript compiler options 我们就能够知道该如何使用 tsconfig.json 文件: > 参数 --project 或者 -p 都能用于编译项目在给定的文件下。这个文件需要含有 tsconfig.json 文件来直接编译。
我们可以编译我们的应用程序通过以下命令: //在应用程序的根目录 $ tsc -p js 执行这个命令之后,应该会在 js 文件夹下生成以下JavaScript文件:
这些文件会在我们的 index.html 文件中引用:
<script type="text/javascript" src="js/constants.js">script>
<script type="text/javascript" src="js/utils.js">script>
<script type="text/javascript" src="js/todoModel.js">script>
<script type="text/javascript" src="js/todoItem.js">script>
<script type="text/javascript" src="js/footer.js">script>
<script type="text/javascript" src="js/app.js">script>
接下来我们准备运行我们的应用程序。
运行应用程序
为了运行我们的应用程序,我们需要一个web服务器。这里我们通过npm来安装 http-server 。这里博主推荐使用 https://www.npmjs.com/package/anywhere 。
我们通过以下命令来安装http-server:
$ npm install -g http-server
如果你使用的是OSX系统,请使用sudo权限
运用以下命令来运行应用程序:
// 在应用的根目录
$ http-server
如果你打开浏览器导航到 http://127.0.0.1:8080/ ,你应用可以看到应用程序正在运行:
记得打开谷歌浏览器开发者工具去查看一下React 开发者扩展工具 并且查看一下当你与应用程序交互时,如何改变组件的属性和状态的值。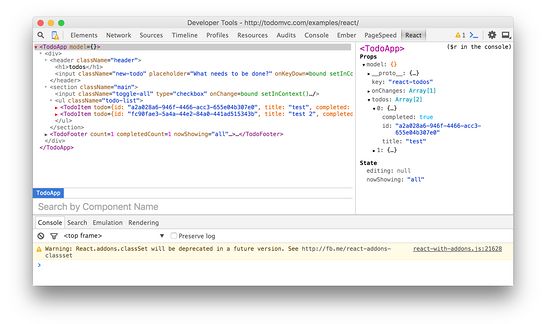
总结
在这篇博客中我们已经学习了怎么搭建开发环境和怎么使用TypeScript来开发React应用程序。
你可以查看这个项目的 源码
如果你想了解更多内容?请查看 Type React and Redux
转载:http://xsstomy.com/articles/9.html

