本篇概要:
- 1. 全文检索概念;
- 2. 全文检索引擎 ElasticSearch;
- 3. 安装 ElasticSearch 以及中文分词插件 IK;
- 3.1 安装 ElasticSearch7;
- 3.2 安装 elasticsearch-head;
- 3.3 ElasticSearch 设置密码;
- 3.4 安装中文分词插件 IK;
- 4. 创建索引;
- 5. 全文数据检索以及关键字高亮显示;
1. 全文检索概念;
-
相关概念
-
全文检索就是对全文数据的检索
-
数据分类:结构化数据、非结构化数据
-
结构化数据
-
行数据,储存在数据库里,可以用
二维表结构来逻辑表达实现的数据
-
能够用数据或统一的结构加以表示
-
在数据表中,可以用
数字和符号进行表示的数据
-
比如在数据表中存储一个商品的库存,可以用一个整型进行存储,存储的是一个数字
-
存储一个商品的价格,可以用一个浮点进行存储
-
给用户存储性别,可以用枚举来进行存储
-
以上举例都称之为结构化数据
-
非结构化数据
-
无法用数字或者统一的结构表示
-
文本、图像、声音、网页都可称之为非结构化数据,在我们数据表里体现方式是文本,
文本就是非结构化数据
-
结构化数据属于非结构化数据
-
非结构化数据就是
全文数据;对全文数据的检索,就是全文检索
-
全文检索
-
概念:一种将文件中或者数据库中所有文本与检索项匹配的文字资料检索的方法
-
对全文数据的检索,就是全文检索
-
顺序扫描法:会将数据表中所有的记录挨个进行扫描,然后再对每一条记录里的内容逐次扫描,把要搜索的内容显示出来。这种方式扫描起来非常慢,效率非常低下。
-
索引扫描法:全文检索的基本思路,也就是将非结构化数据中的一部分信息提取出来,重新组织,使其变得有一定结构,然后对此有一定结构的数据进行搜索,从而达到搜索相对较快的目的。
-
对结构化数据检索的时候是非常快的,索引扫描法就是运用了这样一个思路,先把非结构化的数据变得结构化,将里面的文本全部都拆开,打成一个一个的词元,然后挨个的创建索引。
-
全文检索过程
-
创建索引、搜索索引
-
创建索引
-
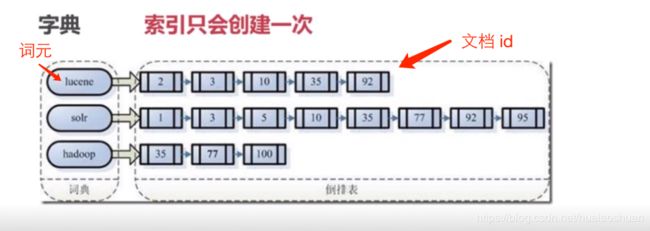
索引保存了什么?索引就是一个字典(如下图一)
-
如何创建索引
-
第一步:一些要索引的原文档(Document,下图二)
-
第二步:将原文档传给分词组件(Tokenizer)。将文档分成一个一个单独的单词、去除标点符号、去除停词(Stop word:a,the 类似这种没有意义的词),得到词元。(下图三)
-
第三步:将得到的词元(Token)传递给语言处理组件(Linguistic Processor)。
-
‐ 会将单词变为小写(Lowercase)
-
‐ 将单词缩减为词根形式,如 “cars” 到 “car”
-
‐ 将单词转换为词根,如 “drove” 到 “drive”
-
第四步:将得到的词(Term)传给索引组件(Indexer)
-
‐ 利用得到的单词(Term)创建一个字典
-
‐ 对字典进行按字母顺序排序
-
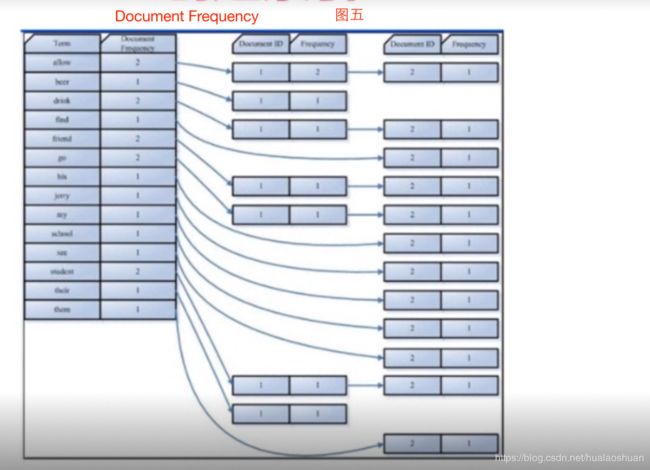
‐ 合并相同的词(Term)成为文档倒排(Posting List)链表(见图四、五)


如何搜索索引
-
第一步:用户输入查询语句(交给词法分析组件、语法分析组件)
-
第二步:对查询语句进行词法分析、语法分析、及语言处理,打成词元
-
第三步:根据词元搜索索引,得到符合的文档 id,根据文档 id 得到结果
-
搜索索引和前面的步骤一样,只不过没有创建索引
2. 全文检索引擎 ElasticSearch;
-
相关概念
-
全文检索引擎是目前广泛应用的主流搜索引擎。
-
它的工作原理是计算机索引程序通过扫描文章中的每一个词,对每一个词建立一个索引,指明该词在文章中出现的次数和位置,当用户查询时,检索程序就根据事先建立的索引进行查找,并将查找的结果反馈给用户的检索方式。
-
使用这种检索方式的软件或者产品称之为全文搜索引擎。
-
相关产品
-
Lucene、Sphinx、Xapian、Nutch、DataparkSearch、
ElasticSearch
-
ElasticSearch 介绍
-
是一个基于 Apache Lucene(TM)的开源搜索引擎。无论在开源还是专有领域,Lucene 可以被认为 是迄今为止最先进、性能最好、功能最全的搜索引擎库。
-
ElasticSearch 也使用 Java 开发并使用 Lucene 作为其核心来实现所有索引和搜索功能,但是它的目的是通过简单的 RESTful API 来隐藏 Lucene 的复杂性,从而让全文搜索变得简单
-
分布式的实时文件存储,每个字段都被索引并且可被搜索
-
分布式的实时分析搜索引擎
-
可以扩展到上百台服务器,处理 PB 级结构化或非结构化数据
-
所有功能集成在一个服务里面,可以通过 RESTful API、各种语言的客户端甚至命令行与之交互
-
上手容易,提供了很多合理的缺省值,开箱即用,学习成本低
-
可免费下载、使用和修改
-
配置灵活
-
官网地址: https://www.elastic.co/cn/
3. 安装 ElasticSearch 以及中文分词插件 IK;
- 下载页面:https://www.elastic.co/cn/downloads/elasticsearch
3.1 安装 ElasticSearch7;
cd /usr/local/src
wget https://artifacts.elastic.co/downloads/elasticsearch/elasticsearch-7.5.0-linux-x86_64.tar.gz
tar zxvf elasticsearch-7.5.0-linux-x86_64.tar.gz -C /usr/local/elasticsearch
vim /usr/local/elasticsearch/config/elasticsearch.yml
cluster.name: el-search
node.name: master-1
network.host: 0.0.0.0
http.port: 9200
cluster.initial_master_nodes: ["master-1"]
/usr/local/elasticsearch/bin/elasticsearch -d
curl localhost:9200
http://192.168.2.214:9200
useradd es
chown -R es /usr/local/elasticsearch/
su es
bin/elasticsearch -d
sysctl -w vm.max_map_count=262144
vim /etc/sysctl.conf
vm.max_map_count = 655360
vim /etc/security/limits.conf
*** hard nofile 65536
*** soft nofile 65536
vim /etc/systemd/system/elasticsearch.service
[Unit]
Description=elasticsearch
[Service]
User=es
LimitNOFILE=100000
LimitNPROC=100000
ExecStart=/usr/local/elasticsearch/bin/elasticsearch
[Install]
WantedBy=multi-user.target
systemctl enable elasticsearch
3.2 安装 elasticsearch-head;
http.cors.enabled: true
http.cors.allow-origin: "*"
npm run start
3.3 ElasticSearch 设置密码;
vim /usr/local/elasticsearch/config/elasticsearch.yml
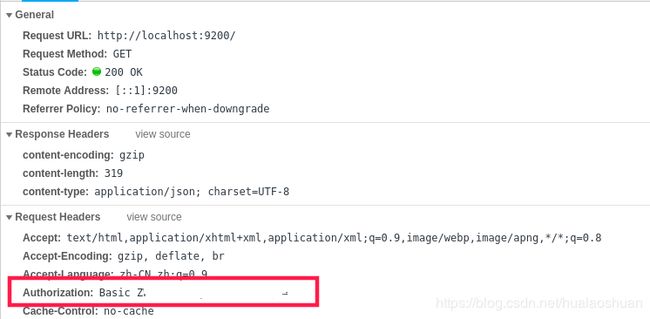
http.cors.allow-headers: Authorization,X-Requested-With,Content-Length,Content-Type
xpack.security.enabled: true
xpack.security.transport.ssl.enabled: true
/usr/local/elasticsearch/bin/elasticsearch-setup-passwords interactive

3.4 安装中文分词插件 IK;
cd /usr/local/src
wget https://github.com/medcl/elasticsearch-analysis-ik/releases/download/v7.5.0/elasticsearch-analysis-ik-7.5.0.zip
mkdir /usr/share/elasticsearch/plugins/ik
unzip elasticsearch-analysis-ik-7.5.0.zip -d /usr/share/elasticsearch/plugins/ik
4. 创建索引;
{
"settings": {
"refresh_interval": "5s",
"number_of_shards": 1,
"number_of_replicas": 0
},
"mappings": {
"properties": {
"productid": {"type": "long"},
"title": {"type": "text", "index": true, "analyzer": "ik_smart"},
"descr": {"type": "text", "index": true, "analyzer": "ik_smart"},
"type": {"type": "text"}
}
}
}
curl -H 'Content-Type: application/json' \
-XPUT "http://192.168.2.214:9200/shop/?pretty" -d '@createindex.json'
{
"acknowledged": true,
"shards_acknowledged": true,
"index": "shop"
}
curl -XGET "http://192.168.2.214:9200/_cat/indices?v"
5. 全文数据检索以及关键字高亮显示;
curl -H 'Content-Type: application/json' \
-XPUT "http://192.168.2.214:9200/shop/_doc/1?pretty" \
-d '{"productid":1, "title":"这是一个商品的标题", "descr":"这是一个商品的描述", "type":"products"}'
{
"_index" : "shop",
"_type" : "_doc",
"_id" : "1",
"_version" : 1,
"result" : "created",
"_shards" : {
"total" : 1,
"successful" : 1,
"failed" : 0
},
"_seq_no" : 0,
"_primary_term" : 1
}
curl -H 'Content-Type: application/json' \
-XPUT "http://192.168.2.214:9200/shop/_doc/2?pretty" \
-d '{"productid":2, "title":"这是一个手机", "descr":"这是一个手机的描述", "type":"products"}'
curl -XGET "http://192.168.2.214:9200/shop/_search?pretty"
{
"took" : 1,
"timed_out" : false,
"_shards" : {
"total" : 1,
"successful" : 1,
"skipped" : 0,
"failed" : 0
},
"hits" : {
"total" : {
"value" : 2,
"relation" : "eq"
},
"max_score" : 1.0,
"hits" : [
{
"_index" : "shop",
"_type" : "_doc",
"_id" : "1",
"_score" : 1.0,
"_source" : {
"productid" : 1,
"title" : "这是一个商品的标题",
"descr" : "这是一个商品的描述",
"type":"products"
}
},
{
"_index" : "shop",
"_type" : "_doc",
"_id" : "2",
"_score" : 1.0,
"_source" : {
"productid" : 2,
"title" : "这是一个手机",
"descr" : "这是一个手机的描述",
"type":"products"
}
}
]
}
}
{
"query": {
"multi_match":{
"query": "手机",
"fields": ["title", "descr"]
}
},
"highlight" : {
"pre_tags" : [""],
"post_tags" : [""],
"fields" : {
"title" : {},
"descr" : {}
}
}
}
curl -H 'Content-Type: application/json' \
-XPOST "http://192.168.2.214:9200/shop/_search?pretty" -d'@search.json'
{
"took" : 7,
"timed_out" : false,
"_shards" : {
"total" : 1,
"successful" : 1,
"skipped" : 0,
"failed" : 0
},
"hits" : {
"total" : {
"value" : 1,
"relation" : "eq"
},
"max_score" : 1.5098255,
"hits" : [
{
"_index" : "shop",
"_type" : "_doc",
"_id" : "2",
"_score" : 1.5098255,
"_source" : {
"productid" : 2,
"title" : "这是一个手机",
"descr" : "这是一个手机的描述",
"type":"products"
},
"highlight" : {
"descr" : [
"这是一个手机的描述"
],
"title" : [
"这是一个手机"
]
}
}
]
}
}


