Angular.js示例应用程序
目录
介绍
演示应用程序概述
发布者端
网站端
Angular.Js简介
应用程序
服务
模块
依赖注入
路由
视图
控制器
作用域
指令
发布者
Angular.js网站
Require.js用法
请参阅index.html
请参阅scripts \ main.js
主应用程序设置
请参阅scripts \ app.js
路由
请参阅scripts \ main.js
根页面
那么这个页面究竟做了什么?
LiveUpdatesService
LocalStorageService
ImageService
UtilitiesService
可拖动指令
可调整大小的指令
根控制器
根视图
“收藏”页面
那么这个页面究竟做了什么?
Favs 控制器
Favs 视图
ColorBox指令
关于页面
结论
- 下载演示应用程序 - 3.3 MB
介绍
我决定花一点时间来学习一些流行的网络MVC框架,这些框架由Google的朋友们称为Angular.js,这是一个JavaScript MVC框架,这对我来说是一个偏离我常见的受XAML影响的世界。然而,尝试一下以了解你将如何在不同的语言/环境中做事情是很好的(我的导师Fredrik Bornander(AKA瑞典人)告诉过我),所以我决定采取Angular.js进行尝试。
本文将讨论Angular.js背后的一些基本思想,然后将重点介绍我在本文中创建的演示应用程序的细节。
在我们进入实际文章之前,我只会简单地(暂时还不太技术化,虽然我知道你们很多人都想看到这一点,而且它会出现,不用担心)谈谈演示应用程序的简单功能,这样你就知道如何在下载时自己驱动它了。
演示应用程序概述
附加的演示应用程序有两个部分:
发布者端
这是一个标准的WPF项目,因此生成一个可以运行的EXE文件。我不会花太多时间在本文中谈论发布者,因为它不是文章的重要部分,它只是在Angular.js网站上展示内容的工具。无论如何,发布者所做的是允许用户点击图像,当用户点击图像时,使用网络套接字将消息发送到Angular.js网站(稍后将详细介绍)。简而言之,这就是发布者所做的一切。
网站端
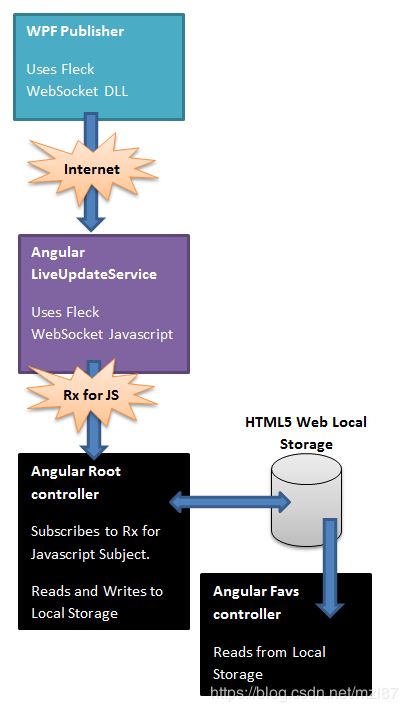
Angular.js网站,是有趣的事情发生的地方(至少在我看来)。Angular.js网站基本上是执行这些任务。
- 当在根页面上时,Angular.js将监听通过wpf发布者通过web套接字发送的消息,然后通过Reactive Extensions for JavaScript在内部向感兴趣的任何人广播消息,本文中的内容基本上只是根页面。
根页面将为接收到的每个允许消息显示一个图像块。由于一些jQuery UI的爱好,图像块可以调整大小并拖动。然后,用户可以选择将图像块保存到他们的收藏夹,这将使得关于图像块的所有信息被保存到HTML 5本地存储器。此信息包括大小,位置等,因此当用户返回根页面时,他们的收藏(他们保存的收藏夹)应该与之前完全一样。用户还可以决定从根页面中删除其收藏夹中的图像块。
- 用户还可以选择导航到收藏页面,收藏页面将显示其HTML 5本地存储持久化收藏夹的一些缩略图图像。可以单击这些缩略图以显示非常标准的ColorBox(Lightbox等类型的东西)jQuery插件。
- 用户还可以选择一个关于页面的静态视图,我只是简单地添加了这个视图,以便在Angular.js中演示路由时提供足够的路由,从而使事情更有价值。
所以简单地说,这就是它的全部,这幅图像可能有助于巩固我刚才用文字表述的内容,图像说明了一切:
这是本文的演示代码的两部分,在正确运行时应该是这样的:

重要的提示
您应该确保按照这些步骤成功运行演示代码。
- 如果您发现某些Publisher.Wpf项目引用无法找到,我将它们包含在“Lib”文件夹中,您可以在其中重新引用它们
- 您应确保首先运行Publisher.Wpf项目并显示所有图像。这可以通过将Publisher.Wpf项目构建到EXE,并简单地在文件系统中找到EXE,然后双击它运行(或使用Visual Studio在DEBUG中运行实例)来完成。
- 然后,您应该运行Angular Web站点,确保在Visual Studio中将Index.html设置为起始页,然后使用Visual Studio运行Angular Web站点
Angular.Js简介
在本节中,我将讨论使用Angular.js的一些基础知识。这一部分将混合我自己的话,文本直接从Angular.js网站上提取。我不会涵盖Angular.js所做的所有事情,因为那更像是一本书,我只是没有那么多时间。然而,我将介绍一些基本的Angular.js构建块,所以你应该阅读这篇文章并想一想“mmm ......这个叫Angular的东西引起了我的兴趣,我可以在哪里学到更多东西”,当然,要通过超链接。
应用程序
每个Angular.js应用程序在某些时候都需要在HTML中使用Angular.js ng-app绑定,或者通过一些与声明性HTML绑定执行相同工作的代码。这段代码本质上是引导Angular.js并让它知道运行应用程序的上下文。例如,您可能有以下代码:
  	{{name}}

  This is not using the angular app, as it is not within the Angular apps scope
可以看出,我们可以告诉HTML的特定部分充当Angular.js应用程序。在这个例子中,这意味着,id="inner" 的div将具有HTML的一部分(虽然没有什么可以阻止你使实际的Body标签设置为 angular应用程序),因此可以完全访问Angular.js应用程序功能(我们将在下面讨论)。
虽然div与id="outer" 将不被认为是Angular.js应用的部分,因此将不会有任何的访问Angular.js应用程序功能(我们将在下面讨论)。
服务
Angular.js中的服务与WinForms / WPF或Silverlight中的服务大致相同。它们是小助手类,可以提供能够在整个应用程序中使用的功能。在诸如C#的强类型语言中,我们通常会使这些服务实现特定的接口并将它们(通过构造函数或属性注入)注入到我们的应用程序代码中。然后我们可以在测试中提供这些服务的伪造/模拟,或者在底层系统更改时提供替代版本(例如从Mongo DB交换到Raven DB存储)
虽然Angular.js不支持接口(虽然你可以为它使用TypeScript),但它确实支持在其代码中注入真实/伪造服务。事实上,我会说,Angular.js的一个主要视图是它支持IOC开箱即用。
模块
大多数应用程序都有一个主要方法,可以实例化,连接和引导应用程序。Angular应用程序没有main方法。相反,模块以声明方式指定应如何引导应用程序。这种方法有几个优点:
- 该过程更具说明性,更易于理解
- 在单元测试中,不需要加载所有模块,这可能有助于编写单元测试。
- 可以在场景测试中加载其他模块,这些模块可以覆盖某些配置并帮助端到端测试应用程序
- 第三方代码可以打包为可重用模块。
- 模块可以以任何/并行顺序加载(由于模块执行的延迟性质)。
http://docs.angularjs.org/guide/module
建议的方法是实际拆分模块,这样你可能有这样的结构:
- 服务模块
- 指令模块
- 过滤器模块
- 应用程序模块
这就是你如何定义Angular.js模块,这是Angular.js提供的“module”功能的使用。
angular.module('xmpl.service', []).
  value('greeter', {
    salutation: 'Hello',
    localize: function(localization) {
      this.salutation = localization.salutation;
    },
    greet: function(name) {
      return this.salutation + ' ' + name + '!';
    }
  }).
  value('user', {
    load: function(name) {
      this.name = name;
    }
  });
依赖注入
Angular.js是在考虑依赖注入(IOC)的情况下构建的,因此,许多基础结构可能会被替换为模拟版本,或者控制器可以使用模拟服务进行测试。显示如何执行此操作,或如何测试Angular.js应用程序不在本文的范围内。如果您想知道这一点,请访问Angular.js文档,或者获取一本书。抱歉!
继上一个模块示例之后,这就是一个模块,可能看起来像是一个依赖项,在这种情况下,我们刚刚定义的模块,我们使用2个值'greeter'和'user',这两个函数都是可用的'xmpl.service'模块。该模块可以提供xmpl.service模块的模拟版本。
angular.module('xmpl', ['xmpl.service']).
  run(function(greeter, user) {
    // This is effectively part of the main method initialization code
    greeter.localize({
      salutation: 'Bonjour'
    });
    user.load('World');
  })
路由
Angular.js主要是单页面应用程序框架,因此具有视图模板的概念,可以应用该视图模板以响应所请求的特定路径。
Angular.js中的路由实际上与ASP MVC甚至node.js之类的路由没有什么不同。
路由是通过使用名为$ routeProvider的预构建服务完成的,该服务作为Angular.js的一部分免费提供。它允许用户使用一个非常简单的API配置他们的路由,这可以归结为这两个函数:
- when(path, route)
- 其中route对象具有以下属性:
- controller
- template
- templateUrl
- resolve
- redirectTo
- reloadOnSearch
- 其中route对象具有以下属性:
- otherwise(params)
这是一个小例子:
$routeProvider
    .when('/products', {
        templateUrl: 'views/products.html',
        controller: 'ProductsCtrl'
    })
    .when('/about', {
        templateUrl: 'views/about.html'
    })
    .otherwise({ redirectTo: '/products' });;
视图
关于这个视图没有太多可说的。我们之前可能都遇到过HTML。这就是视图所包含的内容。唯一的区别是Angular.js视图将包含允许视图模板显示Angular.js范围对象中的数据的其他(非标准HTML)绑定。范围对象通常来自控制器(虽然它不仅限于来自控制器,它可以被继承,或者通过指令创建)。
这是一个视图的小例子,注意那里使用的绑定,比如使用ng-model和ng-repeat一些Angular.js预建过滤器的使用,即filter和orderBy(请注意在本文中我不会覆盖这里的过滤器)。
Search:
Sort by:
-
{{phone.name}}
{{phone.snippet}}
控制器
控制器用于定义视图的作用域。作用域可以是视图可以使用的变量和函数,例如使用ng-click绑定。这是与我们刚看到的视图模板一起使用的控制器代码。
function PhoneListCtrl($scope) {
  $scope.phones = [
    {"name": "Nexus S",
     "snippet": "Fast just got faster with Nexus S.",
     "age": 0},
    {"name": "Motorola XOOM™ with Wi-Fi",
     "snippet": "The Next, Next Generation tablet.",
     "age": 1},
    {"name": "MOTOROLA XOOM™",
     "snippet": "The Next, Next Generation tablet.",
     "age": 2}
  ];

  $scope.orderProp = 'age';
可以看出,控制器定义了以下两个作用域属性:
- phones:这是一个JSON数组
- orderProp:这是一个单一的string值
作用域
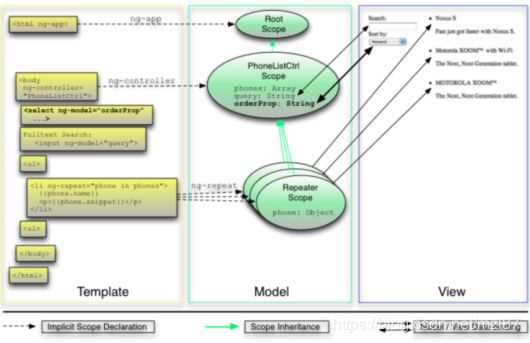
Scope是允许视图和控制器定义的作用域对象属性/函数绑定在一起的粘合剂。如果您曾经使用过任何基于XAML的技术,例如WPF / Silverlight / WinRT,您可以将范围视为一个DataContext。实际上,有很多UI框架具有类似作用域的概念。XAML技术有通常是ViewModel的DataContext,而另一个流行的MVVM JavaScript库Knockout.js也具有作用域和层次作用域的概念,可以使用各种预建的关键词在HTML中的绑定中访问。
Angular.js还支持嵌套/层次化作用域,有时会让人感到有些困惑。我个人发现,使用Angular.js及其作用域的最佳方法之一是安装Batarang浏览器插件,它有一个很好的方法,允许您使用作用域检查器钻取作用域(类似于对WPF的snoop或对Silverlight的silverlightspy)
此图可能有助于巩固视图-控制器-作用域的概念。
指令
Angular.js使用了一种非常新颖的概念,称为指令。指令是聪明的chap,实际上允许您创建额外的属性,甚至是新的DOM片段。这一切都是通过对指令应用某些约束来控制的,这样您可能希望声明某个指令只能用作属性,或者它只能用作元素。您可以将指令视为自定义控件。
指令也遵循正常的Angular.js规则,因为它们支持依赖注入,并且它们也有作用域概念。
无论如何,Angular.js的基础知识到此结束,现在我们将进行实际的演示应用程序代码演练。
发布者
正如我之前所说,发布者是一个WPF应用程序(因此它是一个可运行的EXE),这不是本文的主旨。关于发布者的要点是:
- 这是使用令人敬畏的Fleck WebSocket库与Angular.js网站交流
- 它有一个Win8类型的全景图,因此您可以使用鼠标滚动
以下是WPF发布者运行时的外观:

现在重要的是,Web socket代码。
public class WebSocketInvoker : IWebSocketInvoker
{
    List allSockets = new List();
    WebSocketServer server = new WebSocketServer("ws://localhost:8181");

    public WebSocketInvoker()
    {
        FleckLog.Level = LogLevel.Debug;
        server.Start(socket =>
        {
            socket.OnOpen = () =>
            {
                Console.WriteLine("Open!");
                allSockets.Add(socket);
            };
            socket.OnClose = () =>
            {
                Console.WriteLine("Close!");
                allSockets.Remove(socket);
            };
            socket.OnMessage = Console.WriteLine;
        });
    }

    public void SendNewMessage(string jsonMessage)
    {
        foreach (var socket in allSockets)
        {
            socket.Send(jsonMessage);
        }
    }
} 这就是那部分的全部,事实上,相当酷哈(全部归功于Fleck WebSocket库)。现在我意识到你们中可能有一些人,就像为什么不使用SignalR一样,我本来可以,但那是一篇完全不同的文章,对于这篇文章,我只想把注意力集中在Web客户端的事情上,所以选择使用一个原始的Web套接字,而Fleck WebSocket库完全符合这个要求。
在此代码中,SendNewMessage将在用户单击图像时调用,并且单击的图像名称将通过Web套接字发送到Angular.js网站。Angular.js网站拥有所有可能的图像的副本,因为我不想要进行文件复杂的POST操作,显然Web服务器无法显示本地文件(在我(和任何其他人)的观点中,这将是一个安全风险),所以我选择了发布者和Angular.js网站都知道的共享文件作为本演示应用程序/文章的目的。
Angular.js网站
本节将讨论附加的演示代码Angular.js网站的细节。希望,如果你做到了这一点,当你看到一些代码时,我上面提到的一些东西将开始有意义。
Require.js用法
在我开始研究Angular.js之前,我正在研究使用Require.js,它是JavaScript的模块加载框架,它允许您指定依赖项和首选模块加载顺序。
在本文中,我对此有了更多的建议(从Angular.js O'Reilly的书中附带的源代码开始: https://github.com/shyamseshadri/angularjs-book)
所以,如果你愿意,你可以在这里阅读更多关于这个主题的内容,但是让我们一起来看看附加的Angular.js网站的Require.js元素是什么样的。
它从主Angular.js页面(Index.html)中的这种代码开始:
请参阅index.html
.....
这是标准的Require.js代码,它告诉Require.js它应该运行的主要引导程序代码文件。可以看出,这是scripts/main,所以我们现在看看,好吗?
请参阅scripts \ main.js
// the app/scripts/main.js file, which defines our RequireJS config
require.config({
    paths: {
        angular: 'vendor/angular.min',
        jqueryUI: 'vendor/jquery-ui',
        jqueryColorbox: 'vendor/jquery-colorbox',
        jquery: 'vendor/jquery',
        domReady: 'vendor/domReady',
        reactive: 'vendor/rx'
    },
    shim: {
        angular: {
            deps: ['jquery', 'jqueryUI', 'jqueryColorbox'],
            exports: 'angular'
        },
        jqueryUI: {
            deps: ['jquery']
        },
        jqueryColorbox: {
            deps: ['jquery']
        }
    }
});

require([
  'angular',
  'app',
  'domReady',
  'reactive',
  'services/liveUpdatesService',
  'services/imageService',
  'services/localStorageService',
  'controllers/rootController',
  'controllers/favsController',
  'directives/ngbkFocus',
  'directives/draggable',
  'directives/resizable',
  'directives/tooltip',
  'directives/colorbox'
  // Any individual controller, service, directive or filter file
  // that you add will need to be pulled in here.
],
  function (angular, app, domReady) {
      …….
      …….
      …….
      …….

  }
);这里有很多事情要做。但它可以归结为3个部分:
- 我们使用JavaScript文件所在的路径配置Require.js。
- 我们使用Require.js 填充程序为Require.js配置首选加载顺序。填充程序基本上为要加载的库设置依赖项。
- 然后我们使用Require.js [Require]告诉Angular.js应用程序我们希望满足哪些依赖项。
我还使用Require.js来满足演示应用程序控制器的要求。其中一个例子如下:
define(['controllers/controllers',
        'services/imageService',
        'services/utilitiesService',
        'services/localStorageService'],
    function (controllers) {
        controllers.controller('FavsCtrl',
            ['$window',
            '$scope',
            'ImageService',
            'UtilitiesService',
            'LocalStorageService',
    function (
        $window,
        $scope,
        ImageService,
        UtilitiesService,
        LocalStorageService) {

        ......
        ......
        ......
        ......
        ......


    }]);
});
主应用程序设置
请参阅scripts \ main.js
现在您已经看到了主引导代码(主要由Require.js配置承担),让我们快速了解一下实际的Angular.js引导位。
这是我们在本文开头讨论过的内容,您知道实际的内容使附加代码成为“Angular.js”应用程序。
那部分内容如下:
define(['controllers/controllers',
        'services/imageService',
        'services/utilitiesService',
        'services/localStorageService'],
    function (controllers) {
        controllers.controller('FavsCtrl',
            ['$window',
            '$scope',
            'ImageService',
            'UtilitiesService',
            'LocalStorageService',
    function (
        $window,
        $scope,
        ImageService,
        UtilitiesService,
        LocalStorageService) {

        ......
        ......
        ......
        ......
        ......


    }]);
});这个bootstrapping做了两件事:
- 它设置了可用的有效路线,我们将在下面查看。
- 它依赖于一个名为“DomReady”的特殊Angular.js插件,其工作方式与jQuery及其ready()事件非常相似。在dom准备好之后,“HTML”元素被赋予了使其充当Angular.js应用程序的属性。
还有“MyApp”模块来自何处的问题。是谁在它被引导到这里之前创建的?
答案是,它存在于自己的文件“app.js”中,如下所示:
请参阅scripts \ app.js
// The app/scripts/app.js file, which defines our AngularJS app
define(['angular', 'controllers/controllers',
   'services/services', 'filters/filters', 'directives/directives'], function (angular) {
  return angular.module('MyApp', ['controllers', 'services', 'filters', 'directives']);
});
路由
请参阅scripts \ main.js
对于演示应用程序,有3个有效路径Root/Favs/About。其中每个都使用标准的Angular.js $routeProvider服务进行配置,其中所有设置代码都在boostrapping文件main.js中完成。
unction ($routeProvider) {
    $routeProvider
        .when('/', {
            templateUrl: 'views/root.html',
            controller: 'RootCtrl'
        })
        .when('/favs', {
            templateUrl: 'views/favs.html',
            controller: 'FavsCtrl'
        })
        .when('/about', {
            templateUrl: 'views/about.html'
        }).otherwise({ redirectTo: '/' });;
}我认为非常明显的是,有3个路由,如上所述,以及它们是如何配置的。所以我不会再多说了。
根页面
这是我放在一起的演示网站中最复杂的页面,因为它汇集了许多不同的东西。
那么这个页面究竟做了什么?
这个想法是有一个名为“LiveUpdatesService”的服务,它监听WPF发布者正在推送数据的Web Socket的客户端。LiveUpdatesService使用JavaScript的反应式扩展来提供可能订阅的数据流。
根页面将订阅此已发布的流,并且每次看到新条目时,它将添加新的jQuery UI可拖动/可调整大小的UI元素,前提是它尚未获得具有相同图像名称的元素。
它还允许用户将图像保存到HTML 5本地存储,并将其从本地存储中删除。如果本地存储中已有项目,则其详细信息将用作Root页面的初始启动状态。我不得不说这看起来很酷,因为所有的信息都是持久存在的,所以它会记住大小、位置、ZIndex,所以它会准确地告诉你如何保存它。
总的来说,这就是根页面的作用。
这是根页面的样子:

这就是它的样子,想看一些代码?
LiveUpdatesService
这是一个服务,它侦听来自发布者Web套接字的传入数据,并通过JavaScript Subject对象的反应式扩展将新接收的Web套接字数据推出。以下是该服务的代码:
define(['services/services'],
  function (services) {
      services.factory('LiveUpdatesService', ['$window',
      function (win) {

          var subject = new Rx.Subject();

          if ("WebSocket" in window) {

              // create a new websocket and connect
              var ws = new WebSocket('ws://localhost:8181/publisher', 'my-protocol');

              // when data is coming from the server, this metod is called
              ws.onmessage = function (evt) {
                  subject.onNext(evt.data);
              };

              // when the connection is established, this method is called
              ws.onopen = function () {
                  win.alert('Websocket connection opened');
              };

              //// when the connection is closed, this method is called
              ws.onclose = function () {
                  subject.onError('Websocket connection closed,
                  perhaps you need to restart the Publisher, and refresh web site');
              };
          }

          return {

              publishEvent: function (value) {
                  subject.onNext(value);
              },
              eventsStream: function () {
                  return subject.asObservable();
              }
          };
      }]);
});这里是使用反应式扩展Subject流的根控制器代码,我们首先检查是否我们之前看过一个具有相同名称的项,如果我们只是向用户显示一条消息(请注意我们不直接使用窗口,而是使用一个$window angular 服务(其可更容易地模仿))。
如果我们之前没有看过图像名称,则使用我们随机定位的ImageService创建一个新项目。
LiveUpdatesService.eventsStream().subscribe(
    function (data) {
        if ($location.path() == '/') {
            var idx = $scope.imageitems.propertyBasedIndexOf('name', data);
            if (idx >= 0) {
                $window.alert('An item with that name has already been added');
            } else {
                var randomLeft = UtilitiesService.getRandomInt(10, 600);
                var randomTop = UtilitiesService.getRandomInt(10, 400);
                var randomWidth = UtilitiesService.getRandomInt(100, 300);
                var randomHeight = UtilitiesService.getRandomInt(100, 300);

                $scope.imageitems.push(ImageService.createImageItem(
                    data, randomLeft, randomTop, randomWidth, randomHeight, false));
                $scope.$apply();
            }
        }
    },
    function (error) {
        $window.alert(error);
    });
LocalStorageService
此服务负责从HTML 5本地存储中持久保存/获取数据项。我认为这段代码非常好理解,所以我将其留在那里:
define(['services/services'],
  function (services) {
      services.factory('LocalStorageService', [
        function () {

            return {

                isSupported: function () {
                    try {
                        return 'localStorage' in window && window['localStorage'] !== null;
                    } catch (e) {
                        return false;
                    }
                },

                save: function (key, value) {
                    localStorage[key] = JSON.stringify(value);
                },

                fetch: function (key) {
                    return localStorage[key];
                },

                parse: function(value) {
                    return JSON.parse(value);
                },

                clear: function (key) {
                    localStorage.removeItem(key);
                }
            };
        }]);
  });
ImageService
此服务只是帮助创建Root页面的ImageItem对象和Favs页面的FavItem对象。
function ImageItem(name, left, top, width, height, isFavourite) {

    var self = this;
    self.name = name;
    self.left = left;
    self.top = top;
    self.width = width;
    self.height = height;
    self.isFavourite = isFavourite;

    self.styleProps = function () {
        return {
            left: self.left + 'px',
            top: self.top + 'px',
            width: self.width + 'px',
            height: self.height + 'px',
            position: 'absolute'
        };
    };
    return self;
};

function FavImageItem(name) {

    var self = this;
    self.name = name;
    return self;
};

define(['services/services'],
  function (services) {
      services.factory('ImageService', [
        function () {
            return {
                createImageItem: function (name, left, top, width, height, isFavourite) {
                    return new ImageItem(name, left, top, width, height, isFavourite);
                },
                createFavImageItem: function (name) {
                    return new FavImageItem(name);
                }
            };
        }]);
});需要注意的一件重要事情是如何在Angular.js中完成动态CSS 。要实现在对象更改时更新的动态CSS,您需要提供一个函数来调用,这是您在styleProps()函数中可以看到的内容:
self.styleProps = function () {
    return {
        left: self.left + 'px',
        top: self.top + 'px',
        width: self.width + 'px',
        height: self.height + 'px',
        position: 'absolute'
    };
};使用这个的标记如下所示,这意味着当对JSON对象进行更新时,CSS也会更新,并且HTML反映了这一点。这不是很容易发现的,所以要确保你读过这几遍,巩固知识,把它牢牢地塞进里面。
ng-style="imageitems[$index].styleProps()"UtilitiesService
该服务提供以下功能:
- 添加一个propertyBasedIndexOf()到数组中,这样可以在数组中搜索将返回索引的特定项属性
- getRandomInt():用于获取随机x / y点,以便在第一次显示新图像项时放置它们
- delayedAlert():在一段延迟时间后显示警报
这是代码:
define(['services/services'],
  function (services) {
      services.factory('UtilitiesService', [
        function () {

            var initialised = false;

            return {

                addArrayHelperMethods: function () {
                    if (!initialised) {
                        initialised = true;
                        Array.prototype.propertyBasedIndexOf =
                                 function arrayObjectIndexOf(property, value) {
                            for (var i = 0, len = this.length; i < len; i++) {
                                if (this[i][property] === value) return i;
                            }
                            return -1;
                        };
                    }
                },

                getRandomInt: function (min, max) {
                    return Math.floor(Math.random() * (max - min + 1)) + min;
                },

                delayedAlert: function(message) {
                    setTimeout(function () {
                        $window.alert(message);
                    }, 1000);
                }
            };
        }]);
  });
可拖动指令
为了实现拖动,我已经知道我不得不使用jQuery UI的库,但是处理Angular.js时,有一宗明确的Angular.js方式,并且将控制器代码与DOM混合在一起改变jQuery代码肯定不是Angular.js方式。那我们还有什么选择呢?这就是Angular.js指令适合的地方,它们被设计用来取代和增强DOM,这就是指令最擅长的地方。
因此,只要您需要直接更改DOM(而不是通过作用域更改),您就应该考虑使用Angular.js指令。
所有这一切,创建一个小的jQuery UI Angular.js指令变得简单,这可以在标记中的
下面是draggable指令代码,您可以看到这仅限于属性使用,并且只是将工作委托给实际的jQuery UI(在Require.js配置中作为需求引用,因此我们知道它已加载好,否则该Angular.js就不会启动,因为它将jQuery UI作为Require.js配置中的依赖项)。
这里值得一提的是,一旦拖动完成,我想告知控制器新的位置值,以便它们可以反映在样式中。现在,由于定位是在Angular.js控制器作用域之外完成的(因为它是通过内置的jQuery UI代码完成的),我们需要获取draggable指令来更新控制器作用域,这样它就知道它之外的东西已经改变了一个它的变量。幸运的是,jQuery UI可拖动窗口小部件提供了一个很好的回调,我们可以使用它,然后告诉Angular.js控制器的作用域已经发生了变化,这是使用用于此目的Angular.js $scope.apply()完成的。
define(['directives/directives'], function (directives) {
    directives.directive('draggable', ['$rootScope', function ($rootScope) {
        return {
            restrict: 'A',
            //may need the model to be passed in here so we can apply changes
            //to its left/top positions
            link: function (scope, element, attrs) {

                element.draggable(
                  {
                      stop: function (event, ui) {
                          scope.$apply(function() {
                              scope.updatePosition(
                                  scope.imageitem.name,
                                  {
                                      left: ui.position.left,
                                      top: ui.position.top
                                  }
                              );
                          });
                      }
                  });
            }
        };
    }]);
});
这是当指令调用控制器作用域时调用的控制器代码:
// NOTE: $scope.$apply is called by the draggable directive
$scope.updatePosition = function (name, pos) {
    var idx = $scope.imageitems.propertyBasedIndexOf('name', name);
    var foundItem = $scope.imageitems[idx];
    foundItem.left = pos.left;
    foundItem.top = pos.top;
};
可调整大小的指令
可调整大小(resizable)指令与可拖动(draggable)指令的工作原理非常相似,它是另一个基于jQuery UI的Angular.js指令。这是它的代码:
define(['directives/directives'], function (directives) {
    directives.directive('resizable', ['$rootScope', function ($rootScope) {
        return {
            restrict: 'A',
            //may need the model to be passed in here so we can apply changes
            //to its left/top positions
            link: function (scope, element, attrs) {

                element.resizable(
                  {
                      maxHeight: 200,
                      minHeight: 100,
                      //aspectRatio: 16 / 9,
                      stop: function (event, ui) {
                          scope.$apply(function () {
                              scope.updateScale(
                                  scope.imageitem.name,
                                  {
                                      top: ui.position.top,
                                      left: ui.position.left
                                  },
                                  {
                                      width: ui.size.width,
                                      height: ui.size.height
                                  }
                              );
                          });
                      }
                  });
            }
        };
    }]);
});和以前一样,由于我们正在改变Angular.js控制器知识之外的事物(UI元素的比列),我们需要获取更新控制器作用域的指令,这里是相关的代码:
// NOTE: $scope.$apply is called by the resizable directive
$scope.updateScale = function (name, pos, size) {
    var idx = $scope.imageitems.propertyBasedIndexOf('name', name);
    var foundItem = $scope.imageitems[idx];
    foundItem.left = pos.left;
    foundItem.top = pos.top;
    foundItem.width = size.width;
    foundItem.height = size.height;
};
根控制器
根控制器的一些内部已经被覆盖了,所以我将从我们已经涵盖的函数中删除内部代码,这实际上只是留下了这个控制器的代码:
define(['controllers/controllers',
        'services/liveUpdatesService',
        'services/utilitiesService',
        'services/imageService',
        'services/localStorageService'],
    function (controllers) {
        controllers.controller('RootCtrl',
            ['$window',
                '$scope',
                '$location',
                'LiveUpdatesService',
                'UtilitiesService',
                'ImageService',
                'LocalStorageService',
    function (
        $window,
        $scope,
        $location,
        LiveUpdatesService,
        UtilitiesService,
        ImageService,
        LocalStorageService) {

        $scope.imageitems = [];
        $scope.imageItemsStorageKey = 'imageItemsKey';

        //load existing items from local storage which looks cool,
        //as they show up in their persisted
        //positions again...Cool
        if (LocalStorageService.isSupported()) {
            var currentFavs = LocalStorageService.fetch($scope.imageItemsStorageKey);
            if (currentFavs != undefined) {
                currentFavs = JSON.parse(currentFavs);
                for (var i = 0; i < currentFavs.length; i++) {
                    var favItem = currentFavs[i];

                    $scope.imageitems.push(ImageService.createImageItem(
                            favItem.name, favItem.left, favItem.top,
                            favItem.width, favItem.height, true));
                }
            }
        }

        UtilitiesService.addArrayHelperMethods();

        LiveUpdatesService.eventsStream().subscribe(
	            .....
        	    .....
	            .....

		);


        $scope.addToFavourites = function (index) {
            if (!LocalStorageService.isSupported()) {
                $window.alert('Local storage is not supported by your browser,
                               so saving favourites isn\'t possible');
            } else {
                var currentStoredFavsForAdd = LocalStorageService.fetch
                                              ($scope.imageItemsStorageKey);
                if (currentStoredFavsForAdd == undefined) {
                    currentStoredFavsForAdd = [];
                } else {
                    currentStoredFavsForAdd = JSON.parse(currentStoredFavsForAdd);
                }

                var scopeImageItem = $scope.imageitems[index];
                var favsIdx = currentStoredFavsForAdd.propertyBasedIndexOf
                              ('name', scopeImageItem.name);
                if (favsIdx >= 0) {
                    $window.alert('An item with that name is already in your favourites.');
                    return;
                }

                $scope.imageitems[index].isFavourite = true;
                currentStoredFavsForAdd.push(scopeImageItem);
                LocalStorageService.save($scope.imageItemsStorageKey, currentStoredFavsForAdd);
                $window.alert('Saved to favourites');

            }
        };

        $scope.removeFromFavourites = function (index) {
            if (!LocalStorageService.isSupported()) {
                $window.alert('Local storage is not supported by your browser,
                               so removing from favourites isn\'t possible');
            } else {

                var currentStoredFavsForRemoval = LocalStorageService.fetch
                                                  ($scope.imageItemsStorageKey);
                if (currentStoredFavsForRemoval == undefined) {
                    return;
                } else {
                    currentStoredFavsForRemoval = JSON.parse(currentStoredFavsForRemoval);
                }


                var scopeImageItem = $scope.imageitems[index];

                var favsIdx = currentStoredFavsForRemoval.propertyBasedIndexOf
                              ('name', scopeImageItem.name);
                $scope.imageitems.splice(index, 1);

                if (favsIdx >= 0) {
                    currentStoredFavsForRemoval.splice(favsIdx, 1);
                    LocalStorageService.save
                        ($scope.imageItemsStorageKey, currentStoredFavsForRemoval);
                }
                $window.alert('Item removed from favourites');
            }
        };

        // NOTE: $scope.$apply is called by the draggable directive
        $scope.updatePosition = function (name, pos) {
            .....
            .....
            .....
        };

        // NOTE: $scope.$apply is called by the resizable directive
        $scope.updateScale = function (name, pos, size) {
            .....
            .....
            .....
        };
    }]);
});
可以看出,大多数根控制器的代码已经被覆盖了,那么还有什么要讨论的呢?
基本上,剩下的代码执行以下操作:
- 允许用户使用图像平铺UI中的按钮调用addToFavourites函数(将其添加到HTML 5本地存储)
- 允许用户使用图像平铺UI中的按钮调用removeFromFavourites函数(将从UI和HTML 5本地存储中删除它)
- 首次呈现页面时,将从HTML 5本地存储读取所有项目及其持久状态,这将导致所有持久收藏项目与用户将其保存到本地存储时是完全相同的
根视图
视图很容易,因为大多数实际工作都是由各种服务和控制器完成的。这是根视图代码:
{{imageitem.name}}
![]()


“收藏”页面
虽然没有Root页面及其控制器那么复杂,但是“收藏”页面是第二复杂的页面,所以在我们深入了解它的代码之前,可能需要解释一下。
那么这个页面究竟做了什么?
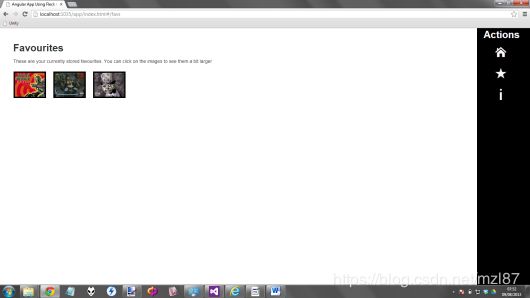
想法是将存在一组(可以是空集)图像数据,其针对HTML 5本地存储中的某个密钥存储。当请求收藏夹视图时,将检查此HTML 5本地存储的数据,并且对于找到的所有项目,将呈现小缩略图。用户还可以单击任何缩略图以启动ColorBox jQuery插件。
这是“收藏”页面的样子,其中一些项目保存在本地存储中:
这就是你点击其中一个thumnbails时的样子:

那么这个页面是如何工作的呢?其中一个难点是你可能认为这是一件非常微不足道的事情。所以在本地存储中,我们有一个1维JSON字符串化数组,我想把它变成一个二维表格布局,我可以使用Angular.js ng-repeat绑定。
Favs 控制器
我们先来看一下控制器。
define(['controllers/controllers',
        'services/imageService',
        'services/utilitiesService',
        'services/localStorageService'],
    function (controllers) {
        controllers.controller('FavsCtrl',
            ['$window',
            '$scope',
            'ImageService',
            'UtilitiesService',
            'LocalStorageService',
    function (
        $window,
        $scope,
        ImageService,
        UtilitiesService,
        LocalStorageService) {

        $scope.imageItemsStorageKey = 'imageItemsKey';
        $scope.favImageItems = [];
        $scope.columnCount = 5;
        $scope.favText = '';
        $scope.shouldAlert = false;

        $scope.tableItems = [];
        while ($scope.tableItems.push([]) < $scope.columnCount);

        if (!LocalStorageService.isSupported()) {
            $scope.favText = 'Local storage is not supported by your browser,
                                  so viewing favourites isn\'t possible';
            $scope.shouldAlert = true;
        } else {

            var currentStoredFavs = LocalStorageService.fetch($scope.imageItemsStorageKey);
            var currentFavs = [];
            if (currentStoredFavs != undefined) {
                currentFavs = JSON.parse(currentStoredFavs);
            }

            if (currentFavs.length == 0) {
                $scope.favText = 'There are no favourites stored at the moment';
                $scope.shouldAlert = true;
            } else {
                var maxRows = Math.ceil(currentFavs.length / $scope.columnCount);
                $scope.favText = 'These are your currently stored favourites.
                                      You can click on the images to see them a bit larger';
                if (currentFavs.length < $scope.columnCount) {
                    $scope.tableItems[0] = [];
                    for (var i = 0; i < currentFavs.length; i++) {
                        $scope.tableItems[0].push(ImageService.createFavImageItem
                                                 (currentFavs[i].name));
                    }
                } else {
                    var originalIndexCounter = 0;
                    for (var r = 0; r < maxRows; r++) {
                        for (var c = 0; c < $scope.columnCount; c++) {
                            if (originalIndexCounter < currentFavs.length) {
                                $scope.tableItems[r][c] =
                                    ImageService.createFavImageItem
                                       (currentFavs[originalIndexCounter].name);
                                originalIndexCounter++;
                            }
                        }
                    }
                }
            }
            if ($scope.shouldAlert) {
                UtilitiesService.delayedAlert($scope.favText);
            }
        }
    }]);
});可以看出,这里的大部分工作是从HTML 5本地存储获取数据,并将其从string表示转换为JSON 1维数组,然后转换为二维结构,可用于在标记内绑定。
还有一些其他注意事项:
- 我们使用Angular.js $window而不是“window”来允许$window服务被模拟替换
- 我们利用我们之前看到的LocalStorageService
- 我们利用我们之前看到的UtilitiesService
- 我们利用我们之前看到的ImageService
Favs 视图
在控制器中完成所有繁琐的工作后,视图代码非常小:
    Favourites

    {{favText}}
![]()
注意整齐嵌套ng-repeat,一旦你在你的作用域内有正确的结构进行迭代,那么在Angular.js中进行表格布局是多么的容易
ColorBox指令
拼图中的最后一部分是如何将这些项目变成jQuery ColorBox。知道我们现在所知道的,我们应该能够意识到这个问题的答案在于使用另一个指令。
是的,你猜对了 colorbox指令,可以在标记中的
下面是colorbox指令代码,您可以看到这仅限于属性用法,并且只是将工作委托给实际的jQuery ColorBox(在Require.js配置中作为需求引用,因此我们知道它已加载好,否则Angular.js不会启动)。
define(['directives/directives'], function (directives) {
    directives.directive('colorbox', ['$rootScope', function ($rootScope) {
        return {
            restrict: 'A',
            //may need the model to be passed in here
            //so we can apply changes to its left/top positions
            link: function (scope, element, attrs) {
                $(element).colorbox({ rel: 'group3', transition:
                "elastic", width: "50%", height: "50%" });
            }
        };
    }]);
});
关于页面
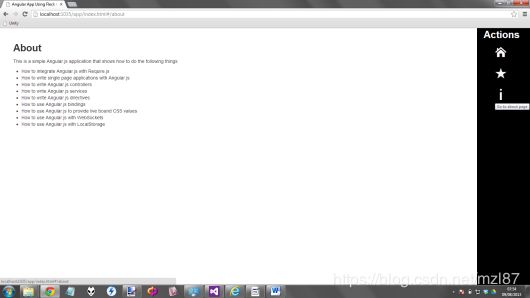
关于(about)页面只是静态文本,所以这里没有groovy。我添加了这个页面只是为了让演示应用程序中有足够的路径使其更加全功能,我想。为了完整起见,这里是关于页面的屏幕截图:
“
结论
无论如何,这就是我现在想说的全部内容,我希望你喜欢这篇文章并从中得到一些东西。我知道我是亲自做的。以很多方式写作是一个棘手的问题,因为对我来说有一些新概念,但我对最终结果非常满意。
原文地址:https://www.codeproject.com/Articles/637430/Angular-js-Example-Application