Spring源码阅读——BeanDefinition注册的过程
本篇文记录一下从location路径 -> BeanDefinition注册的过程. 以XML方式为例子.
看本文前需要读者已经明白如下知识:
BeanDefinition接口,Resource接口,ResourceLoader接口,BeanFactory接口,ApplicationContext接口,我会在另一文中简单介绍一下这些.
一、什么是BeanDefinition的注册
BeanDefinition的注册实际上要做的事就是:通过ResourcePatternResolver(解析location返回Resource [])或者是ResourceLoader(解析location返回 Resource) 来完成对location资源的读取解析成Resource对象。 然后通过Resource对象再来得到BeanDefintionMap。
为了更清晰的看到上面的过程在源码中的实现,下面来一步一步的剥开代码,因为本篇只是介绍到注册为止,因此,我们把断电打在this.beanDefinitionMap.put(beanName, beanDefinition); 这一句上, 但代码中一共有四句这个语句,我们打到这一个位置上:

二、源码解读
下面来一层一层的看调用栈的情况,然后从最外层一层一层剥进去.
![]()
从这条语句进去, 在构造方法中调用了另一个构造方法(下图):
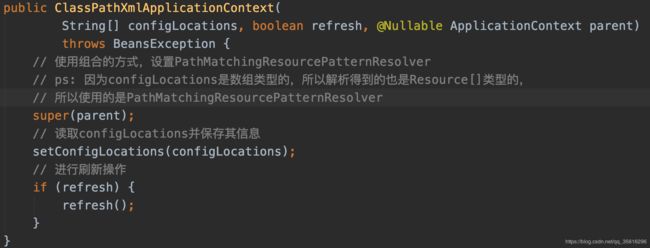
上面的代码已经用注释写的很详细了,就不多解释了,下面进入refresh()方法.
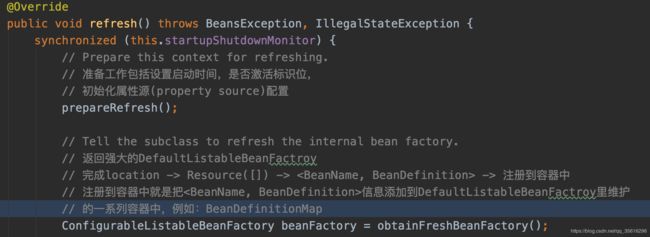
注释也写的很详细了,进入obtainFreshBeanFactory()中.
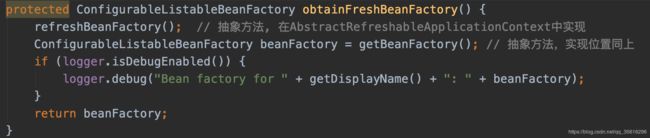
refresh()是在AbstractApplicationContext里实现的,使用了模板模式,而上面的refreshBeanFactory和getBeanFactory都是抽象方法,它们均在AbstractRefreshableApplicationContext中实现。(AbstractRefreshableApplicationContext实现了一部分refresh中的一些通用方法, 看名字也能猜到。。)
接下来进入refreshBeanFactory()
@Override
protectedfinal void refreshBeanFactory() throws BeansException {
	// 如果已经存在了这个要刷新的BeanFactory,
	// 就先把它销毁掉, 再创建个新的
	if (hasBeanFactory()) {
		destroyBeans();
		closeBeanFactory();
	}
	try {
		// 创建DefaultListableBeanFactory
		DefaultListableBeanFactory beanFactory = createBeanFactory();
		// 为这个beanFactory设置序列化时需要用到的序列化id
		beanFactory.setSerializationId(getId());
		// 设置是否允许BeanName的覆盖和循环引用
		customizeBeanFactory(beanFactory);
		// 关键!! 加载BeanDefinition
		loadBeanDefinitions(beanFactory);
		synchronized (this.beanFactoryMonitor) {
			this.beanFactory = beanFactory;
		}
	}
	catch (IOException ex) {
		throw new ApplicationContextException("I/O error parsing bean definition source for " + getDisplayName(), ex);
	}
}
loadBeanDefitions方法就如字面意思,对BeanDefinition进行加载了,但不同的配置方式,加载方式也有所不同,因此这个方法也是个抽象方法,由子类实现。 实现这个方法的有如下这些类:

一定个程度上也反应了配置方式的样子,因为这里的例子是用的XML进行配置的,进入第一个.
@Override
protected void loadBeanDefinitions(DefaultListableBeanFactory beanFactory) throws BeansException, IOException {
	// 给这个 BeanFactory 实例化一个 XmlBeanDefinitionReader
	// DefaultListableBeanFactory实现了BeanDefinitionRegistry接口,因此它也可以作为registry参数!
	XmlBeanDefinitionReader beanDefinitionReader = new XmlBeanDefinitionReader(beanFactory);

	// Configure the bean definition reader with this context's
	// resource loading environment.
	beanDefinitionReader.setEnvironment(this.getEnvironment());

	// AbstractXmlApplicationContext实现了ApplicaitonContext接口,
	// ApplicationContext实现了ResourceLoader接口
	// 因此当前对象是(AbstractXmlApplicationContext类型)是可以作为ResourceLoader使用的
	beanDefinitionReader.setResourceLoader(this);
	beanDefinitionReader.setEntityResolver(new ResourceEntityResolver(this));

	// Allow a subclass to provide custom initialization of the reader,
	// then proceed with actually loading the bean definitions.
	initBeanDefinitionReader(beanDefinitionReader);
	// 重点来了,继续往下
	loadBeanDefinitions(beanDefinitionReader);
}
这个函数的主要作用就是:
- 生成
beanDefinitionReader(XmlBeanDefinitionReader)
beanDefinitionReader的作用顾名思义,就是去读取beanDefinition信息,即:
- String location[] -> Resource[]
- 解析Resource[],解析配置文件, 得到 Bean信息
然后继续进入loadBeanDefinitions


接着进入loadBeanDefinitions(location)

继续跟进
public int loadBeanDefinitions(String location, @Nullable Set<Resource> actualResources) throws BeanDefinitionStoreException {
	// 获取ResourceLoader. (在最初的构造方法里,super(parent)的时候设置的, 是PathMatchingResourcePatternResolver类型的)
	ResourceLoader resourceLoader = getResourceLoader();
	if (resourceLoader == null) {
		throw new BeanDefinitionStoreException(
				"Cannot imports bean definitions from location [" + location + "]: no ResourceLoader available");
	}

	// 是PathMatchingResourcePatternResolver类型的,所以可以进入该if
	if (resourceLoader instanceof ResourcePatternResolver) {
		// Resource pattern matching available.
		try {
			// 通过PathMatchingResourcePatternResolver来读取location得到 Resource[] resources
			Resource[] resources = ((ResourcePatternResolver) resourceLoader).getResources(location);
			// 进入这里! 继续load~
			int loadCount = loadBeanDefinitions(resources); //**************
			if (actualResources != null) {
				for (Resource resource : resources) {
					actualResources.add(resource);
				}
			}
			if (logger.isDebugEnabled()) {
				logger.debug("Loaded " + loadCount + " bean definitions from location pattern [" + location + "]");
			}
			return loadCount;
		}
		catch (IOException ex) {
			throw new BeanDefinitionStoreException(
					"Could not resolve bean definition resource pattern [" + location + "]", ex);
		}
	}
	else {
		// Can only load single resources by absolute URL.
		Resource resource = resourceLoader.getResource(location);
		int loadCount = loadBeanDefinitions(resource);
		if (actualResources != null) {
			actualResources.add(resource);
		}
		if (logger.isDebugEnabled()) {
			logger.debug("Loaded " + loadCount + " bean definitions from location [" + location + "]");
		}
		return loadCount;
	}
}
到这里,就已经把location[]变成了Resource[], 接下来继续loadBeanDefinitions
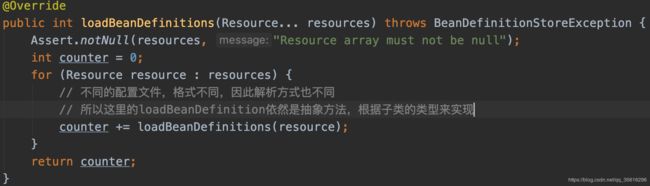
是不是有很强的既视感? 和之前的loadBeanDefinitions(String[])挺像的,不过这里的loadBeanDefinitions(Resource) 是个抽象方法,它接下来就需要读取Resource里的InputStream然后进行配置文件的解析了,而配置文件的格式不止XML一种,还有Properties… ,所以进入

里面是这个样子的

对Resource进行一个编码,继续跟进,进入下面这个函数
![]()
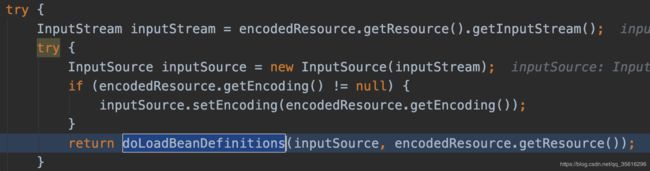
下面这个代码片段是上面这个函数的关键片段,即通过Resource获取到配置文件的InputStream之后就可以对其进行读取了,然后进入doLoadBeanDefinition方法,正是开始:
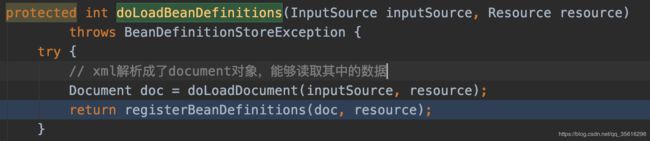
- 读取配置文件 -> 解析 -> 得到
ps: Spring中doXxxx的代码才是正式开始做某个事的代码!
继续跟进~(为了方便阅读主干,后面只截取关键代码段)
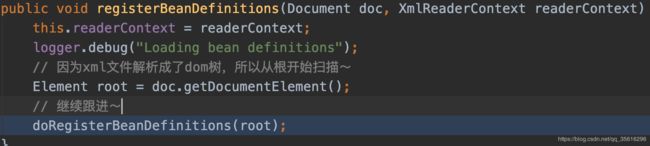
protected void doRegisterBeanDefinitions(Element root) {
		。。。
		// 钩子方法,留给子类实现的
		preProcessXml(root);
		// 进入!
		parseBeanDefinitions(root, this.delegate);
		postProcessXml(root);

		this.delegate = parent;
	}
…
…
几层解析之后,终于解析到了bean标签,然后进入到了processBeanDefinition中
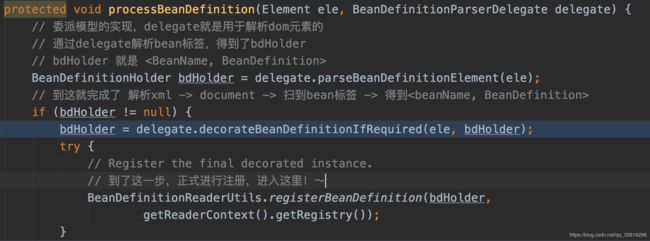
使用了委派模型,上面注释已经解释的很清晰了,即将接近尾声了,就差一个注册了!~
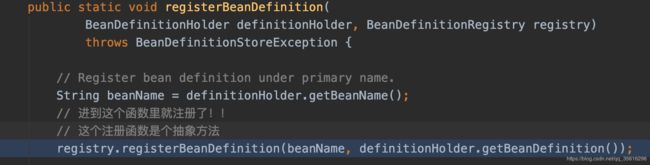
这个抽象方法的实现有如下几种:

SimpleXXX的那个实现就很简单,也没检测BeanName是否已经存在等等,就直接无脑put了,如下

而另外两个实际上都是调用的一个复杂的注册,如下:
其实就是进行了一系列的检测(BeanName是否存在等等),并且更新DefaultListableBeanFactory的容器类型也多了(Map,List)
到这一步,BeanDefinition就注册完毕了! 也到了我们开头的那个地方.
这么一圈子绕下来,发现Spring真的是严格遵守了设计模式对应的原则,单一责任原则! 每个函数或接口可能只做一件事,然后一层一层调用或继承. 同时也使用到了模板模式(refresh),委派模式(注册的时候),组合模式,策略模式(Resource / ResourceLoader )… 阅读高质量代码果然是受益匪浅.