springboot之hibernate基础
springboot之hibernate基础
- 说明
- 一些概念
- 核心对象
- hibernate工作原理:
- Hibernate的缓存机制:
- Hibernate 的三种实体状态
- Hibernate是如何延迟加载?get与load的区别
- 开始使用
- 依赖
- 配置文件
- model层
- 持久层
- service层
- 控制层
说明
Hibernate作为持久层框架,这里需要了解一个概念jpa.
JPA是一个基于ORM(或叫O/R mapping ,对象关系映射)的标准规范,在这个规范中,JPA只定义标准规则,不提供实现。
目前,JPA的主要实现有Hibernate,EclipseLink,OpenJPA等。
由于Hibernate在数据访问解决技术领域的霸主地位,所以JPA标准基本由Hibernate主导。
一些概念
核心对象
hibernate是一个开源框架,它是对象关联关系映射的框架,它对JDBC做了轻量级的封装,而我们java程序员可以使用面向对象的思想来操纵数据库。
hibernate核心接口
session:负责被持久化对象CRUD操作
sessionFactory:负责初始化hibernate,创建session对象
configuration:负责配置并启动hibernate,创建SessionFactory
Transaction:负责事物相关的操作
Query和Criteria接口:负责执行各种数据库查询
hibernate工作原理:
1.通过Configuration config = new Configuration().configure();//读取并解析hibernate.cfg.xml配置文件
2.由hibernate.cfg.xml中的读取并解析映射信息
3.通过SessionFactory sf = config.buildSessionFactory();//创建SessionFactory
4.Session session = sf.openSession();//打开Sesssion
5.Transaction tx = session.beginTransaction();//创建并启动事务Transation
6.persistent operate操作数据,持久化操作
7.tx.commit();//提交事务
8.关闭Session
9.关闭SesstionFactory
Hibernate的缓存机制:
Hibernate缓存包括两大类:Hibernate一级缓存和Hibernate二级缓存
Hibernate一级缓存又称为“Session的缓存”,它是内置的,意思就是说,只要你使用hibernate就必须使用session缓存。由于Session对象的生命周期通常对应一个数据库事务或者一个应用事务,因此它的缓存是事务范围的缓存。在第一级缓存中,持久化类的每个实例都具有唯一的OID。
Hibernate二级缓存又称为“SessionFactory的缓存”,由于SessionFactory对象的生命周期和应用程序的整个过程对应,因此Hibernate二级缓存是进程范围或者集群范围的缓存,有可能出现并发问题,因此需要采用适当的并发访问策略,该策略为被缓存的数据提供了事务隔离级别。第二级缓存是可选的,是一个可配置的插件,在默认情况下,SessionFactory不会启用这个插件
Hibernate 的三种实体状态
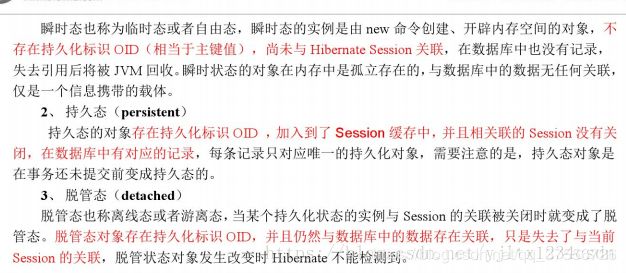
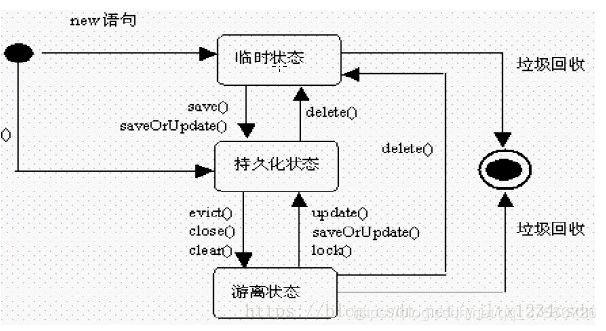
Hibernate有三种实体状态,有瞬时态(transiant),持久态(persistent),游离态(detached)。 简单理解就是,瞬时态指的是刚New 新建的一个对象,没有放在Session时,也没有存储在数据库中。 持久态,指这个对象存储在数据库中,并且存在于Session会话中。 而游离态指的是,这个对象存储在数据库中,但已经不存在于Session会话中。下面是比较官方的说法:
三者之间的相互转化
Hibernate是如何延迟加载?get与load的区别
对于Hibernate get方法,Hibernate会确认一下该id对应的数据是否存在,首先在session缓存中查找,然后在二级缓存中查找,还没有就查询数据库,数据 库中没有就返回null。这个相对比较简单,也没有太大的争议。主要要说明的一点就是在这个版本(bibernate3.2以上)中get方法也会查找二级缓存!
Hibernate load方法加载实体对象的时候,根据映射文件上类级别的lazy属性的配置(默认为true),分情况讨论:
(1)若为true,则首先在Session缓存中查找,看看该id对应的对象是否存在,不存在则使用延迟加载,返回实体的代理类对象(该代理类为实体类的子类,由CGLIB动态生成)。等到具体使用该对象(除获取OID以外)的时候,再查询二级缓存和数据库,若仍没发现符合条件的记录,则会抛出一个ObjectNotFoundException。
(2)若为false,就跟Hibernateget方法查找顺序一样,只是最终若没发现符合条件的记录,则会抛出一个ObjectNotFoundException。
这里get和load有两个重要区别:
如果未能发现符合条件的记录,Hibernate get方法返回null,而load方法会抛出一个ObjectNotFoundException。
load方法可返回没有加载实体数据的代 理类实例,而get方法永远返回有实体数据的对象。
总之对于get和load的根本区别,hibernate对于 load方法认为该数据在数据库中一定存在,可以放心的使用代理来延迟加载,如果在使用过程中发现了问题,只能抛异常;而对于get方 法,hibernate一定要获取到真实的数据,否则返回null。
开始使用
依赖
        org.springframework.boot
	spring-boot-starter-data-jpa


	mysql
	mysql-connector-java
配置文件
配置application.properties
# application.properties
# Server settings (ServerProperties)
server.port=8081
server.address=127.0.0.1
#server.sessionTimeout=30
server.contextPath=/SBootDemo

# Tomcat specifics
#server.tomcat.accessLogEnabled=false
server.tomcat.protocolHeader=x-forwarded-proto
server.tomcat.remoteIpHeader=x-forwarded-for
server.tomcat.basedir=
server.tomcat.backgroundProcessorDelay=30

########################################################
###THYMELEAF (ThymeleafAutoConfiguration)
########################################################
#默认是template目录
spring.thymeleaf.prefix=classpath:/static/
spring.thymeleaf.suffix=.html
#spring.thymeleaf.mode=HTML5
#spring.thymeleaf.encoding=UTF-8
# ;charset= is added
#spring.thymeleaf.content-type=text/html
# set to false for hot refresh
#Thymeleaf缓存
spring.thymeleaf.cache=false

########################################################
###datasource
########################################################
spring.datasource.driverClassName = com.mysql.jdbc.Driver
spring.datasource.url = jdbc:mysql://192.168.18.220:3306/test_group
spring.datasource.username = web
spring.datasource.password = web
#spring.datasource.max-active=20
#spring.datasource.max-idle=8
#spring.datasource.min-idle=8
#spring.datasource.initial-size=10

########################################################
### Java Persistence Api
########################################################
# Specify the DBMS
spring.jpa.database = MYSQL
# Show or not log for each sql query
spring.jpa.show-sql = true
# Hibernate ddl auto (create:启动会删除表重建, create-drop, update:第一次新建表后面更新,none, validate)
spring.jpa.hibernate.ddl-auto = update
# Naming strategy
#[org.hibernate.cfg.ImprovedNamingStrategy #org.hibernate.cfg.DefaultNamingStrategy]
#spring.jpa.hibernate.naming-strategy = org.hibernate.cfg.ImprovedNamingStrategy
# stripped before adding them to the entity manager)
#spring.jpa.properties.hibernate.dialect= org.hibernate.dialect.MySQL5Dialect
model层
import javax.persistence.Column;
import javax.persistence.Entity;
import javax.persistence.GeneratedValue;
import javax.persistence.Id;
import javax.persistence.JoinColumn;
import javax.persistence.OneToMany;
import javax.persistence.Table;

@Entity //加入这个注解,Demo就会进行持久化了
@Table(name="t_api_request_info")
public class ApiName {

    @Id
    @GeneratedValue //主键,自动递 增
    private Integer id;
    @Column(name="apiName")
    private String apiName; //接口名称
    @Column(name="apiHost")
    private String apiHost; //接口地址
    @Column(name="requestUrl")
    private String requestUrl; //接口请求地址
    @Column(name="requestMethod")
    private String requestMethod; //接口请求方法
省略get set。。。。。。
持久层
dao持久层
package com.spring.dao;
import java.util.List;
import org.springframework.data.jpa.repository.JpaRepository;
import com.spring.model.ApiName;
public interface ApiJpaDao extends JpaRepository {
    // 单条件查询   会生成where ApiHost=?
    List findByApiHost(String ApiHost);
    //and组合查询  会生成 where ApiName=? And ApiHost=?
    List findByApiNameAndApiHost(String ApiName, String ApiHost);
}
service层
service 层实现类
package com.spring.service;

import java.util.List;
import java.util.Optional;
import org.springframework.beans.factory.annotation.Autowired;
import org.springframework.stereotype.Service;
import com.spring.dao.ApiJpaDao;
import com.spring.model.ApiName;

@Service  //要加这个注解 表示 为service层,才会自动扫描关生成beans
public class ApiServiceImpl implements ApiService {

    @Autowired  //加这个注解会自动new
    private ApiJpaDao apiJpaDao;

    public ApiName save(ApiName apiName) {
        return apiJpaDao.save(apiName);
    }

    public ApiName update(ApiName apiName) {
        return apiJpaDao.save(apiName);
    }

    public void delete(Integer id){
        apiJpaDao.deleteById(id);
    }

    public List findAll() {
        return apiJpaDao.findAll();
    }

    public Optional findOne(Integer id) {
        return apiJpaDao.findById(id);
    }

    public List findByApiHost(String ApiHost){
        return apiJpaDao.findByApiHost(ApiHost);
    }

    public List findByApiNameAndApiHost(String ApiName, String ApiHost) {
        return apiJpaDao.findByApiNameAndApiHost(ApiName, ApiHost);
    }
}
控制层
@RestController
@SpringBootApplication
@RequestMapping("/api")
public class ApiController {

    @Autowired
    private ApiService apiService;

    /**
     *保存测试数据
     */
    @GetMapping("/saveget")
    public ApiName saveget() {
        ApiName apiName = new ApiName();
        //apiName.setId(1);
        apiName.setApiName("GET接口测试");
        apiName.setApiHost("http://www.baidu.com");
        apiName.setRequestUrl("/test");
        apiName.setRequestMethod("get");
        return apiService.save(apiName);
        //return "GET保存成功";
    }

    @PostMapping("/savepost")
    public String savepost() {
        ApiName apiName = new ApiName();
        //apiName.setId(1);
        apiName.setApiName("POST接口测试");
        apiName.setApiHost("http://www.baidu.com");
        apiName.setRequestUrl("/test");
        apiName.setRequestMethod("get");
        apiService.save(apiName);
        return "POST保存成功";
    }

    //可以不单个字段写传参,直接传model对象ApiName
    @RequestMapping(value = "/save") //简单类型的绑定,可以出来get和post  http://localhost:8080/index/get?name=wujing    http://localhost:8080/index/get?name=无境
    public ApiName save(ApiName apiName) {
        return apiService.save(apiName);
    }

    //按id更新 @PutMapping根据主键存在就更新,不存在就插入 可以用put 或 post请求   http://localhost:8081/api/apinaem/1
    @PutMapping(value = "/update/{id}")
    public ApiName findon(@PathVariable("id") Integer id,
                        @RequestParam("ApiName") String ApiName,
                        @RequestParam("ApiHost") String ApiHost,
                        @RequestParam("RequestUrl") String RequestUrl,
                        @RequestParam("RequestMethod") String RequestMethod) {
        ApiName apiName = new ApiName();
        apiName.setId(id);
        apiName.setApiName(ApiName);
        apiName.setApiHost(ApiHost);
        apiName.setRequestUrl(RequestUrl);
        apiName.setRequestMethod(RequestMethod);
        return apiService.update(apiName);
    }

    //按id删除
    @DeleteMapping(value = "/delete/{id}")
    public String deleter(@PathVariable("id") Integer id){
        apiService.delete(id);
        return "删除成功id:"+id;
    }

    //获取所有列表
    @RequestMapping("/findAll")
    public List findAll() {
        return apiService.findAll();
    }

    //按id查询  http://localhost:8081/api/find?id=1
    @RequestMapping(value = "/find/id-{id}")
    public Optional findon(@PathVariable Integer id) {
        return apiService.findOne(id);
    }

    //通过host查询
    @RequestMapping(value = "/find/ApiHost-{ApiHost}")
    public List findByApiHost(@PathVariable String ApiHost){
        return apiService.findByApiHost(ApiHost);
    }

    //组合查询
    @RequestMapping(value = "/find")
    public List findByApiNameAndApiHost(@RequestParam String ApiName,
                                                @RequestParam String ApiHost){
        return apiService.findByApiNameAndApiHost(ApiName, ApiHost);
    }
}

