项目总结:人脸识别签到系统
人脸识别签到系统项目总结
第一部分:项目简介
实验室人脸识别签到系统
第二部分:项目系统架构设计
2.1业务架构
2.2 技术架构
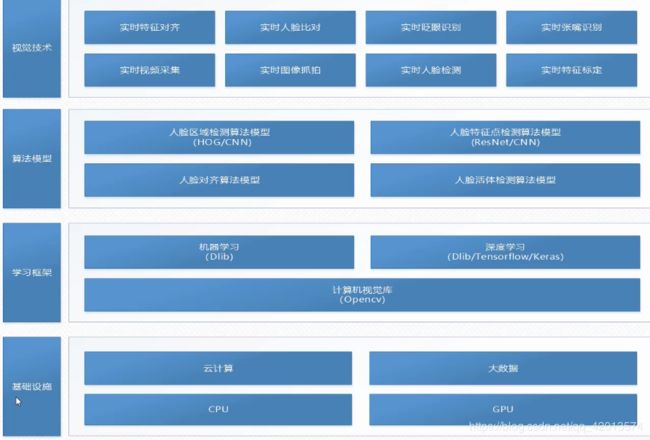
基础设施:主要是GPU,基于CUDA的开发
学习框架:主要是Dlib Opencv Tensorflow
算法模型:主要是人脸区域检测的算法模型,人脸特征点检测算法模型,人脸对齐算法模型,以及活体检测的算法模型
视觉技术:主要有实时视频采集技术, 实时图像抓拍,实时人脸检测,实时特征标定等技术
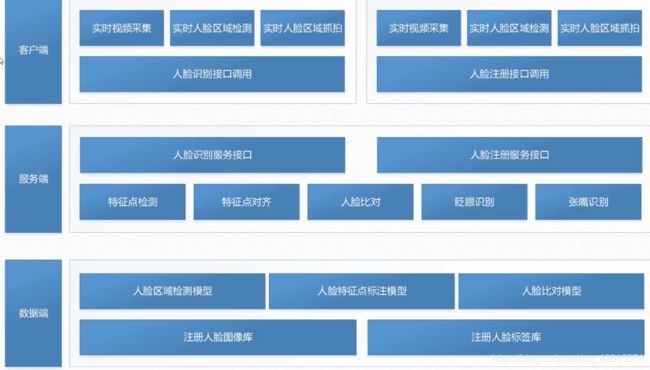
2.3 应用架构
2.4 数据架构
2.5 人脸注册过程
2.6人脸识别流程
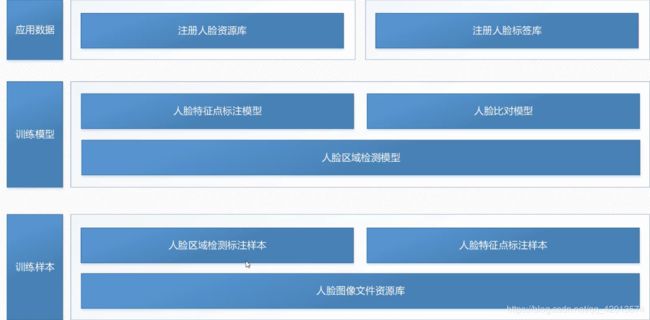
2.7 模型训练流程
第三部分:项目开发环境概述
CUDA Toolkit 9.0:https://developer.nvidia.com/cuda-90-download-archive?target_os=Windows&target_arch=x86_64&target_version=7&target_type=exelocal
Dlib:http://dlib.net/
第四部分:程序设计(python)
1.视频流采集
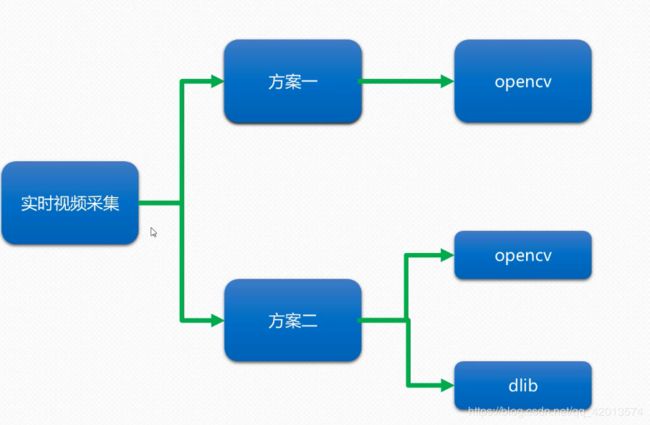
1.1方案设计
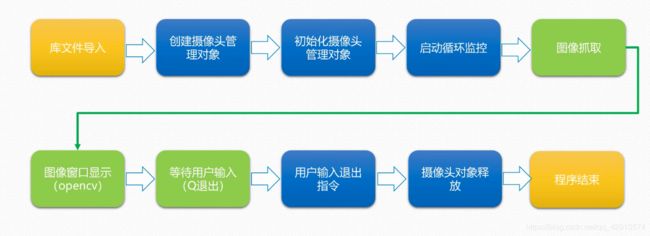
方案一:完全基于opencv进行视频流的采集
方案二:opencv和dlib两个框架结合的形式进行视频流的采集
1.2 程序逻辑(方案一)
代码案例:(方案一)
# 实时:视频图像采集
import cv2 as cv
cap = cv.VideoCapture(0) # 摄像头选择
# 从视频流循环帧
while True:
    ret, frame = cap.read()
    gray = cv.cvtColor(frame, cv.COLOR_BGR2GRAY)
    cv.imshow("Frame", frame)
    # 退出:Q
    if cv.waitKey(1) & 0xFF == ord('q'):
        break
# 清理窗口
cv.destroyAllWindows()
1.3 程序逻辑(方案二)
代码案例(方案二):
# 实时:视频图像采集
import cv2 as cv
import dlib

cap = cv.VideoCapture(0)
win = dlib.image_window()
win.set_title("VideoCapture")
# 从视频流循环帧
while cap.isOpened():
    ret, frame = cap.read()
    if frame is None:
        break
    img = cv.cvtColor(frame, cv.COLOR_RGB2BGR)
    win.clear_overlay()
    win.set_image(img)
    if win.wait_until_closed():
        break
cap.release()
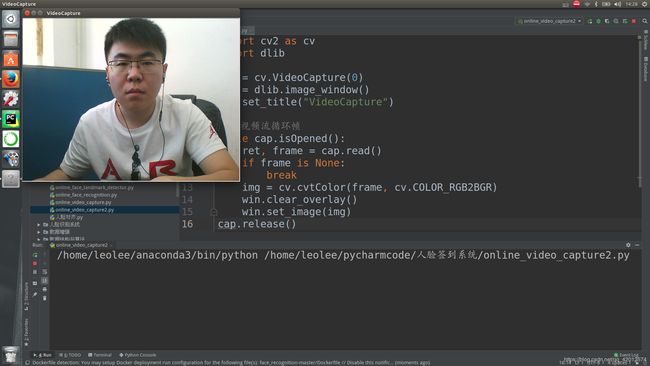
执行结果:
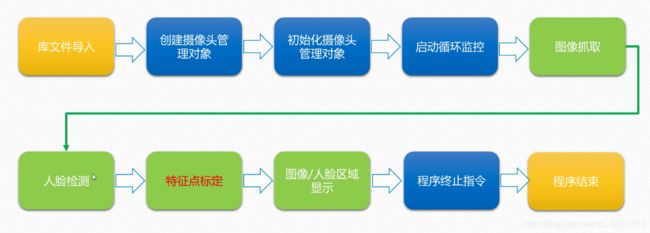
2.实时人脸检测
2.1 程序逻辑
2.2 代码:
# 实时:实时人脸检测
import cv2 as cv
import dlib

# 基于5特征点的人脸检测
detector = dlib.get_frontal_face_detector()
win = dlib.image_window()
cap = cv.VideoCapture(0)

# 从视频流循环帧
while cap.isOpened():
    ret, frame = cap.read()
    image = cv.cvtColor(frame, cv.COLOR_RGB2BGR)
    # 检测灰度帧中的人脸
    dets = detector(image, 0)
    print("检测到人脸数量: {}".format(len(dets)))
    for i, d in enumerate(dets):
        print("Detection {}: Left: {} Top: {} Right: {} Bottom: {}".format(
            i, d.left(), d.top(), d.right(), d.bottom()))
    win.clear_overlay()
    win.set_image(image)
    win.add_overlay(dets)
cap.release()
2.3 执行结果
3. 实时特征点标定
3.1程序逻辑
主要使用68点特征标定的方法
3.2 代码
import cv2 as cv
import dlib


predictor_path = "/home/leolee/pycharmcode/pycode/model/shape_predictor_68_face_landmarks.dat"
detetor = dlib.get_frontal_face_detector()
predictor = dlib.shape_predictor(predictor_path)
win = dlib.image_window()
cap = cv.VideoCapture(0)

# 从视频流循环帧
while cap.isOpened():
    ret, frame = cap.read()
    image = cv.cvtColor(frame, cv.COLOR_RGB2BGR)
    # 人脸检测
    dets = detetor(image, 0)
    win.clear_overlay()
    win.set_image(image)
    print("检测到人脸的数量:{}".format(len(dets)))
    for i, d in enumerate(dets):
        print("Detection {}: Left: {} Top: {} Right: {} Bottom: {}".format(
            i, d.left(), d.top(), d.right(), d.bottom()))
        # 特征点标定:68
        shape = predictor(image, d)
        print("Part 0: {}, Part 1: {} ...".format(shape.part(0),
                                                  shape.part(1)))
        # Draw the face landmarks on the screen.
        win.add_overlay(shape)
    win.add_overlay(dets)
cap.release()
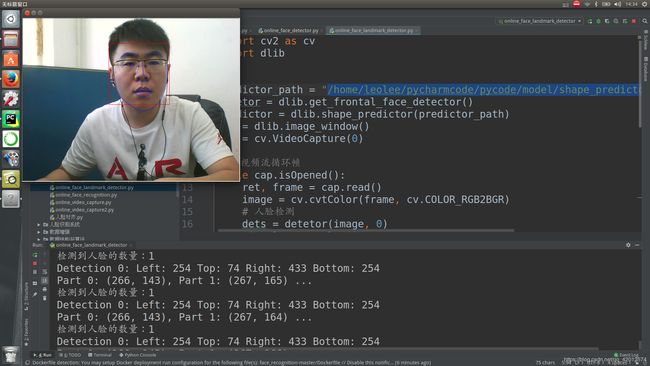
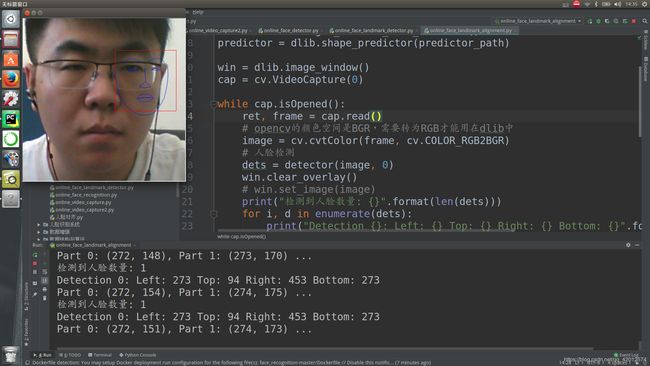
3.3 执行结果
4. 实时人脸(特征点)对齐
4.1 程序逻辑
4.2 代码
import cv2 as cv
import dlib

predictor_path = '/home/leolee/pycharmcode/pycode/model/shape_predictor_68_face_landmarks.dat'

detector = dlib.get_frontal_face_detector()
predictor = dlib.shape_predictor(predictor_path)

win = dlib.image_window()
cap = cv.VideoCapture(0)

while cap.isOpened():
    ret, frame = cap.read()
    # opencv的颜色空间是BGR,需要转为RGB才能用在dlib中
    image = cv.cvtColor(frame, cv.COLOR_RGB2BGR)
    # 人脸检测
    dets = detector(image, 0)
    win.clear_overlay()
    # win.set_image(image)
    print("检测到人脸数量: {}".format(len(dets)))
    for i, d in enumerate(dets):
        print("Detection {}: Left: {} Top: {} Right: {} Bottom: {}".format(
            i, d.left(), d.top(), d.right(), d.bottom()))
        # 特征点标定:68
        shape = predictor(image, d)
        print("Part 0: {}, Part 1: {} ...".format(shape.part(0),
                                                  shape.part(1)))
        win.add_overlay(shape)
        # 人脸对齐
        faces = dlib.full_object_detections()
        for detection in dets:
            faces.append(predictor(image, detection))
        images = dlib.get_face_chips(image, faces, size=480)
        for image in images:
            win.set_image(image)
    win.add_overlay(dets)
cap.release()
4.3 执行结果
5. 实时人脸验证
5.1程序逻辑
5.2 代码
import face_recognition
import cv2

video_capture = cv2.VideoCapture(0)

# 01:导入已注册人脸图像,并向量化表示
image1 = face_recognition.load_image_file("/home/leolee/pycharmcode/liyulong.jpg")
image1_face_encoding = face_recognition.face_encodings(image1)[0]

image2 = face_recognition.load_image_file("/home/leolee/pycharmcode/pycode/data/login/002.jpg")
image2_face_encoding = face_recognition.face_encodings(image2)[0]

# Create arrays of known face encodings and their names
known_face_encodings = [
    image1_face_encoding,
    image2_face_encoding
]
known_face_names = [
    "liyulong",
    "sunli"
]

# Initialize some variables
face_locations = []
face_encodings = []
face_names = []
process_this_frame = True

while True:
    # 捕获视频流
    ret, frame = video_capture.read()
    # 尺寸重置
    small_frame = cv2.resize(frame, (0, 0), fx=0.25, fy=0.25)

    # BCR->RGB
    rgb_small_frame = small_frame[:, :, ::-1]
    # Only process every other frame of video to save time
    if process_this_frame:
        # 查找和压缩当前帧
        face_locations = face_recognition.face_locations(rgb_small_frame)
        face_encodings = face_recognition.face_encodings(rgb_small_frame, face_locations)

        face_names = []
        # 与已注册人脸数据对比
        for face_encoding in face_encodings:
            # 人脸对比
            matches = face_recognition.compare_faces(known_face_encodings, face_encoding)
            name = "Unknown"
            # 匹配到合适的目标,则显示姓名
            if True in matches:
                first_match_index = matches.index(True)
                name = known_face_names[first_match_index]
            face_names.append(name)

    process_this_frame = not process_this_frame

    # 显示识别结果
    for (top, right, bottom, left), name in zip(face_locations, face_names):
        # Scale back up face locations since the frame we detected in was scaled to 1/4 size
        top *= 4
        right *= 4
        bottom *= 4
        left *= 4
        # 绘制矩形
        cv2.rectangle(frame, (left, top), (right, bottom), (0, 0, 255), 2)
        # 显示标签
        cv2.rectangle(frame, (left, bottom - 35), (right, bottom), (0, 0, 255), cv2.FILLED)
        font = cv2.FONT_HERSHEY_DUPLEX
        cv2.putText(frame, name, (left + 6, bottom - 6), font, 1.0, (255, 255, 255), 1)
    # 显示识别结果
    cv2.imshow('Result:', frame)
    # 等待用户退出指令
    if cv2.waitKey(1) & 0xFF == ord('q'):
        break

# 资源释放
video_capture.release()
cv2.destroyAllWindows()
5.3 执行结果
6. 实时活体检测
眨眼行为识别
6.1代码
6.2 执行结果
第五部分:模型训练
5.1 人脸区域检测
5.1.1 人脸区域样本标注
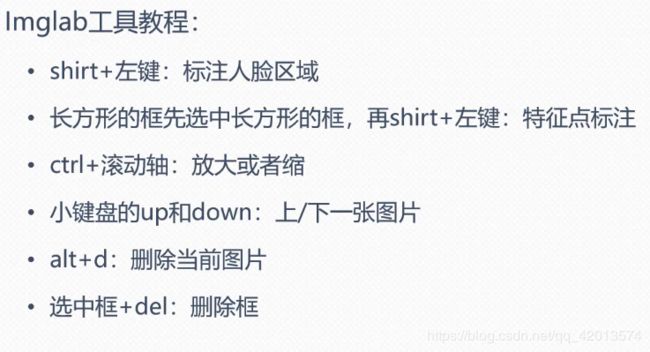
利用Imagelab进行人脸区域样本标注
5.1.2 人脸检测模型训练
5.1.2.1 程序设计——参数设置
5.1.3 人脸检测模型测试
5.2 人脸特征点标定
5.2.1 人脸特征点标定
利用Imagelab进行人脸特征点样本标定--(68点特征点标定)
5.2.2 人脸特征点标定的模型训练
5.2.2.1 程序逻辑
5.2.2.2 程序设计
5.2.3 人脸特征点模型标定测试
5.2.3.1 程序逻辑

