Android学习笔记:自定义实现流式布局
前几天在开发项目的时候,有一个需求是展示历史搜索启示 ,展示的样式是像瀑布流一样(每一行展示的控件个数根据控件的内容不同而不相同,当一行展示满后,自动换行展示)。最开始是自定义LinearLayout,通过判断view的位置和大小来换行。效果是实现了,但是在用的时候遇到bug了。前天学习的时候,正好看到老师讲的自定义ViewGroup实现流式布局样式,所以果断学习了。写个笔记 ,方便下次使用,感谢老师的讲解。
直接上代码了:
----------------------------首先是自定义的ViewGroup---------------
public class FlowLayout extends ViewGroup {
// 存储当前ViewGroup的所有View,在Actvity中直接用addView(View view)添加;
private List
// 把每一行数据的高度存储到List
private List
public FlowLayout(Context context) {
this(context, null);
}
public FlowLayout(Context context, AttributeSet attrs) {
this(context, attrs, 0);
}
public FlowLayout(Context context, AttributeSet attrs, int defStyleAttr) {
super(context, attrs, defStyleAttr);
}
@Override
protected void onLayout(boolean arg0, int arg1, int arg2, int arg3, int arg4) {
mAllViews.clear();
mHeightList.clear();
int width = getWidth();
int overWidth = 0;//每一个view所占据的总宽度margin,padding
int overHeight = 0;//每一个view所占据的总高度
List
int viewCount = getChildCount();//把有View的总数量
for (int i = 0; i < viewCount; i++) {
View child = getChildAt(i);//每一个子View
MarginLayoutParams lp = (MarginLayoutParams) child.getLayoutParams();
int childViewWdth = child.getMeasuredWidth();
int childViewHeight = child.getMeasuredHeight();
//当前View超过一行时,换行处理
if (childViewWdth + overWidth + lp.leftMargin + lp.rightMargin > width-getPaddingLeft()-getPaddingRight()) {// 换行判断
mHeightList.add(overHeight);
mAllViews.add(lineViews);
// 重置行宽和行高
overWidth = 0;
overHeight = childViewHeight + lp.topMargin + lp.bottomMargin;
// 重置我们的View集合
lineViews = new ArrayList
}
overWidth += childViewWdth + lp.leftMargin + lp.rightMargin;
overHeight = Math.max(overHeight, childViewHeight + lp.topMargin + lp.bottomMargin);
lineViews.add(child);
}
// 处理最后一行
mHeightList.add(overHeight);
mAllViews.add(lineViews);
// 设置每一个子View的位置
int childLeft = getPaddingLeft();
int childTop = getPaddingTop();
// 当前行数
int linesNum = mAllViews.size();
for (int i = 0; i < linesNum; i++) {
// 当前行的所有view
lineViews = mAllViews.get(i);
overHeight = mHeightList.get(i);
for (int j = 0; j < lineViews.size(); j++) {
View child = lineViews.get(j);
// 判断当前View的状态
if (child.getVisibility() == View.GONE) {
continue;
}
MarginLayoutParams lp = (MarginLayoutParams) child.getLayoutParams();
int lc = childLeft + lp.leftMargin;
int tc = childTop + lp.topMargin;
int rc = lc + child.getMeasuredWidth();
int bc = tc + child.getMeasuredHeight();
child.layout(lc, tc, rc, bc);// 为子View进行布局
childLeft += child.getMeasuredWidth() + lp.leftMargin + lp.rightMargin;
}
childLeft = getPaddingLeft();
childTop += overHeight;
}
}
@Override
protected void onMeasure(int widthMeasureSpec, int heightMeasureSpec) {
int sizeWidth = MeasureSpec.getSize(widthMeasureSpec);
int modeWidth = MeasureSpec.getMode(widthMeasureSpec);
int sizeHeight = MeasureSpec.getSize(heightMeasureSpec);
int modeHeight = MeasureSpec.getMode(heightMeasureSpec);
super.onMeasure(widthMeasureSpec, heightMeasureSpec);
// wrap_content模式下的宽度和高度
int width = 0;
int height = 0;
// 记录每一行的宽度和高度
int lineWidth = 0;
int lineHeight = 0;
// 获取内容的View元素个数
int cCount = getChildCount();
for (int i = 0; i < cCount; i++) {
View child = getChildAt(i);
// 测量子View的宽度和高度
measureChild(child, widthMeasureSpec, heightMeasureSpec);
// 得到LayoutParams
MarginLayoutParams lp = (MarginLayoutParams) child.getLayoutParams();
// 子View占据的宽度
int childWidth = child.getMeasuredWidth() + lp.leftMargin + lp.rightMargin;
// 子View占据的高度
int childHeight = child.getMeasuredHeight() + lp.topMargin + lp.bottomMargin;
// 换行处理
if (lineWidth + childWidth > sizeWidth - getPaddingLeft() - getPaddingRight()) {
// 对比得到最大宽度
width = Math.max(width, lineWidth);
// 重置
lineWidth = childWidth;
// 记录行高
height += lineHeight;
lineHeight = childHeight;
}
else {
lineWidth += childWidth;
// 获取当前行最大的高度
lineHeight = Math.max(lineHeight, childHeight);
}
if (i == cCount - 1) {// 如果是最后一个控件
width = Math.max(lineWidth, width);
height += lineHeight;
}
}
setMeasuredDimension(
modeWidth == MeasureSpec.EXACTLY ? sizeWidth : width + getPaddingLeft() + getPaddingRight(),
modeHeight == MeasureSpec.EXACTLY ? sizeHeight : height + getPaddingTop() + getPaddingBottom());
}
/**
* 与当前ViewGroup对应的Layoutparmas
*/
@Override
public LayoutParams generateLayoutParams(AttributeSet attrs) {
// TODO Auto-generated method stub
return new MarginLayoutParams(getContext(), attrs);
}
}
-------在Activity中使用---------------------
public class MainActivity extends Activity {
private FlowLayout flow_layout;
private TextView tagView;
@Override
protected void onCreate(Bundle savedInstanceState) {
super.onCreate(savedInstanceState);
setContentView(R.layout.activity_main);
this.flow_layout = (FlowLayout) findViewById(R.id.flow_layout);
for (int i = 0; i < 15; i++) {
tagView = (TextView) getLayoutInflater().inflate(R.layout.flow_textview, flow_layout, false);
ViewGroup.MarginLayoutParams lp = new ViewGroup.MarginLayoutParams(ViewGroup.MarginLayoutParams.WRAP_CONTENT, ViewGroup.MarginLayoutParams.WRAP_CONTENT);
lp.leftMargin = 10;
lp.rightMargin = 10;
lp.topMargin = 10;
tagView.setLayoutParams(lp);
if (i % 3 == 0) {
tagView.setText("TextVeiw" + i * 100);
}else if(i%5==0){
tagView.setText("abcd");
}else if(i%7==0){
tagView.setText("文字");
}
else {
tagView.setText("TextVeiw");
}
flow_layout.addView(tagView);
}
}
}
---------用到的主界面布局R.layout.activity_main---------------
xmlns:ldm="http://schemas.android.com/apk/res/com.ldm.learn"
android:layout_width="match_parent"
android:layout_height="match_parent"
android:background="#ffffff" >
android:layout_width="fill_parent"
android:layout_height="fill_parent"
android:layout_margin="10dp" >
---------用到的TextView展示布局R.layout.activity_main---------------
android:layout_height="wrap_content"
android:padding="10dp"
android:gravity="center"
android:background="@drawable/textview_bg"
android:textSize="13sp"
android:textColor="#333333"
>
--------背景drawable:textview_bg.xml--------
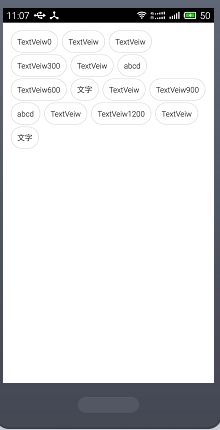
Activity中是随便制造了点数据,最后的效果如图: