基于SpringBoot开发一个Restful服务,实现增删改查功能
SpringBoot介绍
Spring Boot是由Pivotal团队提供的全新框架,其设计目的是用来简化新Spring应用的初始搭建以及开发过程。该框架使用了特定的方式来进行配置,从而使开发人员不再需要定义样板化的配置。
简单的来说就是,只需几个jar和一些简单的配置,就可以快速开发项目。
基于SpringBoot开发一个Restful服务
一、开发准备
1.1 数据库和表
在MySql中创建一个数据库和一张表,数据库的名称为 springboot,表名称为 book
1.2 maven相关依赖
因为我们使用Maven创建的,所以需要添加SpringBoot的相关架包。
这里Maven的配置如下:
springBoot最核心的jar
spring-boot-starter :核心模块,包括自动配置支持、日志和YAML;
    4.0.0

        org.springframework.boot
        spring-boot-starter-parent
        2.1.3.RELEASE


    missLove
    springboot
    0.0.1-SNAPSHOT
    springboot
    Demo project for Spring Boot


        1.8
        8.0.13


            org.springframework.boot
            spring-boot-starter-web


            org.springframework.boot
            spring-boot-starter-test
            test


            org.springframework.boot
            spring-boot-starter-data-jpa


            org.springframework.boot
            spring-boot-devtools
            true


            org.springframework.boot
            spring-boot-starter-test
            test


            mysql
            mysql-connector-java
            ${mysql.version}


            org.mybatis.spring.boot
            mybatis-spring-boot-starter
            1.3.2


                org.springframework.boot
                spring-boot-maven-plugin

                    true
二、工程说明
成功创建好数据库以及下载好相应架包之后。
我们来正式开发SpringBoot项目。
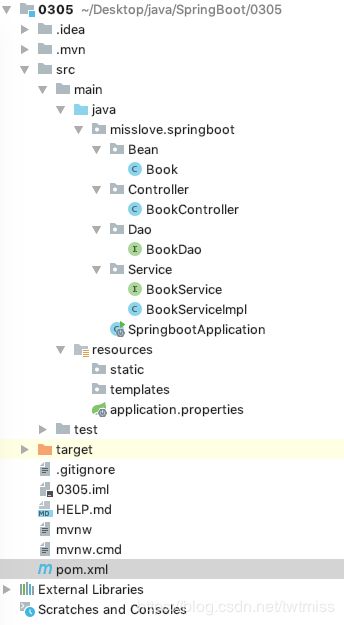
2.1工程结构图:
首先确定工程结构,这里就直接上图了。
2.2 自定义配置文件
一般我们需要一些自定义的配置,例如配置jdbc的连接配置,在这里我们可以用 application.properties 进行配置。数据源实际的配置以各位的为准。
## 数据源配置
spring.datasource.url=jdbc:mysql://localhost:3306/springboot?useUnicode=true&characterEncoding=utf-8
spring.datasource.username=root
spring.datasource.password=qwerqwer
spring.datasource.driver-class-name=com.mysql.jdbc.Driver

## Mybatis 配置
# 配置为 com.pancm.bean 指向实体类包路径。
#mybatis.typeAliasesPackage=misslove.springboot.beans
# 配置为 classpath 路径下 mapper 包下,* 代表会扫描所有 xml 文件。
#mybatis.mapperLocations=classpath\:mapper/*.xml
三、代码编写
在创建好相关工程目录之后,开始编写相应的代码。
3.1 实体类编写
由于在数据库中创建了一张book表,所以这里我们就只创建一个Book实体类,里面的字段对应book表的字段。
示例代码如下:
package misslove.springboot.Bean;

public class Book {
    String name;
    String author;
    String price;
    String isbn;
    public Book(){}
    public Book(String name, String author, String price, String isbn){
        this.name = name;
        this.author = author;
        this.price = price;
        this.isbn = isbn;
    }

    public String getIsbn() {
        return isbn;
    }

    public void setIsbn(String isbn) {
        this.isbn = isbn;
    }

    public String getName() {
        return name;
    }

    public void setName(String name) {
        this.name = name;
    }

    public String getAuthor() {
        return author;
    }

    public void setAuthor(String author) {
        this.author = author;
    }

    public String getPrice() {
        return price;
    }

    public void setPrice(String price) {
        this.price = price;
    }
}
3.2 Dao层编写
在以前的Dao层这块,hibernate和mybatis 都可以使用注解或者使用mapper配置文件。在这里使用spring的JPA来完成基本的增删改查。
说明:
一般有两种方式实现与数据库实现CRUD:
第一种是xml的mapper配置。
第二种是使用注解,@Insert、@Select、@Update、@Delete 这些来完成。本篇使用的是第二种。
package misslove.springboot.Dao;

import misslove.springboot.Bean.Book;
import org.apache.ibatis.annotations.*;
import java.util.List;

@Mapper
public interface BookDao {

    @Insert("insert into book(isbn,name,author,price) values (#{isbn},#{name},#{author},#{price})")
    void addBook(Book book);

    @Update("update book set name=#{name}, author=#{author},price=#{price}")
    void updateBook(Book book);

    @Select("select * from book")
    List findBook();

    @Delete("delete from book where isbn=#{isbn}")
    void deleteBook(String isbn);

}
说明:
- mapper : 在接口上添加了这个注解表示这个接口是基于注解实现的CRUD。
- Insert、Select、Update、Delete:对应数据库的增、查、改、删。
3.3 Service 业务逻辑层
代码如下:
Service层接口:
package misslove.springboot.Service;

import misslove.springboot.Bean.Book;
import java.util.List;

public interface BookService {
    boolean addBook(Book book);
    boolean deleteBook(String isbn);
    List findBook();
    boolean updateBook(Book book);
}
Service层实现类
package misslove.springboot.Service;

import misslove.springboot.Dao.BookDao;
import misslove.springboot.Bean.Book;
import org.springframework.beans.factory.annotation.Autowired;
import org.springframework.stereotype.Service;
import java.util.List;

@Service
public class BookServiceImpl implements BookService{

    @Autowired
    private BookDao bookDao;

    @Override
    public boolean addBook(Book book){
        try{
            bookDao.addBook(book);
            return true;
        }catch (Exception e){
            return false;
        }
    }

    @Override
    public boolean deleteBook(String isbn){
        try{
            bookDao.deleteBook(isbn);
            return true;
        }catch (Exception e){
            return false;
        }
    }

    @Override
    public boolean updateBook(Book book){
        try{
            bookDao.updateBook(book);
            return true;
        }catch (Exception e){
            return false;
        }
    }

    @Override
    public List findBook(){
        return bookDao.findBook();
    }
}
3.4 Controller 控制层
控制层这块和springMVC很像,但是相比而言要简洁不少。
说明:
- RestController:默认类中的方法都会以json的格式返回。
- RequestMapping: 接口路径配置。
- method : 请求格式。
- RequestParam: 请求参数。
具体实现如下:
package misslove.springboot.Controller;

import misslove.springboot.Service.BookService;
import misslove.springboot.Bean.Book;
import org.springframework.beans.factory.annotation.Autowired;
import org.springframework.web.bind.annotation.*;
import java.util.List;
import static org.springframework.web.bind.annotation.RequestMethod.*;

@RestController
@RequestMapping(value = "/book")
public class BookController {
    @Autowired
    private BookService bookService;

    //@RequestMapping(method = RequestMethod.POST, value = "/add")
    @RequestMapping(method = RequestMethod.POST)
    @ResponseBody
    public String add(@RequestBody Book book){
        System.out.println(book.getName());
        if(bookService.addBook(book)){
            return "添加成功";
        }
        else {
            return "添加失败";
        }
    }

    //@RequestMapping(method = DELETE, value = "/delete")
    @RequestMapping(method = DELETE)
    @ResponseBody
    public String delete(@RequestParam("isbn") String isbn){
        if(bookService.deleteBook(isbn)){
            return "删除成功";
        }else {
            return "删除失败";
        }
    }

    //@RequestMapping(method = PUT, value = "/edit")
    @RequestMapping(method = PUT)
    @ResponseBody
    public String edit(@RequestBody Book book){
        if(bookService.updateBook(book)){
            return "修改成功";
        }else {
            return "修改失败";
        }
    }

    //@RequestMapping(method = GET, value = "/find")
    @RequestMapping(method = GET)
    @ResponseBody
    public List find(){
        return bookService.findBook();
    }
}
说明:
使用 @RequestMapping(method = ***, value = "/***") 这种样式的话,需要在URL里填入相应的URL地址postman选用对应的method方法,如http://localhost:8080/book/find
使用@RequestMapping(method = ***)这种样式的话,在postman里选用对应的method方法即可,如http://localhost:8080/book
3.5 Application 主程序
SpringApplication 则是用于从main方法启动Spring应用的类。
默认,它会执行以下步骤:
1.创建一个合适的ApplicationContext实例 (取决于classpath)。
2.注册一个CommandLinePropertySource,以便将命令行参数作为Spring properties。
3.刷新application context,加载所有单例beans。
4.激活所有CommandLineRunner beans。
直接使用main启动该类,SpringBoot便自动化配置了。
ps:即使是现在我依旧觉得这个实在是太厉害了。
该类的一些注解说明。:
SpringBootApplication:开启组件扫描和自动配置。
MapperScan: mapper 接口类扫描包配置
代码如下:
package misslove.springboot;

import org.mybatis.spring.annotation.MapperScan;
import org.springframework.boot.SpringApplication;
import org.springframework.boot.autoconfigure.SpringBootApplication;

@SpringBootApplication
@MapperScan(basePackages = "misslove.springboot.Dao")
public class SpringbootApplication {
    public static void main(String[] args) {
        SpringApplication.run(SpringbootApplication.class, args);
    }
}
四、代码测试
代码编写完之后,我们进行代码的测试。
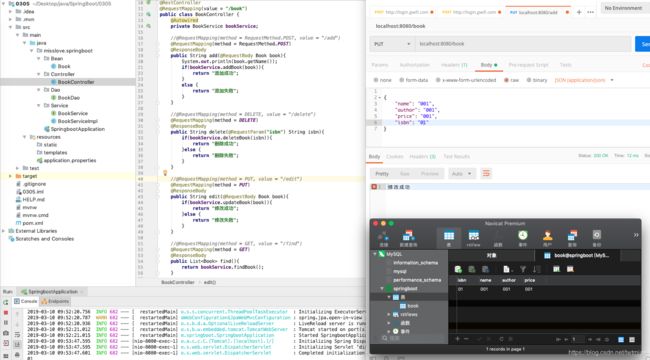
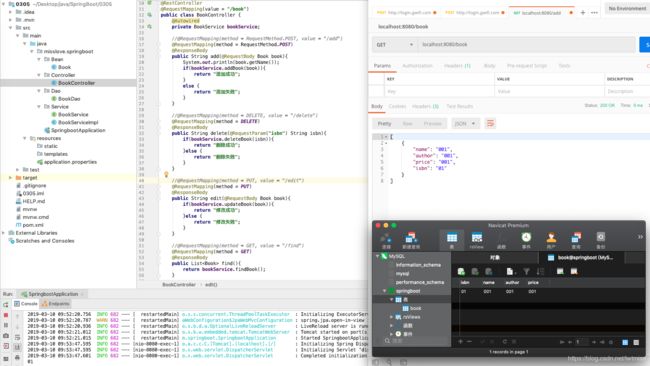
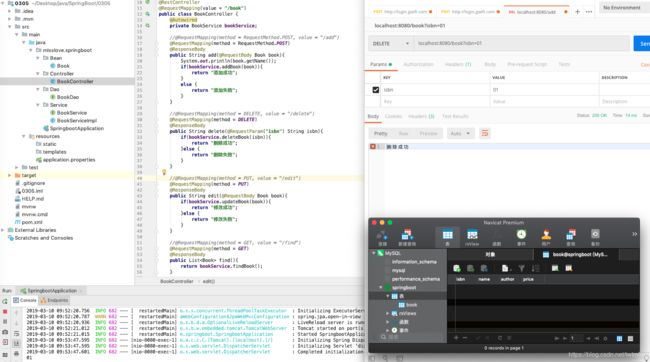
启动Application 之后,使用postman工具进行接口的测试。
测试结果如下:
添加:
修改:
查询:
删除:
引用: https://www.cnblogs.com/xuwujing/p/8260935.html
项目github地址: https://github.com/twtmiss/Spring-Boot-RestFul/tree/master/MVC_mysql


