RHCE 7 考题及答案
***此篇文章是在昂立江海老师的答案基础上做部分修改而来,并非完全原创,在此特别声明***
考试注意事项:
1.RHCE考试, 考试时间上午3.5小时, 总分300分,210上通过考试
2.身份证是唯一一定要带的有效证件
3. 考试需要的软件包和升级软件包所在目录也会给出
4. 考题中出现的 X,是你宿主机的IP 地址主机位
5. example.com 域所在的网络是192.168.0.0/24
cracker.com 域所在的网络是172.16.0.0/16,一般在题意中被要求拒绝的网络
6. RHCSA 部分,在system1 主机上完成
RHCE 部分,在system1 和system2 上完成
考试注意看清在哪台机器上做哪题,别做错或者多做了。
程 序 安 装 五 步 骤:安装---运行---开机启动---防火墙放行服务---防火墙放行端口
文件夹和文件三步骤:创建---权限---SELinux上下文
----------------------------------------------------------------------------------
1. 在你的虚拟机中配置SELinux,处于enforcing状态。
SElinux必须在两个系统中运行Enfocing模式
System1 and System2
vim /etc/selinux/config
SELINUX=enforcing
setenforce 1
Getenforce
----------------------------------------------------------------------------------
2. 配置SSH访问
按以下要求配置SSH访问
A 用户能够从域example.com 内的客户端通过SSH远程访问您的两个虚拟机系统
B 在域cracker.com内的客户端不能访问您的两个虚拟机系统
System1 and System2
vim /etc/hosts.allow
添加一行 sshd: .example.com 使用IP+网段
vim /etc/hosts.deny
添加一行 sshd : .cracker.com
#Firewall-cmd --permanent --add-rich-rule=’rule family=”ipv4” source address=”172.13.8.0/24” server name=”ssh” reject’
----------------------------------------------------------------------------------
3. 自定义用户环境
在系统system1和system2上创建自定义别名,命名为qstat,此自定义命令将执行以下命令: 所有用户/指定用户/所有用户
A: /bin/ps –Ao pid,tt,user,fname,rsz #/etc/bashrc /etc/bash_profile
B: 此命令对系统中所有用户有效。 #/root/bashrc /root/bash_profile
System1 and System2 #/home/harry/bashrc /home/harry/bash_profile
修改/etc/bashrc,在尾部加上一条alias即可
vi /etc/bashrc
alias qstat='/bin/ps -Ao pid,tt,user,fname,rsz'
source /etc/bashrc
----------------------------------------------------------------------------------
4. 端口转发
在系统ststem1配置端口转发,要求如下:
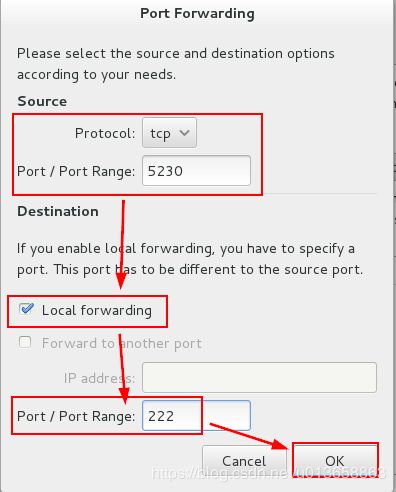
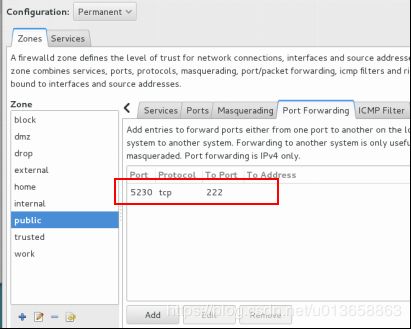
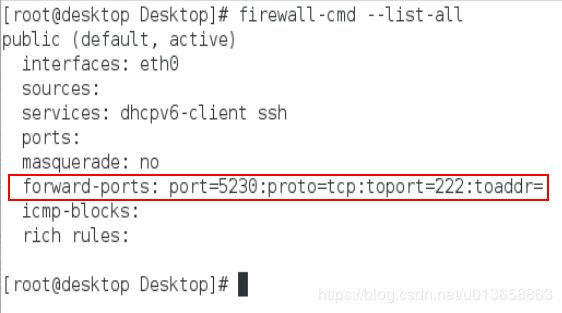
A 在网络中的系统,访问system1 的本地端口5230将被转发到222
B 此设置必须永久有效
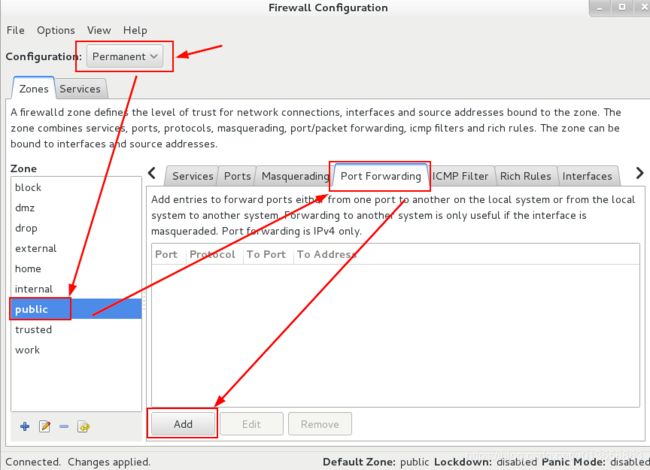
使用图形化界面做,运行firewall-config
题目没有要求明确指明哪个域,就在默认域public中设置
首先选择permanent状态,默认域中,选择本地转发,添加端口
方法一:
firewall-cmd --permanent --add-forward-port=’port=5230:proto=tcp:toport=222’
方法二:
Firewall-cmd -permanent --add-rich-rule=’rule family=”ipv4” source address=”172.24.8.0/24” forward-port port=”5230”protocol=”tcp” to-port=”80”
富规则分段解析:
Firewall-cmd -permanent --add-rich-rule=’
rule family=”ipv4”
source address=”172.24.8.0/24”
forward-port port=”5230”protocol=”tcp” to-port=”80” ‘
方法三,图形设置:
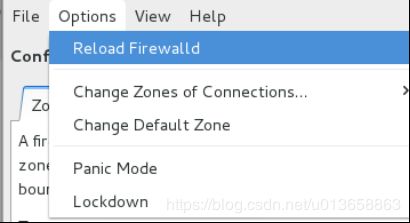
重载防火墙。
----------------------------------------------------------------------------------
5. 配置聚合链路
在system1和system2上按以下要求配置一个链路:
A 此链路使用接口eth1和eth2
B 此链路在一个接口失败时仍然能工作
C 此链路在system1使用下面的地址192.168.10.25/255.255.255.0
D 此链路在system2使用下面的地址192.168.10.35/255.255.255.0
E 此链路在系统重启之后依然保持正常状态
System1 and System2 #broadcast,roundrobin,activebackup,loadbalance,lacp
nmcli con add type team con-name team1 ifname team1 config ‘{“runner”:{“name”:”activebackup”}}’
Nmcli con mod team1 ipv4.addresses ‘192.168.10.25/24’
Nmcli con mod team1 ipv4.method manual
nmcli con add type team-slave (con-name port1) ifname eth1 master team1
Nmcli con add type team-slave (con-name port2) ifname eth2 master team1
Nmcli con up team1
Teamdctl team1 state
nmcli conn state team1
----------------------------------------------------------------------------------
6. 配置ipv6地址
在您的考试系统上配置接口eth0使用下列Ipv6地址:
A system1上的地址应该是::192.168.0.150+X/64
B system2上的地址应该是::192.168.0.200+X/64
C 地址必须在重启后依旧生效
D 两个系统必须保持当前的Ipv4地址并能通信。
nmcli con mod ‘System eth0’ ipv6.addresses '::192.168.0.150+X/64'
nmcli con mod ‘System eth0’ ipv6.method manual #System1
nmcli con mod ‘System eth0’ ipv6.addresses '::192.168.0.200+X/64'
nmcli con mod ‘System eth0’ ipv6.method manual #System2
systemctl restart network Ipv6.method=ignore / auto / manual
ifconfig查看
----------------------------------------------------------------------------------
7. 配置本地邮件服务
在系统system1和system2上配置邮件服务,满足以下要求:
A 这些系统不接收外部发送来的邮件
B 在这些系统上本地发送的任何邮件都会自动路由到classroom.example.com
C 在这些系统上发送的邮件显示来自于serverX.example.com
##在辅导时输入lab smtp-nullclient setup生成环境,考试时不用
System1 and System2
yum install postfix
systemctl enable postfix
systemctl start postfix
配置文件是:/etc/postfix/main.cf
而postconf命令中的-e参数是直接修改main.cf文件)
1、将relayhost指令自动路由到classroom.example.com
postconf –e “relayhost=[classroom.example.com]” --313
2、向配置文件中添加一行指令,用来仅侦听在回环接口上发送的电子邮件
postconf –e “inet_interfaces=loopback-only” --116
3、仅将源自127.0.0.0/8 IPv4网络和[::1]/128 网络的邮件转发到中继主机
postconf –e “mynetworks=127.0.0.0/8, [::1]/128” --264
4、这些系统上发送的邮件显示来自于serverX.example.com
postconf –e “myorigin=serverX.example.com” --98
5、将空客户端配置为将所有邮件转发到中继服务器
postconf –e “mydestination=” --164
6、阻止本地空客户端将任何邮件整理到serverX系统上的邮箱
postconf –e “local_transport=error: local delivery disabled”
---------------------------------------
systemctl restart postfix
firewall-cmd --permanent --add-services=smtp
firewall-cmd --reload
----------------------------------------------------------------------------------
8. 通过SMB共享目录
在system1上配置SMB服务
您的SMB服务器必须是STAFF工作组的一个成员
共享/common目录共享名必须为common
只有example.com域内的客户端可以访问common共享
common必须是可以浏览的
用户harry必须能够读取共享中的内容,如果需要的话,验证的密码是redhat
System1
yum –y install samba samba-client
systemctl enable smb nmb
systemctl start smb nmb
firewall-cmd --permanent --add-service=samba samba-client
firewall-cmd --permanent --add-service=mountd
firewall-cmd --reload
----------------------------------------
mkdir /common
chmod o=rwx /common
chcon –Rt samba_share_t /common
---------------------------------------
vim /etc/samba/smb.conf
89行:workgroup = STAFF #修改global下面的
在文件最后下添加:
[common] #共享名
path = /common #共享路径
hosts allow = 192.168.0.0/24 #example.com
browseable = yes #可以浏览
:wq
---------------------------------------
smbpasswd –a harry
(-a选项是添加该用户到sampasswd的文件中,然后输入密码,记住想要添加smb用户,该用户必须是linux用户。)
systemctl restart smb nmb
----------------------------------------------------------------------------------
9. 配置多用户SMB挂载
在system1共享通过SMB目录/devops满足以下要求
A 共享名为devops
B 共享目录devops只能被example.com域中的客户端使用
C 共享目录devops必须可以被浏览
D 用户harry必须能以读的方式访问此共享,访问密码是redhat
E 用户natasha必须能以读写的方式访问此共享,访问密码是123
F 此共享永久挂载在system2上的/mnt/multi目录,并使用用户harry作为认证,任何用户可以通过用户natasha来临时获取写的权限
System1
mkdir /devops #创建共享文件夹
chmod o=rwx /devops #设置文件夹权限
chcon -t samba_share_t /devops #设置文件夹Selinux上下文
---------------------------------------
vim /etc/samba/smb.conf #配置samba共享,在文件最后下添加,
[devops]
path = /devops
hosts allow = 192.168.0.0/24
browseable = yes
write list = natasha
:wq
---------------------------------------
smbpasswd –a harry #添加samba用户
smbpasswd –a natasha
systemctl restart smb nmb
System2
yum –y install cifs-utils / cifs-* #smbclient -L //system1/ -U harry
mkdir /mnt/multi
vim /etc/fstab
//system1/devops /mnt/multi cifs defaults,multiuser,username=harry,password=redhat,sec=ntlmssp 0 0
su – natasha
cifscreds add system1
----------------------------------------------------------------------------------
10. 配置NFS服务
在system1配置NFS服务,要求如下:
A 以只读的方式共享目录/public 同时只能被example.com域中的系统访问
B 以读写的方式共享目录/protected 能被example.com域中的系统访问
C 访问/protected需要通过kerberos安全加密,您可以使用下面的URL提供的密钥:http://classroom.example.com/pub/nfssecure/krb5.keytab
D 目录/protected 应该包含名为project 拥有人为ldapuserX的子目录
E 用户ldapuserX能以读写方式访问/protected/project
在system1上做: #systemctl status | yum install -y nfs-utlis
systemctl start nfs-server nfs-secure-server
systemctl enable nfs-server nfs-secure-server
---------------------------------------
firewall-cmd --permanent --add-service=nfs
firewall-cmd --permanent --add-service=ntp
firewall-cmd --permanent --add-service=mountd
firewall-cmd --permanent --add-service=rpc-bind
firewall-cmd --reload
---------------------------------------
mkdir –p /public /protected/project #-p 确保目录名称存在,不存在的就建一个
chcon –Rt public_content_t /protected/project
chcon –Rt public_content_t /public
chown ldapuserX /protected/project
wget –O /etc/krb5.keytab http://classroom.example.com/pub/nfssecure/krb5.keytab
---------------------------------------
vim /etc/sysconfig/nfs
设置RPCNFSDARGS=”-V 4.2”
vim /etc/exports
/public *.example.com(ro,sync)
/protected *.example.com (sec=krb5p,rw)
---------------------------------------
systemctl restart nfs-server nfs-secure-server
exportfs –r
showmount –e 127.0.0.1
----------------------------------------------------------------------------------
11. 挂载一个NFS共享
在system2上挂载一个来自system1上的NFS共享,使用3.0,3.1,3.2...版本,默认使用最新4.2, 并符合下列要求:
默认最新版在服务器端配置,指定版本在客户端配置。版本只配一边。
A /public 挂载在下面的目录上/mnt/nfsmount
B /protected挂载在下面的目录上/mnt/nfssecure并使用安全的方式。
密钥下载URL如下:http://classroom.example.com/pub/nfssecure.keytab
C krishna能够在/mnt/nfssecure/project上创建文件
D 这些文件系统在系统启动时自动挂载
在system2上做:
showmount –e system1
mkdir /mnt/nfsmount
mkdir /mnt/nfssecure
---------------------------------------
vim /etc/fstab
system1:/public /mnt/nfsmount nfs defaults 0 0
system1:/protected /mnt/nfssecure nfs defaults,sec=krb5p,v4.2 0 0
:wq
---------------------------------------
systemctl start nfs-secure
systemctl enable nfs-secure
mount –a
***************************************
#RHEL 7.2之后:如果在服务器端已经配置了NFS协议的版本,客户端就不需要再配置nfs的版本号了。
#在RHEL7.1之后的版本,已经不能手工设定nfs-secure服务开机启动,他会根据条件自动启动
# systemctl enable nfs-server.service RHEL 7.2 无法手工启动 nfs-secure-server服务,它会根据条件自动启动
# systemctl restart nfs-secure 注意:首次配置后挂载krb5p验证的nfs共享需要手工重启(该服务可以restart,但不能start和enable)
----------------------------------------------------------------------------------
12. 配置web站点
System1上配置一个站点http://serverX.example.com然后执行下述步骤:
从http://classroom.example.com/pub/example.html下载文件,并且将文件重命名index.html不要修改此文件的内容
将文件index.html拷贝到您的web服务器的documentroot目录下
来自于example.com域的客户端可以访问此Web服务
System1
yum install httpd
systemctl enable httpd
systemctl start httpd
firewall-cmd --permanent --add-service=http
firewall-cmd --permanent --add-rich-rule='rule family=ipv4 source address=172.16.0.0/16 service name="http" reject'
firewall-cmd --permanent --add-rich-rule='rule family=ipv4 source address=192.168.0.0/24 service name="http" accept'
firewall-cme --reload
---------------------------------------
Wget -O /var/www/html/index.html http://classroom.example.com/pub/example.html
Ls -Z
Chcon -t httpd_sys_content_t ./index.html
//从考官机子上下载网页,放到目录里并改名index.html,还要注意SELinux上下文,是httpd_sys_content_t
vim /etc/httpd/conf.d/test.conf #在conf.d下新建一个任意名字,以.conf结尾的配置文件
Documentroot /var/www/html
Servername serverX.example.com
---------------------------------------
curl http://serverX.example.com
System2
Firefox: http://serverX.example.com
然后清除缓存退出火狐
----------------------------------------------------------------------------------
13. 配置安全web服务
为站点http://serverX.example.com配置TLS加密,
一个已签名证书从http://classroom.example.com/pub/certs/serverX.crt获取,
此证书的密钥从http://classroom.example.com/pub/keys/serverX.key获取,
此证书的签名授权信息从http://classroom.example.com/pub/example-ca.crt获取
System1
yum install mod_ssl #安装SSL模块
firewall-cmd --permanent --add-service=https
firewall-cmd --reload
---------------------------------------
Wget -O /etc/pki/tls/certs/serverX.crt http://classroom.example.com/pub/certs/serverX.crt
Wget -O /etc/pki/tls/private/serverX.key http://classroom.example.com/pub/keys/serverX.key
Wget -O /etc/pki/tls/certs/example-ca.csr http://classroom.example.com/pub/example-ca.csr
---------------------------------------
chmod 0600 /etc/pki/tls/certs/*.crt #下载证书到对应的文件夹
chmod 0600 /etc/pki/tls/private/*.key #修改证书为只读属性
---------------------------------------
vim /etc/httpd/conf.d/test.conf
SSLEngine on
SSLProtocol all -SSLv2 –SSLv3
SSLCipherSuite HIGH:MEDIUM:!aNULL:!MD5
SSLHonorCipherOrder on
SSLCertificateFile /etc/pki/tls/certs/serverX.crt #PKI (Public Key Infrastructure )
SSLCertificateKeyFile /etc/pki/tls/private/serverX.key # 公开密钥基础设施
SSLCertificateChainFile /etc/pki/tls/certs/example-ca.crt #TLS (Transport Layer Security)
DocumentRoot /var/www/html # 传输层安全性协议
ServerName serverX.example.com
---------------------------------------
systemctl restart httpd
curl https://serverX.example.com
System2
打开firefox查看结果。
----------------------------------------------------------------------------------
14. 配置虚拟主机
在system1上扩展您的web服务器,为站点http://wwwX.example.com创建一个虚拟主机,然后执行下述步骤:
A 设置DocumentRoot为/var/www/virtual
B 从http://classroom.example.com/pub/virtual.html 下载文件并重命名为index.html 不要对文件index.html的内容做任何修改
C 将文件index.html放到虚拟主机的DocumentRoot 目录下
D 确保natasha用户能够在/var/www/virtual目录下创建文件
注意:原始站点http://serverX.example.com必须仍然能够访问
System1
mkdir /var/www/virtual
Wget -O /var/www/virtual/index.html http://classroom.example.com/pub/virtual.html
setfacl –m u:natasha:rwx /var/www/virtual
---------------------------------------
在第一个Web题的配置文件里面,后面再加一段
vim /etc/httpd/conf.d/test.conf
DocumentRoot /var/www/virtual
ServerName wwwX.example.com
---------------------------------------
systemctl restart httpd
curl http://wwwX.example.com
System2
打开firefox查看结果。
----------------------------------------------------------------------------------
15. 配置web内容的访问
在您的system1上的web服务器的DocumentRoot目录下创建一个名为private的目录,要求如下:
A 从http://classroom.example.com/pub/secret.html下载一个文件副本到这个目录,并且重命名为index.html
B 不要对这个文件的内容做任何修改
C 在system1上,任何人都可以浏览private的内容,但是从其他系统不能访问这个目录的内容
System1
mkdir /var/www/html/private
Wget -O /var/www/html/private/index.html http:// classroom.example.com/pub/secret.html
---------------------------------------
还是刚才的配置文件
vim /etc/httpd/conf.d/test.conf
DocumentRoot /var/www/html
ServerName serverX.example.com
order allow,deny #“order allow,deny”
allow from 192.168.0.150+X #表示允许某些,拒绝所有,
#allow from serverX.example.com #然后跟上允许列表。
esc:wq
---------------------------------------
systemctl restart httpd
curl http://serverX.example.com/private
System2
打开firefox检查。
----------------------------------------------------------------------------------
16. 实现动态WEB内容
在system1上配置提供动态Web内容,要求如下:
A 动态内容名为dymanicX.example.com的虚拟主机提供
B 虚拟主机侦听在端口7777
C 从http://classroom.example.com/pub/webapp.wsgi下载一个脚本,然后放在适当的位置,无论如何都不要求修改此文件的内容
D 客户端访问http://dymanicX.example.com:7777/时应该接收到动态生成的web页面
E 此http://dymanicX.example.com:7777/ 必须被example.com域内的所有系统访问
System1
yum install mod_wsgi
Firewall-cmd --permanent --add-port=7777/tcp #Firewall
Semanage port –a –t http_port_t –p tcp 7777 #Seliunx
mkdir /var/www/webapp
cd /var/www/webapp
wget http://classroom.example.com/pub/webapp.wsgi
---------------------------------------
//还是刚才的配置文件,在后面加一段。
vim /etc/httpd/conf.d/test.conf
listen 7777
ServerName dymanicX.example.com
WSGIScriptAlias / /var/www/webapp/webapp.wsgi
systemctl restart httpd
curl http://dymanicX.example.com
***************************************
#WSGI (Web Server Gateway Interface Web)服务器网关接口
----------------------------------------------------------------------------------
17. 创建一个脚本
在system1上创建一个名为/root/foo.sh 的脚本,让其提供下列特征
A 当运行/root/foo.sh redhat, 输出为fedora
B 当运行/root/foo.sh fedora,输出为redhat
C 当没有任何参数或者参数不是redhat或者fedora时,其错误输出产生以下的信息:/root/foo.sh redhat|fedora
System1
题目给什么名字就写什么名字
vim /root/foo.sh
chmod a+x /root/foo.sh
#!/bin/bash
case “$1” in
redhat)
echo fedora
;;
fedora)
echo redhat
;;
*)
echo ‘/root/foo.sh redhat|fedora’ 2>&1
;;
esac
检查
/root/foo.sh redhat
/root/foo.sh fedora
/root/foo.sh 1
----------------------------------------------------------------------------------
18. 创建一个添加用户的脚本
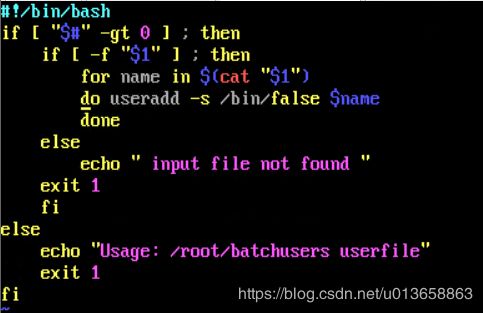
在system1上创建一个脚本,名为/root/batchusers,此脚本能实现为系统system1创建本地用户,并且这些用户的用户名来自一个包含用户名列表的文件。同时满足下列要求:
A 此脚本要求提供一个参数,此参数就是包含用户名列表的文件
B 如果没有提供参数,此脚本应该给出下面的提示信息Usage: /root/batchusers然后退出并返回相应的值
C 如果提供一个不存在的文件名,此脚本应该给出下面的提示信息input file not found 然后退出并返回相应的值
D 创建的用户登录shell为/bin/false
E 此脚本不需要为用户设置密码
你可以从下面的URL获取用户名列表作为测试用http://classroom.example.com/pub/multiusers.txt
System1
cd /root
wget http://classroom.example.com/pub/multiusers.txt
---------------------------------------
Touch /root/batchusers
chmod a+x /root/batchusers
vim /root/batchusers
方法一:
#!/bin/bash
If [ “$#” –eq 0 ];then ## $# 添加到Shell的参数个数
echo ‘Usage: /root/batchusers’
exit 1
fi
if [ ! –f “$1” ];then ## -f 测试是否为文件(File)或文件是否存在
echo ‘Input file not found’
exit 1 ## $? 上一条命令执行后返回的状态,0时表示执行正常,非0值表示执行
fi ##异常或出错判断是否出现错误正常为0异常错误为非0,取值在1-127之间
for NAME in $(cat “$1”)
do
useradd -s /bin/fales $NAME
done
:wq ## $0 当前执行的进程/程序名(就是当前执行的命令或程序的名字)
方法二:
----------------------------------------------------------------------------------
19. 配置iSCSI服务端
配置system1提供一个iSCSI 服务磁盘名为iqn.2015-02.com.example:system1并符合下列要求
A 服务端口为3260
B 使用iscsi-store作其后端卷其大小为2G
C 此服务只能被system2访问
System1
yum –y install targetcli
systemctl enable target
systemctl start target
##Firewall-cmd --permanent --add-rich-rule=’rule family=”ipv4” source address=”172.24.8.12/24” port=3260 protocol=tcp accept‘
firewall-cmd --permanent --add-port=3260/tcp
firewall-cmd –reload
==============================安装iSCSI服务器端
fdisk /dev/vda
n -> +2G -> w
Partprobe
==============================分区,不用格式化
targetcli
/backstores/block create iscsi-store /dev/vda7 ##类似创建PV
##vda7是我在上面分出来的,实际上根据自己分的盘来设置
/iscsi create iqn.2015-02.com.example:system1 ##类似创建VG
/iscsi/iqn.2015-02.com.example:system1/tpg1/acls/ create iqn.2015-02.com.example:system2 ##Users
/iscsi/iqn.2015-02.com.example:system1/tpg1/luns create /backstores/block/iscsi-store ##Share Name
/iscsi/iqn.2015-02.com.example:system1/tpg1/portals/ create 192.168.0.150+X ##Server IP
saveconfig
exit
systemctl restart target
----------------------------------------------------------------------------------
20. 配置iSCSI的客户端
配置system2是其能连接在system1上提供的iqn.2015-02.com.example:system1并符合以下要求
A iSCSI 设备在系统启动的期间自动加载
B 块设备iSCSI上包含一个大小为1G的分区,并格式为ext4
C 此分区挂载在 /mnt/data上同时在系统启动的期间自动挂载
System2
yum install iscsi*
systemctl enable iscsid
systemctl restart iscsid
---------------------------------------
修改本机的iqn名字
vim /etc/iscsi/initiatorname.iscsi
InitiatorName=iqn.2015-02.com.example:system2 #-m=模式,-t=类型,-p=端口
iscsiadm –m discovery –t st –p system1 #man iscsiadm 可查到此条命令
iscsiadm -m node –T iqn.2015-02.com.example:system1 –l #man iscsiadm 可查到此条命令
fdisk /dev/vdc #-T=targetname,-l=login
##这里的sda是服务器共享的磁盘在你的客户端上显示的磁盘名,可以用fdisk -l查看到。
##然后分配一个1G的分区,此处我省略了。
mkfs.ext4 /dev/vdc1
mkdir /mnt/data
vim /etc/fstab
/dev/vdc1 /mnt/data ext4 defaults,_netdev 0 0
mount -a
df -Th
Lsblk
***************************************
#IQN iSCSI限定名称
#TPG (target portal group, )目标门户组
#LUN(Logical Unit Number)逻辑单元号, LUN ID的作用就是扩充了Target ID。
#每个Target下都可以有多个LUN Device,我们通常简称LUN Device为LUN。
----------------------------------------------------------------------------------
21. 配置一个数据库
在system1上创建一个MariaDB数据库,名为employees,并符合以下条件:
A 数据库应该包含来自数据库复制的内容,复制文件的URL为http://classroom.example.com/pub/employees.dump
B 数据库只能被localhost访问
C 创建bob用户,此用户的密码为redhat
D 除了root用户,此数据库只能被用户bob查询
E root用户的密码为redhat,同时不允许空密码登录
System1
yum groupinstall mariadb mariadb-client
systemctl enable mariadb
systemctl restart mariadb #安装启动数据库
---------------------------------------
mysql_secure_installation #加密数据库 #初始化来设置root密码,其余选项,默认全是Y。
mysql -u root -p //使用root用户登录数据库
CREATE USER bob IDENTIFIED BY ‘redhat’; #创建bob用户,并设置密码
SHOW databases;
CREATE DATABSE employees; #创建数据库,名字为employees
GRANT select ON employees.* TO bob@localhost IDENTIFIED BY ‘redhat’;
#给bob用户赋予权限(创建insert、读取select、更新update、删除delete。)
exit
wget http://classroom.example.com/pub/employees.dump #下载数据库文件并导入employees数据库
mysql -u root -p employees < employees.dump #也有可能会给的是mdb文件,例如:employees.mdb
mysql -u root -p #进入数据库后,创建数据库
USE employees; #再导入数据库:source /root/employees.mdb
SHOW tables;
exit
----------------------------------------------------------------------------------
22. 数据库查询
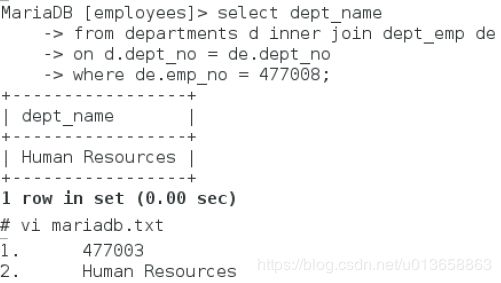
在系统system1上使用数据库employees,并使用相应的SQL查询以回答下列问题:
1. 从 employees 表中查询last_name 是'Zucker',first_name 是'Oguz'的用户emp_no
2. 查询 emp_no 是477008 用户的部门名称
3. 将查询结果写到/root/mariadb.txt #考试时将查询结果填入网页后,提交答案。
System1
mysql -u root -p
use employees;
Select emp_no from employees where last_name = ‘zucker’and first_name= ‘oguz’
Select dept_name from departments dinner join dept_emp
#u_name u_loc u_passwd
#Select u_name.firstname from u_name,u_passed where u_name.userid = u_passwd.uid and u_passwd.password = ‘fadora’;
#Select count(*) from u_name, u_loc where u_name.userid = u_loc.uid and u_name.firstname = ‘john’ and u_loc.location = ‘santa clara’;
