ASP.NET Core
注意:Visual Studio 2017和最新版本的ASP.NET的更新即将推出!
安装 ASP.NET Core 和 TypeScript
首先,若有必要请安装 ASP.NET Core。 这个快速上手指南使用的是 Visual Studio ,若要使用 ASP.NET Core 你需要有 Visual Studio 2015。
其次,如果你的 Visual Studio 中没有包含 TypeScript,你可以从这里安装TypeScript for Visual Studio 2015。
新建工程
-
选择 File
-
选择 New Project (Ctrl + Shift + N)
-
选择 Visual C#
-
选择 ASP.NET Web Application
-
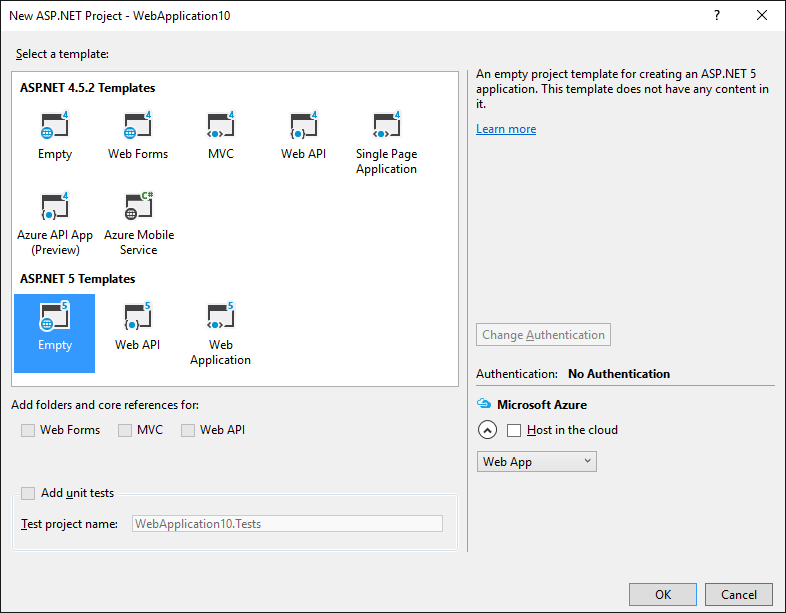
选择 ASP.NET 5 Empty 工程模板
运行此应用以确保它能正常工作。
设置服务项
在 project.json 文件的 "dependencies" 字段里添加:
"Microsoft.AspNet.StaticFiles": "1.0.0-rc1-final"
最终的 dependencies 部分应该类似于下面这样:
"dependencies": {
  "Microsoft.AspNet.IISPlatformHandler": "1.0.0-rc1-final",
  "Microsoft.AspNet.Server.Kestrel": "1.0.0-rc1-final",
  "Microsoft.AspNet.StaticFiles": "1.0.0-rc1-final"
},
用以下内容替换 Startup.cs 文件里的 Configure 函数:
public void Configure(IApplicationBuilder app)
{
    app.UseIISPlatformHandler();
    app.UseDefaultFiles();
    app.UseStaticFiles();
}
添加 TypeScript
下一步我们为 TypeScript 添加一个文件夹。
将文件夹命名为 scripts。
添加 TypeScript 代码
在scripts上右击并选择New Item。 接着选择 TypeScript File(也可能 .NET Core 部分),并将此文件命名为app.ts。
添加示例代码
将以下代码写入app.ts文件。
function sayHello() {
  const compiler = (document.getElementById("compiler") as HTMLInputElement).value;
  const framework = (document.getElementById("framework") as HTMLInputElement).value;
  return `Hello from ${compiler} and ${framework}!`;
}
构建设置
配置 TypeScript 编译器
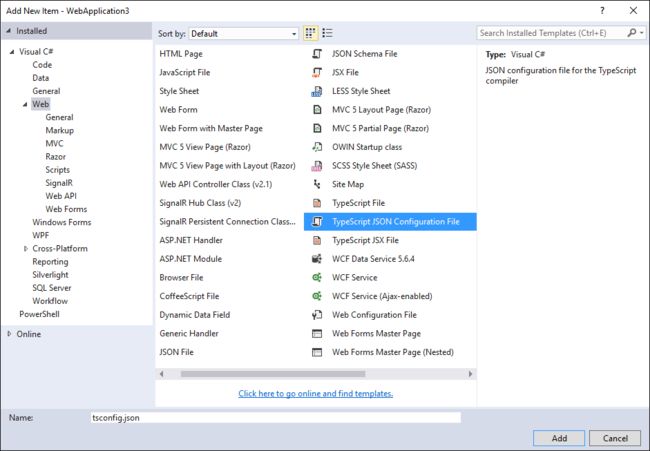
我们先来告诉TypeScript怎样构建。 右击scripts文件夹并选择 New Item。 接着选择 TypeScript Configuration File,保持文件的默认名字为tsconfig.json。
将默认的tsconfig.json内容改为如下所示:
{
  "compilerOptions": {
    "noImplicitAny": true,
    "noEmitOnError": true,
    "sourceMap": true,
    "target": "es5"
  },
  "files": [
    "./app.ts"
  ],
  "compileOnSave": true
}
看起来和默认的设置差不多,但注意以下不同之处:
- 设置
"noImplicitAny": true。 - 显式列出了
"files"而不是依据"excludes"。 - 设置
"compileOnSave": true。
当你写新代码时,设置"noImplicitAny"选项是个不错的选择 — 这可以确保你不会错写任何新的类型。 设置"compileOnSave"选项可以确保你在运行web程序前自动编译保存变更后的代码。
配置 NPM
现在,我们来配置NPM以使用我们能够下载JavaScript包。 在工程上右击并选择 New Item。 接着选择 NPM Configuration File,保持文件的默认名字为package.json。 在 "devDependencies"部分添加"gulp"和"del":
"devDependencies": {
  "gulp": "3.9.0",
  "del": "2.2.0"
}
保存这个文件后,Visual Studio将开始安装gulp和del。 若没有自动开始,请右击package.json文件选择 Restore Packages。
设置 gulp
最后,添加一个新JavaScript文件gulpfile.js。 键入以下内容:
////* This file is the main entry point for defining Gulp tasks and using Gulp plugins. Click here to learn more. http://go.microsoft.com/fwlink/?LinkId=518007 */ var gulp = require('gulp'); var del = require('del'); var paths = { scripts: ['scripts/**/*.js', 'scripts/**/*.ts', 'scripts/**/*.map'], }; gulp.task('clean', function () { return del(['wwwroot/scripts/**/*']); }); gulp.task('default', function () { gulp.src(paths.scripts).pipe(gulp.dest('wwwroot/scripts')) });
第一行是告诉Visual Studio构建完成后,立即运行'default'任务。 当你应答 Visual Studio 清除构建内容后,它也将运行'clean'任务。
现在,右击gulpfile.js并选择Task Runner Explorer。 若'default'和'clean'任务没有显示输出内容的话,请刷新explorer:
编写HTML页
在wwwroot中添加一个新建项 index.html。 在 index.html中写入以下代码:
"utf-8" />
Framework: "framework" value="ASP.NET" οnkeyup="document.getElementById('message').innerText = sayHello()" />
测试
- 运行项目。
- 在输入框中键入时,您应该看到一个消息:
调试
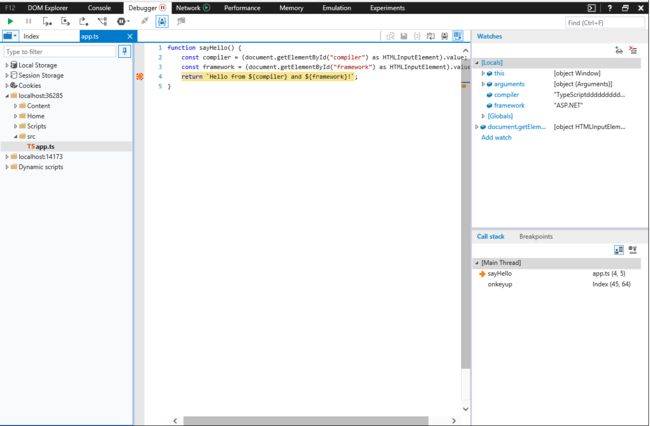
- 在 Edge 浏览器中,按 F12 键并选择 Debugger 标签页。
- 展开 localhost 列表,选择 scripts/app.ts
- 在
return那一行上打一个断点。 - 在输入框中键入一些内容,确认TypeScript代码命中断点,观察它是否能正确地工作。
这就是你需要知道的在ASP.NET中使用TypeScript的基本知识了。 接下来,我们引入Angular,写一个简单的Angular程序示例。
添加 Angular 2
使用 NPM 下载所需的包
在 package.json 文件的 "dependencies" 添加 Angular 2 和 SystemJS:
 "dependencies": {
    "angular2": "2.0.0-beta.11",
    "systemjs": "0.19.24",
  },
更新 tsconfig.json
现在安装好了Angular 2及其依赖项,我们需要启用TypeScript中实验性的装饰器支持。 我们还需要添加ES2015的声明,因为Angular使用core-js来支持像 Promise的功能。 在未来,装饰器会成为默认设置,那时也就不再需要这些设置了。
添加"experimentalDecorators": true, "emitDecoratorMetadata": true到"compilerOptions"部分。 然后,再添加 "lib": ["es2015", "es5", "dom"]到"compilerOptions",以引入ES2015的声明。 最后,我们需要添加 "./model.ts"到"files"里,我们接下来会创建它。 现在 tsconfig.json看起来如下:
{
    "compilerOptions": {
        "noImplicitAny": true,
        "noEmitOnError": true,
        "sourceMap": true,
        "experimentalDecorators": true,
        "emitDecoratorMetadata": true,
        "target": "es5",
        "lib": [
            "es2015", "es5", "dom"
        ]
    },
    "files": [
        "./app.ts",
        "./model.ts",
        "./main.ts",
    ],
    "compileOnSave": true
}
将 Angular 添加到 gulp 构建中
最后,我们需要确保 Angular 文件作为 build 的一部分复制进来。 我们需要添加:
- 库文件目录。
- 添加一个
lib任务来输送文件到wwwroot。 - 在
default任务上添加lib任务依赖。
更新后的 gulpfile.js 像如下所示:
////* This file is the main entry point for defining Gulp tasks and using Gulp plugins. Click here to learn more. http://go.microsoft.com/fwlink/?LinkId=518007 */ var gulp = require('gulp'); var del = require('del'); var paths = { scripts: ['scripts/**/*.js', 'scripts/**/*.ts', 'scripts/**/*.map'], libs: ['node_modules/angular2/bundles/angular2.js', 'node_modules/angular2/bundles/angular2-polyfills.js', 'node_modules/systemjs/dist/system.src.js', 'node_modules/rxjs/bundles/Rx.js'] }; gulp.task('lib', function () { gulp.src(paths.libs).pipe(gulp.dest('wwwroot/scripts/lib')) }); gulp.task('clean', function () { return del(['wwwroot/scripts/**/*']); }); gulp.task('default', ['lib'], function () { gulp.src(paths.scripts).pipe(gulp.dest('wwwroot/scripts')) });
此外,保存了此gulpfile后,要确保 Task Runner Explorer 能看到 lib 任务。
用 TypeScript 写一个简单的 Angular 应用
首先,将 app.ts 改成:
import {Component} from "angular2/core"
import {MyModel} from "./model"

@Component({
    selector: `my-app`,
    template: `Hello from {{getCompiler()}}`
})
class MyApp {
    model = new MyModel();
    getCompiler() {
        return this.model.compiler;
    }
}
接着在 scripts 中添加 TypeScript 文件 model.ts:
export class MyModel {
    compiler = "TypeScript";
}
再在 scripts 中添加 main.ts:
import {bootstrap} from "angular2/platform/browser";
import {MyApp} from "./app";
bootstrap(MyApp);
最后,将 index.html 改成:
"utf-8" />
Loading...
这里加载了此应用。 运行 ASP.NET 应用,你应该能看到一个 div 显示 "Loading..." 紧接着更新成显示 "Hello from TypeScript"。


