salesforce Lightning - Lightning 入门
简述
上一篇文章中已经简单的对Lightning的知识做了一个大概的讲解,怎么开启lightning,如何给User开启访问Lightning的权限等。
本文主要讲解一下salesforce lightning的模型,及数据交互机制。废话不多说,直接进入主题。
模型介绍

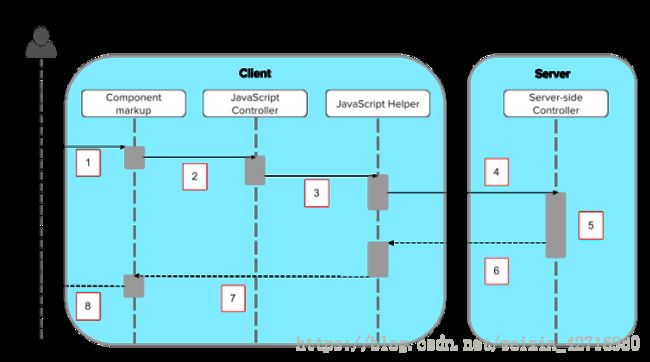
1.用户单击按钮或与组件交互,触发浏览器事件。例如,您想要在单击按钮时从服务器保存数据。
2.按钮单击调用客户端js controller,它在调用js helper之前提供一些定制逻辑。
3.js controller 调用 js helper。
4.js helper调用Apex控制器方法并对动作进行排队。
5.Apex方法被调用并返回数据。
6.当Apex方法完成时调用JavaScript回调函数。
7.JavaScript回调函数评估逻辑并更新组件的UI。
8.用户看到更新的组件
Lightning Commnet
通俗理解,就是一个组件,我们developer开发的时候就会开发一个这样的组件,它可以通过选项卡,通过button进行调用。组件中包含了js controller ,js helper, css,event,comment。 (css 及 event 在后面的博文中我们在讲述 )
下面我们来看怎么去初始化一个组件来供我们使用。我用sublime开发工具为例。
在setting user中我们需要增加如下配置信息:
"Demo":
        {
            "default": false,
            "login_url": "https://test.salesforce.com",
            "password": "xxxxxxxxx",
            "subscribed_metadata_objects":
            [
                "ApexClass",
                "ApexPage",
                "ApexTrigger",
                "ApexComponent",
                "AuraDefinitionBundle"
            ],
            "username": "[email protected]",
            "workspace": "your workspace"
        }
配置完成后,初始化第一个Demo
comment
HaoIDE - > New - > new apex Comment – 输入comment 的name,
完成后再项目Src–>aura 下,就能看到我们刚刚初始化的组件了。

常用继承:我们初始化完成的组件还要实现一些常用接口才能正常使用。
1.flexipage:availableForAllPageTypes : 使您的组件可用于记录页面和任何其他类型的页面
2.lightning:actionOverride :覆盖标准按钮时,需要在component当中加入此属性
3.force:appHostable:可以创建App或者选项卡
4.force:hasRecordId:分配当前记录的ID 属性这么写:
<aura:component implements="flexipage:availableForAllPageTypes,force:appHostable,force:hasRecordId" controller="xxx">

aura:component>
在我们初始化的comment上右键,可以看到能初始化其他项。如:controller.js,helper.js,css,event 等。我们先将js controller 和 js helper初始化。

js controller 可以通俗理解为承接页面上的参数及动作
({
    myAction : function(component, event, helper) {

    }
})
js helper 可以通俗理解为js controller 的方法抽象封装,然后与服务端(controller)交互的层面
({
    helperMethod : function() {

    }
})
标签
1.:此标签用于声明Component中需要引用的内容信息的变量。
2.:此标签用于引入自定义的注册事件。
3.:此标签用于处理自定义的注册事件以及标准的事件,比如初始化(init)等handler。
4.: 此标签用于引入静态资源
初次之外Lightning还有很多其他的标签,可以自动查看文档 ,不能上传,自定谷歌
。
举例说明:
style>

<aura:attribute name="toggleSpinner" type="boolean" default="false"/>

<aura:attribute name="recordId" type="String"/>
<aura:attribute name="options" type="List"/>
<aura:attribute name="typeList" type="List"/>
<aura:attribute name="optionsRate" type="List"/>
<aura:attribute name="detailsList" type="List" default="{'1','2','3'}"/>
js controller
因为component不允许写任何的js,即使类似οnclick=”alert(xxx);”这种js也是被禁止的,所以controller js部分作用是至关重要的。他管理着Component中所有的事件驱动操作。
当我们点击按钮或者触发了注册的事件后,会执行controller.js里面的方法,需要写{!c.functionName},其中c可以理解为 client-side controller,functionName为在controller.js中声明的方法名称。
当我们为一个component bundle新建一个Controller js时,我们会发现,每个Controller方法里面默认都有3个参数:
- cmp : 代表当前操作的action所在的component
- event:代表当前action操作所触发的事件,通过事件可以获取到当前事件所对应的元素;
- helper:helper代表当前的componet对应的helper.js,当然这个参数不是必须的,helper文件可以写js内容用来和后台server controller交互。当然,如果你想把和server controller交互的代码写在当前的controller js中,也是可以的。
helper:helper代表了helper.js的实例化变量,你可以通过helper.helperMethod用来处理具体的逻辑,包括和后台交互;处理结果集;功能性的方法重用等等。因为有了helper,你的代码有了更好的可读性,可维护性以及可重用性。
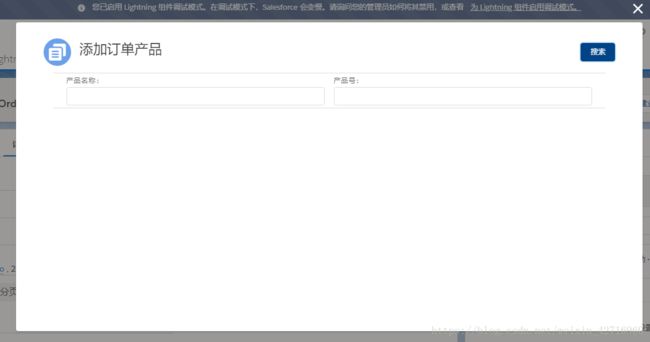
如下代码及实现效果:
<aura:component implements="flexipage:availableForAllPageTypes,force:appHostable,flexipage:availableForRecordHome,force:lightningQuickActionWithoutHeader,force:hasSObjectName,force:hasRecordId" controller="AP_OrderItems">
    <style>
        .slds-modal__container {
             max-width: 80rem !important;
             width:80% !important;
        }
    style>
    <aura:attribute name="recordId" type="String"/>


    <article class="slds-card">
        <div class="slds-card__header slds-grid">
            <header class="slds-media slds-media_center slds-has-flexi-truncate">
              <div class="slds-media__body">
                <h1>
                    <lightning:icon iconName="action:clone"/>
                    <span class="slds-text-heading_small" style="font-size: 24px; margin-left: 15px;">添加订单产品span>
                h1>
              div>
              <div class="slds-no-flex">
                <button class="slds-button slds-button_brand" onclick="{!c.doSearch}">搜索button>
              div>
            header>
        div>

        <div class="slds-card__body slds-card__body_inner">

            <article class="slds-card">
                <div class="slds-card__body slds-card__body_inner">
                    <table class="slds-table slds-table_fixed-layout slds-table_bordered slds-no-row-hover slds-table_cell-buffer">
                        <tr class="slds-text-title_caps">
                             <th scope="col">
                                <div class="slds-truncate" title="Product_Name">
                                     <lightning:input label="产品名称:" value=""  type="text" name="Product_Name" aura:id="Product_Name"/>
                                div>
                              th>
                              <th scope="col">
                                <div class="slds-truncate" title="ProductID">
                                    <lightning:input label="产品号:" value=""  type="text" name="ProductID" aura:id="ProductID"/>
                                div>
                              th>
                        tr>
                    table>
                div>
            article>
        div>


    article>
aura:component>
以上只是单纯的一个组件。没有和js controller 及 js helper有任何交互。
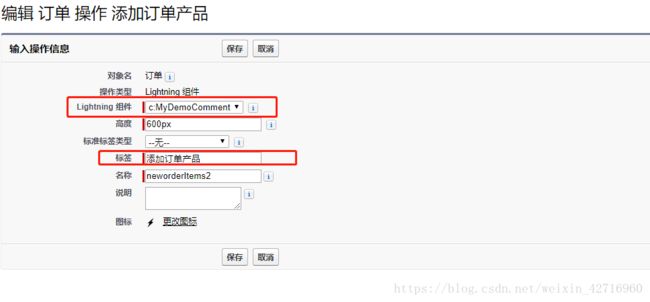
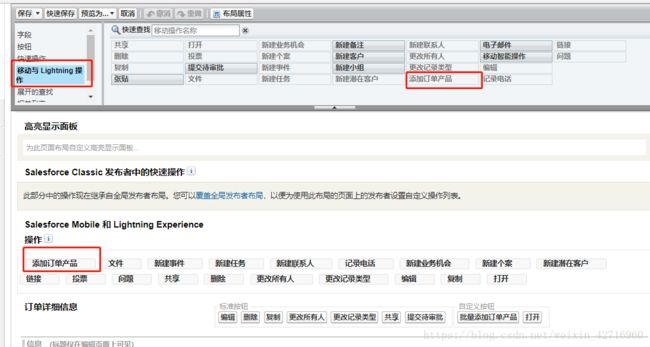
我是通过在订单对象上新建的一个按钮来调用的。

总结:本文整体的介绍了一下快速搭建一个lightning组件的基本操作过程,同时做了一些组件的简单介绍。demo代码中的class 其实都是现成的,包括组件中出现的图标。大家感兴趣可以去这个上面往下down 。
样式网址:https://www.lightningdesignsystem.com/guidelines/color/
tips:
1,代码中我将CSS代码 放到了style中,是因为放到.css文件中去引用不器作用,这个还需要去要就下。
2,如果将style放到comment中发现代码提交不到服务器,那就是当前comment的版本的问题,打开开发 -> lightning组件 —> 找到对应的组件并在控制台中打开 —> 点击最下面的一个button(忘了看了,大致意思就是编辑组件版本)—->更改组件的版本 我用的是41.0 的,可以保存。大家可以试一下。
3,上文中忘了说一点,如果用sublime进行开发的话,怎么样提交代码至服务器呢?
通常需要在setting user的文件中增加一行配置代码。配置一下testLevel。 然后在右键提交到服务器,(会选择一个测试类run,找一个不报错的即可)。如果是lightning 和 classical同时开发的话,那么提交classical代码的时候需要把testLevel 修改成RunAllTestsInOrg。
"deploy_options":
    {
        "allowMissingFiles": false,
        "autoUpdatePackage": false,
        "checkOnly": false,
        "ignoreWarnings": true,
        "performRetrieve": false,
        "purgeOnDelete": false,
        "rollbackOnError": true,
        "runTests": "false",
        "singlePackage": true,
        "testLevel": "RunSpecifiedTests"
    },
后续我会把一些简单的Demo源码给放出来供大家参考,如果觉得我写的有问题,可以给我反馈。

