尝试.NetCore 3.x SignalR
文章目录
- 1、什么是 SignalR?
- 2、创建Hub中心
- 2.1 Hub集线器介绍
- 2.2 创建自定义集线器
- 配置 SignalR 中心
- 3、 创建客户端
- 3.1 .Net客户端
- 3.1.1 安装 SignalR .NET 客户端包
- 3.1.2 连接到自定义Hub中心
- 4、效果展示
1、什么是 SignalR?
ASP.NET Core SignalR 是一个开源库,它简化了向应用程序添加实时 web 功能的功能。 实时 Web 功能使服务器端代码能够即时将内容推送到客户端。
适用场景:
- 需要从服务器进行高频率更新的应用。 示例包括游戏、社交网络、投票、拍卖、地图和 GPS 应用。
- 仪表板和监视应用。 示例包括公司仪表板、即时销售更新或旅行警报。
- 协作应用。 协作应用的示例包括白板应用和团队会议软件。
- 需要通知的应用。 社交网络、电子邮件、聊天、游戏、旅行警报和很多其他应用都需使用通知。
详情介绍详见官网:https://docs.microsoft.com/zh-cn/aspnet/core/signalr/introduction?view=aspnetcore-3.1
2、创建Hub中心
2.1 Hub集线器介绍
- OnConnectedAsync方法:客户端连接的时候事件方法
- OnDisconnectedAsync方法:客户端断开连接的时候事件方法
- Clients对象:服务器和客户端之间的通信对象
- Context对象:该对象是当前请求的上下文对象,例如包含连接Id、用户身份信息等等
2.2 创建自定义集线器
internal class MyCore31Hub : Hub
{
    static IDictionary<string, ClientInfo> _clients;
    static MyCore31Hub()
    {
        _clients = new Dictionary<string, ClientInfo>();
    }
    public async override Task OnConnectedAsync()
    {
        var connid = Context.ConnectionId;
        var httpContext = Context.GetHttpContext();
        httpContext.Request.Query.TryGetValue("groupId", out StringValues groupid);
        httpContext.Request.Query.TryGetValue("userId", out StringValues userId);
        httpContext.Request.Query.TryGetValue("ip", out StringValues ip);
        if (!userId.Equals(StringValues.Empty))
        {
            if (_clients.ContainsKey(userId))
            {
                _clients.Remove(userId);
            }
            _clients.Add(userId, new ClientInfo()
            {
                ConnectionId = connid,
                GroupId = groupid,
                UserId = userId,
                Ip = ip
            });
            await Groups.AddToGroupAsync(connid, groupid);
            await SendConnection(groupid, new ConnectionMessageContent
            {
                From = userId,
                TransferCode = "上线",
                LocalServerCode = "Connection",
                Content = $"{userId}上线啦!!!"
            });
        }
    }

    public async override Task OnDisconnectedAsync(Exception exception)
    {
        var connid = Context.ConnectionId;
        var client = GetClient(connid);
        if (client != default(ClientInfo))
        {
            await Groups.RemoveFromGroupAsync(connid, client.GroupId);
            await SendDisConnection(client.GroupId, new DisConnectionMessageContent
            {
                From = client.UserId,
                TransferCode = "下线",
                LocalServerCode = "DisConnection",
                Content = $"{client.UserId}下线啦!!!"
            });
        }
    }
    public async Task SendConnection(string groupName, ConnectionMessageContent msg)
    {
        await Clients.Group(groupName).ReceiveConnection(msg);
    }

    public async Task SendDisConnection(string groupName, DisConnectionMessageContent msg)
    {
        await Clients.Group(groupName).ReceiveDisConnection(msg);
    }
    ClientInfo GetClient(string connid)
    {
        var client = _clients.Values.Where(c => c.ConnectionId.Equals(connid)).FirstOrDefault();
        if (client != null)
        {
            return client;
        }
        return default(ClientInfo);
    }
}
创建的实例中包含一个客户端对象,该对象用于存储客户端的信息
public class ClientInfo
{
    public ClientInfo()
    {
        ConnectedTime = DateTime.Now;
    }
    public string ConnectionId { get; set; }
    public string GroupId { get; set; }
    public string UserId { get; set; }
    public string Ip { get; set; }
    DateTime ConnectedTime { get; }
}
配置 SignalR 中心
SignalR 中间件需要一些服务,这些服务通过调用 services.AddSignalR进行配置。
services.AddSignalR(options=>
{
    options.EnableDetailedErrors = true;
    options.ClientTimeoutInterval = TimeSpan.FromSeconds(30);
});
将 SignalR 功能添加到 ASP.NET Core 应用时,请通过在 Startup.Configure 方法的 app.UseEndpoints 回调中调用 endpoint.MapHub 来设置 SignalR 路由。
app.UseRouting();
app.UseEndpoints(endpoints =>
{
    endpoints.MapHub<MyCore31Hub>(new PathString("/notify"));
});
这里做一个说明,在3.x以前的版本中使用UseSignalR()
3、 创建客户端
3.1 .Net客户端
3.1.1 安装 SignalR .NET 客户端包
Install-Package Microsoft.AspNetCore.SignalR.Client
3.1.2 连接到自定义Hub中心
若要建立连接,请创建 HubConnectionBuilder 并调用 Build。 在建立连接时,可以配置中心 URL、协议、传输类型、日志级别、标头和其他选项。 通过在 Build中插入任意 HubConnectionBuilder 方法来配置任何所需的选项。 开始与 StartAsync的连接。
该示例中使用Winfrom完成
使用winform必须vs 版本>=16.5.0,我在使用的时候老是创建不了winform就是该原因,微软在3netcore.x版本中就已经支持winform wpf等桌面程序了
public partial class frmMain : Form{
	static string url = "https://localhost:5001/notify";
	string groupId = "123456";
	string userId = "";
	string ip = "127.0.0.1";
	HubConnection conn;
	public frmMain(string uid) : this()
	{
	    userId = uid;
	    this.Text += userId;
	    url += $"?groupId={groupId}&userId={userId}&ip={ip}";
	    conn = new HubConnectionBuilder()
	        .WithUrl(url)
	        .WithAutomaticReconnect() //自动连接
	        .Build();
	    conn.Closed += async (error) =>
	    {
	        await Task.Delay(new Random().Next(0, 5) * 1000);
	        await conn.StartAsync();
	    };
	}
	public frmMain()
	{
	    InitializeComponent();
	}

	private async void btnConnect_Click(object sender, EventArgs e)
	{
	    On();
	    try
	    {
	        await conn.StartAsync();
	        this.rbxCotent.AppendText("Connection started");
	        this.btnConnect.Enabled = false;
	    }
	    catch (Exception ex)
	    {
	        this.rbxCotent.AppendText(ex.Message);
	    }
	}

	private void On()
	{
	    // 收到信息
	    conn.On<UserMessageContent>("ReceiveMessage", (message) =>
	    {
	        Invoke(new Action(() =>
	        {
	            this.rbxCotent.AppendText(message.Content);
	        }));
	    });
	    // 上线
	    conn.On<ConnectionMessageContent>("ReceiveConnection", (message) =>
	    {
	        Invoke(new Action(() =>
	        {
	            this.rbxCotent.AppendText(message.Content);
	            this.listView1.Items.Add(new ListViewItem()
	            {
	                Text=message.From,
	                Name=message.From
	            });
	        }));
	    });
	    // 下线
	    conn.On<DisConnectionMessageContent>("ReceiveDisConnection", (message) =>
	    {
	        Invoke(new Action(() =>
	        {
	            this.rbxCotent.AppendText(message.Content);
	            this.listView1.Items.Add(message.From);
	        }));
	    });
	}
}
4、效果展示
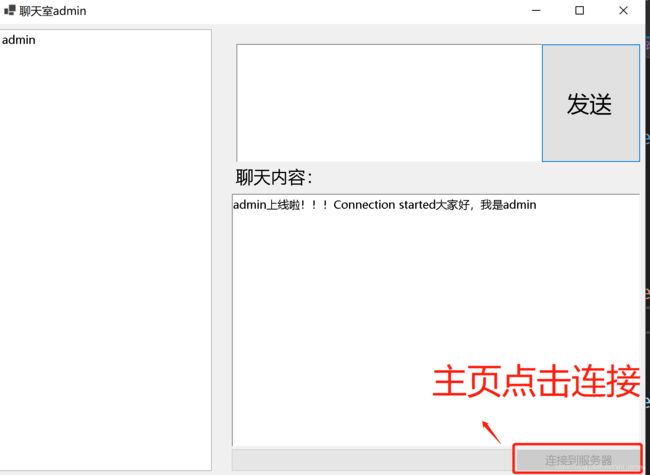
进入主页后点击连接到服务器,连接成功后会收到集线器客户端连接事件发出的消息。通过发送消息给用户组

接下来会讲解下JavaScript客户端
源码地址:https://github.com/jonny-xhl/Cy.WeChat 若给你带来了帮助请欢迎Star
参考文献:
https://docs.microsoft.com/zh-cn/aspnet/core/signalr/introduction?view=aspnetcore-3.1
https://blog.csdn.net/xhl_james/article/details/89235081
Signalr篇文章目录:
一、尝试.NetCore 3.x SignalR
二、JavaScript客户端使用
三、管理 SignalR 中的用户和组
四、强类型中心详解(Hub< T >)
五、ASP.NET Core 中的身份验证和授权 SignalR

