1. 基础环境
- Kubernetes 13
- AWX 6.0.0
- helm 2.11.0
- postgresql 2.0.0
2. 准备环境
2.1 Kubernetes
Kubernetes环境已自行搭建完成
2.2 AWX
- 默认每个pod请求的资源为 —— Memory:6GB CPU:3cores,可在/installer/roles/kubernetes/defaults/main.yml中进行修改,注意修改过小,可能会导致环境崩溃。
2.2.1 下载官方部署文件
官方git:https://github.com/ansible/awx ,部署文件放在awx/installer/,kubernetes相关在awx/installer/roles/kubernetes/目录下。
2.2.2 修改installer/inventory文件
确保所有Openshift Install和独立的Docker部分已被注释。
可通过kubectl config current-context获取自己的kubernetes_context。
我的inventory未注释内容如下
localhost ansible_connection=local ansible_python_interpreter="/usr/bin/env python"

[all:vars]

dockerhub_base=ansible

# Kubernetes Install
kubernetes_context=kubernetes-admin@kubernetes
kubernetes_namespace=awx
tiller_namespace=kube-system
# Optional Kubernetes Variables
pg_persistence_storageClass=StorageClassName
pg_cpu_limit=1000
pg_mem_limit=2

# Common Docker parameters
awx_task_hostname=awx
awx_web_hostname=awxweb
postgres_data_dir=/tmp/pgdocker
host_port=80
host_port_ssl=443
#ssl_certificate=
docker_compose_dir=/tmp/awxcompose

# pg_hostname=postgresql
pg_username=awx
# pg_password should be random 10 character alphanumeric string, when postgresql is running on kubernetes
# NB: it's a limitation of the "official" postgres helm chart
pg_password=awxpass
pg_database=awx
pg_port=5432
#pg_sslmode=require

# RabbitMQ Configuration
rabbitmq_password=awxpass
rabbitmq_erlang_cookie=cookiemonster

# This will create or update a default admin (superuser) account in AWX, if not provided
# then these default values are used
admin_user=admin
admin_password=password

# Whether or not to create preload data for demonstration purposes
create_preload_data=True

# AWX Secret key
# It's *very* important that this stay the same between upgrades or you will lose the ability to decrypt
# your credentials
secret_key=awxsecret

project_data_dir=/data/awx/projects
2.2.3修改installer/roles/kubernetes/defaults
dockerhub_version: latest
我自己不修改这儿会报could not locate file in lookup: /root/installer/../"VERSION"的错,我就自己改了这儿,此时对应的latest版本是6.0.0
2.2.4 helm
官方部署文件在部署的时候会检测是否安装了helm,如果未安装则会帮你安装,这里我是自己已提前安装了helm。
helm安装:https://www.jianshu.com/p/8aec2776f3f1
2.2.5 postgresql
文档使用的postgresql 2.0,在部署过程中会检查是否安装,未安装则会帮你安装,但是因为我是本地环境没有动态持久化存储,通过官方环境则会出错,需要修改一下原文件。所以我下载到本地,放在git上。
postgresql2.0: https://github.com/OranYee/awx
因为没有动态存储,所以修改了postgresql/value.ymal,否则会报pod has unbound immediate PersistentVolumeClaims的错,应该也可以手动添加pv,但是我自己添加的没绑定上,我就直接这么粗暴了。
persistence:
  enabled: false
修改installer/roles/kubernetes/tasks/main.yml,找到Deploy and Activate Postgres,将stable/postgresql修改为本地postgresql的路径,我的是在/root/postgresql
- name: Deploy and Activate Postgres (Kubernetes)
  shell: |
    helm repo update --tiller-namespace={{ tiller_namespace | default('kube-system') }}
    helm upgrade {{ postgresql_service_name }} --install \
      --namespace {{ kubernetes_namespace }} \
      --set postgresqlUsername={{ pg_username }} \
      --set postgresqlPassword={{ pg_password | quote }} \
      --set postgresqlDatabase={{ pg_database }} \
      --set persistence.size={{ pg_volume_capacity|default('5')}}Gi \
      --version="2.0.0" \
      --tiller-namespace={{ tiller_namespace | default('kube-system') }} \
      {{ '--set persistence.storageClass='+pg_persistence_storageClass if pg_persistence_storageClass is defined else ' ' }} \
      {{ '--set resources.limits.cpu='+(pg_cpu_limit | string)+'m' if pg_cpu_limit is defined else ' ' }} \
      {{ '--set resources.limits.memory='+(pg_mem_limit | string)+'Gi' if pg_mem_limit is defined else ' ' }} \
      /root/postgresql
  when:
    - pg_hostname is not defined or pg_hostname == ''
    - postgres_svc_details is defined and postgres_svc_details.rc != 0
    - kubernetes_context is defined
  register: kubernetes_pg_activate
  no_log: no
查看postgresql是否部署成功helm list
NAME            REVISION    UPDATED                     STATUS      CHART               APP VERSION NAMESPACE
awx-postgresql  1           Wed Jul 17 11:29:56 2019    DEPLOYED    postgresql-2.0.0    10.5.0      awx
[root@k8s-master01 postgresql]# kubectl get pods -n awx
NAME                          READY   STATUS    RESTARTS   AGE
awx-postgresql-postgresql-0   1/1     Running   0          7h52m
删除postgresql
helm del postgresql --purge
2.2.6 部署AWX
(我将installer/roles/kubernetes/templates下的deployment.yml.j2下的centos镜像所依赖的软件提前安装在一个镜像中了,kind:StatefulSet下的initContainers内容变成了如下,你也可以不进行修改。)
      initContainers:
        - image: 'oranyee/centos:awx'
          name: init-custom-venvs
          command:
            - sh
            - '-c'
            - >-
              mkdir -p {{ custom_venvs_path }} &&
{% for custom_venv in custom_venvs %}
              virtualenv -p {{ custom_venv.python | default(custom_venvs_python) }} \
                {{ custom_venvs_path }}/{{ custom_venv.name }} &&
              source {{ custom_venvs_path }}/{{ custom_venv.name }}/bin/activate &&
              {{ custom_venvs_path }}/{{ custom_venv.name }}/bin/pip install -U psutil \
                "ansible=={{ custom_venv.python_ansible_version }}" &&
{% if custom_venv.python_modules is defined %}
              {{ custom_venvs_path }}/{{ custom_venv.name }}/bin/pip install -U \
                {% for module in custom_venv.python_modules %}{{ module }} {% endfor %} &&
{% endif %}
              deactivate &&
{% endfor %}
              :
          volumeMounts:
            - name: custom-venvs
              mountPath: {{ custom_venvs_path }}
{% endif %}
在/installer/roles/kubernetes/templates/deployment.yml.j2的name: {{ kubernetes_deployment_name }}-celery的volumeMounts下添加挂载project目录:
{% if project_data_dir is defined %}
            - name: {{ kubernetes_deployment_name }}-project-data-dir
              mountPath: "/var/lib/awx/projects"
              readOnly: false
{% endif %}
在awx目录下,运行ansible-playbook -i inventory install.yml。等待几分钟后,如果没有出错则成功,有错可通过修改installer/roles/kubernetes/tasks/main.yml下的对应的任务下的no_log,修改为yes,再运行ansible-playbook -i inventory install.yml查看具体什么错误,或者ansible-playbook -i inventory install.yml -vvv查看更多信息。
2.2.7 查看AWX部署是否成功
[root@k8s-master01 ~]# kubectl get pods -n awx
NAME                          READY   STATUS    RESTARTS   AGE
awx-0                         4/4     Running   0          5d19h
awx-postgresql-postgresql-0   1/1     Running   0          6d22h
在浏览器访问:ip:32641,默认账户和密码分别是:admin和password,可在installer/inventory下进行修改

进来的awx主页如下:

3. awx的简单使用
3.1 创建playbook
进入awx所在的节点,可通过kubectl get pods -n awx -owide查看awx—0在哪个节点,我的是在k8s-master02
[root@k8s-master01 ~]# kubectl get pods -n awx -owide
NAME                          READY   STATUS    RESTARTS   AGE     IP            NODE
awx-0                         4/4     Running   0          5d20h   10.244.1.79   k8s-master02
awx-postgresql-postgresql-0   1/1     Running   0          6d23h   10.244.2.57   k8s-master03
进入awx projects挂在的目录下,此前在inventory文件中定义在/data/awx/projects下,创建目录ansible-for-devops,在ansible-for-devops目录下创建测试playbook:main.yml
[root@k8s-master02 ansible-for-devops]# cat main.yml
---
- hosts: all
  gather_facts: no
  tasks:
  - name: Check the date on the server.
    command: date
  - name: Check the eth0 ip on the server.
    command: ifconfig em1
3.2 创建证书
点击Credentials,添加证书,选择证书类型为Machine。

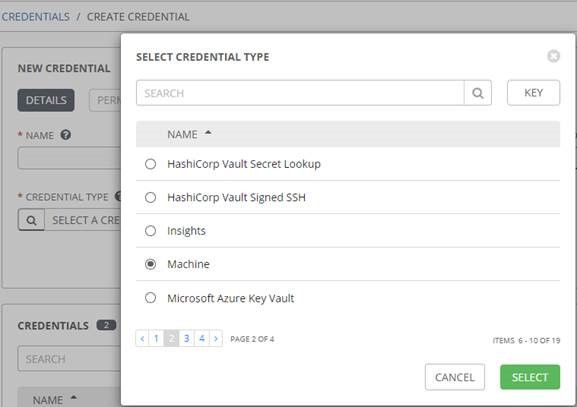
输入你要管理的machine的username和password

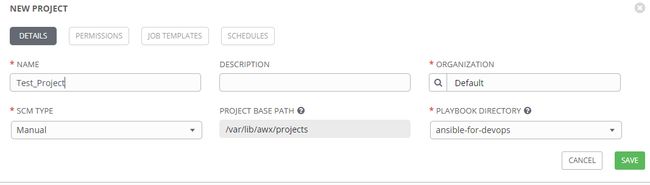
3.3 创建Projects
选择SCM TYPE为Manual,输入project的名字,选ORGANIZATION和PLAYBOOK DIRECTORY
3.4 创建Inventory
创建inventory,输入名字保存,然后点击创建的inventory,选择HOSTS,添加你要管理的machine的ip。

3.5创建Template
点击Templates,创建一个新template保存并运行。

3.6 成功运行
