window10下打开摄像头实现Pytorch-YOLOv3的实时监测
1、参考:
opencv调用YOLOv3模型进行目标检测
基于python3的Opencv(一)-打开摄像头显示图像
python+OpenCV+YOLOv3打开笔记本摄像头模型检测
2、配置:
笔者的运行环境为:
- window 10
- pycharm
- opencv-python
- Pytorch-YOLOv3
朋友们可下载笔者修改过的Pytorch-YOLOv3模型:
Pytorch-YOLOv3使用步骤详解(win系统下)
3、步骤:
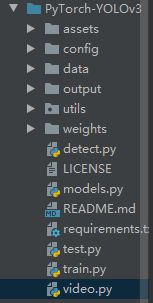
1. 建video文件
在一级文件下建立video.python file:
2. 添加代码
import numpy as np
import cv2
import os
import time


def video_demo():
    # 加载已经训练好的模型路径,可以是绝对路径或者相对路径
    weightsPath = ".\weights\yolov3.weights"
    configPath = ".\config\yolov3.cfg"
    labelsPath = ".\data\coco.names"
    # 初始化一些参数
    LABELS = open(labelsPath).read().strip().split("\n")  # 物体类别
    COLORS = np.random.randint(0, 255, size=(len(LABELS), 3), dtype="uint8")  # 颜色
    boxes = []
    confidences = []
    classIDs = []
    net = cv2.dnn.readNetFromDarknet(configPath, weightsPath)
    # 读入待检测的图像
    # 0是代表摄像头编号,只有一个的话默认为0
    capture = cv2.VideoCapture(0)
    while (True):
        ref, image = capture.read()
        (H, W) = image.shape[:2]
        # 得到 YOLO需要的输出层
        ln = net.getLayerNames()
        ln = [ln[i[0] - 1] for i in net.getUnconnectedOutLayers()]
        # 从输入图像构造一个blob,然后通过加载的模型,给我们提供边界框和相关概率
        blob = cv2.dnn.blobFromImage(image, 1 / 255.0, (416, 416), swapRB=True, crop=False)
        net.setInput(blob)
        layerOutputs = net.forward(ln)
        # 在每层输出上循环
        for output in layerOutputs:
            # 对每个检测进行循环
            for detection in output:
                scores = detection[5:]
                classID = np.argmax(scores)
                confidence = scores[classID]
                # 过滤掉那些置信度较小的检测结果
                if confidence > 0.5:
                    # 框后接框的宽度和高度
                    box = detection[0:4] * np.array([W, H, W, H])
                    (centerX, centerY, width, height) = box.astype("int")
                    # 边框的左上角
                    x = int(centerX - (width / 2))
                    y = int(centerY - (height / 2))
                    # 更新检测出来的框
                    boxes.append([x, y, int(width), int(height)])
                    confidences.append(float(confidence))
                    classIDs.append(classID)
        # 极大值抑制
        idxs = cv2.dnn.NMSBoxes(boxes, confidences, 0.2, 0.3)
        if len(idxs) > 0:
            for i in idxs.flatten():
                (x, y) = (boxes[i][0], boxes[i][1])
                (w, h) = (boxes[i][2], boxes[i][3])
                # 在原图上绘制边框和类别
                color = [int(c) for c in COLORS[classIDs[i]]]
                cv2.rectangle(image, (x, y), (x + w, y + h), color, 2)
                text = "{}: {:.4f}".format(LABELS[classIDs[i]], confidences[i])
                cv2.putText(image, text, (x, y - 5), cv2.FONT_HERSHEY_SIMPLEX, 0.5, color, 2)
        cv2.imshow("Image", image)
        # 等待30ms显示图像,若过程中按“ESC”退出
        c = cv2.waitKey(30) & 0xff
        if c == 27:
            capture.release()
            break


video_demo()
注:1、在此声明,代码转载于https://blog.csdn.net/weixin_43590290/article/details/100736307
2、区分绝对路径和相对路径,朋友们可根据自己的需要切换。
3. 运行
打开pycharm的terminal,切换到该文件环境下,输入:python video.py
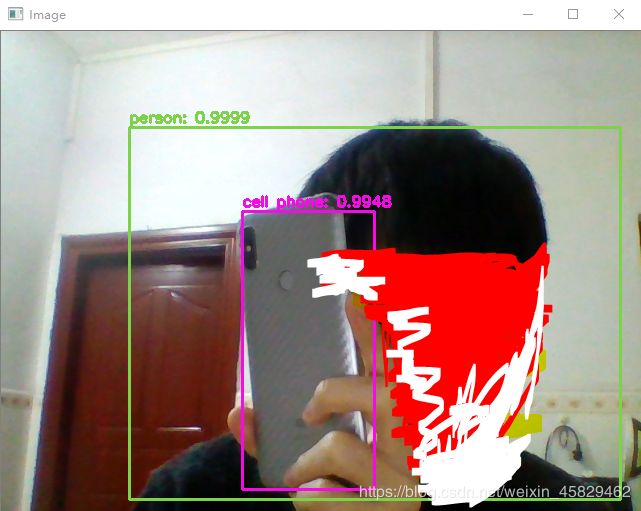
4. .结果