JDBC实现自定义连接池、C3P0连接池和DBCP连接池的简单使用
一、自定义连接池
1、连接池概念
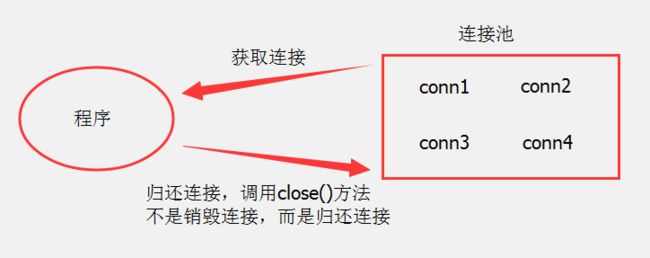
用池来管理 Connection,这样可以重复使用 Connection。有了池,所以我们就不用自己来创建 Connection,而是通过池来获取 Connection 对象。当使用完 Connection 后,调用 Connection 的 close() 方法也不会真的关闭 Connection,而是把 Connection “归还”给池。池就可以在利用这个 Connection 对象了。
2、编写自定义连接池的步骤
- 创建连接池实现(数据源),并实现接口 java.sql.DataSource。因为我们只使用该接口中 getConnection() 方法,简化本案例,我们将自己提供方法,而没有实现接口;
- 提供一个集合,用于存放连接,因为移除/添加操作过多,所以选择 LinkedList;
- 本案例在静态代码快中,为连接池初始化5个连接;
- 之后程序如果需要连接,调用实现类的 getConnection(),本方法将从连接池(容器 List)获得连接。为了保证当前连接只能提供给一个线程使用,所以我们需要将连接先从连接池中移除;
- 当用户使用完连接,释放资源时,不执行 close() 方法,而是将连接添加到连接池中。
首先创建一个数据源,并实现 DataSource 接口。要新建和覆盖的方法已经贴出来:
/**
 * Created by Layne_Yao on 2018-4-25 下午4:51:17.
 * CSDN:http://blog.csdn.net/Jsagacity
 */
public class MyDataSource implements DataSource{
    //1.创建1个容器用于存储Connection对象
    private static LinkedList pool = new LinkedList<>();

    //2.创建5个连接放到容器中去
    static{
        for (int i = 0; i < 5; i++) {
            Connection conn = BaseConnection.getConnection();
            pool.add(conn);
        }
    }

    /**
     * 重写获取连接的方法
     */
    @Override
    public Connection getConnection() throws SQLException {
        Connection conn = null;
        //3.使用前先判断
        if(pool.size() == 0){
            //连接池为空,我们就创建一些连接,并添加进去
            for (int i = 0; i < 5; i++) {
                conn = BaseConnection.getConnection();
                pool.add(conn);
            }
        }
        //5.从池子里面获取一个连接对象Connection
        conn = pool.remove(0);
        return conn;
    }


    /**
     * 归还连接对象到连接池中去
     */
    public void backConnection(Connection conn){
        pool.add(conn);

    }
    //其他方法省略......
}
接着测试一下这个连接池的使用:
/**
     * 使用未改造过的connection
     */
    @Test
    public void testAddPerson() {
        Connection conn = null;
        PreparedStatement pstmt = null;
        // 1.创建自定义连接池
        MyDataSource dataSource = new MyDataSource();
        try {
            conn = dataSource.getConnection();
            String sql = "insert into person (name,age) values(?,?)";
            pstmt = conn.prepareStatement(sql);
            pstmt.setString(1, "Layne");
            pstmt.setInt(2, 20);
            int count = pstmt.executeUpdate();
            if (count > 0) {
                System.out.println("添加成功");
            } else {
                System.out.println("添加失败");
            }
        } catch (Exception e) {
            throw new RuntimeException(e);
        } finally {
            dataSource.backConnection(conn);
        }
    }
经测试,成功使用的,没有问题。
3、增强连接池的方法
提需求:
在自定义连接池中存在严重问题,用户调用 getConnection() 获得连接后,必须使用 backConnection() 方法进行连接归还,如果用户调用 conn.close() 将连接真正的释放,那么连接池的存在意义就不大了。
此时我们希望,即使用户调用了 close() 方法,连接仍归还给连接池。close() 方法原有功能是释放资源。而我们期望的功能是:将当前连接归还连接池。所以我们将对 close() 方法进行增强。
增强方法的方案
装饰者设计模式:此设计模式专门用于增强方法。
使用前提:必须有接口
缺点:需要将接口的所有方法都实现
增强方法步骤
装饰者固定结构:接口 A,已知实现类 C,需要装饰者创建代理类 B
- 创建类 B,并实现接口 A;
- 提供类 B 的构造方法,参数类型为 A,用语言接收 A 接口的其他实现类(C);
- 给类 B 添加类型为 A 成员变量,用于存放 A 接口的其他实现类;
- 增强需要的方法;
- 实现不需要增强的方法,方法体重调用成员变量存放的其他实现类对应的方法。
创建代理类,并按照步骤实现功能:
//1.实现同一个接口Connection
public class MyConnection implements Connection{
    //3.定义一个变量
    private Connection conn;
    private LinkedList pool;

    //2.编写一个构造方法(参数使用了面向对象的多态性)
    public MyConnection(Connection conn,LinkedList pool){
        this.conn = conn;
        this.pool = pool;
    }

    //4.书写需要增强的方法
    @Override
    public void close() throws SQLException {
        pool.add(conn);

    }

    //此方法也覆盖一下
    @Override
    public PreparedStatement prepareStatement(String sql) throws SQLException {
        // TODO Auto-generated method stub
        return conn.prepareStatement(sql);
    }
    //其他方法省略......
}
实现完之后,改造一下数据源,也就是连接池:
/**
 * Created by Layne_Yao on 2018-4-25 下午4:51:17.
 * CSDN:http://blog.csdn.net/Jsagacity
 */
public class UpdateMyDataSource implements DataSource{
    //1.创建1个容器用于存储Connection对象
    private static LinkedList pool = new LinkedList<>();

    //2.创建5个连接放到容器中去
    static{
        for (int i = 0; i < 5; i++) {
            Connection conn = BaseConnection.getConnection();
            //放入池子中connection对象已经经过改造了
            MyConnection myconn = new MyConnection(conn,pool);
            pool.add(myconn);
        }
    }

    /**
     * 重写获取连接的方法
     */
    @Override
    public Connection getConnection() throws SQLException {
        Connection conn = null;
        //3.使用前先判断
        if(pool.size() == 0){
            //连接池为空,我们就创建一些连接,并添加进去
            for (int i = 0; i < 5; i++) {
                conn = BaseConnection.getConnection();
                //放入池子中connection对象已经经过改造了
                MyConnection myconn = new MyConnection(conn,pool);
                pool.add(myconn);
            }
        }
        //5.从池子里面获取一个连接对象Connection
        conn = pool.remove(0);
        return conn;
    }


    /**
     * 归还连接对象到连接池中去
     */
    public void backConnection(Connection conn){
        pool.add(conn);

    }
    //其他方法省略......
}
增强完成,最后测试使用一下:
/**
     * 使用改造过的connection
     */
     @Test
    public void testAddPerson1() {
        Connection conn = null;
        PreparedStatement pstmt = null;
        // 1.创建自定义连接池
        DataSource dataSource = new UpdateMyDataSource();
        try {
            conn = dataSource.getConnection();
            String sql = "insert into person (name,age) values(?,?)";
            pstmt = conn.prepareStatement(sql);
            pstmt.setString(1, "Layne1");
            pstmt.setInt(2, 18);
            int count = pstmt.executeUpdate();
            if (count > 0) {
                System.out.println("添加成功");
            } else {
                System.out.println("添加失败");
            }
        } catch (Exception e) {
            throw new RuntimeException(e);
        } finally {
            BaseConnection.closeResource(null, pstmt, conn);
        }
    }
经测试,也是添加成功的。以上就是简单的自定义连接池,并增强方法的实现。其主要代码都已经贴出来了,就没必要上传源码了。
二、C3P0连接池
C3P0开源免费的连接池!目前使用它的开源项目有:Spring、Hibernate等。使用第三方工具需要导入jar包,c3p0使用时还需要添加配置文件c3p0-config.xml
将文件c3p0-config.xml放在src的目录下:
<c3p0-config>

    <default-config>
        <property name="driverClass">com.mysql.jdbc.Driverproperty>
        <property name="jdbcUrl">jdbc:mysql:///testproperty>
        <property name="user">rootproperty>
        <property name="password">ssy_rootproperty>
        <property name="initialPoolSize">5property>
        <property name="maxPoolSize">20property>
    default-config>

    <named-config name="mysql">
        <property name="driverClass">com.mysql.jdbc.Driverproperty>
        <property name="jdbcUrl">jdbc:mysql:///testproperty>
        <property name="user">rootproperty>
        <property name="password">ssy_rootproperty>
    named-config>


c3p0-config>导入完成之后,其实就可以直接使用的:
@Test
    public void testAddPerson() {
        Connection conn = null;
        PreparedStatement pstmt = null;
        // 1.创建自定义连接池
        ComboPooledDataSource dataSource = new ComboPooledDataSource();//加载默认的配置
//      ComboPooledDataSource dataSource = new ComboPooledDataSource("mysql");//加载对应名称的配置
        try {
            conn = dataSource.getConnection();
            String sql = "insert into person (name,age) values(?,?)";
            pstmt = conn.prepareStatement(sql);
            pstmt.setString(1, "LayneYao");
            pstmt.setInt(2, 18);
            int count = pstmt.executeUpdate();
            if (count > 0) {
                System.out.println("添加成功");
            } else {
                System.out.println("添加失败");
            }
        } catch (Exception e) {
            throw new RuntimeException(e);
        }  finally {
            C3P0Utils.close(conn, pstmt, null);
        }
    }
1、编写C3P0的工具类
编写C3P0的工具类,让代码更加的简洁一些添加一个工具类:
public class C3P0Utils {
    private static ComboPooledDataSource dataSource = new ComboPooledDataSource();

    public static DataSource getDataSource() {
        return dataSource;
    }

    public static Connection getConnection() {
        try {
            return dataSource.getConnection();
        } catch (SQLException e) {
            throw new RuntimeException(e);
        }
    }

      /**
     * 关闭数据库连接
     * @param conn
     */
    public static void closeConn(Connection conn){
        try {
            if(conn!=null && conn.isClosed()){
                conn.close();
            }
        } catch (SQLException e) {
            e.printStackTrace();
        }
    }

    //释放连接回连接池
    public static void close(Connection conn,PreparedStatement ps,ResultSet rs){
           if(rs!=null){
               try {
                   rs.close();
               } catch (SQLException e) {
                   e.printStackTrace();
               }
           }
           if(ps!=null){
               try {
                   ps.close();
               } catch (SQLException e) {
                   e.printStackTrace();
               }
           }

           if(conn!=null){
               try {
                   conn.close();
               } catch (SQLException e) {
                   e.printStackTrace();
               }
           }
       }
}
然后测试使用一下:
    @Test
    public void testAddPerson1() {
        Connection conn = null;
        PreparedStatement pstmt = null;

        try {
            conn = C3P0Utils.getConnection();
            String sql = "insert into person (name,age) values(?,?)";
            pstmt = conn.prepareStatement(sql);
            pstmt.setString(1, "Layne1");
            pstmt.setInt(2, 18);
            int count = pstmt.executeUpdate();
            if (count > 0) {
                System.out.println("添加成功");
            } else {
                System.out.println("添加失败");
            }
        } catch (Exception e) {
            throw new RuntimeException(e);
        } finally {
            C3P0Utils.close(conn, pstmt, null);
        }
    }
代码就是变得如此简洁。
三、DBCP连接池
DBCP也是一个开源的连接池,是Apache Common成员之一,在企业开发中也比较常见,tomcat内置的连接池。
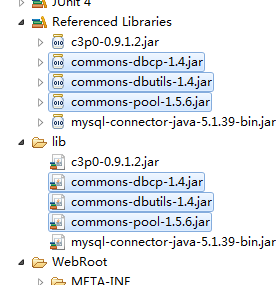
首先导包:

配置文件:
- 配置文件名称:*.properties
- 配置文件的位置:任意,建议src(classpath/类路径)
- 配置文件内容:properties不能编写中文,不支持在STS中修改,必须使用记事本修改内容,否则中文注释就乱码了
#连接设置
driver=com.mysql.jdbc.Driver
url=jdbc:mysql://localhost:3306/test?useUnicode=true&characterEncoding=utf8
username=root
password=ssy_root

#
initialSize = 10

#最大连接数量
maxActive = 50

#
maxIdle = 20

#
minIdle = 5

#
maxWait = 60000

#JDBC驱动建立连接是附带的连接属性的格式必须为这样:[属性名=property;]
#注意:“user”与“password”两个属性会被明确地传递,因为这里不需要包含他们。
connectionProperties=useUnicode=true;characterEncoding=gbk

#指定由连接池所创建的连接的自动提交(auto-commit)状态
defaultAutoCommit = true

#driver default指定由连接池所创建的连接的只读(read-only)状态。
#如果没有设置该值,则“setReadOnly”方法将不被调用。(某些驱动并不支持只读模式,如:Informix)
defaultReadOnly=

#driver default指定由连接池所创建的连接的事务级别(TransactionIsolation)。
#可用值为下列之一:(详情可见javadoc。)NONE,READ_UNCOMMITTED,READ_COMMITTED,REPEATBLE_READ,SERIALIZABLE
defaultTransactionIsolation=READ_UNCOMMITTED
1、编写DBCP的工具类
public class DBCPUtils {
    private static DataSource dataSource;
    static{
        try {
            //1.加载找properties文件输入流
            InputStream is = DBCPUtils.class.getClassLoader().getResourceAsStream("db.properties");
            //2.加载输入流
            Properties props = new Properties();
            props.load(is);
            //3.创建数据源
            dataSource = BasicDataSourceFactory.createDataSource(props);
        } catch (Exception e) {
            throw new RuntimeException(e);
        }
    }

    public static DataSource getDataSource(){
        return dataSource;
    }

    public static Connection getConnection(){
        try {
            return dataSource.getConnection();
        } catch (SQLException e) {
            throw new RuntimeException(e);
        }
    }
}
测试使用一下:
@Test
    public void testUpdatePersonById() {
        Connection conn = null;
        PreparedStatement pstmt = null;

        try {
            conn = DBCPUtils.getConnection();
            String sql = "update person set name=? where _id = ?";
            pstmt = conn.prepareStatement(sql);
            pstmt.setString(1, "Yorkie");
            pstmt.setInt(2, 23);
            int count = pstmt.executeUpdate();
            if (count > 0) {
                System.out.println("更新成功");
            } else {
                System.out.println("更新失败");
            }
        } catch (Exception e) {

            e.printStackTrace();
        }
    }
四、使用DBUtils增删改查的操作
如果只使用JDBC进行开发,我们会发现冗余代码过多,为了简化JDBC开发,本案例我们将采用Apache Commons组建一个成员DBUtils。
DBUtils就是JDBC的简化开发工具包。需要使用技术:连接池(获得连接),SQL语句都没有少。
下面直接展示源码,代码都有注释:
/**
 * 测试DBUtils工具类的增删改操作
 * @author Administrator
 *
 */
public class TestDBUtils1 {

    /**
     * 添加所有用户方法
     */
    @Test
    public void testAddUser() {
        try {
            // 1.创建核心类QueryRunner
            QueryRunner qr = new QueryRunner(C3P0Utils.getDataSource());
            // 2.编写SQL语句
            String sql = "insert into person (name,age) values(?,?)";
            // 3.为站位符设置值
            Object[] params = { "Layne", 18 };
            // 4.执行添加操作
            int rows = qr.update(sql, params);
            if (rows > 0) {
                System.out.println("添加成功!");
            } else {
                System.out.println("添加失败!");
            }
        } catch (SQLException e) {
            // TODO Auto-generated catch block
            e.printStackTrace();
        }
    }

    /**
     * 根据id修改用户方法
     *
     */
    @Test
    public void testUpdateUserById() {
        try {
            // 1.创建核心类QueryRunner
            QueryRunner qr = new QueryRunner(C3P0Utils.getDataSource());
            // 2.编写SQL语句
            String sql = "update person set name=? where _id=?";
            // 3.为站位符设置值
            Object[] params = { "Yorkie", 28 };
            // 4.执行添加操作
            int rows = qr.update(sql, params);
            if (rows > 0) {
                System.out.println("修改成功!");
            } else {
                System.out.println("修改失败!");
            }
        } catch (SQLException e) {
            // TODO Auto-generated catch block
            e.printStackTrace();
        }
    }

    /**
     * 根据id删除用户方法
     */
    @Test
    public void testDeleteUserById() {
        try {
            // 1.创建核心类QueryRunner
            QueryRunner qr = new QueryRunner(C3P0Utils.getDataSource());
            // 2.编写SQL语句
            String sql = "delete from person where _id=?";
            // 3.为站位符设置值
            Object[] params = {28};
            // 4.执行添加操作
            int rows = qr.update(sql, params);
            if (rows > 0) {
                System.out.println("删除成功!");
            } else {
                System.out.println("删除失败!");
            }
        } catch (SQLException e) {
            // TODO Auto-generated catch block
            e.printStackTrace();
        }
    }
}
再有一个类:
/**
* 测试DBUtils查询操作
* @author Administrator
*
*/
public class TestDBUtils2 {
/*
* 查询所有用户方法
*/
@Test
public void testQueryAll() {
try {
// 1.获取核心类queryRunner
QueryRunner qr = new QueryRunner(C3P0Utils.getDataSource());
// 2.编写sql语句
String sql = "select * from person";
// 3.执行查询操作
List persons = qr.query(sql, new BeanListHandler(Person.class));
// 4.对结果集集合进行遍历
for (Person person : persons) {
System.out.println(person.toString());
}
} catch (SQLException e) {
throw new RuntimeException(e);
}
}
/*
* 根据id查询用户方法
*/
@Test
public void testQueryUserById() {
try {
// 1.获取核心类queryRunner
QueryRunner qr = new QueryRunner(C3P0Utils.getDataSource());
// 2.编写sql语句
String sql = "select * from person where _id=?";
//3.为占位符设置值
Object[] params = {21};
// 4.执行查询操作
Person person = qr.query(sql, new BeanHandler(Person.class), params);
System.out.println(person.toString());
} catch (SQLException e) {
throw new RuntimeException(e);
}
}
/*
* 根据所有用户的总个数
*/
@Test
public void testQueryCount() {
try {
// 1.获取核心类queryRunner
QueryRunner qr = new QueryRunner(C3P0Utils.getDataSource());
// 2.编写sql语句
String sql = "select count(*) from person";
// 4.执行查询操作
Long count = (Long) qr.query(sql, new ScalarHandler());
System.out.println(count);
} catch (SQLException e) {
throw new RuntimeException(e);
}
}
/*
* 查询所有用户方法
*/
@Test
public void testQueryAll1() {
try {
// 1.获取核心类queryRunner
QueryRunner qr = new QueryRunner(C3P0Utils.getDataSource());
// 2.编写sql语句
String sql = "select * from person";
// 3.执行查询操作
List> list = qr.query(sql, new MapListHandler());
// 4.对结果集集合进行遍历
for (Map map : list) {
System.out.println(map);
}
} catch (SQLException e) {
throw new RuntimeException(e);
}
}
/*
* 查询所有用户方法
*/
@Test
public void testQueryAll2() {
try {
// 1.获取核心类queryRunner
QueryRunner qr = new QueryRunner(C3P0Utils.getDataSource());
// 2.编写sql语句
String sql = "select * from person";
// 3.执行查询操作
List 源码下载

