.NET领域最为流行的IOC框架之一Autofac
一、前言
Autofac是.NET领域最为流行的IOC框架之一,微软的Orchad开源程序使用的就是Autofac,Nopcommerce开源程序也是用的Autofac。
Orchad和Nopcommerce在用Autofac的时候进行封装,看过源码的都知道Autafac使用简单,功能强大。
建议下载Orchad和Nopcommerce学习下源码:附上下载地址
http://www.orchardproject.net/
http://www.nopcommerce.com/
和其他IOC对比:
Unity:微软patterns&practicest团队开发的IOC依赖注入框架,支持AOP横切关注点。
MEF(Managed Extensibility Framework):是一个用来扩展.NET应用程序的框架,可开发插件系统。
Spring.NET:依赖注入、面向方面编程(AOP)、数据访问抽象,、以及ASP.NET集成。
PostSharp:实现静态AOP横切关注点,使用简单,功能强大,对目标拦截的方法无需任何改动。
Autofac:最流行的依赖注入和IOC框架,轻量且高性能,对项目代码几乎无任何侵入性。
下面介绍Autofac的使用
二、Autofac使用
新建一个mvc的项目,使用nuget安装Autofac,需要安装Autofac和Autofac ASP.NET MVC5 Intergration
![]()
安装完成后引用里面就多了Autofac.dll和Autofac.Intergration.MVC,如果是在webApi里使用Autofac需要安装Autofac ASP.NET Web API2.2 Intergration 才可以。
新建一个person实体类
    public class Person
    {
        public int Id { get; set; }
        public string Name { get; set; }
        public int Age { get; set; }
        public string Address { get; set; }
    }
新建一个person仓储接口
    public interface IPersonRepository
    {
        IEnumerable GetAll();
        Person Get(int id);
        Person Add(Person item);
        bool Update(Person item);
        bool Delete(int id);
    }
新建实现
 public class PersonRepository : IPersonRepository
    {
        List person = new List();

        public PersonRepository()
        {
            Add(new Person { Id = 1, Name = "joye.net1", Age = 18, Address = "中国上海" });
            Add(new Person { Id = 2, Name = "joye.net2", Age = 18, Address = "中国上海" });
            Add(new Person { Id = 3, Name = "joye.net3", Age = 18, Address = "中国上海" });
        }
        public IEnumerable GetAll()
        {
            return person;
        }
        public Person Get(int id)
        {
            return person.Find(p => p.Id == id);
        }
        public Person Add(Person item)
        {
            if (item == null)
            {
                throw new ArgumentNullException("item");
            }
            person.Add(item);
            return item;
        }
        public bool Update(Person item)
        {
            if (item == null)
            {
                throw new ArgumentNullException("item");
            }

            int index = person.FindIndex(p => p.Id == item.Id);
            if (index == -1)
            {
                return false;
            }
            person.RemoveAt(index);
            person.Add(item);
            return true;
        }
        public bool Delete(int id)
        {
            person.RemoveAll(p => p.Id == id);
            return true;
        }
    }
Global属性注入
 public class MvcApplication : System.Web.HttpApplication
    {
        private void SetupResolveRules(ContainerBuilder builder)
        {
            builder.RegisterType().As();
        }
        protected void Application_Start()
        {
            var builder = new ContainerBuilder();
            SetupResolveRules(builder);
            builder.RegisterControllers(Assembly.GetExecutingAssembly()).PropertiesAutowired();
            var container = builder.Build();
            DependencyResolver.SetResolver(new AutofacDependencyResolver(container));

            AreaRegistration.RegisterAllAreas();
            FilterConfig.RegisterGlobalFilters(GlobalFilters.Filters);
            RouteConfig.RegisterRoutes(RouteTable.Routes);
            BundleConfig.RegisterBundles(BundleTable.Bundles);
        }
    }
最好获取数据结果;
![]()
三、总结
文中只是给出了一个简单的注入实现,剩下的可以自己去研究下,构造函数注入,方法注入
泛型注入,所有程序集注入,都可以看下,
也可以把文章开头的两个开源的项目下载下来研究里面的Autofac注入方式。
WebAPI2使用Autofac实现IOC属性注入完美解决方案
一、前言
只要你是.NETer你一定IOC,IOC里面你也会一定知道Autofac,上次说了在MVC5实现属性注入,今天实现在WebApi2实现属性注入,顺便说一下autofac的程序集的注入方式,都会在后面的代码里面有提现
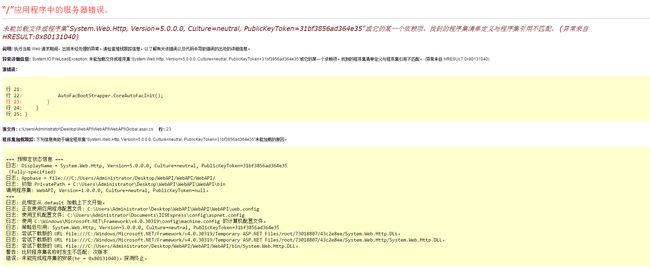
在WebAPI2使用Autofac注入的时候大多数人会出现如下问题:
未能加载文件或程序集“System.Web.Http, Version=5.0.0.0, Culture=neutral, PublicKeyToken=31bf3856ad364e35”或它的某一个依赖项。找到的程序集清单定义与程序集引用不匹配。 (异常来自 HRESULT:0x80131040)
截图如下:
这个是Autofac强依赖造成的,比较坑的。解决办法如下。
Nuget添加Microsoft.AspNet.WebApi
或通过NuGet 程序包管理器控制台添加:
Install-Package Microsoft.AspNet.WebApi
Update-Package Microsoft.AspNet.WebApi -reinstall(存在)
原因:我们新建的是一个空的MVC项目,缺少引用
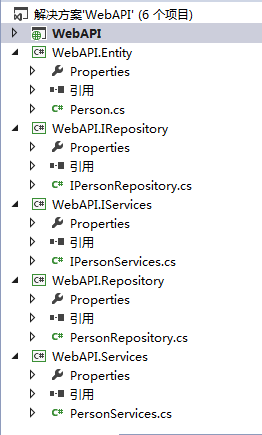
先上个结构图,结构图只是为了说明webAPI如何简单使用Autofac实现属性注入。
属性注入存在安全隐患,官方建议使用构造函数注入。
下面说下具体实现:
二、代码实现
1、新建一个WebAPI.Entity类库,新建一个Person.cs类
    public class Person
    {
        public int Id { get; set; }
        public string Name { get; set; }
        public int Age { get; set; }
        public string Address { get; set; }
    }
2、新建WebAPI.IRepository类库,新建一个IPersonRepository类
    public interface IPersonRepository
    {
        List GetAll();
        Person Get(int id);
        Person Add(Person item);
        bool Update(Person item);
        bool Delete(int id);
    }
3、新建WebAPI.Repository类库,新建一个PersonRepository类实现IPersonRepository接口
public class PersonRepository : IPersonRepository
    {
        List person = new List();

        public PersonRepository()
        {
            Add(new Person { Id = 1, Name = "joye.net1", Age = 18, Address = "中国上海" });
            Add(new Person { Id = 2, Name = "joye.net2", Age = 18, Address = "中国上海" });
            Add(new Person { Id = 3, Name = "joye.net3", Age = 18, Address = "中国上海" });
        }
        public List GetAll()
        {
            return person;
        }
        public Person Get(int id)
        {
            return person.Find(p => p.Id == id);
        }
        public Person Add(Person item)
        {
            if (item == null)
            {
                throw new ArgumentNullException("item");
            }
            person.Add(item);
            return item;
        }
        public bool Update(Person item)
        {
            if (item == null)
            {
                throw new ArgumentNullException("item");
            }

            int index = person.FindIndex(p => p.Id == item.Id);
            if (index == -1)
            {
                return false;
            }
            person.RemoveAt(index);
            person.Add(item);
            return true;
        }
        public bool Delete(int id)
        {
            person.RemoveAll(p => p.Id == id);
            return true;
        }
    }
4、新建WebAPI.IServices类库,新建IPersonServices接口
    public interface IPersonServices
    {
        List GetAll();
    }
5、IPersonServices接口在WebAPI.Services类库里面PersonServices实现
    public class PersonServices : IPersonServices
    {
        //程序集属性注入
        public IPersonRepository iPerson;

        public List GetAll()
        {
            return iPerson.GetAll();
        }
    }
6、新建一个WebAPI项目WebAPI,新建AutoFacBootStrapper类,nuget安装autofac
public class AutoFacBootStrapper
    {
        public static void CoreAutoFacInit()
        {
            var builder = new ContainerBuilder();
            HttpConfiguration config = GlobalConfiguration.Configuration;

            SetupResolveRules(builder);

            ////注册所有的Controllers
            //builder.RegisterControllers(Assembly.GetExecutingAssembly()).PropertiesAutowired();
            //注册所有的ApiControllers
            builder.RegisterApiControllers(Assembly.GetExecutingAssembly()).PropertiesAutowired();

            var container = builder.Build();
            //注册api容器需要使用HttpConfiguration对象
            config.DependencyResolver = new AutofacWebApiDependencyResolver(container);
            DependencyResolver.SetResolver(new AutofacDependencyResolver(container));
        }

        private static void SetupResolveRules(ContainerBuilder builder)
        {
            //WebAPI只用引用services和repository的接口,不用引用实现的dll。
            //如需加载实现的程序集,将dll拷贝到bin目录下即可,不用引用dll
            var iServices = Assembly.Load("WebAPI.IServices");
            var services = Assembly.Load("WebAPI.Services");
            var iRepository = Assembly.Load("WebAPI.IRepository");
            var repository = Assembly.Load("WebAPI.Repository");

            //根据名称约定(服务层的接口和实现均以Services结尾),实现服务接口和服务实现的依赖
            builder.RegisterAssemblyTypes(iServices, services)
              .Where(t => t.Name.EndsWith("Services"))
              .AsImplementedInterfaces();

            //根据名称约定(数据访问层的接口和实现均以Repository结尾),实现数据访问接口和数据访问实现的依赖
            builder.RegisterAssemblyTypes(iRepository, repository)
              .Where(t => t.Name.EndsWith("Repository"))
              .AsImplementedInterfaces();
        }
    }
7、程序启动注入
        protected void Application_Start()
        {
            GlobalConfiguration.Configure(WebApiConfig.Register);
            AreaRegistration.RegisterAllAreas();
            RouteConfig.RegisterRoutes(RouteTable.Routes);
            FilterConfig.RegisterGlobalFilters(GlobalFilters.Filters);
            BundleConfig.RegisterBundles(BundleTable.Bundles);

            //程序启动注入
            AutoFacBootStrapper.CoreAutoFacInit();
        }
8.接口调用数据
        public IPersonServices IServices { get; set; }
        // GET api/
        public IEnumerable Get()
        {
            var list = IServices.GetAll();
            return new string[] { "value1", "value2" };
        }
9.运行访问api/values/,打个断点看下搞定
三、总结
autofac确实用起来很方便,上面只是简单的实现,如果想深入学习可以下载我上一个文章提供的两个开源的项目可以学习下,也可以到autofac官网去了解下。
最近在看相关文章,很多都太专业化了没怎么看懂,这是自己现在对IoC的一些理解,记录下来,要不然时间一久,也就忘了。
自己对IoC模式理解还很浅,希望得到各位的指点。
代码下载:
https://yunpan.cn/c6QCURhYmGcP9 (提取码:e97a)
AutoFac容器初步
转载请注明出处,AutoFac:最流行的依赖注入和IOC框架,轻量且高性能,对项目代码几乎无任何侵入性。
那么我们怎么来使用这样一个框架呢
1、在引用项右击,选择Nuget管理,这里我们要导入两个包
一个是AutoFac包,另外一个就是Autofac ASP.NET MVC5 Intergration
在webapi里面使用的话我们需要添加一个Autofac ASP.NET Web API2.2 Intergration 才可以。
2.Global.asax.cs属性注入,配置IOC容器,我这里配置的是通用的以I开头的Repository(仓库类)
#region autofac IOC容器配置
            var builder = new ContainerBuilder();

            //注册所有的controller
            builder.RegisterControllers(typeof(MvcApplication).Assembly).PropertiesAutowired();
            //注册所有模块module
            builder.RegisterAssemblyModules(Assembly.GetExecutingAssembly());

            var assemblys = BuildManager.GetReferencedAssemblies().Cast().ToArray();

            //注册所有继承IDependency接口的类
            builder.RegisterAssemblyTypes(assemblys)
            .Where(type => typeof(IDependency).IsAssignableFrom(type) && !type.IsAbstract);

            //注册服务,所有IxxxxRepository=>xxxxRepository
            builder.RegisterAssemblyTypes(assemblys).Where(t => t.Name.EndsWith("Repository") && !t.Name.StartsWith("I")).AsImplementedInterfaces();

            var container = builder.Build();

            BaseInfo._container = container;

            DependencyResolver.SetResolver(new AutofacDependencyResolver(container));
            #endregion
3.新建实体基类以及实体类,也就是创建数据模型
base类:
public class BaseEntity
    {
        [NotMapped]
        [PropertyModelBinder("start")]
        public int pageIndex { get; set; }

        [NotMapped]
        [PropertyModelBinder("length")]
        public int pageSize { get; set; }

        [NotMapped]
        public string draw { get; set; }

        [NotMapped]
        public List order { get; set; }

        [NotMapped]
        public List columns { get; set; }

    }


   public class Orderby {
       public string column { get; set; }

       public string dir { get; set; }
   }


   public class Datacolumn {
       public string data { get; set; }

       public string name { get; set; }

       public bool searchable { get; set; }

       public bool orderable { get; set; }
   }
实体类:
public class User : BaseEntity
    {
       public User() {
           RoleList = new List();
           MessageList = new List();
       }
       public int UserID { get; set; }

       public string UserName { get; set; }

       public string UserPassword {get;set;}

       public string UserReallyname {get;set;}

       public string HeadPortrait { get; set; }

       public string MobilePhone { get; set; }

       public string Email { get; set; }

       public int DepartmentID {get;set;}

       public bool IsEnable {get;set;}

       public DateTime CreateTime {get;set;}

       public DateTime? UpdateTime {get;set;}

       public string Remark { get; set; }

       public ICollection RoleList { get; set; }

       //接收消息列表
       public ICollection MessageList { get; set; }

       public Dictionary Department { get; set; }

       //发送消息列表
       public List Messages { get; set; }

    }
4.创建仓储接口,因为我在配置Global属性时,已经说明了我要注入所有以 “I” 开头的接口,那么我就把这个用户的接口给定义为IUserRepository
当然,不同的实体类所需要的仓储接口也不一样,这里根据自己的实际需求去写需要的方法类,接口嘛,就不要在这里具体实现你的方法了
 public interface IUserRepository
    {
        Tuple> GetList(User model);

        List GetUserInfos();

        User GetSingle(User model);

        User GetbyID(int userID);

        void AddUser(User model);

        void ModifyUser(User model);

        void DeleteUser(User model);

        void SetUserInfoRole(int userID, List roleIDList);

        List GetUserInfobyName(string value);

        void ResetUserPWDbyID(int id);

    }
5.我们定义一个实现接口的类,然后把接口的方法给实现,这里面就是对数据实体进行操作了
public class UserRepository : IUserRepository
{
public Tuple> GetList(User model)
{
using (UnitOfWork dal=BaseInfo._container.Resolve())
{
var SysUserRepository = dal.GetRepository();
var conditions = ExpandHelper.True();
if (!string.IsNullOrEmpty(model.UserName))
conditions = conditions.And(a => a.UserName.Contains(model.UserName));
if (!string.IsNullOrEmpty(model.UserReallyname))
conditions = conditions.And(a => a.UserReallyname.Contains(model.UserReallyname));
if (model.DepartmentID > 0)
conditions = conditions.And(a => a.DepartmentID == model.DepartmentID);
var templist = SysUserRepository.Get(filter: conditions, includeProperties: "RoleList");
var count = templist.Count();
if (model.order != null&&model.order.Count()>0)
{
foreach (var item in model.order)
{
var column = model.columns.ElementAt(int.Parse(item.column));
templist = templist.OrderSort(column.data, item.dir);
}
}
var result = templist.PageBy(model.pageIndex, model.pageSize).ToList();
return new Tuple>(count, result);
}
}
public User GetSingle(User model)
{
using(UnitOfWork dal=BaseInfo._container.Resolve()){
var conditions = ExpandHelper.True();
if (!string.IsNullOrEmpty(model.UserName))
conditions = conditions.And( a => a.UserName == model.UserName || a.MobilePhone == model.UserName);
if (!string.IsNullOrEmpty(model.MobilePhone))
conditions = conditions.And(a => a.MobilePhone == model.MobilePhone);
var result = dal.GetRepository().Get(conditions).FirstOrDefault();
return result;
}
}
public User GetbyID(int userID)
{
using (UnitOfWork dal = BaseInfo._container.Resolve())
{
// var result = dal.GetRepository().Get(filter: a => a.UserID == userID, includeProperties: "RoleList.MenuList,RoleList.rbList").AsNoTracking().FirstOrDefault();
var result = dal.GetRepository().Get(filter: a => a.UserID == userID,includeProperties: "RoleList").FirstOrDefault();
foreach (var item in result.RoleList)
{
var role=dal.GetRepository().Get(a=>a.RoleID==item.RoleID,includeProperties:"MenuList,rbList").FirstOrDefault();
item.MenuList = role.MenuList;
item.rbList = role.rbList;
}
return result;
}
}
public void AddUser(User model)
{
using (UnitOfWork dal = BaseInfo._container.Resolve())
{
dal.GetRepository().Insert(model);
dal.Save();
}
}
public void ModifyUser(User model)
{
using (UnitOfWork dal = BaseInfo._container.Resolve())
{
dal.GetRepository().UpdateSup(model, new List() { "IsEnable", "CreateTime" }, false);
dal.Save();
}
}
public void DeleteUser(User model)
{
using (UnitOfWork dal = BaseInfo._container.Resolve())
{
var sysUserRepository= dal.GetRepository();
var Usermodel = sysUserRepository.GetByID(model.UserID);
Usermodel.IsEnable=Usermodel.IsEnable?false:true;
sysUserRepository.UpdateSup(Usermodel, new List() { "IsEnable" });
dal.Save();
}
}
///
/// 添加用户角色信息,先删除原有数据,在添加到数据库
///
///
///
/// roleIDList)
{
using (UnitOfWork dal = BaseInfo._container.Resolve())
{
var sysUserRepository = dal.GetRepository();
var roleRepository = dal.GetRepository();
var UserModel = GetbyID(userID);
var roleList = UserModel.RoleList.ToList();
roleList.ForEach(m =>
{
var userModel = sysUserRepository.Get(filter: a => a.UserID == userID, includeProperties: "RoleList").FirstOrDefault();
var roleModel = roleRepository.GetByID(m.RoleID);
userModel.RoleList.Remove(roleModel);
});
roleIDList.ForEach(m =>
{
var userModel = sysUserRepository.GetByID(userID);
var roleModel = roleRepository.GetByID(m);
userModel.RoleList.Add(roleModel);
});
dal.Save();
}
}
public List GetUserInfobyName(string value)
{
Mapper.Initialize(a =>
{
a.CreateMap()
.ForMember(au => au.id, op => { op.MapFrom(user => user.UserID); })
.ForMember(au => au.text, op => { op.MapFrom(user => user.UserReallyname); })
.ForMember(au => au.department, op => { op.MapFrom(user => user.Department.DicValue); });
a.CreateMap();
});
using (var dal = BaseInfo._container.Resolve()) {
return dal.GetRepository()
.Get(a => a.UserReallyname.Contains(value) || a.MobilePhone == value, includeProperties: "Department,Role").ProjectToQueryable().ToList();
}
}
public void ResetUserPWDbyID(int id)
{
using (var dal = BaseInfo._container.Resolve())
{
var repository = dal.GetRepository();
var usermodel = new User()
{
UserID = id,
UserPassword = "123456"
};
repository.UpdateSup(usermodel, new List() { "UserPassword" });
dal.Save();
}
}
public List GetUserInfos()
{
using (var dal = BaseInfo._container.Resolve())
{
return dal.GetRepository().Get().ToList();
}
}
}
6.然后我们就可以在MVC的控制器里面去调用这些方法来实现我们所想要的功能了,我这里只展示一个方法
public void SendEmailAsync(Message model)
        {
            Task.Run(() =>
            {
                try
                {
                    var reclist = string.Empty;
                    foreach (var item in model.RecUser.Split(','))
                    {
                        var userinfo = this.UserRepository.GetbyID(int.Parse(item));  //这里就调用了实现接口的那个类的方法,去验证用户的ID
                        if (!string.IsNullOrEmpty(userinfo.Email))
                        {
                            reclist += userinfo.Email + ",";
                        }
                    }
                    if (!string.IsNullOrEmpty(reclist))
                    {
                        reclist = reclist.Substring(0, reclist.Length - 1);
                        EmailHelper email = new EmailHelper(reclist, model.MessageTitle, model.MessageText);
                        email.Send();
                    }
                    model.SendEmailState = 2;
                    this.MessageServer.SetSendState(model);
                }catch(Exception ex){
                    new LogHelper().LogError("发送邮件异常" + ex);
                    model.SendEmailState = 3;
                    this.MessageServer.SetSendState(model);
                }
            });
        }
那么整个流程就是这样,看着别人写的那些博客里面的流程不是那么的全面,我这里就详细的把AutoFac的整个流程给梳理出来了,有不对的地方请及时指出
后面我会详细说明一下Unity IOC框架是如何使用的,这里我就不再叙述了
下面是两篇比较好的博文,我觉得比较有参考意义的,可以看一下,喜欢我发布的内容的可以关注我,后面还会有其他的干货和内容进行分享
.NET领域最为流行的IOC框架之一Autofac:https://www.cnblogs.com/yinrq/p/5381492.html
.NET Unity IOC框架使用实例:https://blog.csdn.net/chen_peng7/article/details/54896449


