RT-Thread 学习笔记(十二)--- 开启基于RTGUI的LCD显示功能(2)
软件环境:Win7,Keil MDK 4.72a, IAR EWARM 7.2, GCC 4.2,Python 2.7 ,SCons 2.3.2
硬件环境:Armfly STM32F103ZE-EK v3.0开发板
参考文章:RT-Thread编程指南
RT-Thread_1.2.0+lwip+rtgui0.8.0 移植心得
RT-Thread RTOS组件:RTGUI教程 Hello World
上篇文章中我们LCD驱动进行了移植,接下来进行编译和调试
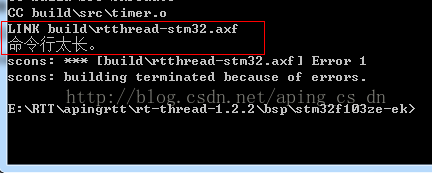
【1】在命令行中使用scons编译,出现“命令太长”的错误
看到Link时命令行太长的错误,如下图。
参考文章修正scons编译时armlink链接错误的解决办法:
(1) 使用Notepad++打开C:\Python27\Lib\site-packages\scons-2.3.2\SCons\Platform\__init__.py,定位到205行,修改如下代码:
prefix = env.subst('$TEMPFILEPREFIX')
if not prefix:
#prefix = '@'
prefix = ' '
修改后保存。
(2)使用Notepad++打开stm32f103ze-ek/Sconstruct文件,定位到27行附近,如入如下代码:
if rtconfig.PLATFORM == 'iar':
env.Replace(CCCOM = ['$CC $CCFLAGS $CPPFLAGS $_CPPDEFFLAGS $_CPPINCFLAGS -o $TARGET $SOURCES'])
env.Replace(ARFLAGS = [''])
env.Replace(LINKCOM = ['$LINK $SOURCES $LINKFLAGS -o $TARGET --map project.map'])
if rtconfig.PLATFORM == 'armcc':
env["TEMPFILE"] = SCons.Platform.TempFileMunge
# env["LINKCOM"] = "${TEMPFILE('$LINK -o $TARGET $SOURCES')}"
env["LINKCOM"] = "$LINK -o $TARGET $LINKFLAGS ${TEMPFILE('--via $SOURCES')}"
env["TEMPFILEPREFIX"] = ' ' # arm tool chain
Export('RTT_ROOT')
Export('rtconfig')
... ...
修改完成后保存。
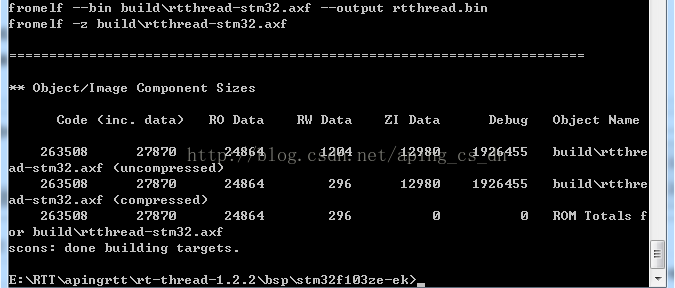
然后重新scons编译,结果如下:
【2】RTGUI运行测试
将编译生成的代码下载到开发板中,复位运行,终端中显示如下:
\ | /
- RT - Thread Operating System
/ | \ 1.2.2 build Apr 10 2015
2006 - 2013 Copyright by rt-thread team
found part[0], begin: 219152384, size: 1.690GB
dm9000 id: 0x90000a46
finsh />operating at 100M full duplex mode
lwIP-1.4.1 initialized!
RTGUI: could not open the font file:/resource/hzk16.fnt
RTGUI: please mount the fs first and make sure the file is there
set font size to 16
W25Q64BV or W25Q64CV detection
flash0 mount to /.
sd0 mount to /dev.
... ...
hard fault on thread: init
thread pri status sp stack size max used left tick error
-------- ---- ------- ---------- ---------- ---------- ---------- ---
... ...
很显然,挂载的根目录下面根本没有/resource/hzk16.fnt文件,所以报错,因为字库占空间较大,所以目前还无法支持汉字功能。打开rtconfig.h文件,定位到173行附近,注释掉RTGUI_USING_FONTHZ定义,修改如下:
/* SECTION: RT-Thread/GUI */
#define RT_USING_RTGUI
/* name length of RTGUI object */
#define RTGUI_NAME_MAX 12
/* support 16 weight font */
#define RTGUI_USING_FONT16
/* support Chinese font */
//#define RTGUI_USING_FONTHZ
/* use DFS as file interface */
#define RTGUI_USING_DFS_FILERW
/* use font file as Chinese font */
#define RTGUI_USING_HZ_FILE
/* use Chinese bitmap font */
#define RTGUI_USING_HZ_BMP
/* use small size in RTGUI */
#define RTGUI_USING_SMALL_SIZE
修改后保存,重新编译下载,复位运行,此时终端显示
finsh />list_thread()
thread pri status sp stack size max used left tick error
-------- ---- ------- ---------- ---------- ---------- ---------- ---
rtgui 0x0f suspend 0x000000f8 0x00000400 0x000000f8 0x00000005 000
tshell 0x14 ready 0x00000090 0x00000800 0x000001b0 0x00000008 -04
tidle 0x1f ready 0x0000005c 0x00000100 0x00000064 0x0000001f 000
led 0x14 suspend 0x00000078 0x00000200 0x00000078 0x00000005 000
0, 0x00000000
finsh />
信息显示rtgui线程处于挂起状态,下面将加载一些Demo程序进行测试。
【3】加入RTGUI Demo例程
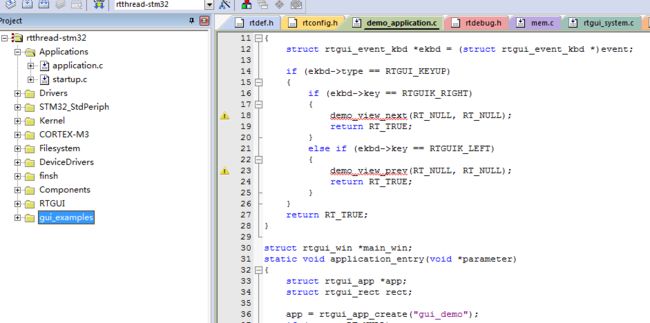
(1)将github网站的RTGUI-Master/demo/examples复制到rt-thread-1.2.2/components/rtgui目录下,然后在命令行运行scons --tartget=mdk4 -s,重新打开工程后可以看到gui-examples组已经加入进来,如下图:
(2)打开application.c,定位到45行附近,加入gui_appplication_init(),修改如下:
#include "led.h"
extern void gui_application_init(void);
extern void gui_application_init(void);
extern void rt_spi_flash_device_init(void);
... ...
再定位到158行附近,
... ...
#ifdef RTGUI_USING_CALIBRATION
//calibration_set_restore(cali_setup);
//calibration_set_after(cali_store);
//calibration_init();
#endif /* #ifdef RTGUI_USING_CALIBRATION */
gui_application_init();
}
#endif /* RT_USING_RTGUI */
(3)打开gui_examples工作组下dem_application.c,定位到129行附近,代码修改如下:
void gui_application_init(void)
{
static rt_bool_t inited = RT_FALSE;
if (inited == RT_FALSE) /*避免重复初始化 */
{
rt_thread_t tid;
tid = rt_thread_create("wb",
gui_application_entry, RT_NULL,
2048 * 2, 25, 10);
if (tid != RT_NULL)
rt_thread_startup(tid);
inited = RT_TRUE;
}
}
#ifdef RT_USING_FINSH
#include
void gui_application()
{
gui_application_init();
}
/* finsh 终端可以执行gui_appplication() 命令运行上面函数*/
FINSH_FUNCTION_EXPORT(gui_application,guiapplication demo)
#endif
然后再定位到31行附近,将gui_appliction线程入口的名字改过来,修改如下:
... ...
struct rtgui_win *main_win;
static void gui_application_entry(void *parameter)
{
struct rtgui_app *app;
struct rtgui_rect rect;
app = rtgui_app_create("gui_demo");
if (app == RT_NULL)
return;
... ...
然后定位到64行到120附近代码,从demo_view_box()开始,直到rtgui_win_show()之间的代码除了留下demo_view_button() ,其它代码注释掉,修改如下:
    rtgui_container_add_child(RTGUI_CONTAINER(main_win), RTGUI_WIDGET(the_notebook));

    //demo_view_box();

    /* ³õʼ»¯¸÷¸öÀý×ÓµÄÊÓͼ */
/*    demo_view_benchmark();

    demo_view_dc();
#ifdef RTGUI_USING_TTF
    demo_view_ttf();
#endif

#ifndef RTGUI_USING_SMALL_SIZE
    demo_view_dc_buffer();
#endif
    demo_view_animation();
#ifndef RTGUI_USING_SMALL_SIZE
    demo_view_buffer_animation();
    demo_view_instrument_panel();
#endif
    demo_view_window();
*/    demo_view_label();
/*    demo_view_button();
    demo_view_checkbox();
    demo_view_progressbar();
    demo_view_scrollbar();
    demo_view_radiobox();
    demo_view_textbox();
    demo_view_listbox();
    demo_view_menu();
    demo_view_listctrl();
    demo_view_combobox();
    demo_view_slider();
    demo_view_notebook();
    demo_view_mywidget();
    demo_plot();
	demo_view_digtube();
*/
#if defined(RTGUI_USING_DFS_FILERW)
	demo_view_edit();
	demo_view_bmp();
#endif
(4)打开demo_view.c,定位到81行和98行,将rtgui_button_create()中的中文更换成英文,因为在rtconfig.h中我们关闭了使用中文字体选项,修改如下:
... ...
    /* 创建"下一个"按钮 */
#ifdef RTGUI_USING_FONTHZ
    next_btn = rtgui_button_create("下一个");
#else
		next_btn = rtgui_button_create("Next");
#endif
    /* 设置onbutton动作到demo_view_next函数 */
    rtgui_button_set_onbutton(next_btn, demo_view_next);
    /* 设置按钮的位置信息 */
    rtgui_widget_set_rect(RTGUI_WIDGET(next_btn), &rect);
    /* 添加按钮到视图中 */
    rtgui_container_add_child(container, RTGUI_WIDGET(next_btn));

    /* 获得视图的位置信息 */
    rtgui_widget_get_rect(RTGUI_WIDGET(container), &rect);
    rtgui_widget_rect_to_device(RTGUI_WIDGET(container), &rect);
    rect.x1 += 5;
    rect.y2 -= 5;
    rect.x2 = rect.x1 + 100;
    rect.y1 = rect.y2 - 25;

    /* 创建"上一个"按钮 */
#ifdef RTGUI_USING_FONTHZ
    prev_btn = rtgui_button_create("上一个");
#else
		prev_btn = rtgui_button_create("Previous");
#endif
    /* 设置onbutton动作到demo_view_prev函数 */
    rtgui_button_set_onbutton(prev_btn, demo_view_prev);
    /* 设置按钮的位置信息 */
    rtgui_widget_set_rect(RTGUI_WIDGET(prev_btn), &rect);
    /* 添加按钮到视图中 */
    rtgui_container_add_child(container, RTGUI_WIDGET(prev_btn));

    /* 返回创建的视图 */
    return container;
... ...
然后保存,重新scons编译,下载到开发板上,可以看到如下效果:
下图是未作修改rtgui_button_create()中的中文更换的button_view的的显示效果,左边的四个按钮的前景色应该分别是红色、蓝色、灰色和灰色,是但实际上没有显示出来。
【4】修改调色板
上面显示有一个问题,Red Left标签应显示红色,实际显示蓝色,而Blue Right标签应显示蓝色,实际显示红色。
打开rtgui\include\rtgui\color.h文件,在头文件的开始部分可以看到有关颜色的定义:
/*
 * The color used in the GUI:
 *
 *         bit        bit
 * RGB565  15 R,G,B   0
 * BGR565  15 B,G,R   0
 * RGB888  23 R,G,B   0
 * ARGB888 31 A,R,G,B 0
 * RGBA888 31 R,G,B,A 0
 * ABGR888 31 A,B,G,R 0
 *
 * The rtgui_color is defined as ARGB888.
 *        bit31 A,R,G,B bit0
 */
#define RTGUI_ARGB(a, r, g, b)  \
        ((rtgui_color_t)(((rt_uint8_t)(b)|\
        (((unsigned long)(rt_uint8_t)(g))<<8))|\
        (((unsigned long)(rt_uint8_t)(r))<<16)|\
        (((unsigned long)(rt_uint8_t)(a))<<24)))
#define RTGUI_RGB(r, g, b)  RTGUI_ARGB(255, (r), (g), (b))

#define RTGUI_RGB_B(c)  ((c) & 0xff)
#define RTGUI_RGB_G(c)  (((c) >> 8)  & 0xff)
#define RTGUI_RGB_R(c)  (((c) >> 16) & 0xff)
#define RTGUI_RGB_A(c)  (((c) >> 24) & 0xff)
针对上面代码,修改如下:
#ifdef RTGUI_USING_BRG565
#define RTGUI_ARGB(a, b, g, r)  \
        ((rtgui_color_t)(((rt_uint8_t)(b)|\
        (((unsigned)(rt_uint8_t)(g))<<8))|\
        (((unsigned long)(rt_uint8_t)(r))<<16)|\
        (((unsigned long)(rt_uint8_t)(a))<<24)))
#define RTGUI_RGB(r, g, b)  RTGUI_ARGB(255, (b), (g), (r))

#define RTGUI_RGB_B(c)  ((c) & 0xff)
#define RTGUI_RGB_G(c)  (((c) >> 8)  & 0xff)
#define RTGUI_RGB_R(c)  (((c) >> 16) & 0xff)
#define RTGUI_RGB_A(c) (((c) >> 24) & 0xff)#define RTGUI_USING_CAST_CHECK
//#define RTGUI_USING_DESKTOP_WINDOW
//#undef RTGUI_USING_SMALL_SIZE
//#define RTGUI_USING_TOUCHPANEL
//#define RTGUI_USING_CALIBRATION
#define RTGUI_USING_BRG565
修改完成后保存。重新scons编译,结果显示如下:
上图中"12 font"和“16 font”标签的颜色分别是改成了dark_grey和light_grey。
下一节将要解决,触摸屏驱动和矫正问题。


