python笔记-------------
------------------下面是几个python内容
1:改变python的编辑器
2:匿名函数
3:def f(a[:])#参数传递的是拷贝
4:with自动关闭文件
5:yield ==>pipe row 》》》http://www.cnblogs.com/coderzh/archive/2008/05/18/1202040.html
6:闭包函数
7:eval()==>生成一个函数指针(类似)
8:all([])所有都为真才为真;any([])有一个为假则为假
9:43 in (12,2345,356,467,'asdf') 会返回True,False
---------------------------python调用oracle存储过程,参数可传递数组等
http://www.cnblogs.com/hzhida/archive/2012/08/09/2630173.html
---------发送邮件
------------http://www.cnblogs.com/lonelycatcher/archive/2012/02/09/2343480.html
438: from email.mime.multipart import MIMEMultipart
439: from email.mime.text import MIMEText
440: from email.utils import COMMASPACE,formatdate
441: import smtplib
442: msg = MIMEMultipart()
444: msg['From'] = "[email protected]"
445: msg['Subject'] = "ssss"
446: msg['To'] = COMMASPACE.join("[email protected]")
447: msg['Date'] = formatdate(localtime=True)
449: msg.attach(MIMEText("test content!!!"))
450: smtp = smtplib.SMTP('mail.autonavi.com')
451: smtp.login('autonavi\hongliang.lu', 'adsfad')
452: smtp.sendmail('[email protected]','[email protected]', to,msg.as_string())
453: smtp.sendmail('[email protected]','[email protected]', msg.as_string())
----------------列表求交集
b1=[1,2,3]
b2=[2,3,4]
b3 = [val for val in b1 if val in b2]
print b3
----------------列表求差集
b1=[1,2,3]b2=[2,3,4]
b3 = [val for val in b1 if val not in b2]
print b3
----------------列表排重对rows
rows=list(set(rows))#排重列表
set: 指的是对于其中的元素不会出现重复。类似map,单是单键值集合。
----------------------------------------------python中使用cx_oracle的sqlalchemy方式调用存储过程 其中存储过程一个参数是列表数组的形式
--------sql脚本
create or replace package PMB is
TYPE pmb_num_arr IS TABLE OF NUMBER INDEX BY PLS_INTEGER;
procedure Insert_Publish_Batch(pc_id integer,glb_lst pmb_num_arr,v_apply_view varchar2);
end PMB;
create or replace package body PMB is
procedure Insert_Publish_Batch(pc_id integer,glb_lst pmb_num_arr,v_apply_view varchar2) is
  cnt number;
begin
  for i in 1..glb_lst.count loop
      execute immediate
      'insert into table(select publish_batch from pdb_poi a where poi_id=:1 and
             exists(select 1 from '||v_apply_view||' b where a.compile_id=b.compile_mark))
             values (:2)'
             using glb_lst(i),pc_id;
  end loop;
  commit;
end Insert_Publish_Batch;
end PMB;
-------python调用脚本
@staticmethod
def Insert_Publish_Batch(pc_id,glb_lst,v_apply_view):
    if glb_lst and len(glb_lst)>0:
        tns=cx_Oracle.makedsn(Comm.ip,Comm.port,Comm.sid)
        c=cx_Oracle.connect(Comm.user,Comm.pwd,tns)
        cur=c.cursor()
        gl= cur.arrayvar(cx_Oracle.NUMBER, glb_lst)
        cur.execute('begin pmb.Insert_Publish_Batch(:a,:b,:c); end;', a=pc_id,b=gl,c=v_apply_view)
        cur.close()
        c.close()
---------------------------------在python中调用存储过程使用参数返回值out
def commitview(self,V_APPLY_ID):
        try:
            mr_user=self.parseconn(self.cfg_info.MDB_CONN_INFO)
            v_result= self.cur.var(cx_Oracle.NUMBER)#调用完存储过程后返回的值
            self.cur.execute('begin data_flow_util.CommitDataFlowTask(:a,:b); end;', a=V_APPLY_ID,b=v_result)
            if v_result==1:
                return 1
            else:
                return 0
        except:
            self.recordrunlog(self.getpubinfo(),'ERROR',sys.exc_info())
            return 2
----------在安装完成cx_oracle之后示例可参照C:\Python27\cx_Oracle-doc\test下的demo即可
--------------------在使用pycharm调试python的时候,像下面这样含有"\"的注释 是不可被认的
"""
fname:文件全路径 demo:c:\xx\aaa.xml
返回全路径的aaa
"""
但是改写成:
#fname:文件全路径 demo:c:\xx\aaa.xml
#返回全路径的aaa
就没有问题。
------------python读取ini配置文件
http://blog.csdn.net/wklken/article/details/7271014
-------------python在使用import是所要注意的事项,比如循环导入 A.PY导入B.PY ;B.PY导入A.PY这样的事情
http://blog.csdn.net/zbyufei/article/details/5894645
---------------python 函数参数带有星号"*"/"**" 含义
http://blog.sina.com.cn/s/blog_4bfd07180100g34k.html
-------------
python 获取程序的当前行号和方法名
http://blog.sina.com.cn/s/blog_6acdaf6d01013ie7.html
--------cx_oracle调用函数 返回值是clob
va= self.cur.callfunc("pmb_comm.getunion",cx_Oracle.CLOB,['a,b,c,d','b,h'])
------cx_oracle调用存储过程
cur.callproc("pmb.LgWkInvMig", (Comm.cfgid,v_apply_id,v_apply_view,result))
------------------python异常处理 获取堆栈信息
http://www.cnblogs.com/dkblog/archive/2011/06/24/2089026.html
http://blog.sina.com.cn/s/blog_6d802e7b0100r4y7.html
traceback模块被用来跟踪异常返回信息. 如下例所示:
import traceback
try:
    raise SyntaxError, "traceback test"
except:
    traceback.print_exc()
将会在控制台输出类似结果:
Traceback (most recent call last):
File "H:\PythonWorkSpace\Test\src\TracebackTest.py", line 3, in
    raise SyntaxError, "traceback test"
SyntaxError: traceback test
类似在你没有捕获异常时候, 解释器所返回的结果.
你也可以传入一个文件, 把返回信息写到文件中去, 如下:
import traceback
import StringIO
try:
    raise SyntaxError, "traceback test"
except:
    fp = StringIO.StringIO()    #创建内存文件对象
    traceback.print_exc(file=fp)
    message = fp.getvalue()
    print message
这样在控制台输出的结果和上面例子一样
traceback模块还提供了extract_tb函数来格式化跟踪返回信息, 得到包含错误信息的列表, 如下:

import traceback
import sys

def tracebacktest():
    raise SyntaxError, "traceback test"
try:
    tracebacktest()
except:
    info = sys.exc_info()
    for file, lineno, function, text in traceback.extract_tb(info[2]):
        print file, "line:", lineno, "in", function
        print text
    print "** %s: %s" % info[:2]

控制台输出结果如下:
H:\PythonWorkSpace\Test\src\TracebackTest.py line: 7 in
tracebacktest()
H:\PythonWorkSpace\Test\src\TracebackTest.py line: 5 in tracebacktest
raise SyntaxError, "traceback test"
** : traceback test
-----------------------如下即可实现编码是utf-8,不会出现使用python的时候出现乱码 (python2.7.3)据说在python3.*的时候已经没这个问题了
# -*- coding: utf-8 -*-
在保存文件的时候,需要注意文字本身的编码,如果str_content是从数据库中获取到的,那么就看数据库的字符集编码select userenv('language') from dual ,如果是utf-8的那么:
str_content= '%s'%format_content
if not output_format:#XML
    f.write(self.xml_head)
    f.write(str_content)
    f.write(self.xml_tail)
如果是gbk的那么
str_content= ('%s'%format_content).decode('gbk').decode('utf-8')
if not output_format:#XML
    f.write(self.xml_head)
    f.write(str_content)
    f.write(self.xml_tail)
然后需要在win7 的 系统环境变量 加上 NLS_LANG:SIMPLIFIED CHINESE_CHINA.ZHS16GBK
--------------------------python一些list,tuple,dict的一些操作
http://www.cnblogs.com/zhengyuxin/articles/1938300.html
-----------python 的帮助和输入参数设置
http://www.360doc.com/content/12/1111/21/11029609_247282120.shtml
------时间操作
http://www.tutorialspoint.com/python/os_utime.htm
http://qinxuye.me/article/details-about-time-module-in-python/
local=time.localtime(time.time())#返回struct_time的结构体
a=time.struct_time((1993, 5, 5, 14, 14, 50, 3, 125, 0))#返回struct_time的结构体
b=time.mktime(a)#返回一个float
os.utime("D:\\DATA\\2013-06-08\\2013-06-08-170325-757000-2526.xml",(b,b))#修改文件属性的修改时间
----格式化字符串
c=time.strftime('%Y-%m-%d %H:%M:%S',a)
-----------修改文件的“修改时间”
#coding=gbk
import sys
import os
import time
reload(sys)
sys.setdefaultencoding('utf-8')

def main(dir):
    try:
        dir_list= os.listdir(dir)
        a=[]
        for item in dir_list:
            itemsrc=os.path.join(dir,item)
            a.append(itemsrc)
        a.sort(reverse=False)
        k=0
        times= time.struct_time([2013, 6, 22, 8, 23, 38, 2, 177, 0])#返回struct_time的结构体
        times= time.mktime(times)
        for i in a:
            k=k+10;#每个文件同上一个文件的“修改时间”属性相差1秒
            times= times+k
            os.utime(i,(times,times))
    except Exception, e:
            print e.message

if __name__ == '__main__':
    argv = [a.decode() for a in sys.argv[1:]]
    main(str(argv[0]))
-------------查看cpu个数
import multiprocessing, os
multiprocessing.cpu_count()
------------------多进程使用
http://blog.csdn.net/maqingli20/article/details/7109905
http://www.coder4.com/archives/3352
http://www.cnblogs.com/congbo/archive/2012/08/23/2652433.html
-------------------------------------python使用cxfreeze或者py2exe编译程序的注意事项:
1:如果python是32/64位版本 ,则cxfreeze或者py2exe 也使用32/64位版本,cx_Oracle也需使用32/64位版本。
2:使用py2exe方法:http://www.cnblogs.com/h3idan/archive/2012/05/26/2519670.html 。其中需要将setup.py文件(自己写的)拷贝到程序中,不然当a.py引用b.py的时候,然后对a.py进行编译exe,会出现找不到模块的情况。
如果在dist下打包了多个则会产生一个叫做library.zip的文件,每次打包都覆盖,最好就是在打完一个exe包之后,然后将此library.zip的内容和之前library.zip的内容都解压出来,然后进行覆盖即可。
如果在正文(即py文件)中含有引入相对路径的话,比如:其中CCSVTable是在./csv/CCSVTable.py文件
sys.path.append('./csv')
try:
   import CCSVTable
except ImportError, e:
   raise
则可以使用如下的方法:
下面是一个使用py2exe 进行setup_**.py,使用sys.path.append引入打包即可。
import os,sys
sys.path.append('C:\\Users\\hongliang.lu\\PycharmProjects\\rp\\common')
os.chdir(os.path.dirname(sys.executable))
from distutils.core import setup
import py2exe
setup(console=["C:\\Users\\hongliang.lu\\PycharmProjects\\rp\\finder.py"])
3:一台机子安装两个python版本,的时候在使用 cxfreeze或者py2exe的时候 必须 cd 到安装python版本的目录下,比如c:\python275。
c:\python275>python "C:\\Users\hongliang.lu\\PycharmProjects\\PublishSys\\setup.py" py2exe
4:将C:\python275\Lib\site-packages\cx_Oracle.py拷贝到 生成的exe目录下,如C:\python275\dist
5:msvcm80.dll,msvcp80.dll,msvcr80.dll,msvcrt.dll等等这些都拷贝将C:\python275\DLLs下,编译才能成功。
6:需要在边编译exe的py文件前加上“import decimal”。
--------------------------------python cx_Oracle 中 oracle 乱码的解决
http://hi.baidu.com/yunyun658/item/0b5ad97f562a9d3c6dc37cde
--------------------------------hpython解决 'ascii' codec can't encode characters
http://cooler1217.iteye.com/blog/1465335
-----------------------------------------python字符集编码问题总结:
环境:win7 64位 + oralce 数据库字符编码UTF8 ===》详见代码
# -*- coding: utf-8 -*-
import decimal
import datetime
import cx_Oracle
import codecs
import sys
import os
import ConfigParser
import traceback
from multiprocessing import Process, freeze_support
os.environ['NLS_LANG'] = 'SIMPLIFIED CHINESE_CHINA.UTF8'
UTF82GBK= lambda x:x.decode('utf-8').encode('gbk')#注意第一个decode运行的时候必须确认x是utf-8的编码如果不是的话,会报错
GBK2UTF8= lambda x:x.decode('gbk').encode('utf-8')
#decode只有一个参数,不是两个参数,如果写两个也能用只能说明decode没有将第二个参数用到。


cf = ConfigParser.ConfigParser()
cf.readfp(codecs.open(self.ini_fpath, "r", "utf-8-sig"))#配置文件self.ini_fpath需要时UTF8编码的。
spec_ver= cf.get("baseconf","OUTPUT_DATA_TMPPATH")
src= UTF82GBK(mm.cfg_info["OUTPUT_DATA_TMPPATH"])
#对于“u”来说unicode
raise Exception("ERROR OUTPUT_DATA_TMPPATH=%s已经存在,说明之前某轮处理有问题"%GBK2UTF8(src))#抛出一个utf-8的字符串
self.cur.callproc("pmb.RecordRunLog", (pubid,ACTION_TYPE,ACTION_DESC))
#在写入xml_head字符串的时候,需确定xml_head为UTF8编码,这样写的文件才是UTF8的编码。如果xml_head是直接从数据库读取下来的,那么肯定是UTF8因为oracle
#数据库的字符集编码是UTF8。
#fpath字符串必须是GBK的,因为win7系统默认是GBK编码,否则会出现文件名乱码,或者根据fpath找文件找不到。
f = open(fpath, "w")#在此处如果fpath是utf-8的编码则生成的文件的文件名会是一个乱码的文件名,因为win7是GBK编码的,所以如果fpath是utf-8那么你需要UTF82GBK(fpath)一下。
f.write(xml_head)
f.close()
print '文件%s写完'%fpath #此处需要注意两点1:因为有# -*- coding: utf-8 -*- 所以当这个程序写完之后这个文件保存成为***.py的时候此py文件中所有字符都是utf-8编码,所以'文件%s写完'也是utf-8的编码。2:fpath必须unicode编码(即decode解码后的,否则文件名会出现乱码)。对于f = codecs.open(fpath, "w", 'utf-8')的认识,即 f文件会对write到其内的内容进行压码,encode将其压成utf-8的编码。所以write的内容必须是encode解码后的内容,否则会报错。
-----------------------------------python可以将类当字符串处理。也就是反射
class cx:
pass
a=cx
b=a()
b
c=eval('cx()')
<__main__.cx instance at 0x00000000040D9048>
--------------------------------------python开发总结六——c程序员python之路
http://blog.csdn.net/chgaowei/article/details/8006070
-----------------------------
复制可以使用import copy
import copy
1:浅拷贝
a=[1,"test",(3.4,7),{"key":1, "comment":"your comment"}]
b=copy.copy(a)
a[0]=99999999
a[3]['test']='testtesttest'
===========结果,注意a[0]和a[3]的变化。
a===>[99999999,
'test',
(3.4, 7),
{'comment': 'your comment', 'key': 1, 'test': 'testtesttest'}]
b===>[1,
'test',
(3.4, 7),
{'comment': 'your comment', 'key': 1, 'test': 'testtesttest'}]
2:深拷贝
b=copy.deepcopy(a)#深拷贝,这里b就不惧a的改变。
对于dict的复制可以使用
a={1:24354,3:346536,4:436536}
b=dict(a)#这样会很快
-----------------------------------------------range和xrange区别
range随机数产生,一次开辟所有空间:
a=range(10)#直接就是list
xrange也是随机数产生,只是调一次产生一个数,要想转换成为list需要使用 :
a=xrange(10)#生成器
b=list(a)#list
----------------------------------------------
如果函数没有return语句,则他的返回值为None
-------------------------------------可变参数
http://www.cnblogs.com/tqsummer/archive/2011/01/25/1944416.html
从可变参数中解析出值:
In [69]: def fun(*a,**b):#其中a可认为是一个list,b可认为是一个dict
   ....:     print a
   ....:

In [70]: fun(a=1,b=3,c=5)
()

In [71]: fun(23,a=1,b=3,c=5)
(23,)

In [72]: fun(23,45,356,4356,47,4444,a=1,b=3,c=5)
(23, 45, 356, 4356, 47, 4444)

In [73]: fun(23,45,356,4356,47,4444,a=1,b=3,c=5,435365)
  File "", line 1
SyntaxError: non-keyword arg after keyword arg
--------------------------python中的左移右移
5<<3#等价于5*(2*2*2)
5>>3#等价于5/(2*2*2)
-------------------------------python中可以返回多个值:
def fun():
a='asdfs'
b=23452353
return a,b
x,y=fun()
---------------------------------------四个重要的python内置函数
1:map
def fun(a,b):
return a+b
a=[2,3,4,54,56,7,71]
b=[2345,34,234,2454,43556,37,271]
c=map(fun,a,b)#所以a,和b都 must support iteration 。因为fun含有两个参数所以必须是map(fun,a,b)而不能是map(fun,[2,3]),必须是map(fun,[2,3],[4,5])或者map(fun,[2],[3])
2:reduce
reduce(sum,[1,2,3,4,5,6])#6
3:zip
zip([2,3,1],[4,56])#[(2, 4), (3, 56)]
4:filter
filter(lambda x:x<4,[1,2,34,5,666])
------------------------------------------re模块match和search区别
import re
a=re.search('2.+3','223 233 243 253 aa')
print a.group()
match只会从str的第0个pos处配置,找到既找到,否则返回None
search会搜索str的所有内容不仅仅是0这个pos处。
----------------------------------python正则替换
a=re.sub(r"\[stArt\].*?\[End\]","[start]AAA[end]","[start]OOOSSSS[end]",1,re.I)
-----------------------------------------动态的添加库路径。在程序运行过程中修改sys.path的值,添加自己的库路径
sys.path.append(r'your_path')
http://hi.baidu.com/billschen/item/9ee4aad4b5a9391d21e25016
-------------------------------------------子类如果覆盖了父类的方法(顺便说一下,python没有重写父类overload的机制,python是运行时多态),则可以通过一下方式进行调用父类方法:
def write(self, dir,format_rows,flds,seq_num,ready_succlst,result):
        super(fmt_super,self).write(dir,format_rows,flds,seq_num,ready_succlst,result,"xml")#调用父类方法
http://bestchenwu.iteye.com/blog/1044848
http://blog.csdn.net/caz28/article/details/8270709
-----------------------------------------------python中的类继承
http://wenku.baidu.com/view/e959c78ca0116c175f0e4881.html
http://www.360doc.com/content/13/0306/15/9934052_269664772.shtml
----------------------------------------------------字符串反转
b='agethythgwrt8gu835jlgr'
c=b[::-1]#反转
--------------------------------------------------------获取昨天的日期
YESTERDAY=lambda x:(datetime.date.today() - datetime.timedelta(days=1)).strftime('%Y-%m-%d')
--------------------------------------------------安装chardet模块,用来检测字符的编码风格
下载setuptools:https://pypi.python.org/pypi/setuptools/1.0 ,然后安装setuptools:http://www.cnblogs.com/dkblog/archive/2011/02/12/1980659.html
下载chardet:https://pypi.python.org/pypi/chardet,然后安装chardet:http://zhidao.baidu.com/link?url=N0ZyqaSytVhgUfTd1ooZXGu_Pcie2OkkcSKZtC5wyg0zx542xSkW3Du2aYusk03IYH3IDjs9XvcyYIe4bJgscK
注意:在安装这两个模块的时候,如果你的机子值安装了一个python版本则 直接使用cmd,然后cd到setuptools和charset的解压目录下,然后运行setup.py install即可。
如果你的机子上安装了两个或两个以上的python版本,则可能需要不同的方法:
比如我的机子上安装了两个版本python:c:\python和c:\python275这两个,则如果想安装到c:\python上的话则需要先cmd,然后cd c:\python,然后将setuptools文件夹拷贝到c:\python下,然后运行python c:\python\chardet-2.1.1\setup.py install即可,然后chardet花同样的方法,完了之后再将c:\python下的setuptools和chardet的文件夹上除掉即可。
---------------------------------------------------------进程锁 进程间共享变量
http://blog.csdn.net/meeasyhappy/article/details/8552014
http://www.cnblogs.com/dkblog/archive/2011/03/14/1983250.html
http://u50.cn/blog/python%E5%9C%A8%E8%BF%9B%E7%A8%8B%E9%97%B4%E5%85%B1%E4%BA%AB%E6%95%B0%E6%8D%AE
--------------------------------------python使用shapelib 此处的python为2.7.5做demo
https://code.google.com/p/polipoly/wiki/ShapeLib
http://www.cnblogs.com/cjingzm/archive/2012/03/04/2378900.html
Here are some notes on installing pyshapelib on Windows, as of September 2011:

how to install pyshapelib
downloaded shapelib-1.3.0b3.zip from http://download.osgeo.org/shapelib/
downloaded pyshapelib-0.3.zip from http://ftp.intevation.de/users/bh/pyshapelib/
  put pyshapelib-0.3 folder as a child of the shapelib-1.3.0b3 folder
  update pyshapelib-0.3\setup.py to include safileio.c in each extension build:
      extensions = [Extension("shapelibc",
                       ["shapelib_wrap.c",
                        shp_dir + "/shpopen.c",
                        shp_dir + "/shptree.c",
                        shp_dir + "/safileio.c"],
                       include_dirs = [shp_dir]),
             Extension("shptree",
                       ["shptreemodule.c",
                        shp_dir + "/safileio.c"],
                       include_dirs = [shp_dir]),
             Extension("dbflibc",
                       ["dbflib_wrap.c",
                        shp_dir + "/dbfopen.c",
                        shp_dir + "/safileio.c"],
                       include_dirs = [shp_dir],
                       define_macros = dbf_macros())]
dowloaded "Microsoft Windows SDK for Windows 7 and .NET Framework 4" from http://www.microsoft.com/download/en/confirmation.aspx?id=8279
  (even though the title is Windows 7 it works for Windowx XPSP3)
  requires admin privileges to install
with a command line:
  cd to shapelib-1.3.0b3
  python setup.py build
  python setup.py install
---------------------pycharm使用pip导入cx_Oracle,cx_logging等模块。
File->Default Setting...->Project Interpreters->python Interpreters 然后添加python版本注意窗体下面的红色字体提示的“**********pip************”点击安装即可。
http://www.g2w.me/2012/10/pycharm-setup-package-path/
---------------------------------------------------更换系统的python版本
只需要更新 系统环境路径的path环境变量即可:
C:\Python27\Scripts;C:\Python27;C:\instantclient_11_2;**********
改成
C:\Python275\Scripts;C:\Python275;C:\instantclient_11_2;**********
就可以改换了
--------------------------------------------------安装ipython和pyreadline ,一般机子上安装了两个版本的python的时候最好 使用source code进行安装
http://blog.chinaunix.net/uid-21977330-id-3330018.html
https://pypi.python.org/pypi/pyreadline/2.0
http://shapelib.maptools.org/
-------------------------------------------------------------shapelib的demo实例
import shapelib, dbflib, shptree

#
#       The the shapefile module
#

def make_shapefile(filename):
    obj = shapelib.SHPObject(shapelib.SHPT_POLYGON, 1,
                             [[(10, 10), (20, 10), (20, 20), (10, 10)]])
    print obj.extents()
    print obj.vertices()
    outfile = shapelib.create(filename, shapelib.SHPT_POLYGON)
    outfile.write_object(-1, obj)
    del outfile

def read_shapefile(filename):
    # open the shapefile
    shp = shapelib.ShapeFile(filename)

    # the info method returns a tuple (num_shapes, type, min, max) where
    # num_shapes is the number of shapes, type is the type code (one of
    # the SHPT* constants defined in the shapelib module) and min and
    # max are 4-element lists with the min. and max. values of the
    # vertices.
    print shp.info()

    # read_object reads a shape
    obj = shp.read_object(0)

    # The vertices method returns the shape as a list of lists of tuples.
    print obj.vertices()[0][:10]

    # The extents returns a tuple with two 4-element lists with the min.
    # and max. values of the vertices.
    print obj.extents()

    # The type attribute is the type code (one of the SHPT* constants
    # defined in the shapelib module)
    print obj.type

    # The id attribute is the shape id
    print obj.id

    # the cobject method returns a PyCObject containing the shapelib
    # SHPHandle. This is useful for passing shapefile objects to
    # C-Python extensions.
    print shp.cobject()

    # build a quad tree from the shapefile. The first argument must be
    # the return value of the shape file object's cobject method (this
    # is currently needed to access the shape file at the C-level). The
    # second argument is the dimension and the third the maximum depth.
    # 0 means to guess an appropriate depth
    tree = shptree.SHPTree(shp.cobject(), 2, 0)

    # Retrieve the ids for a region. Here we just use the extents of the
    # object previously read from the shapefile
    minima, maxima = obj.extents()
    print tree.find_shapes(minima[:2], maxima[:2])


make_shapefile("testfile")
read_shapefile("testfile")

#
#       Test the DBF file module.
#

def make_dbf(file):
    # create a new dbf file and add three fields.
    dbf = dbflib.create(file)
    dbf.add_field("NAME", dbflib.FTString, 20, 0)
    dbf.add_field("INT", dbflib.FTInteger, 10, 0)
    dbf.add_field("FLOAT", dbflib.FTDouble, 10, 4)

def add_dbf_records(file):
    # add some records to file
    dbf = dbflib.open(file, "r+b")
    # Records can be added as a dictionary...
    dbf.write_record(0, {'NAME': "Weatherwax", "INT":1, "FLOAT":3.1415926535})
    # ... or as a sequence
    dbf.write_record(1, ("Ogg", 2, -1000.1234))

def list_dbf(file):
    # print the contents of a dbf file to stdout
    dbf = dbflib.DBFFile(file)
    print "%d records, %d fields" % (dbf.record_count(), dbf.field_count())
    format = ""
    for i in range(dbf.field_count()):
        type, name, len, decc = dbf.field_info(i)
        if type == 0:
            format = format + " %%(%s)%ds" % (name, len)
        elif type == 1:
            format = format + " %%(%s)%dd" % (name, len)
        elif type == 2:
            format = format + " %%(%s)%dg" % (name, len)
    print format
    for i in range(dbf.record_count()):
        print format % dbf.read_record(i)


make_dbf("testfile")
add_dbf_records("testfile")
list_dbf("testfile")
python 获取文件名和扩展名
import os
f = "a/b/c/d.txt"
name, ext = os.path.splitext(f)
print name, ext
print os.path.dirname(f)
print os.path.basename(f)
结果:
a/b/c/d .txt
a/b/c
d.txt
------------------------------------------------------------------python写文件的时候默认是没有BOM头的
http://www.coder4.com/archives/3835
a = codecs.open(r'd:\tty.txt', 'w', 'utf-8')
a.write(codecs.BOM_UTF8.decode("utf-8"))
a.write(.....)
a.close()
----------------------------------------------------------------utf-8 与gbk转换
http://hi.baidu.com/dushm/item/29c7bc9475f357ba82d2952f
print str.decode('UTF-8').encode('GBK')

比较通用的方法应该是:
import sys
type = sys.getfilesystemencoding()
print str.decode('UTF-8').encode(type)
----------------------------------Dependency Walker 2.2 查看dll依赖关系 下载
http://www.dependencywalker.com/
--------------------在使用chardet模块的在打包完成后,运行exe的时候,有时会出现 :
Traceback (most recent call last):
File "procquot.py", line 3, in
ImportError: No module named chardet
的错误。
解决方法如下:
方法一:
1:将chardet的安装包下的所有文件都拷贝到“C:\Python27\Lib\site-packages”下即可。
2:然后使用py2exe进行打包
方法二:
我的机子上安装了两个python版本,py2.73和py2.75,记得第一次安装chardet的时候是先安装的py2.73安装完后有 “C:\Python27\Lib\site-packages\chardet-2.1.1-py2.7.egg” 是一个文件夹,但是当安装py2.75的时候“C:\python275\Lib\site-packages\chardet-2.1.1-py2.7.egg”是一个文件而不是文件夹。所以再python275下打包的时候始终会报这个错误。解决方法是将py273下的chardet-2.1.1-py2.7.egg文件夹拷贝到py275下对应的目录中。
方法三:
不使用chardet模块二使用python本身的chardetect模块也可以进行检测字符编码。
----------------------------python的 参数模块 Arguments add_argument 《默认参数的使用,注意需要使用"-dfads"的方式》
http://www.verydemo.com/demo_c122_i7278.html
------------------------------------python使用数组的方式传递参数给oracle的话,如果过超过一定数量(15000)则会报错。
-------------------------python实现统计计算机的I/O和cpu吞吐量 可以psutil
http://blog.csdn.net/bubu8633/article/details/8258342
如果在使用disk_io_counters的是偶遇到“disk_io_counters fail to find physical disk on Windows”,解决方法:http://code.google.com/p/psutil/issues/detail?id=351
即在cmd下输入:“diskperf -y” 即可。
---------------------pycharm主题设置
http://www.cnblogs.com/chenkai/archive/2013/01/31/2888110.html
http://svenspruijt.nl/themebuilder/ (一些更多的主题)
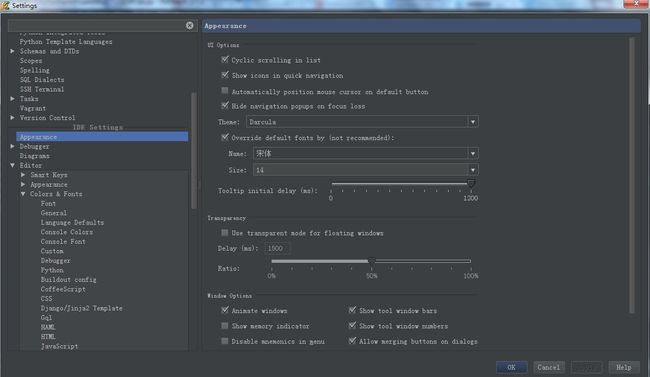
File -> Settings -> IDE Settings -> Appearance -> Theme -> 选择喜欢的主题即可。在Theme下面有一个Name,可以改变字体的类型和大小
修改主题后后,可能出现乱码,修改如下:C:\Program Files (x86)\JetBrains\PyCharm 2.7.2\jre\jre\lib\fontconfig.properties.src
修改如下http://www.oschina.net/code/snippet_57579_3840
对于文本中字体的大小更改如下:
必须先几点“Save As..”,比如保存了一个“aa”,然后在对对这个aa进行更改字体即可。否则无法修改字体大小。
---------------加入系统路径
os.path.append(r'e:\xxx\xxxx')
如果想带入某个比如:mm.py文件则只需 import mm 即可。
--------------global使用方法
def set_attribute_filter_custom(self, uifilter, not_flag=False):
        """
        add by lhl 2014-4-16
        usage:对自定义过滤条件进行处理(此条件需通知开发人员提前开发之后才可使用)
        uifilter:过滤条件. demo:isnumber(fld2) demo:
        not_flag:False==>删除 True==>不删除
        """
        layer=self.ds.GetLayer(0)
        layer.SetAttributeFilter(None)
        unkownlist= []#不知道是删除还是保留的数据fid列表
        global dellist#分析完之后确定的需要删除数据fid列表

        #comm部分
        def getidx2typ(fldname):
            """
            获取layer中相关字段所在的索引和类型
            OFTInteger = 0, OFTIntegerList = 1, OFTReal = 2, OFTRealList = 3,
            OFTString = 4, OFTStringList = 5, OFTWideString = 6, OFTWideStringList = 7,
            OFTBinary = 8, OFTDate = 9, OFTTime = 10, OFTDateTime = 11
            """
            idx= -1
            layer_defn = layer.GetLayerDefn()
            lfldcnt= layer_defn.GetFieldCount()
            for i in range(lfldcnt):
                flddefn= layer_defn.GetFieldDefn(i)
                sfldname= flddefn.name.decode('gbk')
                if sfldname==fldname:
                    idx= i
            return idx

        def dumpftolist(fpath):
            """
            读取文件dump到list中
            """
            f= open(fpath)
            return [i for i in f]

        def call_FilterNumber(fldvalue, externargs):
            return fldvalue.isdigit()

        def call_FilterMeshMappingCity(fldvalue, externargs):
            return fldvalue in externargs

        def CalculateDel(fldname, callfunc, externargs= None):
            """
            无论输入的参数是要保留还是删除,一律只求其删除部分,然后反向求其保留部分
            fldname:字段名
            callfunc:回调函数
            externargs:回调函数需要的二外参数
            """
            global dellist
            fldname= fldname.decode('utf8')
            allfid= [item.GetFID() for item in layer]
            idx= getidx2typ(fldname)
            layer.ResetReading()
            for item in layer:
                lfid= item.GetFID()
                fldvalue = str(item[idx]).decode('gbk')#数据文件某一行的那一列
                if callfunc(fldvalue, externargs):
                    unkownlist.append(lfid)
            if not_flag:#保留
                dellist= copy.copy([val for val in allfid if val not in unkownlist])#求差集
            else:#删除
                dellist= copy.copy(unkownlist)

        #自定义内置函数
        def FilterNumber(fldname):
            """
            usage:对layer中筛选保留/删除数字的行
            fldname:数据中需要筛选的字段名
            example含义:
                not_flag=True, fldvalue=数字==>保留此行
                not_flag=False,fldvalue=数字==>删除此行
            """
            #计算删除部分
            CalculateDel(fldname, call_FilterNumber)

        def FilterMeshMappingCity(fldname, citycollect):
            """
            usage:对layer中数据通过城市对应MESH号进行筛选数据保留/删除这些行
            fldname:数据中需要筛选的字段名
            citylist:城市列表逗号分隔
            """
            #整理cfg 可以放到class中,减少时间开销
            mapmesh2city= {}
            cfgcity2mesh= dumpftolist("TargetData-Golden.txt")
            for item in cfgcity2mesh:
                #demo:\广东省\东莞市(21)\F50F013001==>:\广东省\东莞市\F50F013001
                sline= (re.sub('\(.*?\)','',item)).strip('\r\n').decode('gbk')
                vallist= sline.split('\\')
                llen= len(vallist)
                if llen>=3:
                    mesh_value= vallist[llen-1]
                    city_value= vallist[llen-2]
                    #province_value= vallist[llen-3]
                    mapmesh2city[mesh_value]= city_value
                else:
                    print 'city映射mesh配置文件格式不正确!'

            #根据用户输入参数过滤mapcity2mesh
            citylist= citycollect.decode('utf8').split(',');
            meshlist= [item[0] for item in mapmesh2city.items() if item[1] in citylist]

            #计算删除部分
            CalculateDel(fldname, call_FilterMeshMappingCity, meshlist)

        #exec command
        eval(uifilter)

        #push fid
        for feat in dellist:
            self.del_fidset.add(feat.GetFID())
        return True
--------------改变pycharm的IDE环境编码
http://hi.baidu.com/lhaix/item/6d605889ad7e4e55e63d19b6
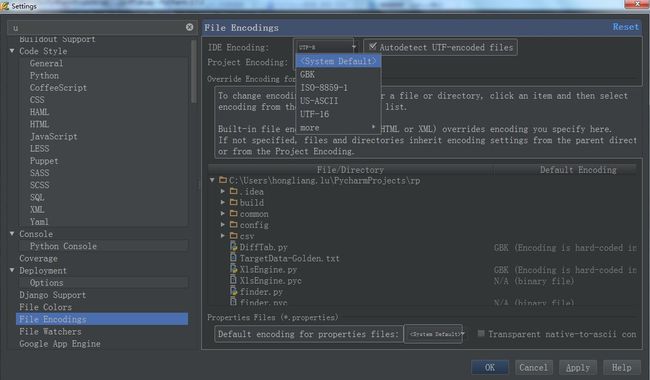
刚安装pycharm后IDE是UTF8编码,如果需要更改则参见系统默认(System Default)即可,win则会使gbk。
-------------------读取xlsx,可已使用xlrd
下载: https://pypi.python.org/pypi/xlrd
其中的源码中有一些demo。
# -*- coding: gbk -*-

import xlrd
import os

class CXlsEngine():
    """
    The XlsEngine is a demo class for excel openration
    Just for some basic test or the using or the 3rd class in python
    """
    def __init__(self,__name):
        # define class variable
        self.xls_name = __name
        self.xlrd_object = None
        self.isopenfailed = True
    def open(self):
        try:
            self.xlrd_object = xlrd.open_workbook(self.xls_name)
            self.isopenfailed = False
            pass
        except :
            self.isopenfailed = True
            self.xlrd_object = None
            print("open %s failed \n"%self.xls_name)
            pass
        finally:
            '''
            do nothing
            '''
            pass
        return [self.isopenfailed,self.xlrd_object]

    def dump_sheet(self):
        if self.isopenfailed == False:
            '''
            dump the sheet

            usging for getting the sheet
            table = data.sheets()[0]
            table = data.sheet_by_index(0)
            table = data.sheet_by_name(u'Sheet1')
            '''
            for name in self.xlrd_object.sheet_names():
                table = self.xlrd_object.sheet_by_name(name)
                print("sheet %s rownums=%d colnums=%d"%(name,table.nrows,\
                                                         table.ncols))
        else:
            print("file %s is not open \n"%self.xls_name)

    def dump_cell(self,sheet_index,cell_row,cell_col):
        try:
            table=self.xlrd_object.sheet_by_index(0)
            value=table.cell(cell_row,cell_col).value
            print("value=%d"%value)
            pass
        except:
            pass


    def modify_cell(self,sheet_index,cell_row,cell_col,__value):
        try:
            table=self.xlrd_object.sheet_by_index(0)
            value=table.cell(cell_row,cell_col).value
            print("value=%d"%value)
            table.put_cell(cell_row,cell_col,1,__value,0)
            value=table.cell(cell_row,cell_col).value
            print("value=%d"%value)
            pass
        except:
            print("error")

        pass

if __name__ == '__main__':
    path='E:\python_works\DiffTab\config\CheckSingleMesh(两字段不满足对应关系_RoadSegment.dbf).xlsx'
    tt=CXlsEngine(path)
    xlsobj=tt.open()
    if xlsobj[0]==False:
        table=xlsobj[1].sheets()[0]
        province_name=table.col_values(0)
        mesh_dir=table.col_values(2)

        #tables=xlsobj[1].sheets()
        #tabnum=len(tables)


        for i in range(1, len(mesh_dir)-1):
            print '%s,%s'%(province_name[i], mesh_dir[i])
        pass


