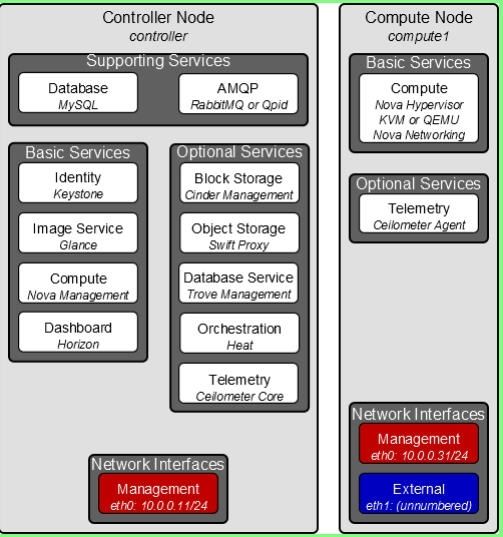
Based on Ubuntu 14.04 LTS x86_64
nova controller node setup
1. Install and Configure OpenStack Compute Service (Nova)
aptitude -y install nova-api nova-cert nova-conductor nova-consoleauth nova-novncproxy nova-scheduler python-novaclient
mysql -uroot -p
mysql> create database nova;
mysql> grant all privileges on nova.* to 'nova'@'localhost' identified by 'NOVA-DBPASS';
mysql> grant all privileges on nova.* to 'nova'@'%' identified by 'NOVA-DBPASS';
mysql> flush privileges;
vi /etc/nova/nova.conf
[database]
connection=mysql://nova:nova@MYSQL-SERVER/nova
rm -rf /var/lib/nova/nova.sqlite
nova-manage db sync
vi /etc/nova/nova.conf
[DEFAULT]
my_ip=192.168.1.10
auth_strategy=keystone
rpc_backend = rabbit
rabbit_host = controller
rabbit_password = GUEST-PASS
vncserver_listen=192.168.1.10
vncserver_proxyclient_address=192.168.1.10
[keystone_authtoken]
auth_host=controller
auth_port=35357
auth_protocol=http
auth_uri=http://controller:5000
admin_user=nova
admin_password=NOVA-USER-PASSWORD
admin_tenant_name=service
# add nova user (set in service tenant))
keystone user-create --tenant service --name nova --pass NOVA-USER-PASSWORD
# add nova user in admin role
keystone user-role-add --user nova --tenant service --role admin
# add service for nova
keystone service-create --name=nova --type=compute --description="Nova Compute Service"
# add endpoint for nova
keystone endpoint-create --region RegionOne --service nova --publicurl=http://controller:8774/v2/%\(tenant_id\)s --internalurl=http://controller:8774/v2/%\(tenant_id\)s --adminurl=http://controller:8774/v2/%\(tenant_id\)s
chown -R nova:nova /etc/nova /var/log/nova
for i in api cert consoleauth scheduler conductor novncproxy; do
service nova-$i restart
done
2. nova p_w_picpath-list
nova-manage service list
nova computer node setup
1. eth0 for management/public/floating (192.168.1.0/24), eth1 for internal/flat (192.168.20.0/24), it's recommended to use seperated nic for management network
vi /etc/network/interface
auto eth1
iface eth1 inet manual
up ip link set dev $IFACE up
down ip link set dev $IFACE down
2. vi /etc/hosts
# remove or comment the line beginning with 127.0.1.1
192.168.1.10 controller
192.168.1.11 node1
3. aptitude -y install qemu-kvm libvirt-bin virtinst bridge-utils
modprobe vhost_net
echo vhost_net >> /etc/modules
4. aptitude -y install ntp
vi /etc/ntp.conf
server 192.168.1.10
restrict 192.168.1.10
service ntp restart
5. aptitude -y install python-mysqldb
6. aptitude -y install nova-compute-kvm python-guestfs
7. dpkg-statoverride --update --add root root 0644 /boot/vmlinuz-$(uname -r)
vi /etc/kernel/postinst.d/statoverride
#!/bin/sh
version="$1"
# passing the kernel version is required
[ -z "${version}" ] && exit 0
dpkg-statoverride --update --add root root 0644 /boot/vmlinuz-${version}
chmod +x /etc/kernel/postinst.d/statoverride
8. vi /etc/nova/nova.conf
[DEFAULT]
auth_strategy=keystone
rpc_backend = rabbit
rabbit_host = controller
rabbit_password = GUEST-PASS
my_ip=192.168.1.11
vnc_enabled=true
vncserver_listen=0.0.0.0
vncserver_proxyclient_address=192.168.1.11
novncproxy_base_url=http://controller:6080/vnc_auto.html
glance_host=controller
[keystone_authtoken]
auth_host=controller
auth_port=35357
auth_protocol=http
auth_uri=http://controller:5000
admin_user=nova
admin_password=NOVA-USER-PASSWORD
admin_tenant_name=service
[database]
connection=mysql://nova:NOVA-DATABASE-PASSWORD@MYSQL-SERVER/nova
rm -rf /var/lib/nova/nova.sqlite
9. chown -R nova:nova /etc/nova /var/log/nova
service nova-compute restart
on controller node to check node1 status:
nova-manage service list
Now for legacy FlatDHCP networking:
# on controller node
vi /etc/nova/nova.conf
[DEFAULT]
network_api_class=nova.network.api.API
security_group_api=nova
service nova-api restart
service nova-scheduler restart
service nova-conductor restart
11. aptitude -y install nova-network nova-api-metadata
12. vi /etc/nova/nova.conf
[DEFAULT]
network_api_class=nova.network.api.API
security_group_api=nova
network_manager=nova.network.manager.FlatDHCPManager
firewall_driver=nova.virt.libvirt.firewall.IptablesFirewallDriver
network_size=254
allow_same_net_traffic=false
multi_host=True
send_arp_for_ha=True
share_dhcp_address=True
force_dhcp_release=True
flat_interface=eth1
flat_network_bridge=br100
public_interface=eth0
#auto_assign_floating_ip=True
Notes:
By default, all the VMs in the “flat” network can see one another regardless of which tenant they belong to. "allow_same_net_traffic=false",this configures IPtables policies to prevent any traffic between instances (even inside the same tenant), unless it is unblocked in a security group.
13. service nova-api-metadata restart; service nova-network restart
14. on controller
# create flat network
source ~/adminrc
demo1=`keystone tenant-list | grep demo1 | awk '{ print $2 }'`
nova network-create vmnet1 --dns1 210.22.84.3 --dns2 210.22.70.3 --fixed-range-v4 10.10.10.0/24 --bridge br100 --multi-host T --project-id $demo1
Notes:dns1 and dns2 are public dns server, using any private networking for fixed-range-v4
Now for legacy VLAN networking:
there is a bug for vlan, to fix it, on nova controller and all compute nodes:
vi /usr/lib/python2.7/dist-packages/nova/network/manager.py
# line 1212
vlan = kwargs.get('vlan_start', None)
reboot
# on controller node
vi /etc/nova/nova.conf
network_api_class=nova.network.api.API
security_group_api=nova
service nova-api restart
service nova-scheduler restart
service nova-conductor restart
11. aptitude -y install nova-network nova-api-metadata
12. vi /etc/nova/nova.conf
network_api_class=nova.network.api.API
security_group_api=nova
network_manager=nova.network.manager.VlanManager
firewall_driver=nova.virt.libvirt.firewall.IptablesFirewallDriver
network_size=254
allow_same_net_traffic=false
multi_host=True
send_arp_for_ha=True
share_dhcp_address=True
force_dhcp_release=True
vlan_start=100
vlan_interface=eth1
public_interface=eth0
#auto_assign_floating_ip=True
13. service nova-api-metadata restart; service nova-network restart
14. on controller
# create vlan network
source ~/adminrc
# Normally: one subnet --> one vlan id --> one secuiry group
demo1=`keystone tenant-list | grep demo1 | awk '{ print $2 }'`
nova network-create vmnet1 --dns1 210.22.84.3 --dns2 210.22.70.3 --fixed-range-v4 10.10.10.0/24 --vlan 100 --multi-host T --project-id $demo1
Notes:dns1 and dns2 are public dns server, using any private networking for fixed-range-v4
keystone tenant-create --name=demo2 --description="Demo2 Tenant"
demo2=`keystone tenant-list | grep demo2 | awk '{ print $2 }'`
nova network-create vmnet2 --dns1 210.22.84.3 --dns2 210.22.70.3 --fixed-range-v4 10.10.11.0/24 --vlan 110 --multi-host T --project-id $demo2
Launch Instances
source ~/demo1rc
nova secgroup-list
# create test-sec group
nova secgroup-create test-sec "Test Security Group"
# permit ssh
nova secgroup-add-rule test-sec tcp 22 22 0.0.0.0/0
# permit ICMP
nova secgroup-add-rule test-sec icmp -1 -1 0.0.0.0/0
nova secgroup-list-rules test-sec
nova keypair-add demokey > demokey.pem
nova keypair-list
nova flavor-list
nova p_w_picpath-list
source ~/adminrc to run below commands:
nova network-list
nova-manage network list
vmnet1=`nova network-list | grep vmnet1 | awk '{ print $2 }'`
source ~/demo1rc
nova boot --flavor 1 --p_w_picpath "CirrOS 0.3.2" --key-name demokey --security-groups test-sec --nic net-id=$vmnet1 CirrOS
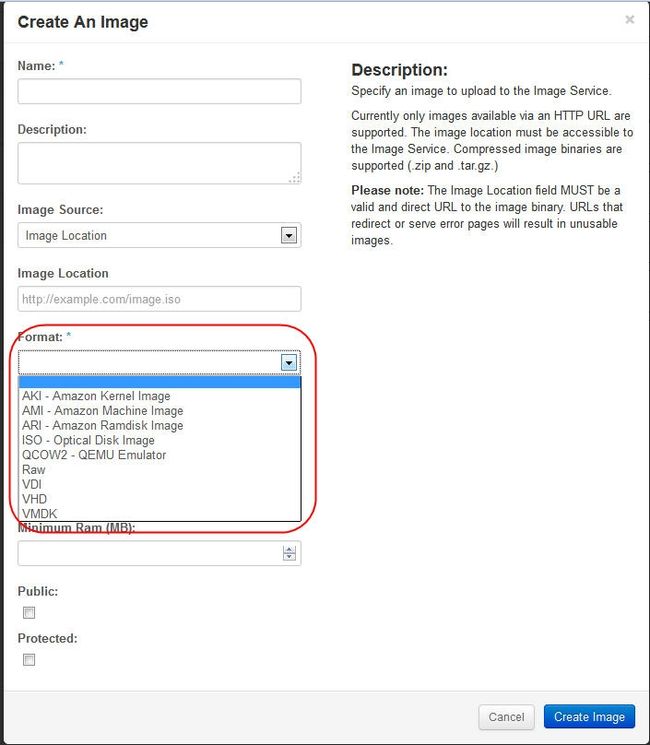
1. you can use vmware workstation to build p_w_picpaths, then upload to glance using dashboard
ubuntu
1). vi /etc/hosts to remove 127.0.1.1. item
2). enable ssh login
3). enable dhcp client on interface
4). enable normal username/password
5). set root password
centos/redhat
1). rm -rf /etc/ssh/ssh_host_*
2). vi /etc/sysconfig/network-scripts/ifcfg-ethX to remove HWADDR and UUID items
3). rm -rf /etc/udev/rules.d/70-persistent-net.rules
4). enable ssh login
5). enable dhcp client on interface (also vi /etc/sysconfig/network, /etc/resolv.conf)
6). enable normal username/password
7). set root password
2. launch instance without keypair
nova commands:
nova list; nova show CirrOS
nova stop CirrOS
nova start CirrOS
# get vnc console address via web browser:
nova get-vnc-console CirrOS novnc
# create floating network
nova-manage floating create --ip_range 192.168.1.248/29
Notes: floating ip will use eth0 public related ip range
nova-manage floating list
# Associate the floating IP address with your instance even it's running
nova floating-ip-associate CirrOS 192.168.1.249
( nova floating-ip-disassociate cirros 192.168.1.249 )
nova list
ping 192.168.1.249 (floating ip)
using xshell or putty to ssh -i demokey.pem [email protected] (username: cirros, password: cubswin:))
[ for ubuntu cloud p_w_picpath: username is ubuntu, for fedora cloud p_w_picpath: username is fedora ]
now we can ping and ssh to 192.168.1.249, and CirrOS can access Internet now.
Notes: you should have enough space in /var/lib/nova/instances for store VMs, you can mount partition to it ( using local or shared storages).
Access novnc console from Internet method1
1. add another interface face to Internet on nova controller (normally keystone+dashboard node)
2. assign a public ip address
3. on computer node, vi /etc/nova/nova.conf
novncproxy_base_url=http://public_ip_address_of_nova_controller:6080/vnc_auto.html
service nova-compute restart
4. nova get-vnc-console CirrOS novnc
http://public_ip_address_of_nova_controller:6080/vnc_auto.html?token=4f9c1f7e-4288-4fda-80ad-c1154a954673
Access novnc console from Internet method2
1. you can publish dashboard web site to Internet (normally keystone+dashboard node)
2. on computer node, vi /etc/nova/nova.conf
novncproxy_base_url=http://public_ip_address_of_firewall:6080/vnc_auto.html
service nova-compute restart
3. nova get-vnc-console CirrOS novnc
http://public_ip_address_of_firewall:6080/vnc_auto.html?token=4f9c1f7e-4288-4fda-80ad-c1154a954673


