使用Phoenix5 Java api操作HBase
文章目录
- 引入依赖
- 配置文件
- 编写测试类
- 建表
- 插入记录
- 查询
引入依赖
<dependency>
    <groupId>org.apache.hbasegroupId>
    <artifactId>hbase-clientartifactId>
    <version>2.1.5version>
dependency>

<dependency>
    <groupId>org.apache.phoenixgroupId>
    <artifactId>phoenix-coreartifactId>
    <version>5.0.0-HBase-2.0version>
dependency>
配置文件
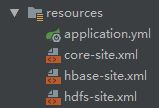
类似于使用最新的 hbase-client 2.1 操作 hbase,这里也需要将配置文件hbase-site.xml core-site.xml hdfs-site.xml添加到工程目录下:

网上的资料都是需要将这几个配置文件拷贝过来,我实际测试过程中(我用的Phoenix5),即使将不拷贝这几个配置文件也是可以的。
编写测试类
public class PhoenixTest {

    static Connection conn = null;
    static ResultSet rs = null;
 /** 这里可以不用主动加载PhoenixDriver
    static {
        try {
            Class.forName("org.apache.phoenix.jdbc.PhoenixDriver");
        } catch (ClassNotFoundException e) {
            e.printStackTrace();
        }
    }
*/
    /**
     * 创建一个新的链接不是一个昂贵的操作,所以这里就不使用连接池了。
     * @return
     */
    @Before
    public void getConnection() {
        try {
            // jdbc 的 url 类似为 jdbc:phoenix [ : [ : ] [ : ] ],
            conn = DriverManager.getConnection("jdbc:phoenix:node1,node2,node3:2181");
        } catch (SQLException e) {
            e.printStackTrace();
        }
    }

    @After
    public void close(){
        System.out.println("close........");
        if (rs != null) {
            try {
                rs.close();
            } catch (SQLException e) {
                e.printStackTrace();
            }
        }
        if (conn != null) {
            try {
                conn.close();
            } catch (SQLException e) {
                e.printStackTrace();
            }
        }
    }
}
上面代码包含了getConnection和关闭的代码,便于后续测试。
建表
 @Test
public void create() {
    try {
        String createSql = "CREATE TABLE user (id varchar PRIMARY KEY,name varchar ,passwd varchar)";
        PreparedStatement ps = conn.prepareStatement(createSql);
        ps.execute();
        ps.close();
    } catch (SQLException e) {
        e.printStackTrace();
    }
}
执行成功后可以在Phoenix 的 shell 中使用!table命令查看表。
插入记录
@Test
public void  upsert() {
    try {
        String upsertSql = "upsert into user(id, name, passwd) values(?, ?, ?)";
//        String[] param = {"1", "张三", "123456"};
        String[] param = {"2", "李四", "111111"};
        PreparedStatement ps = conn.prepareStatement(upsertSql);
        for (int i = 1; i <= param.length; i++) {
            ps.setString(i, param[i - 1]);
        }
        ps.executeUpdate();
        conn.commit(); // you must commit
        ps.close();
    } catch (SQLException e) {
        e.printStackTrace();
    }
}
插入成功后查询:
0: jdbc:phoenix:node1,node2,node3:2181> select * from user;
+-----+-------+---------+
| ID  | NAME  | PASSWD  |
+-----+-------+---------+
| 1   | 张三    | 123456  |
| 2   | 李四    | 111111  |
+-----+-------+---------+
2 rows selected (0.122 seconds)
查询
@Test
public void query() {
    try {
        String sql = "select * from user";
        String[] param = null;

        PreparedStatement ps = conn.prepareStatement(sql);
        if (param != null) {
            for (int i = 1; i <= param.length; i++) {
                ps.setString(i, param[i - 1]);
            }
        }

        rs = ps.executeQuery();
        ResultSetMetaData meta = rs.getMetaData();
        int colLength = meta.getColumnCount();
        List<String> colName = new ArrayList<>();
        for (int i = 1; i <= colLength; i++) {
            colName.add(meta.getColumnName(i));
        }

        List<String[]> result = new ArrayList<>();
        String[] colArr;
        while (rs.next()) {
            colArr = new String[colLength];
            for (int i = 0; i < colLength; i++) {
                colArr[i] = rs.getString(colName.get(i));
            }
            result.add(colArr);
        }
        ps.close();
        System.out.println(JSON.toJSONString(result));
    } catch (Throwable e) {
        e.printStackTrace();
    }
}
输出
System mutex table already appears to exist, not creating it
Re-resolved stale table USER with seqNum 0 at timestamp 1563785295742 with 3 columns: [ID, 0.NAME, 0.PASSWD]
Scan ready for iteration: {"loadColumnFamiliesOnDemand":true,"startRow":"","stopRow":"","batch":-1,"cacheBlocks":true,"totalColumns":1,"maxResultSize":-1,"families":{"0":["ALL"]},"caching":2147483647,"maxVersions":1,"timeRange":[0,9223372036854775807]}
Iterator ready: org.apache.phoenix.iterate.RoundRobinResultIterator@66de00f2
Explain plan: CLIENT 1-CHUNK PARALLEL 1-WAY ROUND ROBIN FULL SCAN OVER USER
Getting iterators for ResultIterators [name=PARALLEL,id=dfeee496-823e-995a-d22a-4395ead54589,scans=[[{"loadColumnFamiliesOnDemand":true,"startRow":"","stopRow":"","batch":-1,"cacheBlocks":true,"totalColumns":3,"maxResultSize":-1,"families":{"0":["\\x00\\x00\\x00\\x00","\\x80\\x0B","\\x80\\x0C"]},"caching":2147483647,"maxVersions":1,"timeRange":[0,9223372036854775807]}]]]
Id: dfeee496-823e-995a-d22a-4395ead54589, Time: 1ms, Scan: {"loadColumnFamiliesOnDemand":true,"startRow":"","stopRow":"","batch":-1,"cacheBlocks":true,"totalColumns":3,"maxResultSize":-1,"families":{"0":["\\x00\\x00\\x00\\x00","\\x80\\x0B","\\x80\\x0C"]},"caching":2147483647,"maxVersions":1,"timeRange":[0,9223372036854775807]}
[["1","张三","123456"],["2","李四","111111"],["211","李四","111111"]]
close........
上面日志中不仅输出了最终结果,还输出了一些中间信息,比如:3 columns: [ID, 0.NAME, 0.PASSWD]标识这个表总共有三列,而且列族我们没有设置,默认是0。
我们把查询的SQL改为String sql = "select * from \"test\""; test表中的数据是不规整的,hbase中存储的数据大多是这样的,Phoenix会将没有数据的列使用null代替。
输出结果:
[["row1","value1",null,null,"12"],
["row2","value2a","value2",null,"13"],
["row3",null,null,"value3",null]]