Linux系统(Centos7.4)安装FastDFS
目录
一.环境准备
二.安装 tracker
三.安装storage
四.配置客户端
五.测试
一.环境准备
FastDFS是C语言开发,建议在linux上运行,本教程使用Centos7.4作为安装环境。
①安装gcc
检测是否安装: gcc -v
如下图所示表示已安装
安装FastDFS需要先将官网下载的源码进行编译,编译依赖gcc环境,如果没有gcc环境,需要安装gcc:yum install gcc-c++
②安装 libevent
yum -y install libevent③安装 libfastcommon
libfastcommon是FastDFS官方提供的,libfastcommon包含了FastDFS运行所需要的一些基础库。
将libfastcommonV1.0.7.tar.gz拷贝至 /usr/local/services(没有则创建,该目录可以自定义) 下
依次执行以下命令:
解压:
tar -zxvf libfastcommonV1.0.7.tar.gz删除安装包
rm libfastcommonV1.0.7.tar.gz进入 libfastcommon-1.0.7 执行:
./make.sh
./make.sh install
libfastcommon安装好后会自动将库文件拷贝至/usr/lib64下,由于FastDFS程序引用usr/lib目录所以需要将/usr/lib64下的库文件libfastcommon.so拷贝至/usr/lib下。
要拷贝的文件如下:
cp /usr/lib64/libfastcommon.so /usr/lib/二.安装 tracker
①下载FastDFS安装包:
可以去官网自行下载并上传到安装目录,也可以用如下方式下载
进入安装目录例如:/usr/local/services

wget https://jaist.dl.sourceforge.net/project/fastdfs/FastDFS%20Server%20Source%20Code/FastDFS%20Server%20with%20PHP%20Extension%20Source%20Code%20V5.05/FastDFS_v5.05.tar.gz
将FastDFS_v5.05.tar.gz拷贝至/usr/local/services下
解压
tar -zxvf FastDFS_v5.05.tar.gz进入解压的目录
cd FastDFS②编译安装
进入FastDFS执行以下命令
./make.sh
./make.sh install
安装成功将安装目录下的conf下的文件拷贝到/etc/fdfs/下。
cp /usr/local/FastDFS/conf/* /etc/fdfs/③修改配置
安装成功后进入 /etc/fdfs 目录,拷贝一份新的tracker配置文件:
cp tracker.conf.sample tracker.conf
//有覆盖提示则确认
修改配置文件
base_path=/home/yuqing/fastdfs   改为: base_path=/home/fastdfs
目录不存在的话创建/home/fastdfs目录 :  mkdir -p /home/fastdfs
④启动
/usr/bin/fdfs_trackerd /etc/fdfs/tracker.conf restart如下表示成功
![]()
注意:在/home/fastdfs/ 目录下生成两个目录, 一个是数据,一个是日志;
⑤设置开机自动启动
vim /etc/rc.d/rc.local将运行命令行添加进文件:
/usr/bin/fdfs_trackerd /etc/fdfs/tracker.conf restart三.安装storage
由于上面已经安装过tracker,这里只需要配置storage就好了
进入/etc/fdfs目录,拷贝一份新的storage配置文件:
cp storage.conf.sample storage.conf修改storage.conf
vim storage.conf
group_name=group1
base_path=/home/yuqing/FastDFS改为:base_path=/home/FastDFS
store_path0=/home/yuqing/FastDFS改为:store_path0=/home/FastDFS/fdfs_storage//没有则创建目录
#如果有多个挂载磁盘则定义多个store_path,如下
#store_path1=.....
#store_path2=......
tracker_server=IP:22122   #配置tracker服务器:IP
#如果有多个则配置多个tracker
tracker_server=ip:22122
启动
/usr/bin/fdfs_storaged /etc/fdfs/storage.conf restart如下表示成功
![]()
四.配置客户端
切换目录到 /etc/fdfs/ 拷贝一份新的client配置文件
cp client.conf.sample client.confvim /etc/fdfs/client.conf修改为如下内容
base_path=/home/fastdfs
tracker_server=IP:22122    #tracker服务器所在IP
五.测试
使用格式:

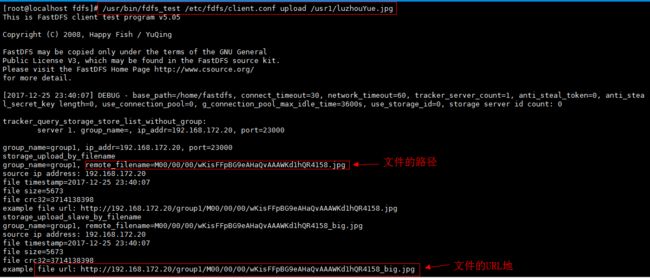
/usr/bin/fdfs_test   客户端配置文件地址    upload     上传文件地址

比如将/home下的图片上传到FastDFS中:

/usr/bin/fdfs_test    /etc/fdfs/client.conf    upload    /usr/local/boy.jpg
结果如下表示成功
Java代码测试:
public static void main(String[] args) throws FileNotFoundException, IOException, Exception {
	// 1、加载配置文件,配置文件中的内容就是 tracker 服务的地址。
	ClientGlobal.init("D:\\Develop\\eclipse-jee-mars-2-win32\\workspace\\fastDFS\\src\\main\\resources\\fdfs_client.conf");
	// 2、创建一个 TrackerClient 对象。直接 new 一个。
	TrackerClient trackerClient = new TrackerClient();
	// 3、使用 TrackerClient 对象创建连接,获得一个 TrackerServer 对象。
	TrackerServer trackerServer = trackerClient.getConnection();
	// 4、创建一个 StorageServer 的引用,值为 null
	StorageServer storageServer = null;
	// 5、创建一个 StorageClient 对象,需要两个参数 TrackerServer 对象、StorageServer 的引用
	StorageClient storageClient = new StorageClient(trackerServer, storageServer);
	// 6、使用 StorageClient 对象上传图片。
	//扩展名不带“.”
	String[] strings = storageClient.upload_file("E:/pic/girl.jpg", "jpg",null);
	// 7、返回数组。包含组名和图片的路径。
	for (String string : strings) {
		System.out.println(string);
	}

}由于现在还没有和nginx整合无法使用http下载
整合Nginx请看这里 https://blog.csdn.net/qq_30162219/article/details/87989314


