Prometheus+Pushgateway+Grafana可视化监控全流程,并实现自定义监控
一、Prometheus 简介
Prometheus 是一套开源的系统监控报警框架。它启发于 Google 的 borgmon 监控系统,由工作在 SoundCloud 的 google 前员工在 2012 年创建,作为社区开源项目进行开发,并于 2015 年正式发布。2016 年,Prometheus 正式加入 Cloud Native Computing Foundation,成为受欢迎度仅次于 Kubernetes 的项目。
废话不多说,直接开干
二、Prometheus安装及配置
下载安装Prometheus(https://prometheus.io/download/)
$ wget https://github.com/prometheus/prometheus/releases/download/v2.3.0/prometheus-2.3.0.linux-amd64.tar.gz
$ tar zxvf prometheus-2.3.0.linux-amd64.tar.gz -C /usr/local/
$ ln -sv /usr/local/prometheus-2.3.0.linux-amd64/ /usr/local/prometheus
$ cd /usr/local/prometheus
改Prometheus配置文件prometheus.yml (替换你要监控的IP地址):
- job_name: 'prometheus'

    # metrics_path defaults to '/metrics'
    # scheme defaults to 'http'.

    static_configs:
    - targets: ['localhost:9090']
      labels:
          instance: prometheus
启动Prometheus
nohup ./prometheus --config.file=prometheus.yml &
Prometheus内置了一个web界面,我们可通过http://prometheusip:9090进行访问:
三、安装pushgateway
Pushgateway 是 Prometheus 生态中一个重要工具,使用它的原因主要是:
- Prometheus 采用 pull 模式,可能由于不在一个子网或者防火墙原因,导致 Prometheus 无法直接拉取各个 target 数据。
- 在监控业务数据的时候,需要将不同数据汇总, 由 Prometheus 统一收集。
由于以上原因,不得不使用 pushgateway,但在使用之前,有必要了解一下它的一些弊端:
- 将多个节点数据汇总到 pushgateway, 如果 pushgateway 挂了,受影响比多个 target 大。
- Prometheus 拉取状态
up只针对 pushgateway, 无法做到对每个节点有效。 - Pushgateway 可以持久化推送给它的所有监控数据。
因此,即使你的监控已经下线,prometheus 还会拉取到旧的监控数据,需要手动清理 pushgateway 不要的数据。
使用 prom/pushgateway 的 Docker 镜像
docker pull prom/pushgateway
接下来启动Push Gateway:
docker run -d \
  --name=pg \
  -p 9091:9091 \
  prom/pushgateway
访问url:
http://pushgatewayIP:9091/要使Push Gateway正常工作,必须要在prometheus中配置对应的job才行
修改配置文件
vim /opt/prometheus/prometheus.yml然后重启Prometheus使配置生效,访问targets,等待1分钟,等待pushgateway状态为UP
我们开始尝试向pushgateway发送http请求,linux中比较简单:
向 {job="some_job"} 添加单条数据:
echo "some_metric 3.14" | curl --data-binary @- http://pushgateway.example.org:9091/metrics/job/some_job使用自己搭建的http通讯库或者postman时注意text内容最后需要换行(\n)(这里卡了我好久)
然后我们查看pushgateway后台,如下图则http请求接收成功
四、安装运行Grafana
Grafana安装配置介绍
$ wget https://s3-us-west-2.amazonaws.com/grafana-releases/release/grafana-5.0.1-1.x86_64.rpm
$ sudo yum localinstall grafana-5.0.1-1.x86_64.rpm
编辑配置文件/etc/grafana/grafana.ini,修改dashboards.json段落下两个参数的值:
[dashboards.json]
enabled = true
path = /var/lib/grafana/dashboards
最后我们运行Grafana服务
$ systemctl daemon-reload
$ systemctl start grafana-server
$ systemctl status grafana-server
我们可通过http://Grafanaip:3000访问Grafana网页界面(默认登陆帐号/密码为admin/admin):
然后我们到Data Sources页面添加数据源,选择我们的Prometheus:
最后创建仪表盘
metrics中可填写自定义数据获取来源,alert可设置邮件报警等
五、设置grafana报警
首先配置邮件服务
yum install -y sendmail
vi /etc/grafana/grafana.ini
(配置文件添加如下,初步还没有自己搭建邮件服务器,我用的QQ邮箱服务器)
重启grafana
systemctl restart grafana-server
在grafana的web界面添加接收告警的邮箱地址,如果发送成功,右上角会有提示
稍后你会收到一封邮件,如下
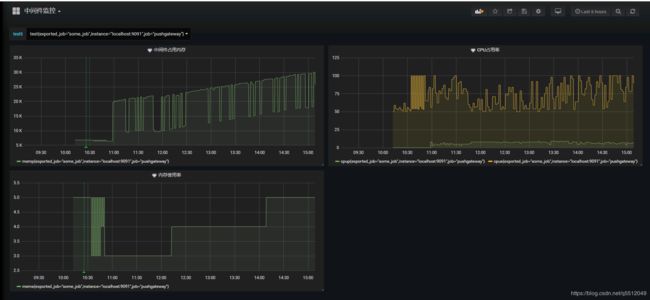
最后整体效果如下:


