DBFace: 源码阅读(一)
DBFACE: 源码阅读
1. 背景
DBFace框架是可以同时获得人脸检测和关键点定位,相较与人脸检测和关键点定位分开的做法有一定的优势,减少了对原图的crop和resize操作,并且对多人脸的情况,这种操作是对人脸个数敏感的,后期倾向也是将人脸检测和关键点定位,甚至后期的segmentation放到一套代码中去完成了.
使用DBFace的原因主要还是算法很快,精度也不错!
2. 总体框架(App类)
代码的主体是作者创建了一个App类,其中主要是超参数的设定,网络结构的设定,三个loss的定义,数据的下载,训练的过程等
class App(object):
    def __init__(self, labelfile, imagesdir, numlandmarks):
        self.numlandmarks = numlandmarks  # 增加关键点数量设置
        self.width, self.height = 800, 800  # 输入图片大小是800*800,这个后续要减少,否则时间肯定不能满足
        self.mean = [0.408, 0.447, 0.47]
        self.std = [0.289, 0.274, 0.278]
        self.batch_size = 18
        self.lr = 1e-4
        self.gpus = [0]  # [0, 1, 2, 3]
        self.gpu_master = self.gpus[0]
        self.model = DBFace(has_landmark=True, wide=64, has_ext=True, upmode="UCBA")  # 网络主体定义的部分
        self.model.init_weights()  # 初始化权重
        self.model = nn.DataParallel(self.model, device_ids=self.gpus)
        self.model.cuda(device=self.gpu_master)
        self.model.train()
        # 三个loss 的部分
        self.focal_loss = losses.FocalLoss()
        self.giou_loss = losses.GIoULoss()
        self.landmark_loss = losses.WingLoss(w=2)

        # 构建dataset部分,继承torch 的dataset类
        self.train_dataset = LDataset(labelfile, imagesdir, numlandmarks, mean=self.mean, std=self.std,
                                      width=self.width, height=self.height)
        self.train_loader = DataLoader(dataset=self.train_dataset, batch_size=self.batch_size, shuffle=True,
                                       num_workers=1)
        # 优化器adam,使用默认的weight_decay=0
        self.optimizer = torch.optim.Adam(self.model.parameters(), lr=self.lr)
        self.per_epoch_batchs = len(self.train_loader)
        self.iter = 0
        self.epochs = 150

    def set_lr(self, lr):

        self.lr = lr
        log.info(f"setting learning rate to: {lr}")
        for param_group in self.optimizer.param_groups:
            param_group["lr"] = lr

    def train_epoch(self, epoch):

        for indbatch, (images, heatmap_gt, heatmap_posweight, reg_tlrb, reg_mask, landmark_gt, landmark_mask, num_objs,
                       keep_mask) in enumerate(self.train_loader):

            self.iter += 1

            batch_objs = sum(num_objs)
            batch_size = self.batch_size

            if batch_objs == 0:
                batch_objs = 1

            heatmap_gt = heatmap_gt.to(self.gpu_master)
            heatmap_posweight = heatmap_posweight.to(self.gpu_master)
            keep_mask = keep_mask.to(self.gpu_master)
            reg_tlrb = reg_tlrb.to(self.gpu_master)
            reg_mask = reg_mask.to(self.gpu_master)
            landmark_gt = landmark_gt.to(self.gpu_master)
            landmark_mask = landmark_mask.to(self.gpu_master)
            images = images.to(self.gpu_master)

            hm, tlrb, landmark = self.model(images)
            hm = hm.sigmoid()
            hm = torch.clamp(hm, min=1e-4, max=1 - 1e-4)
            tlrb = torch.exp(tlrb)

            hm_loss = self.focal_loss(hm, heatmap_gt, heatmap_posweight, keep_mask=keep_mask) / batch_objs
            reg_loss = self.giou_loss(tlrb, reg_tlrb, reg_mask) * 5
            landmark_loss = self.landmark_loss(landmark, landmark_gt, landmark_mask) * 0.1
            loss = hm_loss + reg_loss + landmark_loss

            self.optimizer.zero_grad()
            loss.backward()
            self.optimizer.step()

            epoch_flt = epoch + indbatch / self.per_epoch_batchs

            if indbatch % 10 == 0:
                log.info(
                    f"iter: {self.iter}, lr: {self.lr:g}, epoch: {epoch_flt:.2f}, loss: {loss.item():.2f}, hm_loss: {hm_loss.item():.2f}, "
                    f"box_loss: {reg_loss.item():.2f}, lmdk_loss: {landmark_loss.item():.5f}"
                )

            if indbatch % 1000 == 0:## 标题
                log.info("save hm")
                hm_image = hm[0, 0].cpu().data.numpy()
                common.imwrite(f"{jobdir}/imgs/hm_image.jpg", hm_image * 255)
                common.imwrite(f"{jobdir}/imgs/hm_image_gt.jpg", heatmap_gt[0, 0].cpu().data.numpy() * 255)

                image = np.clip((images[0].permute(1, 2, 0).cpu().data.numpy() * self.std + self.mean) * 255, 0,
                                255).astype(np.uint8)
                outobjs = eval_tool.detect_images_giou_with_netout(hm, tlrb, landmark, threshold=0.1, ibatch=0)

                im1 = image.copy()
                for obj in outobjs:
                    common.drawbbox(im1, obj)
                common.imwrite(f"{jobdir}/imgs/train_result.jpg", im1)

    def train(self):
        # warm up?
        lr_scheduer = {
            1: 1e-3,
            2: 2e-3,
            3: 1e-3,
            60: 1e-4,
            120: 1e-5
        }

        # train
        self.model.train()
        for epoch in range(self.epochs):

            if epoch in lr_scheduer:
                self.set_lr(lr_scheduer[epoch])

            self.train_epoch(epoch)
            file = f"{jobdir}/models/{epoch + 1}.pth"
            common.mkdirs_from_file_path(file)
            torch.save(self.model.module.state_dict(), file)
3. DBFace类
这一类其实就是网络的结构的定义,作者选择使用CenterNet结构做检测任务,使用MobileNetV3-small做backbone,(mobilenet v1提出了depthwise convolution和pointwise convolution, mobilenet v2增加了expand dim 操作, mobilenet 3增加了SE,也就是channel attention部分, 增加了Hard-Swish Activation,但是如果要应用到前端,激活函数要使用比较常见的比较好吧, 类似sigmoid, relu这种, tanh都会有点问题…)
1. backbone 部分
 # define backbone
        self.bb = Mbv3SmallFast()
class Mbv3SmallFast(nn.Module):
    def __init__(self):
        super(Mbv3SmallFast, self).__init__()

        self.keep = [0, 2, 7]
        self.uplayer_shape = [16, 24, 48]
        self.output_channels = 96

        self.conv1 = nn.Conv2d(3, 16, kernel_size=3, stride=2, padding=1, bias=False)
        self.bn1 = nn.BatchNorm2d(16)
        self.hs1 = nn.ReLU(inplace=True)

        self.bneck = nn.Sequential(
            Block(3, 16, 16, 16, nn.ReLU(inplace=True), None, 2),  # 0 *
            Block(3, 16, 72, 24, nn.ReLU(inplace=True), None, 2),  # 1
            Block(3, 24, 88, 24, nn.ReLU(inplace=True), None, 1),  # 2 *
            Block(5, 24, 96, 40, nn.ReLU(inplace=True), SeModule(40), 2),  # 3
            Block(5, 40, 240, 40, nn.ReLU(inplace=True), SeModule(40), 1),  # 4
            Block(5, 40, 240, 40, nn.ReLU(inplace=True), SeModule(40), 1),  # 5
            Block(5, 40, 120, 48, nn.ReLU(inplace=True), SeModule(48), 1),  # 6
            Block(5, 48, 144, 48, nn.ReLU(inplace=True), SeModule(48), 1),  # 7 *
            Block(5, 48, 288, 96, nn.ReLU(inplace=True), SeModule(96), 2),  # 8
        )

    def load_pretrain(self):
        checkpoint = model_zoo.load_url(f"{_MODEL_URL_DOMAIN}/{_MODEL_URL_SMALL}")
        self.load_state_dict(checkpoint, strict=False)

    def forward(self, x):
        x = self.hs1(self.bn1(self.conv1(x)))

        outs = []
        for index, item in enumerate(self.bneck):
            x = item(x)

            if index in self.keep:
                outs.append(x)

        outs.append(x)
        return outs
下面代码是mobileNet v3 的block
class Block(nn.Module):
    def __init__(self, kernel_size, in_size, expand_size, out_size, nolinear, semodule, stride):
        super(Block, self).__init__()
        self.stride = stride
        self.se = semodule

        self.conv1 = nn.Conv2d(in_size, expand_size, kernel_size=1, stride=1, padding=0, bias=False)
        self.bn1 = nn.BatchNorm2d(expand_size)
        self.nolinear1 = nolinear
        self.conv2 = nn.Conv2d(expand_size, expand_size, kernel_size=kernel_size, stride=stride,
                               padding=kernel_size // 2, groups=expand_size, bias=False)
        self.bn2 = nn.BatchNorm2d(expand_size)
        self.nolinear2 = nolinear
        self.conv3 = nn.Conv2d(expand_size, out_size, kernel_size=1, stride=1, padding=0, bias=False)
        self.bn3 = nn.BatchNorm2d(out_size)

        self.shortcut = nn.Sequential()
        if stride == 1 and in_size != out_size:
            self.shortcut = nn.Sequential(
                nn.Conv2d(in_size, out_size, kernel_size=1, stride=1, padding=0, bias=False),
                nn.BatchNorm2d(out_size),
            )

    def forward(self, x):
        out = self.nolinear1(self.bn1(self.conv1(x)))
        out = self.nolinear2(self.bn2(self.conv2(out)))
        out = self.bn3(self.conv3(out))
        if self.se != None:
            out = self.se(out)
        out = out + self.shortcut(x) if self.stride == 1 else out
        return out

# SE part channel attention
class SeModule(nn.Module):
    def __init__(self, in_size, reduction=4):
        super(SeModule, self).__init__()

        self.pool = nn.AdaptiveAvgPool2d(1)
        self.se = nn.Sequential(
            nn.Conv2d(in_size, in_size // reduction, kernel_size=1, stride=1, padding=0, bias=False),
            nn.BatchNorm2d(in_size // reduction),
            nn.ReLU(inplace=True),
            nn.Conv2d(in_size // reduction, in_size, kernel_size=1, stride=1, padding=0, bias=False),
            nn.BatchNorm2d(in_size),
            nn.Sigmoid()
        )

    def forward(self, x):
        return x * self.se(self.pool(x))
2. FPN 部分
在源代码中抽取了4层, stride4, stride8, stride16, stride32,这里的stride其实就是卷积中的设置的步长,有利于提取不同尺度的特征
# Get the number of branch node channels
        # stride4, stride8, stride16
        c0, c1, c2 = self.bb.uplayer_shape

        self.conv3 = CBAModule(self.bb.output_channels, wide, kernel_size=1, stride=1, padding=0, bias=False)  # s32
        self.connect0 = CBAModule(c0, wide, kernel_size=1)  # s4
        self.connect1 = CBAModule(c1, wide, kernel_size=1)  # s8
        self.connect2 = CBAModule(c2, wide, kernel_size=1)  # s16

        self.up0 = UpModule(wide, wide, kernel_size=2, stride=2, mode=upmode)  # s16
        self.up1 = UpModule(wide, wide, kernel_size=2, stride=2, mode=upmode)  # s8
        self.up2 = UpModule(wide, wide, kernel_size=2, stride=2, mode=upmode)  # s4
在forward的时候是按照如下操作:
		s4, s8, s16, s32 = self.bb(x)
        s32 = self.conv3(s32)

        s16 = self.up0(s32) + self.connect2(s16)
        s8 = self.up1(s16) + self.connect1(s8)
        s4 = self.up2(s8) + self.connect0(s4)
举个例子,将stride为32的feature_map进行上采样,将得到的feature map 与stride16的feature map经过CBA操作后的feature map进行相加. 具体上采样在源码中有3种方式
# Up Sample Module
class UpModule(nn.Module):
    def __init__(self, in_channels, out_channels, kernel_size=2, stride=2, bias=False, mode="UCBA"):
        super(UpModule, self).__init__()
        self.mode = mode

        if self.mode == "UCBA":
            # self.up = nn.UpsamplingBilinear2d(scale_factor=2)
            self.up = nn.UpsamplingNearest2d(scale_factor=2)
            self.conv = CBAModule(in_channels, out_channels, 3, padding=1, bias=bias)
        elif self.mode == "DeconvBN":
            self.dconv = nn.ConvTranspose2d(in_channels, out_channels, kernel_size, stride, bias=bias)
            self.bn = nn.BatchNorm2d(out_channels)
        elif self.mode == "DeCBA":
            self.dconv = nn.ConvTranspose2d(in_channels, out_channels, kernel_size, stride, bias=bias)
            self.conv = CBAModule(out_channels, out_channels, 3, padding=1, bias=bias)
        else:
            raise RuntimeError(f"Unsupport mode: {mode}")

    def forward(self, x):
        if self.mode == "UCBA":
            return self.conv(self.up(x))
        elif self.mode == "DeconvBN":
            return F.relu(self.bn(self.dconv(x)))
        elif self.mode == "DeCBA":
            return self.conv(self.dconv(x))
其中的CBA就是常规的Conv+BN+Activation
# Conv BatchNorm Activation
class CBAModule(nn.Module):
    def __init__(self, in_channels, out_channels=24, kernel_size=3, stride=1, padding=0, bias=False):
        super(CBAModule, self).__init__()
        self.conv = nn.Conv2d(in_channels, out_channels, kernel_size, stride, padding=padding, bias=bias)
        self.bn = nn.BatchNorm2d(out_channels)
        self.act = nn.ReLU(inplace=True)

    def forward(self, x):
        x = self.conv(x)
        x = self.bn(x)
        x = self.act(x)
        return x
3. SSH 检测
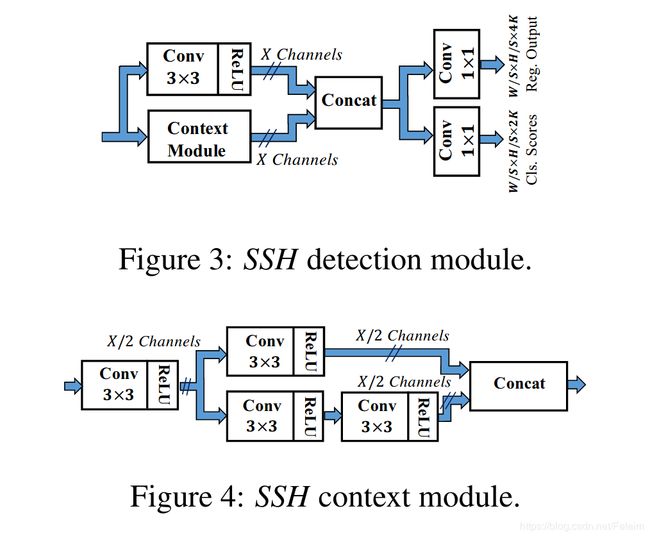
从论文中截下来的module如下,也不是很复杂

对应的代码实现, 非常的清晰,从图到对应的代码可以看到其实就是对经过FPN后的feature map经过不同程度的特征提取,最后将不同程度的特征再进行concat操作得到最后的feature map,原文中说主要是为了增加特征图有效的感受野,换句话说也就是为了获得更好的特征图,这个特征图的表征能力更强!
# SSH Detect Module
class DetectModule(nn.Module):
    def __init__(self, in_channels):
        super(DetectModule, self).__init__()

        self.upconv = CBAModule(in_channels, in_channels // 2, 3, 1, padding=1)
        self.context = ContextModule(in_channels)

    def forward(self, x):
        up = self.upconv(x)
        down = self.context(x)
        return torch.cat([up, down], dim=1)

# SSH Context Module
class ContextModule(nn.Module):
    def __init__(self, in_channels):
        super(ContextModule, self).__init__()

        block_wide = in_channels // 4
        self.inconv = CBAModule(in_channels, block_wide, 3, 1, padding=1)
        self.upconv = CBAModule(block_wide, block_wide, 3, 1, padding=1)
        self.downconv = CBAModule(block_wide, block_wide, 3, 1, padding=1)
        self.downconv2 = CBAModule(block_wide, block_wide, 3, 1, padding=1)

    def forward(self, x):
        x = self.inconv(x)
        up = self.upconv(x)
        down = self.downconv(x)
        down = self.downconv2(down)
        return torch.cat([up, down], dim=1)
4. 任务输出
最后就是经常说的head部分了,在源代码中是有三个输出的,分别是人脸box中心点的高斯heat map, 第二个是回归出来的人脸框部分,最后就是人脸关键点landmark部分
self.center = HeadModule(wide, 1, has_ext=has_ext)
        self.box = HeadModule(wide, 4, has_ext=has_ext)

        if self.has_landmark:
            self.landmark = HeadModule(wide, 10, has_ext=has_ext)
这里的HeadModule模块如下
class HeadModule(nn.Module):
    def __init__(self, in_channels, out_channels, has_ext=False):
        super(HeadModule, self).__init__()
        self.head = nn.Conv2d(in_channels, out_channels, kernel_size=1)
        self.has_ext = has_ext

        if has_ext:
            self.ext = CBAModule(in_channels, in_channels, kernel_size=3, padding=1, bias=False)

    def init_normal(self, std, bias):
        nn.init.normal_(self.head.weight, std=std)
        nn.init.constant_(self.head.bias, bias)

    def forward(self, x):

        if self.has_ext:
            x = self.ext(x)
        return self.head(x)
换句话说headmodule就是针对对应的任务做个卷积,用最后的卷积来明确下任务类型,就像一个小孩已经学了很多知识了,下面三个任务相当于告诉小孩需要考语文,数学,英语这三门课,另外的CBA,可以理解成还需要老师再进行一次知识点归纳,再进行考试.
5. 初始化权重
之前有篇文章说使用预训练模型并不能够提升准确率,只是能够加速网络收敛,但是数据量如果不大,感觉还是应该加载与训练模型的
    def init_weights(self):

        # Set the initial probability to avoid overflow at the beginning
        prob = 0.01
        d = -np.log((1 - prob) / prob)  # -2.19

        # Load backbone weights from ImageNet
        self.bb.load_pretrain()
        self.center.init_normal(0.001, d)
        self.box.init_normal(0.001, 0)

        if self.has_landmark:
            self.landmark.init_normal(0.001, 0)

    def load(self, file):
        checkpoint = torch.load(file, map_location="cpu")
        for k, v in checkpoint.items():
            print(k)
        print("*****************************************")
        self.load_state_dict(checkpoint)
4. 损失函数(3个)
1. focal Loss
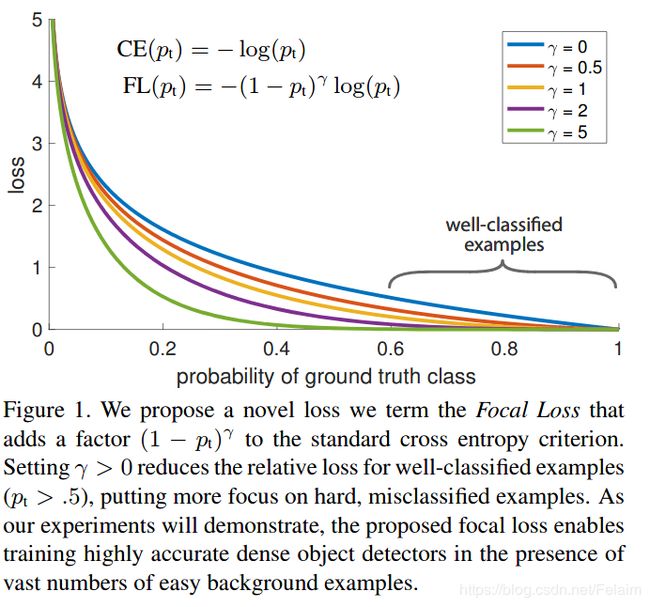
下图截自focal loss原论文
class FocalLoss(nn.Module):
    def forward(self, pred, gt, pos_weights, keep_mask=None):
        pos_inds = gt.eq(1).float()
        neg_inds = gt.lt(1).float()

        neg_weights = torch.pow(1 - gt, 4)
        pos_loss = torch.log(pred) * torch.pow(1 - pred, 2) * pos_weights
        neg_loss = torch.log(1 - pred) * torch.pow(pred, 2) * neg_weights * neg_inds

        if keep_mask is not None:
            pos_loss = (pos_loss * keep_mask).sum()
            neg_loss = (neg_loss * keep_mask).sum()
        else:
            pos_loss = pos_loss.sum()
            neg_loss = neg_loss.sum()
        return -(pos_loss + neg_loss)
对于Focal loss 的解释已经有很多了,主要就是为了平衡目标检测中正负样本比例严重失衡的问题,使用mask是为了去除一些小人脸对loss的贡献
2. GIoU Loss
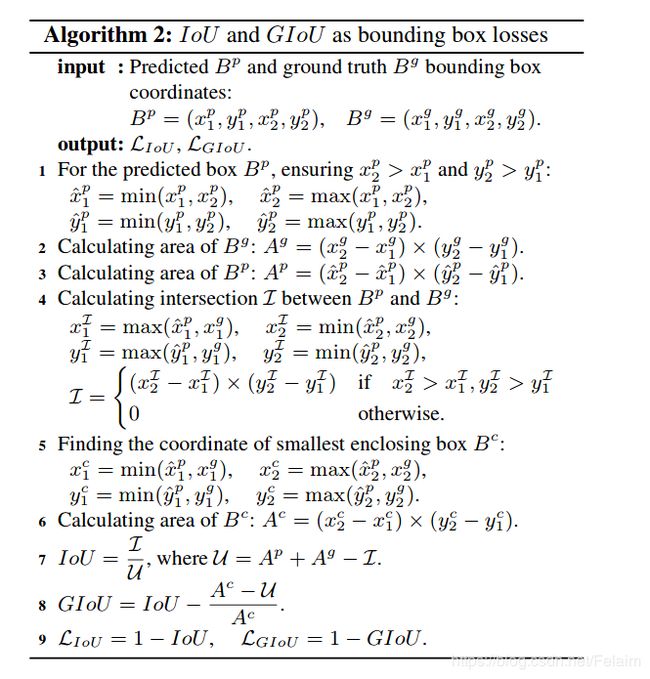
下图截自原始GIoU论文,可以发现在l2距离和l1距离一样的情况下,IoU和GIoU的差别很大.
 按照传统方式计算IoU的时候,如果两个框没有交集,那么IoU计算都为0,无法区分两个框之间的距离,于是作者就提出了GIoU这个概念,也可以度量两个框之间的距离大小,因为在GIoU涉及到两个框的包络,也就度量了两个框的距离.
class GIoULoss(nn.Module):

    def __init__(self):
        super(GIoULoss, self).__init__()
        self.shift = None

    def forward(self, pred, gt, weight):
        # pred is   b, 4, h, w
        # gt is     b, 4, h, w
        # mask is   b, 1, h, w
        # 4 channel is x, y, r, b - cx //这是个啥
        h, w = pred.shape[2:]
        weight = weight.view(-1, h, w)
        mask = weight > 0
        weight = weight[mask]
        avg_factor = torch.sum(weight)

        if avg_factor == 0:
            print("avg is zero")
            return torch.tensor(0.0)

        if self.shift is None:
            x = torch.arange(0, w, device=pred.device)
            y = torch.arange(0, h, device=pred.device)
            shift_y, shift_x = torch.meshgrid(y, x)
            self.shift = torch.stack((shift_x, shift_y), dim=0).float()  # 2, h, w

        pred_boxes = torch.cat((
            self.shift - pred[:, [0, 1]],
            self.shift + pred[:, [2, 3]]
        ), dim=1).permute(0, 2, 3, 1)  # b, 4, h, w   to   b, h, w, 4

        # gt_boxes = torch.cat((
        #     self.shift + gt[:, [0, 1]],
        #     self.shift + gt[:, [2, 3]]
        # ), dim=1).permute(0, 2, 3, 1)  # b, 4, h, w   to   b, h, w, 4
        gt_boxes = gt.permute(0, 2, 3, 1)

        pred_boxes = pred_boxes[mask].view(-1, 4)
        gt_boxes = gt_boxes[mask].view(-1, 4)

        # max x, max y
        lt = torch.max(pred_boxes[:, :2], gt_boxes[:, :2])

        # min r, min b
        rb = torch.min(pred_boxes[:, 2:], gt_boxes[:, 2:])
        wh = (rb - lt + 1).clamp(0)  # n, 2

        enclose_lt = torch.min(pred_boxes[:, :2], gt_boxes[:, :2])
        enclose_rb = torch.max(pred_boxes[:, 2:], gt_boxes[:, 2:])
        enclose_wh = (enclose_rb - enclose_lt + 1).clamp(0)  # n, 2
        enclose_area = enclose_wh[:, 0] * enclose_wh[:, 1]
        overlap = wh[:, 0] * wh[:, 1]

        pred_area = (pred_boxes[:, 2] - pred_boxes[:, 0] + 1) * (pred_boxes[:, 3] - pred_boxes[:, 1] + 1)
        gt_area = (gt_boxes[:, 2] - gt_boxes[:, 0] + 1) * (gt_boxes[:, 3] - gt_boxes[:, 1] + 1)
        ious = overlap / (pred_area + gt_area - overlap)

        u = pred_area + gt_area - overlap
        gious = ious - (enclose_area - u) / enclose_area
        iou_distance = 1 - gious
        return torch.sum(iou_distance * weight) / avg_factor
3. Wing Loss
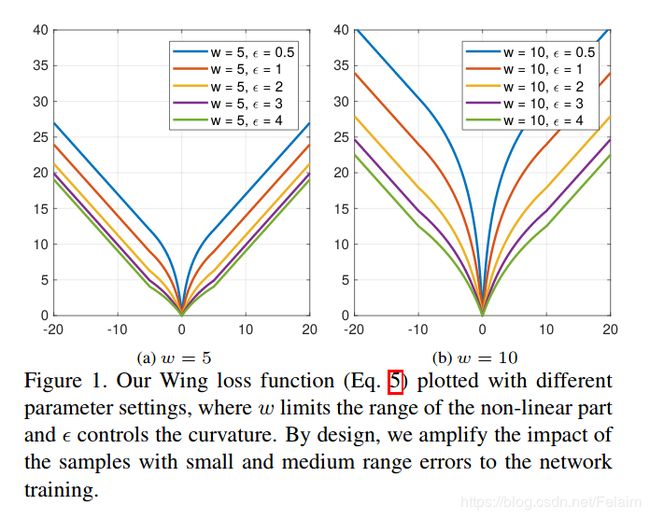
公式和截图都来自原论文,主要也是对loss的一个改进,l1loss在算梯度是step不变,L2loss的异常值对loss的影响太大,smooth L1在loss比较小的时候step太小,于是有了Wing loss


class WingLoss(nn.Module):
    def __init__(self, w=10, e=2):
        super(WingLoss, self).__init__()

        # https://arxiv.org/pdf/1711.06753v4.pdf   Figure 5
        self.w = w
        self.e = e
        self.C = self.w - self.w * np.log(1 + self.w / self.e)

    def forward(self, x, t, weight, sigma=1):
        diff = weight * (x - t)
        abs_diff = diff.abs()

        flag = (abs_diff.data < self.w).float()
        y = flag * self.w * torch.log(1 + abs_diff / self.e) + (1 - flag) * (abs_diff - self.C)
        return y.sum()
5. 数据处理
这个LZ准备再开一个博客,在详细写一下,主要涉及到对应gt的生成,数据增广,怎么使用自己的数据等一系列问题.
参考地址
1.mobilenet v3
2. SSH: Single Stage Headless Face Detector
3. Objects as Points
4. Focal Loss for Dense Object Detection
5. focal loss 分析 https://zhuanlan.zhihu.com/p/80692105
6. Generalized Intersection over Union: A Metric and A Loss for Bounding Box Regression
7. Wing Loss for Robust Facial Landmark Localisation with Convolutional NeuralNetworks

