TinyOS04:nesC编程语言
nesC语言特定:组件化 + 基于事件驱动 = 能很好地支持并发
一、nesC语言简介
- nesC语言都是由组件(component)构成的,由双向性质的接口(interface)连接(wiring)而成
- nesC定义了并发模型,该模型是基于任务 (task) 和硬件事件句柄 (hadware event handler),并且在编译期间有数据竞争的检测。
1、组件(components)
- 基本概念:任何一个使用nesC编写的应用程序都是由一个或多个组件连接而成,从而成为一个可执行的、完整的程序。
- 组件的类型:
1、模块(module):实现具体逻辑功能的组件,模块组件中实现了一个或多个接口。
2、配件(configuration):汇聚其它组件,连接接口的使用者和提供者;(顶层配件,其内容就是把应用程序用到的所有组件都连接起来,从而形成一个完整的TinyOS应用程序) - 一个组件的原型如图所示:

详细解释:
1、Component有两类:模块module + 配件Configuration
2、接口时访问组件的唯一方式,具有双向性(具有双向性指的是:组件可以提供(provides)接口,也可以使用接口) + 接口中申明了命令方法Command和一些事件方法Event + 并且规定:接口的提供者必须实现该接口声明的所有的命令函数,而接口的使用者则必须实现该接口声明的所有的事件函数 + 一个组件可以提供或使用多个接口,并且可以提供或使用同一个接口的多个实例。 - 基于组件的调用模型图:

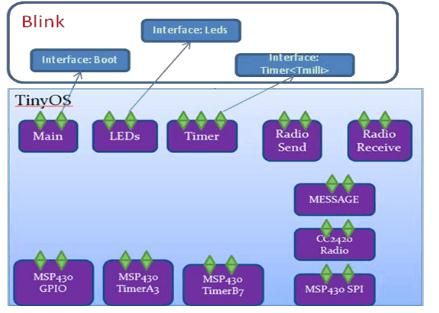
上层的应用调用TinyOS所提供的不同组件,而每个组件都会相应的提供自身的应用接口 - Blink程序举例:
1、Blink涉及到使用的三个组件:LEDs、Timer、Main
2、组件对应的接口:
{
uses interface Timer as Timer0;
uses interface Timer as Timer2;
uses interface Leds;
uses interface Boot;
}
注解:Timer[TMilli]当串连提供者和使用者的接口带有类型参数时,它们的类型必须相互匹配
3、BlinkC在调用这些接口所定义的命令(Command)的同时必须实现接口所定义的事件的处理函数(Event)

6. 程序编译

1、nesC的编译器会根据用户所指定的平台编译生成一个对应于特定平台的C源文件。
2、nesC依据不同的微控制器使用一个对应的本地GNU的C编译器将产生的C源文件编译成可执行文件并将其下载到对应硬件平台上
7. TinyOS应用程序中的并发模型(这个还不是很理解,到时要修改)
TinyOS程序的执行会涉及到两个线程:任务Task、硬件事件处理器(Event Handler)
1、任务:执行一些比较耗时的操作,可以被硬件事件中断抢占
2、事件中断:可以抢占任务的执行,具有实时性
3、命令和事件要作为事件中断来执行,则必须用关键字async来声明。
4、任务和事件中断是可以被其它异步代码抢占的,存在一定的数据竞争,可能导致数据的不一致或错误。为避免竞争而带来的错误产生,可以在任务内排外地访问数据,或者每次访问都采用原子 (atomic) 语句
8. 常用的make命令
1、make [platform]:此命令是将nesC
代码编译成可在特定平台运行的代码,在执行前要切换到代码所在的目录;
2、make [platform] reinstall:使用 make [platform]命令后,就可以将在某平台的可执行代码下载到对应的平台上了
3、make [platform] install :此命令的功能相当于先执行命令make [platform],再执行命令make [platform] reinstall。
4、make clean 此命令删除上述编译命令产生的文件及文件夹;
5、make [platform] docs :此命令生成程序使用的所有组件、接口的关系的
文件。生成的文件在tinyos-2.x\doc\nesdoc 目录下,其中索引文件为 “index.html”
二、应用举例:Blink —TinyOS编程的“Hello World”程序
- Blink包含两个组件:
①、模块组件:BlinkC.nc,是Blink应用程序的实现代码
②、配置组件:BlinkAppC.nc,也就是顶层配置组件,在Implementation中连接“BlinkC.nc”和其他必要组件 +任何一个应用程序都有一个用应用程序名命名的顶层配件,nesC编译器(ncc)根据该文件的内容产生特定平台上可执行文件。 - Blink应用程序的配件:BlinkAppC.nc
 /BlinkAppC.nc
  configuration BlinkAppC
  {
  }
 implementation {
    components MainC, BlinkC, LedsC;

    components new TimerMilliC() as Timer0;
    components new TimerMilliC() as Timer1;
    components new TimerMilliC() as Timer2;

    BlinkC -> MainC.Boot;

    BlinkC.Timer0 -> Timer0;
    BlinkC.Timer1 -> Timer1;
    BlinkC.Timer2 -> Timer2;
    BlinkC.Leds -> LedsC;
}
1、 非顶层配置组件也可以使用和提供接口,顶层配置组件不需要provides和uses接口:
 configuration BlinkAppC
 {
 }
2、components那行列出了此配件用到的一组组件。分别是MainC,BlinkC和LedsC和三个计时器,所以需要使用new关键字创建三个计时器的实例,然后分别用as被重命名为Timer0、Timer1和Timer2。
components MainC, BlinkC, LedsC;
components new TimerMilliC() as Timer0;   components new TimerMilliC() as Timer1;   components new TimerMilliC() as Timer2;
3、 再往下就是组件之间的接口的连接了。BlinkC使用了Boot接口,而MainC正好提供了BlinkC所需的Boot接口,所以我们将他们进行连接(即接口的使用者绑定到接口的提供者)。
BlinkC.Boot->Mainc.Boot意为:Blink组件内使用的Boot接口由MainC组件提供
因为BlinkC内部就使用了一个Boot接口,所以BlinkC后面的
Boot可以被省略了。
3. Blink应用程序的模块组件:BlinkC.nc
BlinkC.nc代码:
include "Timer.h"
module BlinkC
{
    uses interface Timer as Timer0;
    uses interface Timer as Timer1;
    uses interface Timer as Timer2;
    uses interface Leds;
    uses interface Boot;
}

implementation
{
    event void Boot.booted()
    {
        call Timer0.startPeriodic( 250 );
        call Timer1.startPeriodic( 500 );
        call Timer2.startPeriodic( 1000 );
    }

    event void Timer0.fired()
    {
        dbg("BlinkC", "Timer 0 fired @ %s.\n", sim_time_string());
         call Leds.led0Toggle();
    }

    event void Timer1.fired()
    {
     dbg("BlinkC", "Timer 1 fired @ %s \n", sim_time_string());
      call Leds.led1Toggle();
    }

    event void Timer2.fired()
     {
      dbg("BlinkC", "Timer 2 fired @ %s.\n", sim_time_string());
       call Leds.led2Toggle();
    }
}
1、在模块BlinkC的声明内(module BlinkC{})表明了该程序需要用到的全部接口;
2、在实现部分(implementation{})需要实现所有我们用到的接口的事件(接口内的命令,则由接口的提供者负责实现。)
3、在booted事件中,也就是程序启动以后,我们的主要任务就启动三个计时器(调用call使用的接口中实现了的命令方法)
event void Boot.booted()
{
//startPeriodic是一个启动计时器的命令
    call Timer0.startPeriodic( 250 );
    call Timer1.startPeriodic( 500 );
    call Timer2.startPeriodic( 1000 );
}
4、另一个需要我们处理的事件就是计时器的触发,因为有三个计时器,所以需要书写三个触发事件:
    event void Timer0(1、2).fired()
    {
        dbg("BlinkC", "Timer 0 fired @ %s.\n", sim_time_string());
         call Leds.led0Toggle();
    }