上一篇自己动手写opengl 由于时间原因停止了更新,现在继续。
1. 首先我们定义以下变量
	public static class DisplayInfo{
		Canvas canvas;
		int height;
		int width;
	}
	private static DisplayInfo mInfo;

	public static void initDrawEnvirement(DisplayInfo info){
		mInfo = info;
	}

	public enum MatrixMode{
		MODE_MODEL_VIEW,
		MODE_PROJECTION
	}
	//for testing
	public static M4 mCurrentSurfaceViewProjectionMatrix = null;
	public static M4 mCurrentSurfaceViewModelViewMatrix = null;

	public static Stack mModelViewMatrixStack = new Stack();
	public static Stack mProjectionMatrixStack = new Stack();
	public static M4 mCurrentModelViewMatrix = new M4();

	public static M4 mCurrentProjectionMatrix = new M4();


	public static M4 mCurrentViewPortMatrix = new M4();
	public static MatrixMode mMatrixMode = MatrixMode.MODE_MODEL_VIEW;
	public static float mViewPortZNear = 0.0f;
	public static float mViewPortZFar = 1.0f;
	public static  GLColor mVertexColor = new GLColor(0, 0, 0);
	public static ArrayList mVertexList = new ArrayList();
从上面可以看到我们的变量基本上有以下几个
1. ModelView matrix
2.Project matrix
3.Viewport matrix
这几个矩阵就构成了把一个3D空间的(x,y,z)转换为2D空间的所有的东西。下面看看他们如何实现他们,与矩阵相关的几个函数如下:
矩阵模式
    public static void glMatrixMode(MatrixMode mode){
        mMatrixMode = mode;
    }
矩阵指定
glLoadIdentity
	public static void glLoadIdentity(){
		if(mMatrixMode == MatrixMode.MODE_MODEL_VIEW){
			mCurrentModelViewMatrix.setIdentity();
		}else{
			mCurrentProjectionMatrix.setIdentity();
		}
	}
矩阵保存
glPushMatrix
	public static void  glPushMatrix(){
		if(mMatrixMode == MatrixMode.MODE_MODEL_VIEW){
			mModelViewMatrixStack.push(new M4(mCurrentModelViewMatrix));
		}else{
			mProjectionMatrixStack.push(new M4(mCurrentProjectionMatrix));
		}
	}
矩阵恢复
glPopMatrix
	public static void  glPopMatrix(){
		if(mMatrixMode == MatrixMode.MODE_MODEL_VIEW){
			mCurrentModelViewMatrix = mModelViewMatrixStack.pop();
		}else{
			mCurrentProjectionMatrix = mProjectionMatrixStack.pop();
		}
	}
矩阵修改
glMultMatrix
	public static void glMultMatrix(M4 m){
		if(mMatrixMode == MatrixMode.MODE_MODEL_VIEW){
			mCurrentModelViewMatrix.multiply(m);
		}else{
			mCurrentProjectionMatrix.multiply(m);
		}
	}
ViewPort矩阵指定
    public static void glDepthRangef(
        float zNear,
        float zFar
    ){
    	mViewPortZNear = zNear;
    	mViewPortZFar = zFar;
    }
	public static   void glViewport(
            int x,
            int y,
            int width,
            int height
     )
	{
		int surfaceHeight = mInfo.height;
		float far = mViewPortZFar;
		float near = mViewPortZNear;
		float sx = width/2.0f;
		float ox = sx + x;
		float sy = height/2.0f;
		float oy = sy + surfaceHeight - height - y;
		float A = (far - near)/2.0f;
		float B = (far + near)/2.0f;
		// compute viewport matrix
		float[][] f = new float[4][4];
	    f[0][0] = sx;  f[0][1] = 0;   f[0][2] = 0;  f[0][3] = ox;
		f[1][0] = 0;   f[1][1] =-sy;  f[1][2] = 0;  f[1][3] = oy;
		f[2][0] = 0;   f[2][1] = 0;   f[2][2] = A;  f[2][3] = B;
		f[3][0] = 0;   f[3][1] = 0;   f[3][2] = 0;  f[3][3] = 1;
		mCurrentViewPortMatrix = new M4();
		mCurrentViewPortMatrix.m = f;
	}
这下好了所有矩阵都有了,唯一的事情就是指定顶点和绘制方式了
2. 然后我们指定顶点
	public static  void glVertexPointer(
            int size,
            int type,
            int stride,
            java.nio.Buffer pointer)
	{

		if((type!= GL10.GL_FLOAT && type!= GL10.GL_FIXED) ||size != 3){
			throw new RuntimeException("this lib only support GL_FLOAT GL_FIXED type and size must equals 3, stride must equals 0!");
		}
		mVertexList.clear();

		int capacity = pointer.capacity();
		pointer.position(0);

		while(true){
			if(capacity >= size){
				capacity-=size;
				GLVertex verTex = new GLVertex();
				if(type == GL10.GL_FLOAT){
					verTex.x= ((FloatBuffer)pointer).get();
					verTex.y= ((FloatBuffer)pointer).get();
					verTex.z= ((FloatBuffer)pointer).get();
				}else if(type == GL10.GL_FIXED){

					verTex.x= ((IntBuffer)pointer).get()>>16;
					verTex.y= ((IntBuffer)pointer).get()>>16;
					verTex.z= ((IntBuffer)pointer).get()>>16;
				}
				mVertexList.add(verTex);
				if(capacity >= stride){
					capacity -= stride;
					for(int i = 0; i < stride; ++i){
						if(type == GL10.GL_FLOAT){
							((FloatBuffer)pointer).get();
						}else if(type == GL10.GL_FIXED){
							((IntBuffer)pointer).get();
						}
					}
				}else{
					break;
				}
			}else{
				break;
			}
		}

	}
看上去是不是很简单呢,接下就是绘制了
3. 最后我们绘制图像
	public static void glDrawElements(int mode, int mIndexCount,
			int type, Buffer mIndexBuffer) {
		if(mode!= GL10.GL_TRIANGLES){
			throw new RuntimeException();
		}

		if((type!= GL10.GL_UNSIGNED_SHORT&&type!=GL10.GL_UNSIGNED_BYTE) || mode != GL10.GL_TRIANGLES){
			throw new RuntimeException("this lib glDrawElements only support GL_TRIANGLES and GL_UNSIGNED_SHORT !");
		}

		mIndexBuffer.position(0);
		ArrayList drawingList = preDealVertex();
		//clearColor();
		int capacity = mIndexCount;
		while(true){
			if(capacity >= 3){
				if(type == GL10.GL_UNSIGNED_SHORT){
					capacity-=3;
					ShortBuffer buffer = ((ShortBuffer)mIndexBuffer);
					GLVertex v1 = drawingList.get(buffer.get());
					GLVertex v2 = drawingList.get(buffer.get());
					GLVertex v3 = drawingList.get(buffer.get());
					drawTriangles(v1,v2,v3);
				}else if(type == GL10.GL_UNSIGNED_BYTE){
					capacity-=3;
					ByteBuffer buffer = ((ByteBuffer)mIndexBuffer);
					GLVertex v1 = drawingList.get(buffer.get());
					GLVertex v2 = drawingList.get(buffer.get());
					GLVertex v3 = drawingList.get(buffer.get());
					drawTriangles(v1,v2,v3);
				}

			}else{
				break;
			}
		}
	}
空间变换到此完成,可这只是万里长征的第一步。后面还有很多事情要做:
1.图元装配和裁剪:
图元装配发生在视口变换之前,图元装配上面已经做了,但是没有进行裁剪。
所以后面将研究如何将视景体之外的裁剪掉。
这个阶段主要有两个任务,一个是图元组装,另一个是图元处理。
- 所谓图元组装是指顶点数据根据设置的绘制方式被结合成完整的图元。例如,点绘制方式仅需要一个单独的顶点,此方式下每个顶点为一个图元;线段绘制方式则需要两个顶点,此方式下每两个顶点构成一个图元;三角形绘制方式下需要三个顶点构成一个图元。
- 图元处理最重要的工作是裁剪,其任务是消除位于半空间(half-space)之外的部分几何图元,这个半空间是由一个剪裁平面所定义的。例如,点剪裁就是简单的接受或者拒绝顶点,线段或者多边形剪裁可能需要增加额外的顶点,具体取决于直线或者多边形与剪裁平面之间的位置关系
 之所以要进行裁剪时因为随着观察位置角度的不同,并不总能看到(显示到设备屏幕上)特定3D物体某个图元的全部
 - 裁剪时,若图元完全位于视景体以及自定义裁剪平面的内部,则将图元传递到后面的步骤进行处理;如果完全位于视景体或者自定义裁剪平面的外部,则丢弃该图元;如果其有一部分位于内部,另一部分位于外部,则需要裁剪该图元。
2. 光栅化:纹理插值
- 1.虽然虚拟3D世界中的几何信息是三维的,但由于目前用于显示的设备都是二维的,因此在真正执行光栅化工作之前,首先要将虚拟3D世界汇总的物体投影到视平面上。根据摄像机位置的不同,同一个3D场景的物体投影到视平面可能会产生不同的效果。
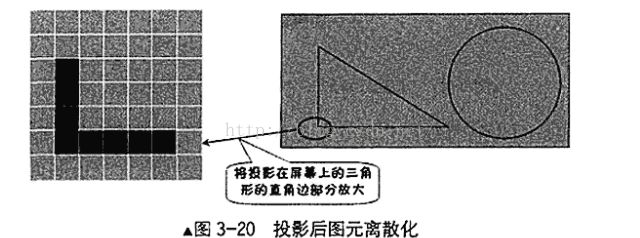
- 2.另外,由于虚拟3D世界当中物体的几何信息一般采用连续的数学量来表示,因此投影的平面结果也是用连续的数学量表示的。但目前的显示设备屏幕都是离散化的,因此还需要将投影的结果离散化。将其分解为一个一个离散化的小单元,这些小单元一般称之为片元。
-
- 其实每个片元都对应帧缓冲中的一个像素,之所以不直接称之为像素是因为3D空间中的物体时可以相互遮挡的。而一个3D场景最终显示到屏幕上虽然是一个整体,但每个3D物体的每个图元是独立处理的。可能出现这种情况,系统先处理的是位于观察点较远的图元,其光栅化成为了一组片元,暂时送入帧缓冲的相对应位置。但后面继续处理距离观察点较远的图元是也光栅化了一组片元,两组片元中有对应到帧缓冲中同一个位置的,这时距离近的片元将覆盖距离远的片元(如何覆盖的检测是在深度检测阶段完成)。因此某片元就不一定能成为最终屏幕上的像素,称之为像素就不准确了,可以理解为候选像素。
- 每个片元包含其对应的顶点坐标、顶点颜色、顶点纹理坐标以及顶点的深度等信息,这些信息是系统根据投影前此片元对应的3D空间中的位置及与此片元相关的图元的各顶点信息进行插值计算而生成的
-
3. 前后平面裁剪
如果需要源代码,请下载此软件到手机上。
http://a.app.qq.com/o/simple.jsp?pkgname=com.wa505.kf.epassword
参考文章
http://blog.csdn.net/u013746357/article/details/52799601
http://www.songho.ca/opengl/gl_transform.html
http://mobile.51cto.com/aengine-437172.htm