图文讲解Spring Boot Swagger2 生成API 接口文档
一、准备工作:
1、引入架包
<dependency>
    <groupId>io.springfoxgroupId>
    <artifactId>springfox-swagger2artifactId>
    <version>2.2.2version>
dependency>

<dependency>
    <groupId>io.springfoxgroupId>
    <artifactId>springfox-swagger-uiartifactId>
    <version>2.2.2version>
dependency>
2、在启动类增加@EnableSwagger2注解,
@SpringBootApplication
@EnableSwagger2  //开启Swagger2
public class DemoApplication {

    public static void main(String[] args) {
        SpringApplication.run(DemoApplication.class, args);
    }

}
3、配置Swagger:
@Bean
public Docket buildDocket(){
    return new Docket(DocumentationType.SWAGGER_2)
            .apiInfo(buildApiInf())
            .select()
	        //参数为controller包路径
            .apis(RequestHandlerSelectors.basePackage("com.feishida.demo.controller"))
            .paths(PathSelectors.any())
            .build();
}

private ApiInfo buildApiInf(){
    return new ApiInfoBuilder()
             //标题
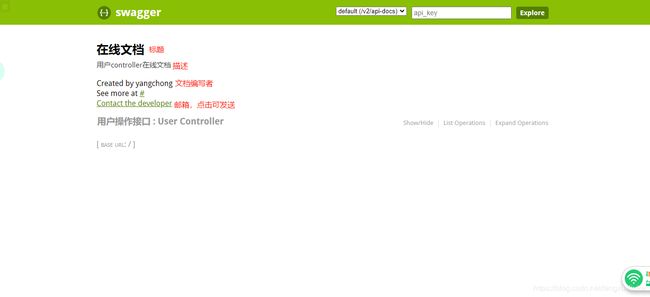
            .title("在线文档")
             //描述
            .description("用户controller在线文档")
             //url
            .termsOfServiceUrl("null")
             //三个参数,第一个为作者,第二个是url,第三个是邮箱
            .contact(new Contact("yangchong", "#", "[email protected]"))
            .build();

}
效果如图:
二、使用:
1、常用注解:
常用的注解如下:
- @Api()用于类名
- @ApiOperation()用于方法名
- @ApiParam()用于参数说明
- @ApiModel()用于实体类
- @ApiModelProperty用于实体类属性
更加详细的含义可以参考官方说明wiki
下面开始分别介绍:
@Api()用在请求的类上,表示对类的说明,例子:
@Api(value="用户controller",tags={"用户操作接口"})
tags=“说明该类的作用,可以在UI界面上看到的注解”
value=“该参数并没有多大的意义,在UI界面上也看到,可省略”
效果图:
@ApiOperation()用于描述一个方法或者接口,语法如下:
@ApiOperation(value = “接口说明”, httpMethod = “接口请求方式”, response = “接口返回参数类型”, notes = “接口发布说明”)
示例:
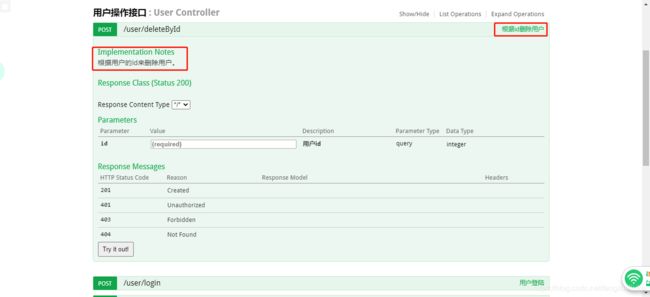
@ApiOperation(value="根据id删除用户", httpMethod="post" notes="根据用户的id来删除用户。")
效果图:
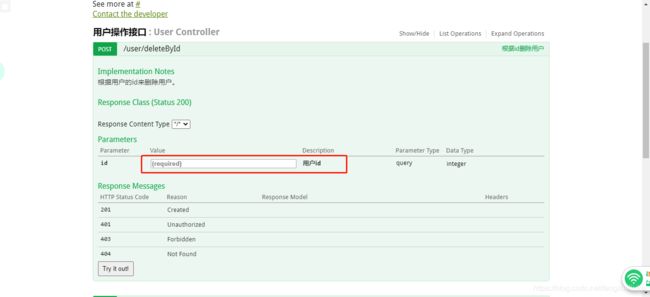
@ApiParam单个参数描述,格式:
@ApiParam(required = “是否必须参数”, name = “参数名称”, value = “参数具体描述”,default=”默认值”,)
示例:
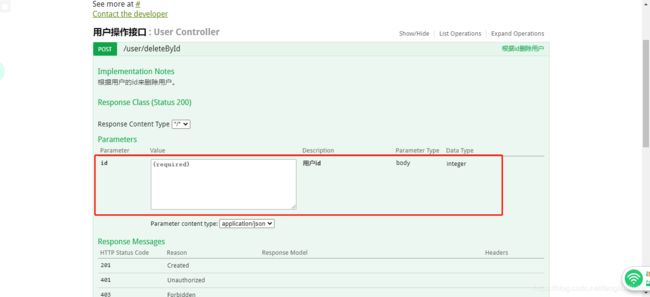
public String deleteById(@ApiParam(name="id",value="用户id",required=true) Integer id){}
效果图:
@ApiModel()用于类,在方法以对象作为参数的时候,可以在对象上添加注解,让其页面显示。
value–表示对象名
description–描述
示例:
@ApiModel(value="user对象",description="用户对象user")
@ApiModelProperty()用于方法,字段; 表示对model属性的说明或者数据操作更改,
一般配合@ApiModel注解使用,
value–字段说明
name–重写属性的名称
dataType–参数的数据类型
required–是否必填
example–举例
hidden–隐藏
示例(@ApiModel和@ApiModelProperty()):
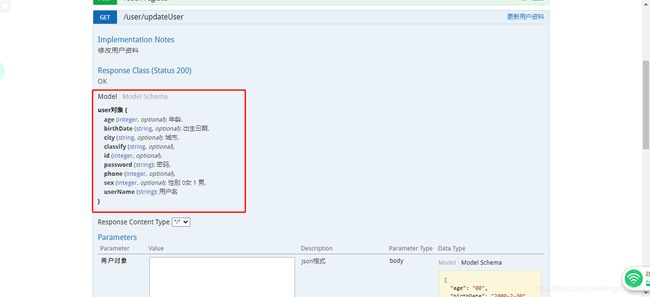
@ApiModel(value="user对象",description="用户对象user")
public class User {

    private Integer id;
    @ApiModelProperty(value="用户名",name="userName",example="张三",required=true)
    private String userName;
    @ApiModelProperty(value="密码",name="password",example="password",required=true)
    private String password;
    @ApiModelProperty(value="出生日期",name="birthDate",example="2000-2-30")
效果图:
@ApiImplicitParams、@ApiImplicitParam:
@ApiImplicitParams:用在请求的方法上,包含一组参数说明
@ApiImplicitParam:对单个参数的说明
包含的属性:
name:参数名
value:参数的说明
required:参数是否必须传,默认false
paramType:参数放在哪个地方,查询参数类型,这里有几种形式:
header --> 请求参数的获取:@RequestHeader,参数在request headers 里边提交
query --> 请求参数的获取:@RequestParam,直接跟参数,完成自动映射赋值
path(用于restful接口)–> 请求参数的获取:@PathVariable,以地址的形式提交数据
body(不常用)–> 以流的形式提交 仅支持POST
form(不常用)–> 以form表单的形式提交 仅支持POST
dataType:参数类型,默认String,其它值dataType=“Integer”
defaultValue:参数的默认值
@ApiImplicitParam示例:
@ApiImplicitParam(name = "password", value = "用户密码", required = true, dataType = "String")
效果图:
@ApiImplicitParams示例:
@ApiImplicitParams({
        @ApiImplicitParam(name = "userName", value = "用户名", required = true, dataType = "String",paramType="form"),
        @ApiImplicitParam(name = "password", value = "用户密码", required = true, dataType = "String",paramType="form")
})
效果图:
接口文档写完之后可以通过下面地址进行访问:
http://你的ip地址:端口号/swagger-ui.html#/
