基于ultra96v2的amp方案验证
目标计划
- 1.zu3eg下4*apu部署linux+ubuntu16.04操作系统
- 2.zu3eg下2*rpu部署freertos系统
- 3.rpu的程序固件由apu的系统启动后再进行加载
- 4.apu与rpu完成可靠通信
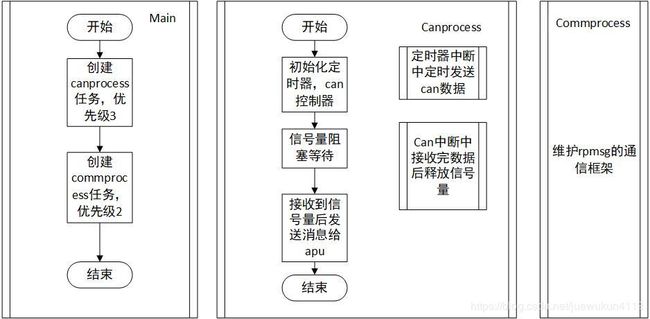
- 5.rpu控制can外设,硬件定时器,完成在20ms的周期定时下向外发送can信号
- 6.在满足5的情况下完成rpu控制can接收数据并发送给apu的linux的可靠测试
- 7.测试apu与rpu的通信时延及从rpu接收can数据到apu接收完数据的时间
硬件环境
测试的硬件基于ultra96v2
 全部源码已上传
https://github.com/tccxy/ultra96v2_openamp_test
软件环境
vivado2018.2
xilinx sdk2018.2
petalinux2018.2
++在官网上找了好几个宣称适用的bsp发现都起不来,逛论坛貌似ultra96v2的bsp还没有发布++
最后在github上搜到了一个
https://github.com/KeitetsuWorks/SDSoC-Ultra96-V2
这个非官方的vivado工程至少可以让板子正常启动了,对于我们完成此次的测试目标够用了,所以基于这个vivado工程进行后续的开发
amp的开发基于openamp框架完成
重要参考文档
https://china.xilinx.com/support/documentation/sw_manuals/
xilinx2019_1/ug1186-zynq-openamp-gsg.pdf
https://china.xilinx.com/support/documentation/user_guides/
ug1085-zynq-ultrascale-trm.pdf
openamp的linux端demo在
https://github.com/Xilinx/meta-openamp
因为需要涉及到将ubuntu移植到ultra96v2上,为了方便移植,参考开发板官网的镜像系统
http://zedboard.org/support/design/28476/181
板载了一个sdio接口的wifi模块,驱动在
https://github.com/Avnet/u96v2-wilc-driver
还有一些零散的参考在,注意这里面的标号为v2的包是针对ultra96v1的第二个版本的,而不是针对ultra96v2的包
https://github.com/Avnet/Ultra96-PYNQ
开始
vivado阶段
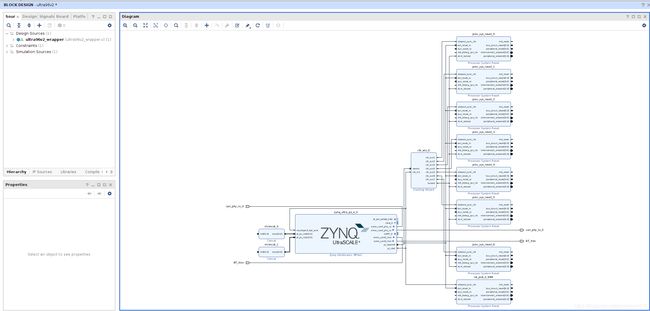
这块只是在原有的基础上加了一个ps端的can0控制器通过emio的方式引出到板子的40pin上,未做其他的改动
apu部署linux+ubuntu
本节主要叙述如何在ultra96v2上部署一个可以正常使用的Ubuntu系统,这是后续章节的前提
linux内核基于petalinux2018.2进行编译即可
ubuntu16.02-base的移植之前的文档也有过专门的叙述
到ultra96v2的板子上实际上主要涉及到一个sdio的wifi驱动的适配
petalinux目录下添加一个wifi驱动模块的支持
petalinux-create -t modules --name wilc --enable
在recipes-modules的bb文件中替换为如下文件
SUMMARY = "Recipe for building an external wilc Linux kernel module"
SECTION = "PETALINUX/modules"
LICENSE = "GPLv3"
LIC_FILES_CHKSUM = "file://${COMMON_LICENSE_DIR}/GPL-3.0;
md5=c79ff39f19dfec6d293b95dea7b07891"

inherit module

SRC_URI =  "git://github.com/Avnet/u96v2-wilc-driver;
protocol=http;branch=master"

SRCREV = "master"

DEPENDS += "virtual/kernel"

S = "${WORKDIR}/git/wilc"

EXTRA_OEMAKE = 'CONFIG_WILC=y \
		WLAN_VENDOR_MCHP=y \
		CONFIG_WILC_SDIO=m \
		CONFIG_WILC_SPI=n \
		CONFIG_WILC1000_HW_OOB_INTR=n \
		KERNEL_SRC="${STAGING_KERNEL_DIR}" \
		O=${STAGING_KERNEL_BUILDDIR}'
执行petalinux build
编译完成后将image/linux下的rootfs/lib/modules下的文件拷贝到ubuntu的/lib/modules下
将官方镜像包中的/home下的文件拷贝到ubuntu的/home/xxx下
xxx@localhost:~$ ls
ble.sh  bt.sh  test.sh  wifi.sh  wpa_supplicant.conf
xxx@localhost:~$
修改wpa_supplicant.conf中的wifi参数
然后sd卡分区fat分区存放petalinux编译的BOOT.BIN和image.ub
ext4分区存放ubuntu的系统
板子上电,可以正常启动
以root用户执行wifi.sh,wifi可以正常使用
xxx@localhost:~$ sudo ./wifi.sh
[sudo] password for xxx:
Successfully initialized wpa_supplicant
xxx@localhost:~$ ifconfig
lo        Link encap:Local Loopback
          inet addr:127.0.0.1  Mask:255.0.0.0
          inet6 addr: ::1/128 Scope:Host
          UP LOOPBACK RUNNING  MTU:65536  Metric:1
          RX packets:0 errors:0 dropped:0 overruns:0 frame:0
          TX packets:0 errors:0 dropped:0 overruns:0 carrier:0
          collisions:0 txqueuelen:1000
          RX bytes:0 (0.0 B)  TX bytes:0 (0.0 B)

wlan0     Link encap:Ethernet  HWaddr f8:f0:05:c4:1f:58
          inet addr:192.168.0.102  Bcast:192.168.0.255
          Mask:255.255.255.0
          inet6 addr: fe80::faf0:5ff:fec4:1f58/64 Scope:Link
          UP BROADCAST RUNNING MULTICAST  MTU:1500  Metric:1
          RX packets:26 errors:0 dropped:0 overruns:0 frame:0
          TX packets:16 errors:0 dropped:0 overruns:0 carrier:0
          collisions:0 txqueuelen:1000
          RX bytes:5065 (5.0 KB)  TX bytes:2199 (2.1 KB)

xxx@localhost:~$
rpu固件启动
本节主要叙述如何完成rpu上freertos系统的部署以及如何通过apu的linux启动rpu的固件,并完成通信demo的测试
1.rpu的固件编译
点击vivado中的File > launch SDK
在SDK的界面中点击File > New > Application Projects
在 Processor中选择psu_cortexr5_0 或 psu_cortexr5_1 .
os选择freertos
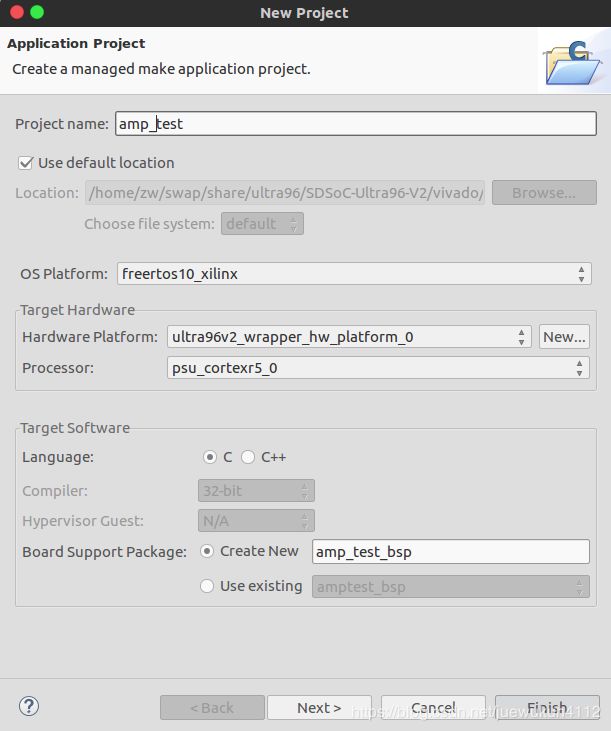
在Demo中选择OpenAMP echo-test
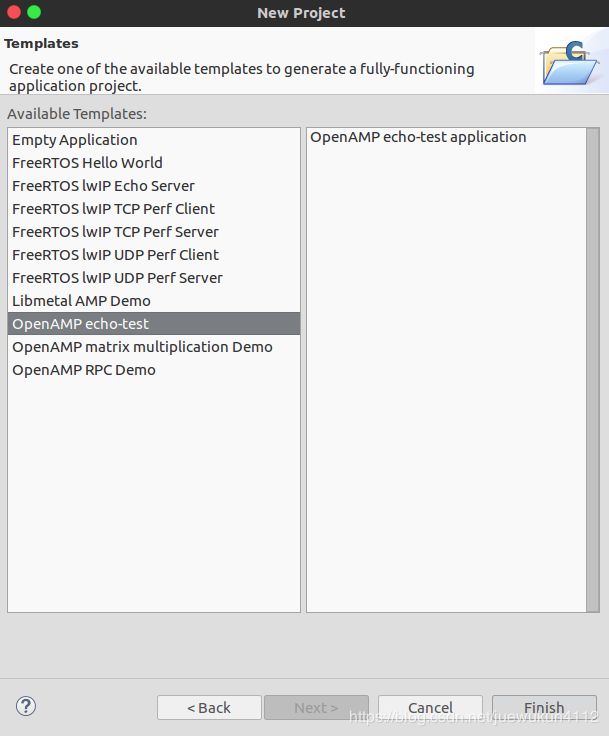
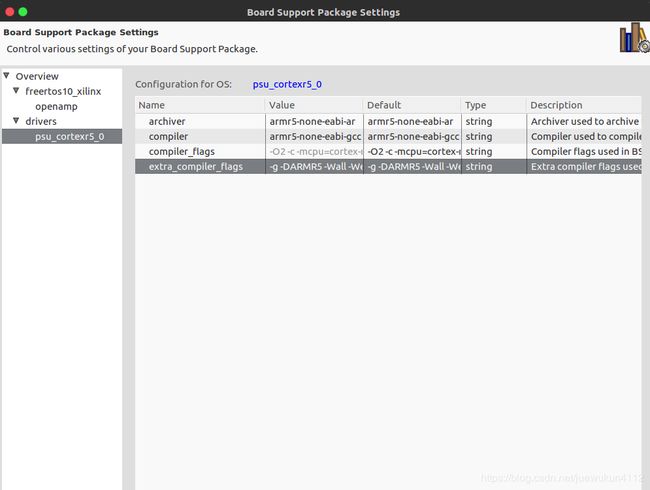
在 Board Support Package Settings中的psu_cortexr5_0中的extra_compiler_flags中的Value中添加-DUSE_AMP=1
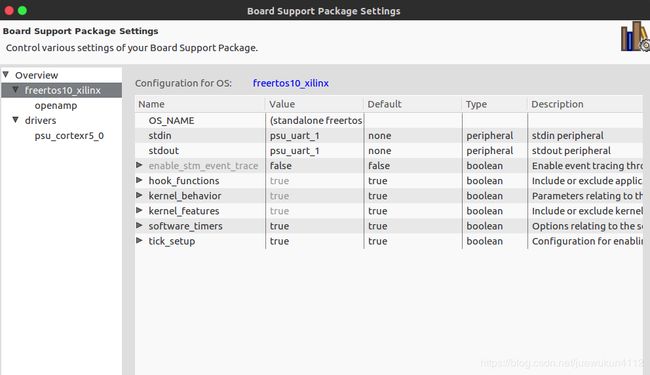
调试串口选择uart1,ultra96v2引出来的uart为uart1
执行Project > Build All就可以生成对应的.elf固件了
2.linux+ubuntu上添加openamp的支持
linux内核中添加
petalinuxconfig -c kenel
[*] Enable loadable module support --->
Device Drivers --->
Generic Driver Options --->
<*> Userspace firmware loading support
Device Drivers --->
Remoteproc drivers --->
 ZynqMP_r5 remoteproc support
设备树中system-user.dtsi添加文件系统中添加
	reserved-memory {
		#address-cells = <2>;
		#size-cells = <2>;
		ranges;
		rproc_0_reserved: rproc@3ed000000 {
			no-map;
			reg = <0x0 0x3ed00000 0x0 0x1000000>;
		};
	};

	power-domains {
		pd_r5_0: pd_r5_0 {
			#power-domain-cells = <0x0>;
			pd-id = <0x7>;
		};
		pd_tcm_0_a: pd_tcm_0_a {
			#power-domain-cells = <0x0>;
			pd-id = <0xf>;
		};
		pd_tcm_0_b: pd_tcm_0_b {
			#power-domain-cells = <0x0>;
			pd-id = <0x10>;
		};
	};

	amba {
		r5_0_tcm_a: tcm@ffe00000 {
			compatible = "mmio-sram";
			reg = <0x0 0xFFE00000 0x0 0x10000>;
			pd-handle = <&pd_tcm_0_a>;
		};
		r5_0_tcm_b: tcm@ffe20000 {
			compatible = "mmio-sram";
			reg = <0x0 0xFFE20000 0x0 0x10000>;
			pd-handle = <&pd_tcm_0_b>;
		};

		elf_ddr_0: ddr@3ed00000 {
			compatible = "mmio-sram";
			reg = <0x0 0x3ed00000 0x0 0x40000>;
		};

		test_r50: zynqmp_r5_rproc@0 {
			compatible = "xlnx,zynqmp-r5-remoteproc-1.0";
			reg = <0x0 0xff9a0100 0x0 0x100>,
			<0x0 0xff340000 0x0 0x100>,
			<0x0 0xff9a0000 0x0 0x100>;
			reg-names = "rpu_base","ipi","rpu_glbl_base";
			dma-ranges;
			core_conf = "split0";
			srams = <&r5_0_tcm_a &r5_0_tcm_b &elf_ddr_0>;
			pd-handle = <&pd_r5_0>;
			interrupt-parent = <&gic>;
			interrupts = <0 29 4>;
		} ;
	};
petalinuxconfig -c rootfs
Filesystem Packages --->
misc --->
openamp-fw-echo-testd --->
[*] openamp-fw-echo-testd
openamp-fw-mat-muld --->
[*] openamp-fw-mat-muld
openamp-fw-rpc-demo --->
[*] openamp-fw-rpc-demo
Petalinux Package Groups --->
packagegroup-petalinux-openamp --->
[*] packagegroup-petalinux-openamp
执行petalinux build
编译完成后将image/linux下的rootfs/lib/modules下的文件拷贝到ubuntu的/lib/modules下
将image/linux下的rootfs/lib/firmware下的文件拷贝到ubuntu的/lib/firmware下
3.openamp通信demo测试
这个例子中用到的rpu的固件和linux端的执行程序都是petalinux的rootfs中带的
在/home/xxx目录下创建脚本添加以下内容
#!/bin/sh
modprobe zynqmp_r5_remoteproc
echo image_echo_test > /sys/class/remoteproc/remoteproc0/firmware
echo start > /sys/class/remoteproc/remoteproc0/state
modprobe rpmsg_user_dev_driver
modprobe virtio_rpmsg_bus
echo_test

exit 0
以root用户执行该脚本
可以看到控制台打印
Echo test start

 Open rpmsg dev /dev/rpmsg0!

 **************************************

  Echo Test Round 0

 **************************************

 sending payload number 0 of size 17
echo test: sent : 17
 received payload number 0 of size 17

 sending payload number 2 of size 18
echo test: sent : 18
 received payload number 2 of size 18

 sending payload number 3 of size 19
echo test: sent : 19
 received payload number 3 of size 19

 sending payload number 4 of size 20
echo test: sent : 20
 received payload number 4 of size 20

...
对应的源代码在软件环境提到的openamp 的linux demo中
4替换自己的源码编译的程序进行测试
将第一步生成的.elf固件文件拷贝到ubuntu的/lib/firware中
在petalinux的目录执行
petalinux-create -t apps --name amptest --enable
在recipes-apps/amptest/files文件夹中添加下面的文件夹内的全部内容,为了便于区分将名字改成amp_test
https://github.com/Xilinx/meta-openamp/tree/master/
recipes-openamp/rpmsg-examples/rpmsg-echo-test
在上层的bb文件中也替换上述git文件的bb文件,注意名字要更改成一致的
执行petalinux build
编译后将image/linux下的rootfs/usr/bin下的amptest文件拷贝到ubuntu的/usr/local/sbin下
替换第3步中的shell的image_echo_test为rpu的.elf,echo_test为linux的amptest
以root用户执行脚本,可看到与第3步同样的控制台输出
这个amptest的就是后续测试的apu的linux侧的源码基础
rpu的xsdk的工程是后续测试的rpu侧的工程
xsdk的开发界面如下,在裸机这一侧,xsdk提供了很多的bsp库函数
位于_bsp > psu_cortexr5_0 > libsrc 下
同时在system.mss中也给了一定的example参考
ug1085也就是Zynq UltraScale+ Device的trm
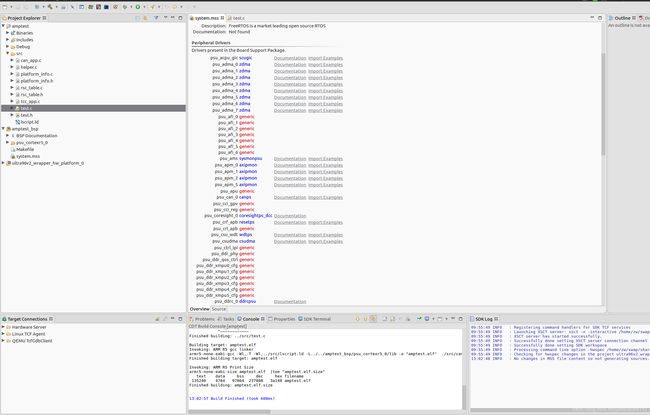
后续的测试中因为rpu与apu对同一个外设有同样的访问权力,为了可以直观的看到调试效果,将uart1作为rpu的打印输出,linux的调试输出放在网口的telnet中进行
rpu与apu协同测试
本节主要涉及到目标的5、6
涉及到的代码有点多,无法截图了,会传到gitlab上,需要注意的是,如果rpu中用到的外设在apu中应该禁掉,具体的就是dts中应当将相应的节点disable掉
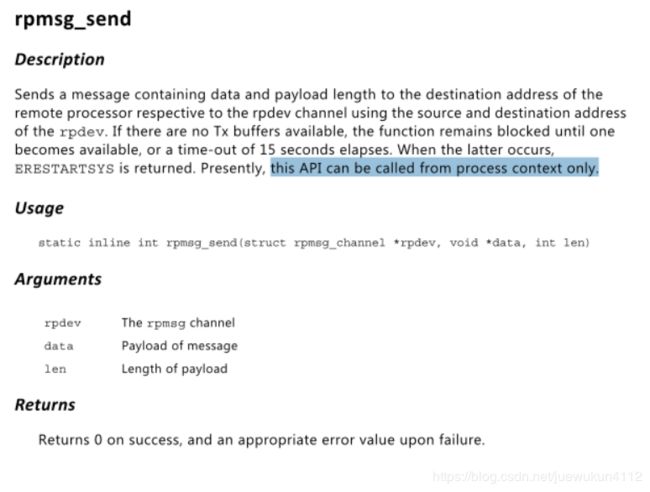
rpmsg的相应API只能在上下文中使用,不能在中断中使用
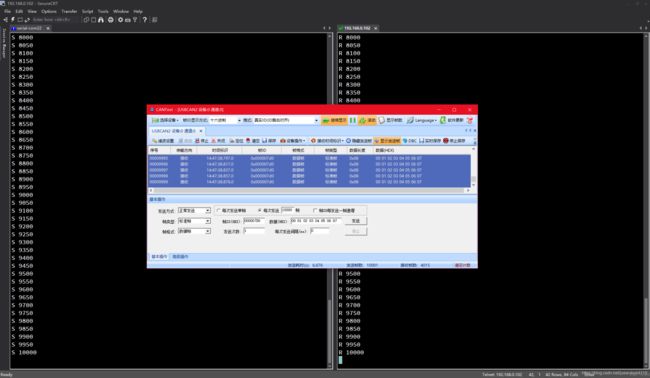
测试效果
左侧为rpu的打印共转发了10000帧,右侧为apu的接收打印共接收了10000帧
同时rpu以20ms的周期向外发送can数据
通信时延测试
为了掌握openamp框架的通信时延级别,进行此测试,可以不是十分精确,但是需要测量出为us级还是ms级别
通过在rpu端配置使能一个计数器,当can中断接收数据完成后读取一下计数器的值,rpu端发送完数据后读取一下计数器的值,linux端接收完数据后读取一下寄存器的值
以此来计算通信时延级别
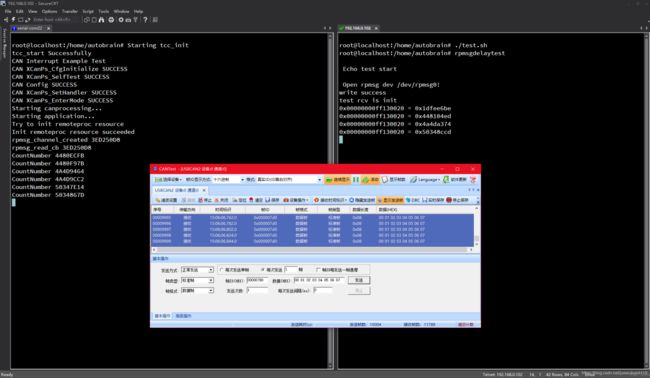
如上图可以看到,计数器的时钟为100M
数据从can中断接收完成到linux接收到该数据的时间大概为37.69us
$$
(0x50348ccd - 0x50347E14)/100 000 000
$$
而rpmsg的通信时延大概为16.16us
$$
(0x50348ccd - 0x5034867D)/100 000 000
$$
