机器学习 | 集成学习
集成学习
- 1 面试遇到的问题
- 1.1 GBDT XGBoost LightGBM 三者有什么区别?
- 1.1.1 GBDT VS XGBoost
- 1.1.2 XGBoost VS LightGBM
- 1.2 bagging和boosting有什么区别?
- 1.3 Adaboost每次样本权重的调整体现在哪?
- 1.4 随机森林的随机体现在哪?
- 1.5 为什么随机森林的树深度往往大于 GBDT 的树深度?
- 1.6 谈一谈XGBoost
- 2 集成学习(Ensemble Learning)
- 2.1 目的
- 2.2 有意思的等式
- 2.3 集成学习的好坏需要满足的条件?
- 2.4 集成学习所需要解决的问题
- 2.5 集成学习个体学习器的问题
- 2.5.1 两大类个体学习器
- 2.5.2 同质个体学习器的结合策略
- 2.6 集成学习分类及原理概览
- 2.7 集成学习的策略
- 3 bagging
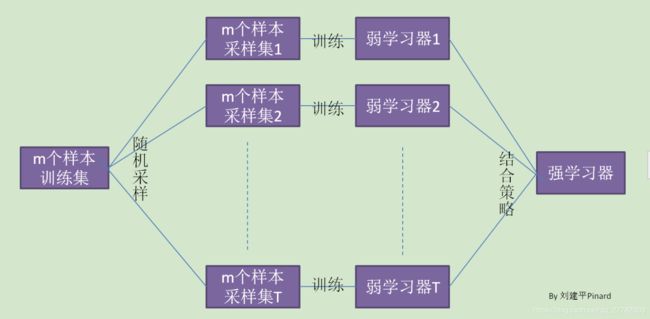
- 3.1 什么是bagging?
- 3.1.1 思想
- 3.1.2 步骤
- 3.1.3 bagging的优势
- 3.2 bagging的衍生,变形有哪些?
- 3.2.1 什么是随机森林?
- 3.2.2 随机森林的基模型是?
- 3.2.3 随机森林和bagging的联系
- 3.2.4 随机森林的扩展
- 3.2.4.1 extra trees
- 3.2.4.2 Totally Random Trees Embedding
- 3.2.4.3 Isolation Forest
- 3.2.5 随机森林的步骤?
- 3.3 随机森林的优缺点
- 4 boosting
- 4.1 思想
- 4.2 要解决的问题
- 4.3 Adaboost
- 4.3.1 原理/思想
- 4.3.2 推导
- 4.3.3 用于分类时的步骤
- 4.3.4 用于回归时步骤
- 4.3.5 正则化
- 4.3.6 基模型是啥呢?
- 4.3.7 Adaboost算法的训练误差分析是什么意思?
- 4.3.8 优缺点
- 4.4 提升树(boosting tree)
- 4.4.1 什么叫提升树?
- 4.4.2 提升树的分类
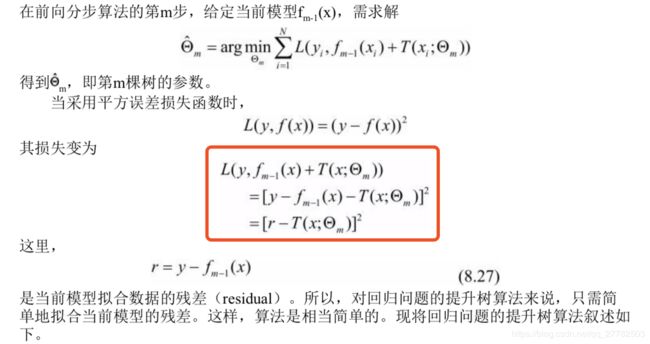
- 4.4.3 为什么回归问题的提升树是拟合残差?
- 4.4.4 具体算法
- 4.5 GBDT
- 4.5.1 GBDT和Adaboost的比较
- 4.5.2 问题:如何度量上述说的损失尽可能小呢?
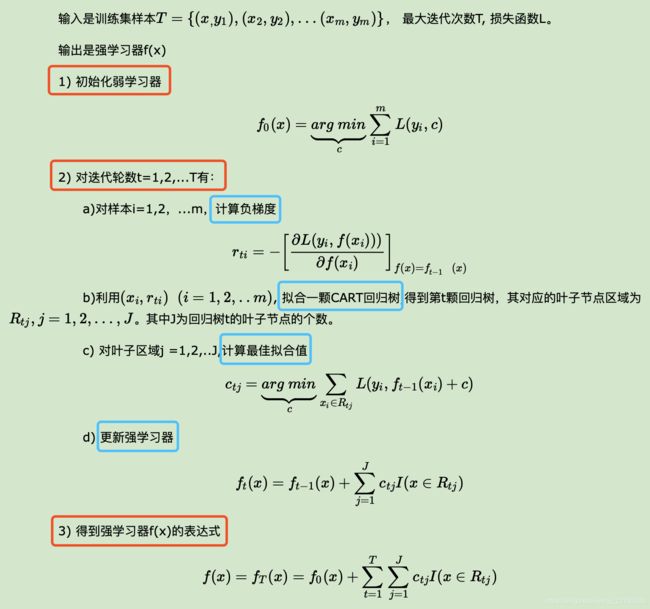
- 4.5.3 GBDT回归算法
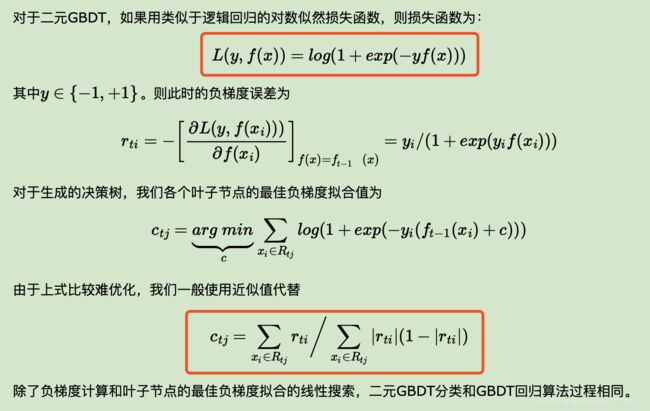
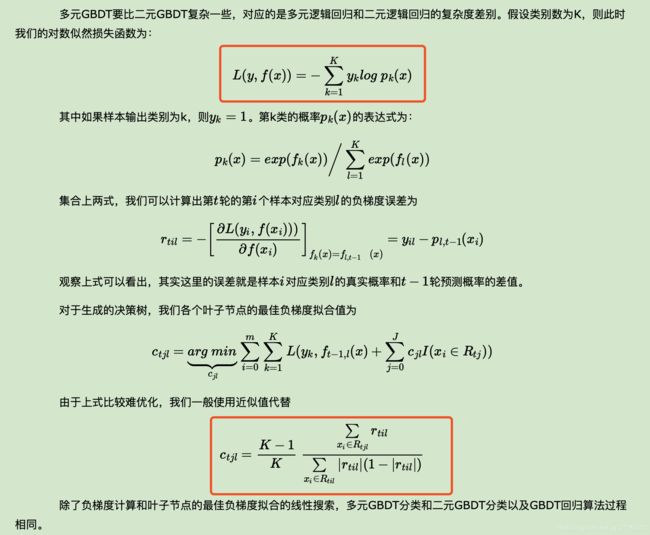
- 4.5.4 GBDT分类算法
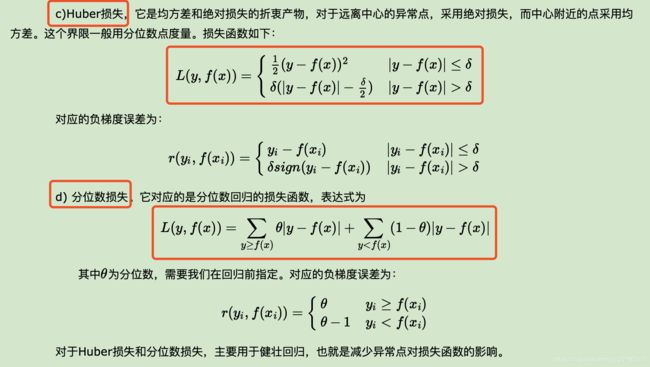
- 4.5.5 常用损失函数
- 4.5.6 GBDT正则化
- 4.5.7 GBDT优缺点
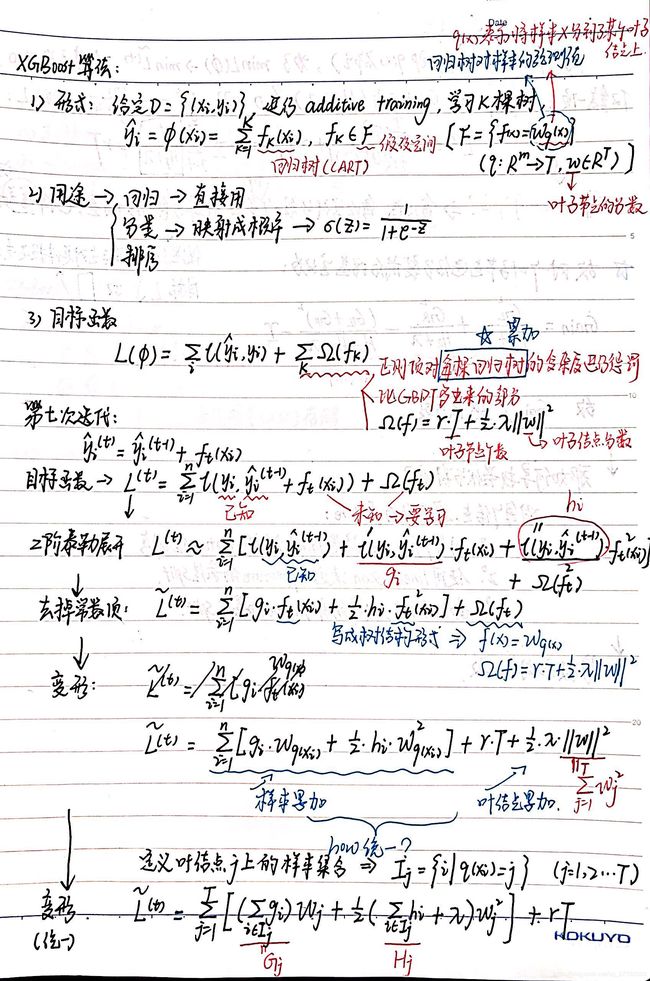
- 4.6 XGBoost
- 4.6.1 算法推导过程
- 4.6.2 XGBoost是个啥?
- 4.6.3 XGBoost的基分类器是?
- 4.6.4 基分类器-回归树的特点
- 4.6.5 以CART为基模型对应的最终模型可视化-模型最后长啥样
- 4.6.6 具体求解时候的两种思路
- 4.6.7 XGBoost的优点/缺点是什么?
- 4.6.8 GBDT和XGBoost的比较
- 4.7 LightGBM
- 4.7.1 什么是LightGBM?
- 4.7.2 LightGBM的并行方案
- 4.7.3 基于梯度的单边检测(GOSS)
- 4.7.4 排他性特征捆绑(EFB)
- 4.7.5 XGBoost和LightGBM对比
- 5 代码实现
- 5.1 报错信息进行忽略
- 5.2 bagging实现
- 5.2.1 建模
- 5.2.2 评估效果
- 5.2.3 交叉验证
- 5.2.4 看下测试集AUC
- 5.2.5 封装成函数-计算测试集AUC
- 5.3 随机森林实现
- 5.3.1 先不调参
- 5.3.2 开始调参
- 5.3.2.1 estimator调参
- 5.3.2.2 深度/样本数调参
- 5.3.2.3 查看上述调参后模型的袋外分数
- 5.3.2.4 决策树相关参数一起调参
- 5.3.2.5 max_features做调参
- 5.3.2.6 最终结果
- 5.4 Adaboost实现
- 5.4.1 未调参
- 5.4.2 开始调参
- 5.4.2.1 estimator调参
- 5.4.2.2 步长调参
- 5.5 GBDT实现
- 5.5.1 未调参
- 5.5.2 开始调参
- 5.5.2.1 步长+迭代次数调参
- 5.5.2.2 决策树调参
- 5.5.2.3 决策树继续调参
- 5.5.2.4 调参max_features
- 5.6 XGBoost实现
- 5.6.1 未调参
- 5.6.2 调参
- 5.6.2.1 n_estimators调参
- 5.7 LightGBM实现
- 5.7.1 没有调参
- 5.7.2 调参
- 6 参考
- 7 数据
1 面试遇到的问题
1.1 GBDT XGBoost LightGBM 三者有什么区别?
1.1.1 GBDT VS XGBoost
- GBDT是机器学习算法,XGBoost是该算法的工程实现。
- 是否有显示正则化项(目标函数中)。在使用CART作为基分类器时,XGBoost显式地加入了正则项来控制模型的复杂度,有利于防止过拟合,从而提高模型的泛化能力。
- 损失函数导数信息的利用。GBDT在模型训练时只使用了代价函数的一阶导数信息,XGBoost对代价函数进行二阶泰勒展开,可以同时使用一阶和二阶导数。
- 基分类器的选择。基分类器的选择传统的GBDT采用CART作为基分类器(本身就是二叉树,所以只支持二分类),XGBoost支持多种类型的基分类器,比如线性分类器。
- 是否有列抽样。XGBoost则采用了与随机森林相似的策略,支持列抽样,不仅能降低过拟合,还能减少计算。
- 缺失值处理。传统的GBDT没有设计对缺失值进行处理,XGBoost可以自动学习出它的分裂方向。XGBoost对于缺失值能预先学习一个默认的分裂方向。
- 是否支持并行计算。XGBoost可以在特征粒度上进行并行计算,GBDT不行。
- 分裂方式存在差异。当分裂时遇到一个负损失时,LightGBM会停止分裂。而XGBoost会一直分裂到指定的最大深度(max_depth),然后回过头来剪枝。如果某个节点之后不再有正值,它会去除这个分裂。这种做法的优点,当一个负损失(如-2)后面有个正损失(如+10)的时候,就显现出来了。LightGBM会在-2处停下来,因为它遇到了一个负值。但是 XGBoost会继续分裂,然后发现这两个分裂综合起来会得到+8,因此会保留这两个分裂。
1.1.2 XGBoost VS LightGBM
-
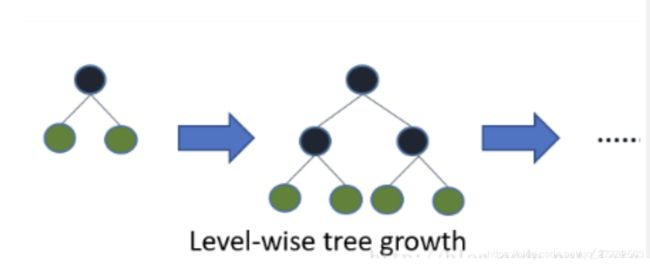
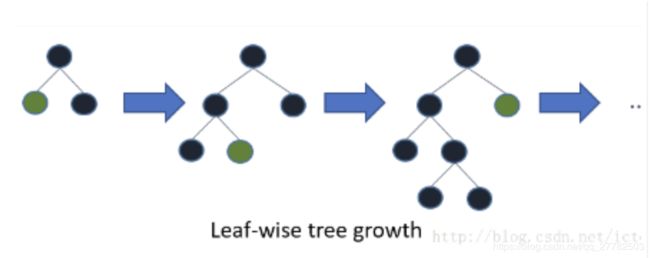
叶子生长策略不同。
- XGBoost:Level-wise
- LightGBM:Leaf-wise。Leaf-Wise分裂导致复杂性的增加并且可能导致过拟合。但是可以通过设置另一个参数 max-depth 来克服,它分裂产生的树的最大深度。
-
时间复杂度不同。
- XGBoost使用基于预排序的决策树算法,每遍历一个特征就需要计算一次特征的增益,时间复杂度为O(datafeature)。
- LightGBM使用基于直方图的决策树算法,直方图的优化算法只需要计算K次,时间复杂度为O(Kfeature)
-
类别名称的处理。
- LightGBM 支持类别特征,不需要进行独热编码处理
- XGBoost需要对类别变量进行先单独热编码处理
-
优化方法不同
- LightGBM的优化方法比XGBoost更多
-
决策树算法存在差异。
- XGBoost使用的是pre-sorted算法。(对所有特征都按照特征的数值进行预排序,在遍历分割点的时候用O(data)的代价找到一个特征上的最好分割点),能够更精确的找到数据分隔点;(xgboost的分布式实现也是基于直方图的,利于并行)
- LightGBM使用的是histogram算法。(类似一种分桶算法),占用的内存更低,数据分隔的复杂度更低。
1.2 bagging和boosting有什么区别?
- 样本选择。Bagging采用的是Bootstrap随机有放回抽样;而Boosting每一轮的训练集是不变的,改变的只是每一个样本的权重。
- 样本权重。Bagging使用的是均匀取样,每个样本权重相等;Boosting根据错误率调整样本权重,错误率越大的样本权重越大。
- 预测函数。Bagging所有的预测函数的权重相等;Boosting中误差越小的预测函数其权重越大。
- 并行计算。Bagging各个预测函数可以并行生成;Boosting各个预测函数必须按顺序迭代生成。
1.3 Adaboost每次样本权重的调整体现在哪?
体现在每一次构造基分类器的过程中,都会考虑到上一次的样本权重,目标函数就是使得分类之后的损失函数最小,会考虑到样本权重
1.4 随机森林的随机体现在哪?
- 采样的差异性:从含m个样本的数据集中有放回的采样,得到含m个样本的采样集,用于训练。这样能保证每个决策树的训练样本不完全一样。【数据的随机性选取】
- 特征选取的差异性:每个决策树的n个分类特征是在所有特征中随机选择的(n是一个需要我们自己调整的参数)【待选特征的随机选取】
1.5 为什么随机森林的树深度往往大于 GBDT 的树深度?
-
从偏差方差关系来看。需要平衡好偏差和方差,既拟合的不错,又得泛化性能好。
- 偏差:指的是算法的期望预测与真实预测之间的偏差程度,反应了模型本身的拟合能力。【看拟合的好不好】
- 方差:度量了同等大小的训练集的变动导致学习性能的变化,刻画了数据扰动所导致的影响。【看泛化性能好不好】
-
Bagging:并行训练很多不同的分类器的目的就是降低方差,所以基分类器应该尽可能降低偏差,即会采用深度很深甚至不剪枝的决策树。
-
Boosting:每一步我们都会在上一轮的基础上更加拟合原数据,所以可以保证偏差在不断减小,故基分类器应该尽可能的降低方差,即更简单的分类器,所以我们选择了深度很浅的决策树。
1.6 谈一谈XGBoost
-
大的框架
- 集成学习包括bagging和boosting,XGBoost属于boosting方法的一种。
-
什么是XGBoost?
- XGBoost 是 “Extreme Gradient Boosting” 的缩写,XGBoost 算法的步骤和 GBDT 基本相同,都是首先初始化为一个常数,GBDT 是根据一阶导数,XGBoost 是根据一阶导数 gi 和二阶导数 hi,迭代生成基学习器,相加更新学习器。
-
XGBoost求解方法有两种:
- 贪心法
- 近似法
-
XGBoost优点/缺点:
优点:
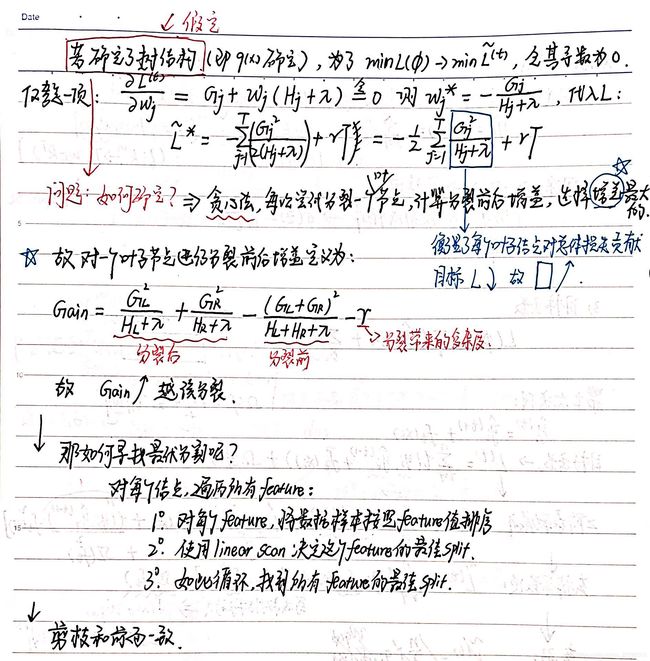
- 节点分裂的准则区别于一般的决策树方法。Gain=分裂后-分裂前的,具体的式子为目标函数中的一部分,衡量了每个叶子节点对总体损失贡献。Gain越大越好
- 可以并行计算,XGBoost的并行是在特征粒度上的。XGBoost在训练之前,预先对数据进行了排序,然后保存为block结构,后面的迭代中重复地使用这个结构,大大减小计算量。在进行节点的分裂时,需要计算每个特征的增益,最终选增益最大的那个特征去做分裂,那么各个特征的增益计算就可以开多线程进行。【即XGBoost最大的认知在于其能够自动地运用CPU的多线程进行并行计算,同时在算法精度上也进行了精度的提高。 】
- 可并行的近似直方图算法。先通过直方图算法获得候选分割点的分布情况,然后根据候选分割点将连续的特征信息映射到不同的buckets中,并统计汇总信息。为什么这么做呢?因为每次分割的时候需要把全量数据都导入到内存,不一定一次就能成功,效率低,故采用近似直方图算法。
- 正则化。XGBoost在代价函数中加入了正则项(叶子节点数+叶子节点分数),用于控制模型的复杂度。从权衡方差偏差来看,它降低了模型的方差,使学习出来的模型更加简单,防止过拟合。
- shrinkage(缩减),相当于学习速率(XGBoost中的eta)。XGBoost在进行完一次迭代时,会将叶子节点的权值乘上该系数,主要是为了削弱每棵树的影响,让后面有更大的学习空间。
- 列抽样。XGBoost借鉴了随机森林的做法,支持列抽样,不仅防止过拟合,还能减少计算
- 对缺失值的处理。对于特征的值有缺失的样本,XGBoost还可以自动学习出它的分裂方向;
缺点:
- level-wise分裂方式的计算复杂度高。level-wise建树方式对当前层的所有叶子节点一视同仁,有些叶子节点分裂收益非常小,对结果没影响,但还是要分裂,加重了计算代价。
- 预排序方法空间消耗比较大。不仅要保存特征值,也要保存特征的排序索引,同时时间消耗也大,在遍历每个分裂点时都要计算分裂增益(不过这个缺点可以被近似算法所克服)
2 集成学习(Ensemble Learning)
2.1 目的
- 将已有的分类或回归算法通过一定方式组合起来,形成一个性能更加强大的分类器;
- 更准确的说这是一种分类算法的组装方法。即将弱分类器组装成强分类器的方法。
2.2 有意思的等式
-
Bagging + 决策树 = 随机森林
-
AdaBoost + 决策树 = 提升树
-
Gradient Boosting + 决策树 = GBDT
2.3 集成学习的好坏需要满足的条件?
- 要获得好的集成,个体学习器应“好而不同”,
- 即个体学习器要有一定的“准确性”,即学习器不能太差,并且要有“多样性”,即学习器间具有差异。
2.4 集成学习所需要解决的问题
-
如何得到若干个个体学习器
-
如何选择一种结合策略,将这些个体学习器集合成一个强学习器。
2.5 集成学习个体学习器的问题
2.5.1 两大类个体学习器
个体学习器分为同质和异质两种。
- 同质:比如都是决策树个体学习器,或者都是神经网络个体学习器。
- 异质:所有的个体学习器不全是一个种类的,比如我们有一个分类问题,对训练集采用支持向量机个体学习器,逻辑回归个体学习器和朴素贝叶斯个体学习器来学习,再通过某种结合策略来确定最终的分类强学习器。
那我们用哪个比较多?
- 同质的!
- 同质个体学习器的应用是最广泛的,一般我们常说的集成学习的方法都是指的同质个体学习器。
- 而同质个体学习器使用最多的模型是CART决策树和神经网络。
2.5.2 同质个体学习器的结合策略
现在知道了大部分都是同质个体学习器的组合,那么如何组合呢?两种方式!
- 串行生成。代表算法是boosting系列算法。个体学习器之间存在强依赖关系,一系列个体学习器基本都需要串行生成。
- 并行生成。代表算法是bagging和随机森林(Random Forest)系列算法。个体学习器之间不存在强依赖关系,一系列个体学习器可以并行生成
2.6 集成学习分类及原理概览
这一部分直接引言刘建平老师的博客,真的写的太好了!http://www.cnblogs.com/pinard/p/6131423.html
- 集成学习主要是包括bagging和boosting两大类!
2.7 集成学习的策略
- 平均法(回归)
- 投票法(分类)—三种:相对多数投票法;绝对多数投票法(比如必须还得超过一半);加权投票法
- 学习法:典型代表stacking。待补充stacking思想及实现!
stacking:
当使用stacking的结合策略时,我们不是对弱学习器的结果做简单的逻辑处理,而是再加上一层学习器,也就是说,我们将训练集弱学习器的学习结果作为输入,将训练集的输出作为输出,重新训练一个学习器来得到最终结果。在这种情况下,我们将弱学习器称为初级学习器,将用于结合的学习器称为次级学习器。对于测试集,我们首先用初级学习器预测一次,得到次级学习器的输入样本,再用次级学习器预测一次,得到最终的预测结果。
3 bagging
3.1 什么是bagging?
3.1.1 思想
就是首先对于样本进行自助抽样,然后分别对每一个样本进行建模,最后根据所有单模型的预测结果进行投票决定最终结果。
-
bagging = boostrap aggregation
-
boostrap:在统计学中,自助法(Bootstrap Method,Bootstrapping,或自助抽样法)是一种从给定训练集中有放回的均匀抽样,也就是说,每当选中一个样本,它等可能地被再次选中并被再次添加到训练集中。 自助法由Bradley Efron于1979年在《Annals of Statistics》上发表。
至于为什么boostrap效果比较好,可以见知乎:https://www.zhihu.com/question/38429969
个人主要觉得是样本量比较小的时候,boostrap效果会比较好
3.1.2 步骤
-
进行Boostrap。从原始样本集中使用Bootstraping方法(自助法)随机抽取样本容量为n的样本,共进行k轮抽取,得到k个训练集。(k个训练集之间相互独立,元素可以有重复)
-
建立模型。对于k个训练集,我们训练k个模型(这k个模型可以根据具体问题而定,比如决策树,knn等)
-
集成得结果。对于分类问题:由投票表决产生分类结果;对于回归问题:由k个模型预测结果的均值作为最后预测结果。
3.1.3 bagging的优势
使用bagging之后就可以不用交叉验证来求测试误差了!而是采用OOB误差!为啥呢?
- 平均而言,每一个袋装树可以利用 2/3 的观察样本。而剩下的 1/3 观察样本就可以称为 out-of-bag (OOB) 观察样本,它们并不会拟合一一棵给定袋装树。
- 所以每一颗树都可以利用剩下的1/3来进行测试,利用建立的模型来进行预测,并求得 OOB MSE(回归问题)和分类误差率(分类问题)。
- 上述操作的可行性保证就是每一个样本的预测值都是仅仅使用不会进行拟合训练模型的样本!
- 即可以利用OOB检测模型的泛化能力
- bagging可以降低方差,但偏差降低比较少。由于Bagging算法每次都进行采样来训练模型,因此泛化能力很强,对于降低模型的方差很有作用。当然对于训练集的拟合程度就会差一些,也就是模型的偏倚会大一
3.2 bagging的衍生,变形有哪些?
主要衍生就是:随机森林
3.2.1 什么是随机森林?
- bagging + 决策树 = 随机森林
- 随机森林是决策树的集成,即基模型为决策树!
- 随机森林指的是利用多棵决策树对样本进行训练并预测的一种分类器。可回归可分类。
3.2.2 随机森林的基模型是?
CART树!
3.2.3 随机森林和bagging的联系
随机森林是bagging的进化版,进行了改进,那改进的地方有哪些呢?
- RF使用了CART决策树作为弱学习器
- RF不是使用全部的特征来进行选择哪个特征分割,RF通过随机选择节点上的一部分样本特征,这个数字小于n,假设为nsub,然后在这些随机选择的nsub个样本特征中,选择一个最优的特征来做决策树的左右子树划分。这样进一步增强了模型的泛化能力。
那如何确定nsub呢?
- nsub越小,模型越健壮,即方差越小,但偏差越大。
- nsub=n,则RF的CART=普通的CART
- 一般使用交叉验证调参获取一个合适的nsub的值
3.2.4 随机森林的扩展
随机森林有下面三种扩展
3.2.4.1 extra trees
相对于普通随机森林,它的变化有:
- 不随机采样。extra trees一般不采用随机采样,即每个决策树采用原始训练集。
- 特征选择的方式不同。extra trees比较的激进,他会随机的选择一个特征值来划分决策树。
故模型的方差相对于RF进一步减少,但是偏倚相对于RF进一步增大
3.2.4.2 Totally Random Trees Embedding
思想:
- 非监督学习的数据转化方法。它将低维的数据集映射到高维,从而让映射到高维的数据更好的运用于分类回归模型
具体过程:
- 模型建立。TRTE在数据转化的过程也使用了类似于RF的方法,建立T个决策树来拟合数据。
- 进行编码,从低维映射到高维。当决策树建立完毕以后,数据集里的每个数据在T个决策树中叶子节点的位置也定下来了。比如我们有3颗决策树,每个决策树有5个叶子节点,某个数据特征x划分到第一个决策树的第2个叶子节点,第二个决策树的第3个叶子节点,第三个决策树的第5个叶子节点。则x映射后的特征编码为(0,1,0,0,0, 0,0,1,0,0, 0,0,0,0,1), 有15维的高维特征。这里特征维度之间加上空格是为了强调三颗决策树各自的子编码。
- 继续建模。映射到高维特征后,可以继续使用监督学习的各种分类回归算法了。
3.2.4.3 Isolation Forest
作用:
- 异常点检测
具体过程:
- 随机采样(样本量小于n)。但是采样个数不需要和RF一样,对于RF,需要采样到采样集样本个数等于训练集个数。但是IForest不需要采样这么多,一般来说,采样个数要远远小于训练集个数?为什么呢?因为我们的目的是异常点检测,只需要部分的样本我们一般就可以将异常点区别出来了。
- 建立模型(随机选特征+设置小的决策树深度)。对于每一个决策树的建立, IForest采用随机选择一个划分特征,对划分特征随机选择一个划分阈值;IForest一般会选择一个比较小的最大决策树深度max_depth,原因同样本采集,用少量的异常点检测一般不需要这么大规模的决策树。
- 异常点的判断。

3.2.5 随机森林的步骤?
也就是如何构建随机森林的?三步!
- 数据的随机选取。bagging方式。
- 建立模型,随机选特征。
- 预测。结合多个预测结果进行集成。
3.3 随机森林的优缺点
优点:
- 并行训练。训练可以高度并行化,对于大数据时代的大样本训练速度有优势。个人觉得这是的最主要的优点。
- 随机选特征。由于可以随机选择决策树节点划分特征,这样在样本特征维度很高的时候,仍然能高效的训练模型。
- 输出特征重要性。在训练后,可以给出各个特征对于输出的重要性
- 方差小泛化强。由于采用了随机采样,训练出的模型的方差小,泛化能力强。
- 实现简单。相对于Boosting系列的Adaboost和GBDT, RF实现比较简单。
- 对部分特征缺失不敏感。
缺点:
- 在某些噪音比较大的样本集上,RF模型容易陷入过拟合。
- 取值划分比较多的特征容易对RF的决策产生更大的影响,从而影响拟合的模型的效果。
4 boosting
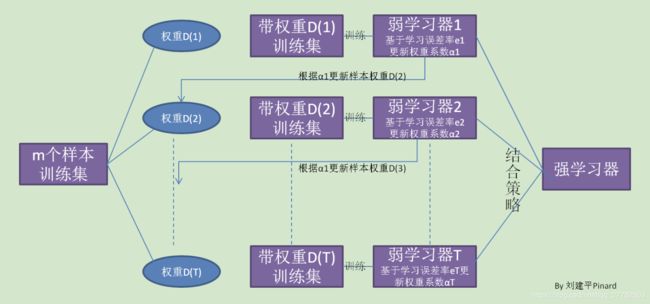
4.1 思想
Boosting算法的工作机制是:
-
首先从训练集用初始权重训练出一个弱学习器1,根据弱学习的学习误差率表现来更新训练样本的权重,使得之前弱学习器1学习误差率高的训练样本点的权重变高,使得这些误差率高的点在后面的弱学习器2中得到更多的重视。
-
然后基于调整权重后的训练集来训练弱学习器2······,如此重复进行,直到弱学习器数达到事先指定的数目T
4.2 要解决的问题
- 如何计算学习误差率e?
- 如何得到弱学习器权重系数α?
- 如何更新样本权重D?
- 使用何种结合策略?
4.3 Adaboost
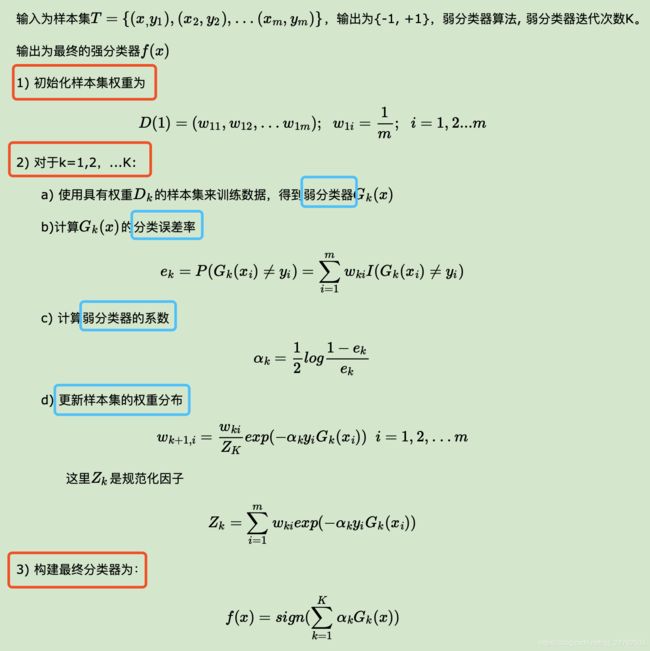
回答上面四个问题:
- 第一个很简单了,就是分类正确/错误
- 具体公式
- 结合具体公式
- 线性加和
4.3.1 原理/思想
解释1:Adaboost是前向分步算法的一个实现,模型为加法模型,损失函数为指数损失,算法为前向分步算法。
那什么叫前向分步算法呢?
- 机器学习通常的做法是找到一个函数来更好的拟合已有数据同时在未知数据上有很好的泛化能力
- 但是集成模型通常会比单模型要好,也即构造一系列的弱学习器,将其线性组合起来,或许可以得到很强的泛化能力。这个想法被称作加法模型!
- 但是直接对上述加法模型和实际值进行比较,优化损失函数时非常复杂!
- 于是想到了分开去考虑!将其分割为一系列的子问题去求解,将减小优化的复杂度;具体地,从前往后,每一步学习一个基函数及其系数,逐步使每步的损失函数减小,直到最后逼近0,即达到优化目的,这便是前向分步算法的思想。
4.3.2 推导
见《统计学习方法》或者刘建平老师博客,不难。
4.3.3 用于分类时的步骤
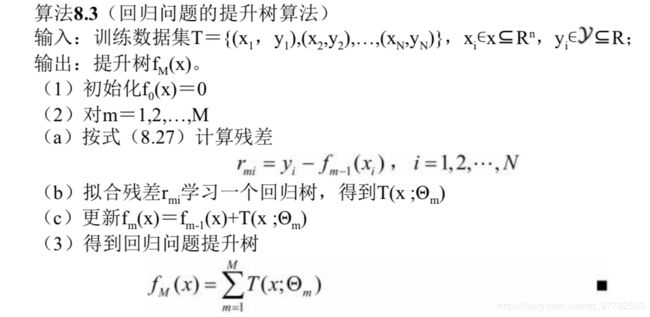
4.3.4 用于回归时步骤
4.3.5 正则化
4.3.6 基模型是啥呢?
- 理论上任何学习器都可以用于Adaboost.
- 但一般来说,使用最广泛的Adaboost弱学习器是决策树和神经网络。
- 对于决策树,Adaboost分类用了CART分类树,而Adaboost回归用了CART回归树。
4.3.7 Adaboost算法的训练误差分析是什么意思?
Adaboost最基本的性质是它能在学习过程中不断减少训练误差,既在训练数据集上的分类误差率,而Adaboost的训练误差界定理则保证了这一结论!
4.3.8 优缺点
优点:
- 精度高。Adaboost作为分类器时,分类精度很高
- 框架灵活。在Adaboost的框架下,可以使用各种回归分类模型来构建弱学习器,非常灵活。
- 简单。作为简单的二元分类器时,构造简单,结果可理解。
- 不容易发生过拟合
缺点:
- 对异常样本敏感,异常样本在迭代中可能会获得较高的权重,影响最终的强学习器的预测准确性。
4.4 提升树(boosting tree)
提升树系列算法里面应用最广泛的是梯度提升树(Gradient Boosting Tree)。
4.4.1 什么叫提升树?
- 以决策树为基函数的提升方法称为提升树。
- 那什么叫提升方法?提升方法实际采用的是加法模型(即基函数的线性组合)与前向分步算法!
4.4.2 提升树的分类
分类问题的提升树。相当于Adaboost算法中基分类器限制为二类分类树即可。
回归问题的提升树。
4.4.3 为什么回归问题的提升树是拟合残差?
因为回归问题的提升树也是前向分步算法,每步得到的基模型都是当前情况下损失函数最小时候的模型,而损失函数推导之后的结果也就是下图中r和T的差的平方(因为回归问题一般都采用平方损函数),结果肯定是大于等于0的,现在要最小,即为0,如何为0呢?也就是下一步模型T=r,也就是残差!这样就能保证每一步损失函数最小了!最后是将每一步进行累加汇总!
4.4.4 具体算法
4.5 GBDT
4.5.1 GBDT和Adaboost的比较
-
基学习器存在差异。Adaboost什么都可以,但一般来说,使用最广泛的是决策树和神经网络;而GBDT限定了只能使用CART回归树模型(GBDT 无论用于分类还是回归一直都是使用的 CART 回归树)。
-
迭代思路存在差异。Adaboost是利用前一轮迭代弱学习器的误差率来更新训练集的权重,这样一轮轮的迭代下去;而GBDT则是每一步迭代找到决策树,要让样本的损失尽量变得更小。
4.5.2 问题:如何度量上述说的损失尽可能小呢?
使用损失函数进行判断!对于普通的损失函数,比如平方损失和指数损失,每一步求解损失是比较容易的,但是对于一般损失函数就不容易了,这时候可以采用损失函数的负梯度表示误差!
4.5.3 GBDT回归算法
4.5.4 GBDT分类算法
- 问题:
GBDT的分类算法从思想上和GBDT的回归算法没有区别,但是由于样本输出不是连续的值,而是离散的类别,导致我们无法直接从输出类别去拟合类别输出的误差。
4.5.5 常用损失函数
-
GBDT分类:
- 指数损失函数
- 对数损失函数
-
GBDT回归:
4.5.6 GBDT正则化
三种方式:
-
步长。和Adaboost类似的正则化项,即步长(learning rate),定义为 ν,0≤v≤1,对于同样的训练集学习效果,较小的ν意味着我们需要更多的弱学习器的迭代次数。通常我们用步长和迭代最大次数一起来决定算法的拟合效果。
-
子采样比例(subsample)。区别于bagging,是无放回抽样。一般取值[0.5,0.8],即每次训练模型不是使用全部样本,而是抽一部分。这种方法也被称为随机梯度提升树(Stochastic Gradient Boosting Tree, SGBT),由于使用了子采样,程序可以通过采样分发到不同的任务去做boosting的迭代过程,最后形成新树,从而减少弱学习器难以并行学习的弱点。
-
对于弱学习器即CART回归树进行正则化剪枝
4.5.7 GBDT优缺点
-
优点:
- 适用数据类型多。可以灵活处理各种类型的数据,包括连续值和离散值。
- 准确率高。在相对少的调参时间情况下,预测的准确率也可以比较高。这个是相对SVM来说的。
- 对异常点鲁棒性好。使用一些健壮的损失函数,对异常值的鲁棒性非常强。比如 Huber损失函数和Quantile损失函数。
-
缺点:
- 难以并行训练。由于弱学习器之间存在依赖关系,难以并行训练数据。不过可以通过自采样的SGBT来达到部分并行。
4.6 XGBoost
4.6.1 算法推导过程
4.6.2 XGBoost是个啥?
XGBoost 是 “Extreme Gradient Boosting” 的缩写,XGBoost 算法的步骤和 GBDT 基本相同,都是首先初始化为一个常数,GBDT 是根据一阶导数,XGBoost 是根据一阶导数 gi 和二阶导数 hi,迭代生成基学习器,相加更新学习器。
4.6.3 XGBoost的基分类器是?
不仅是CART树,也支持多分类的!
4.6.4 基分类器-回归树的特点
回归树有以下四个优点:
- 使用范围广,像GBM,随机森林等。(PS:据陈天奇大神的统计,至少有超过半数的竞赛优胜者的解决方案都是用回归树的变种)
- 对于输入范围不敏感。所以并不需要对输入归一化
- 能学习特征之间更高级别的相互关系
- 很容易对其扩展
4.6.5 以CART为基模型对应的最终模型可视化-模型最后长啥样
4.6.6 具体求解时候的两种思路
-
贪心法:
- 思想:一棵树一棵树地往上加,一直到K棵树停止。从树的深度为0开始,每一节点都遍历所有的特征。对于某个特征,先按照该特征里的值进行排序,然后线性扫描该特征来决定最好的分割点,最后在所有特征里选择分割后,Gain(定义区别于普通的ID3 C4.5 CART 而是XGBoost特有的 即分裂后减去分裂前的增益)最高的那个特征。
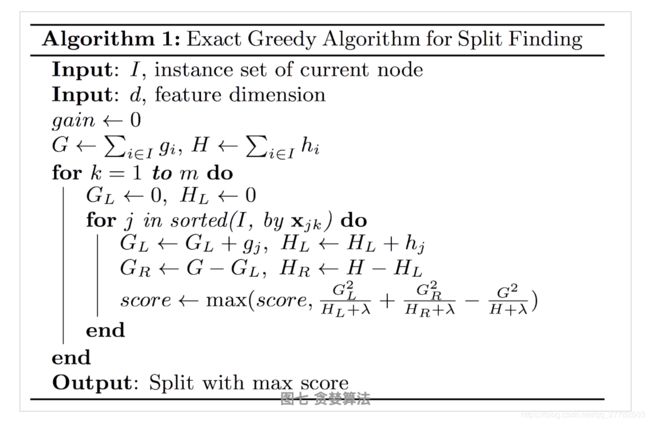

第一种XGBoost算法(基于贪婪算法)的流程:

2. 近似法:
- 思想:根据百分位法列举几个可能成为分割点的候选者,然后从候选者中根据上面求分割点的公式计算找出最佳的分割点。XGBoost会一直分裂到指定的最大深度(max_depth),然后回过头来剪枝。如果某个节点之后不再有正值,它会去除这个分裂。
- 为什么近似法?因为上面太慢了,每一次排序结束之后,都是线性扫描来决定最终的分割点,但关键信息是顺序,尝试用分位数来进行分割!而不是遍历所有的值

4.6.7 XGBoost的优点/缺点是什么?
-
优点:
- 节点分裂的准则区别于一般的决策树方法。Gain=分裂后-分裂前的,具体的式子为目标函数中的一部分,衡量了每个叶子节点对总体损失贡献。Gain越大越好
- 可以并行计算,XGBoost的并行是在特征粒度上的。XGBoost在训练之前,预先对数据进行了排序,然后保存为block结构,后面的迭代中重复地使用这个结构,大大减小计算量。在进行节点的分裂时,需要计算每个特征的增益,最终选增益最大的那个特征去做分裂,那么各个特征的增益计算就可以开多线程进行。【即XGBoost最大的认知在于其能够自动地运用CPU的多线程进行并行计算,同时在算法精度上也进行了精度的提高。 】
- 可并行的近似直方图算法。先通过直方图算法获得候选分割点的分布情况,然后根据候选分割点将连续的特征信息映射到不同的buckets中,并统计汇总信息。为什么这么做呢?因为每次分割的时候需要把全量数据都导入到内存,不一定一次就能成功,效率低,故采用近似直方图算法。
- 正则化。XGBoost在代价函数中加入了正则项(叶子节点数+叶子节点分数),用于控制模型的复杂度。从权衡方差偏差来看,它降低了模型的方差,使学习出来的模型更加简单,防止过拟合。
- shrinkage(缩减),相当于学习速率(XGBoost中的eta)。XGBoost在进行完一次迭代时,会将叶子节点的权值乘上该系数,主要是为了削弱每棵树的影响,让后面有更大的学习空间。
- 列抽样。XGBoost借鉴了随机森林的做法,支持列抽样,不仅防止过拟合,还能减少计算
- 对缺失值的处理。对于特征的值有缺失的样本,XGBoost还可以自动学习出它的分裂方向;
-
缺点:
- level-wise分裂方式的计算复杂度高。level-wise建树方式对当前层的所有叶子节点一视同仁,有些叶子节点分裂收益非常小,对结果没影响,但还是要分裂,加重了计算代价。
- 预排序方法空间消耗比较大。不仅要保存特征值,也要保存特征的排序索引,同时时间消耗也大,在遍历每个分裂点时都要计算分裂增益(不过这个缺点可以被近似算法所克服)
4.6.8 GBDT和XGBoost的比较
- GBDT是机器学习算法,XGBoost是该算法的工程实现。
- 是否有显示正则化项(目标函数中)。在使用CART作为基分类器时,XGBoost显式地加入了正则项来控制模型的复杂度,有利于防止过拟合,从而提高模型的泛化能力。
- 损失函数导数信息的利用。GBDT在模型训练时只使用了代价函数的一阶导数信息,XGBoost对代价函数进行二阶泰勒展开,可以同时使用一阶和二阶导数。
- 基分类器的选择。基分类器的选择传统的GBDT采用CART作为基分类器(本身就是二叉树,所以只支持二分类),XGBoost支持多种类型的基分类器,比如线性分类器。
- 是否有列抽样。XGBoost则采用了与随机森林相似的策略,支持列抽样,不仅能降低过拟合,还能减少计算。
- 缺失值处理。传统的GBDT没有设计对缺失值进行处理,XGBoost可以自动学习出它的分裂方向。XGBoost对于缺失值能预先学习一个默认的分裂方向。
- 是否支持并行计算。XGBoost可以在特征粒度上进行并行计算,GBDT不行。
- 分裂方式存在差异。当分裂时遇到一个负损失时,LightGBM会停止分裂。而XGBoost会一直分裂到指定的最大深度(max_depth),然后回过头来剪枝。如果某个节点之后不再有正值,它会去除这个分裂。这种做法的优点,当一个负损失(如-2)后面有个正损失(如+10)的时候,就显现出来了。LightGBM会在-2处停下来,因为它遇到了一个负值。但是 XGBoost会继续分裂,然后发现这两个分裂综合起来会得到+8,因此会保留这两个分裂。
4.7 LightGBM
4.7.1 什么是LightGBM?
- LightGBM 是微软开发的一款快速、分布式、高性能的基于决策树的梯度 Boosting 框架。
- LightGBM是XGBoost的改进版,相比于前者,它添加了很多新的方法来改进模型,包括:并行方案、基于梯度的单边检测、排他性特征捆绑
4.7.2 LightGBM的并行方案
-
特征并行方案。通过在本地保存全部数据避免对数据切分结果的通信。特征并行的主要思想是在不同机器在不同的特征集合上分别寻找最优的分割点,然后在机器间同步最优的分割点。
- 每个worker在基于局部的特征集合找到最优分裂特征。
- workder间传输最优分裂信息,并得到全局最优分裂信息。
- 每个worker基于全局最优分裂信息,在本地进行数据分裂,生成决策树。
-
数据并行方案。数据并行中使用分散规约(Reduce scatter)把直方图合并的任务分摊到不同的机器,让不同的机器先在本地构造直方图,然后进行全局的合并,最后在合并的直方图上面寻找最优分割点。同时利用直方图做差,进一步减少了一半的通信量。
- 使用Reduce Scatter并行算子。LightGBM算法使用Reduce Scatter并行算子 归并来自不同worker的不同特征子集的直方图,然后在局部归并的直方图中找到最优局部分裂信息,最终同步找到最优的分裂信息。
- LightGBM使用直方图减法加快训练速度。我们只需要对其中一个子节点进行数据传输,另一个子节点可以通过histogram subtraction得到。
-
基于投票的并行方案。有理论证明,这种voting parallel以很大的概率选出实际最优的特征,因此不用担心top k的问题。
- 在每个worker中选出top k个分裂特征,
- 将每个worker选出的k个特征进行汇总,并选出全局分裂特征,进行数据分裂。
4.7.3 基于梯度的单边检测(GOSS)
-
解决的问题
- 对于梯度小的数据,希望舍弃,因为已经训练的很好了,但是直接舍弃会改变数据分布,影响模型精度。
-
思想
- GOSS保持有较大梯度的实例,在小梯度数据上运行随机采样。
4.7.4 排他性特征捆绑(EFB)
-
解决的问题
- 高维度特征具有稀疏性。许多特征是互斥的,出现大量0,例如one-hot
-
思想
- GOSS保持有较大梯度的实例,在小梯度数据上运行随机采样。
4.7.5 XGBoost和LightGBM对比
-
时间复杂度不同。
- XGBoost使用基于预排序的决策树算法,每遍历一个特征就需要计算一次特征的增益,时间复杂度为O(datafeature)。
- LightGBM使用基于直方图的决策树算法,直方图的优化算法只需要计算K次,时间复杂度为O(Kfeature)
-
类别名称的处理。
- LightGBM 支持类别特征,不需要进行独热编码处理
- XGBoost需要对类别变量进行先单独热编码处理
-
优化方法不同
- LightGBM的优化方法比XGBoost更多
-
决策树算法存在差异。
- XGBoost使用的是pre-sorted算法。(对所有特征都按照特征的数值进行预排序,在遍历分割点的时候用O(data)的代价找到一个特征上的最好分割点),能够更精确的找到数据分隔点;(xgboost的分布式实现也是基于直方图的,利于并行)
- LightGBM使用的是histogram算法。(类似一种分桶算法),占用的内存更低,数据分隔的复杂度更低。
5 代码实现
5.1 报错信息进行忽略
import warnings
warnings.filterwarnings('ignore')
数据准备-电信数据
import pandas as pd
df = pd.read_csv('./data/telecom_churn.csv')
print(df.shape)
df.head()
(3463, 20)
| subscriberID | churn | gender | AGE | edu_class | incomeCode | duration | feton | peakMinAv | peakMinDiff | posTrend | negTrend | nrProm | prom | curPlan | avgplan | planChange | posPlanChange | negPlanChange | call_10000 | |
|---|---|---|---|---|---|---|---|---|---|---|---|---|---|---|---|---|---|---|---|---|
| 0 | 19164958 | 1 | 0 | 20 | 2 | 12 | 16 | 0 | 113.666667 | -8.0 | 0 | 1 | 0 | 0 | 1 | 1 | 0 | 0 | 0 | 0 |
| 1 | 39244924 | 1 | 1 | 20 | 0 | 21 | 5 | 0 | 274.000000 | -371.0 | 0 | 1 | 2 | 1 | 3 | 2 | 2 | 1 | 0 | 1 |
| 2 | 39578413 | 1 | 0 | 11 | 1 | 47 | 3 | 0 | 392.000000 | -784.0 | 0 | 1 | 0 | 0 | 3 | 3 | 0 | 0 | 0 | 1 |
| 3 | 40992265 | 1 | 0 | 43 | 0 | 4 | 12 | 0 | 31.000000 | -76.0 | 0 | 1 | 2 | 1 | 3 | 3 | 0 | 0 | 0 | 1 |
| 4 | 43061957 | 1 | 1 | 60 | 0 | 9 | 14 | 0 | 129.333333 | -334.0 | 0 | 1 | 0 | 0 | 3 | 3 | 0 | 0 | 0 | 0 |
df['churn'].value_counts()
0    1929
1    1534
Name: churn, dtype: int64
切分训练集测试集
X = df.iloc[:, 3:].values
y = df['churn'].values
from sklearn.model_selection import train_test_split
X_train, X_test, y_train, y_test = train_test_split(X, y, test_size = 0.3,
                                                    random_state = 23)
print(X_train.shape, X_test.shape, y_train.shape, y_test.shape)
(2424, 17) (1039, 17) (2424,) (1039,)
5.2 bagging实现
5.2.1 建模
from sklearn.ensemble import BaggingClassifier
bgc = BaggingClassifier(n_estimators=500)
bgc.fit(X_train, y_train)
bgc.predict(X_test)
array([0, 0, 1, ..., 0, 0, 1])
5.2.2 评估效果
from sklearn.metrics import classification_report
print(classification_report(y_test, bgc.predict(X_test)))
              precision    recall  f1-score   support

           0       0.82      0.88      0.85       595
           1       0.82      0.74      0.77       444

   micro avg       0.82      0.82      0.82      1039
   macro avg       0.82      0.81      0.81      1039
weighted avg       0.82      0.82      0.82      1039
5.2.3 交叉验证
针对样本:训练集内!
from sklearn.model_selection import cross_val_score
cross_val_score(bgc, X_train, y_train, cv = 5) # 指标为precision 即准确率
array([0.82474227, 0.85979381, 0.82061856, 0.84123711, 0.85743802])
5.2.4 看下测试集AUC
# 看测试集AUC为多少
from sklearn import metrics
pred = bgc.predict_proba(X_test)[:,1]
fpr, tpr, thresholds = metrics.roc_curve(y_test, pred)
metrics.auc(fpr, tpr)
0.9118139147550912
5.2.5 封装成函数-计算测试集AUC
def CalAuc(model, X_test, y_test):
    # 看测试集AUC为多少
    from sklearn import metrics
    pred = model.predict_proba(X_test)[:,1]
    fpr, tpr, thresholds = metrics.roc_curve(y_test, pred)
    auc = metrics.auc(fpr, tpr)
    print('模型在测试集上的AUC值为: %.4f' %(auc))
CalAuc(bgc, X_test, y_test)
模型在测试集上的AUC值为: 0.9118
5.3 随机森林实现
5.3.1 先不调参
from sklearn.ensemble import RandomForestClassifier
rfc = RandomForestClassifier(oob_score=True, random_state=23)
rfc.fit(X_train, y_train)
# 查看袋外误差
print('模型袋外误差为: %.4f' % (rfc.oob_score_))
# 查看测试集auc
CalAuc(rfc, X_test, y_test)
模型袋外误差为: 0.8106
模型在测试集上的AUC值为: 0.8930


/Users/apple/anaconda3/lib/python3.6/site-packages/sklearn/ensemble/forest.py:246: FutureWarning: The default value of n_estimators will change from 10 in version 0.20 to 100 in 0.22.
  "10 in version 0.20 to 100 in 0.22.", FutureWarning)
/Users/apple/anaconda3/lib/python3.6/site-packages/sklearn/ensemble/forest.py:458: UserWarning: Some inputs do not have OOB scores. This probably means too few trees were used to compute any reliable oob estimates.
  warn("Some inputs do not have OOB scores. "
/Users/apple/anaconda3/lib/python3.6/site-packages/sklearn/ensemble/forest.py:463: RuntimeWarning: invalid value encountered in true_divide
  predictions[k].sum(axis=1)[:, np.newaxis])
5.3.2 开始调参
RF需要调参的参数也包括两部分:
- 第一部分是Bagging框架的参数
- 第二部分是CART决策树的参数
5.3.2.1 estimator调参
- 先对n_estimators进行调参,即随机森林树的棵树!
- 网格搜索
# 导入相应的库
from sklearn.model_selection import GridSearchCV

# 设置要调参的参数
param_test1 = {'n_estimators':range(10,71,10)} # 即[10, 20, 30, 40, 50, 60, 70]

# 搭建模型
estimator = RandomForestClassifier(min_samples_split=100, # 内部节点再划分所需最小样本数
                                   min_samples_leaf=20, # 叶子节点最少样本数
                                   max_depth=8, # 决策树最大深度
                                   max_features='sqrt', # RF划分时考虑的最大特征数 "sqrt"或者"auto"意味着划分时最多考虑根号N个特征。
                                   random_state=10)
# 网格调参框架搭建
gsearch1 = GridSearchCV(estimator = estimator, # 预测器
                       param_grid = param_test1, # 参数
                        scoring='roc_auc', # 评价准则
                        cv=5 ) # 交叉验证次数

# 拟合模型 开始漫漫调参路 针对训练集
gsearch1.fit(X_train, y_train)

# 查看调参结果
gsearch1.best_params_, gsearch1.best_score_, gsearch1.best_estimator_
({'n_estimators': 20},
 0.9179481242409072,
 RandomForestClassifier(bootstrap=True, class_weight=None, criterion='gini',
             max_depth=8, max_features='sqrt', max_leaf_nodes=None,
             min_impurity_decrease=0.0, min_impurity_split=None,
             min_samples_leaf=20, min_samples_split=100,
             min_weight_fraction_leaf=0.0, n_estimators=20, n_jobs=None,
             oob_score=False, random_state=10, verbose=0, warm_start=False))
5.3.2.2 深度/样本数调参
- 这样我们得到了最佳的弱学习器迭代次数
- 接着我们对决策树最大深度max_depth和内部节点再划分所需最小样本数min_samples_split进行网格搜索。
# 设置要调参的参数
param_test2 = {'max_depth': range(3,14,2),
              'min_samples_split': range(50,201,20)}

# 搭建模型
estimator = RandomForestClassifier(n_estimators=20, # 内部节点再划分所需最小样本数
                                   min_samples_leaf=20, # 叶子节点最少样本数
                                   max_features='sqrt', # RF划分时考虑的最大特征数 "sqrt"或者"auto"意味着划分时最多考虑根号N个特征。
                                   oob_score=True,
                                   random_state=23)
# 网格调参框架搭建
gsearch2 = GridSearchCV(estimator = estimator, # 预测器
                       param_grid = param_test2, # 参数
                        scoring='roc_auc', # 评价准则
                        iid=False,
                        cv=5 ) # 交叉验证次数

# 拟合模型 开始漫漫调参路 针对训练集
gsearch2.fit(X_train, y_train)

# 查看调参结果
gsearch2.best_params_, gsearch2.best_score_, gsearch2.best_estimator_
({'max_depth': 9, 'min_samples_split': 50},
 0.9193420878244473,
 RandomForestClassifier(bootstrap=True, class_weight=None, criterion='gini',
             max_depth=9, max_features='sqrt', max_leaf_nodes=None,
             min_impurity_decrease=0.0, min_impurity_split=None,
             min_samples_leaf=20, min_samples_split=50,
             min_weight_fraction_leaf=0.0, n_estimators=20, n_jobs=None,
             oob_score=True, random_state=23, verbose=0, warm_start=False))
5.3.2.3 查看上述调参后模型的袋外分数
rf1 = RandomForestClassifier(bootstrap=True, class_weight=None, criterion='gini',
             max_depth=9, max_features='sqrt', max_leaf_nodes=None,
             min_impurity_decrease=0.0, min_impurity_split=None,
             min_samples_leaf=20, min_samples_split=50,
             min_weight_fraction_leaf=0.0, n_estimators=20, n_jobs=None,
             oob_score=True, random_state=23, verbose=0, warm_start=False)
rf1.fit(X,y)
print(rf1.oob_score_)
0.8255847531042448
没有调参之前模型袋外误差为: 0.8106,现在调参之后提升了!
5.3.2.4 决策树相关参数一起调参
- 下面我们再对内部节点再划分所需最小样本数min_samples_split和叶子节点最少样本数min_samples_leaf一起调参。
# 设置要调参的参数
param_test3 = {'min_samples_leaf': range(10,60,10),
              'min_samples_split': range(50,201,20)}

# 搭建模型
estimator = RandomForestClassifier(n_estimators=20, # 内部节点再划分所需最小样本数
                                   max_depth=9,
                                   max_features='sqrt', # RF划分时考虑的最大特征数 "sqrt"或者"auto"意味着划分时最多考虑根号N个特征。
                                   oob_score=True,
                                   random_state=23)
# 网格调参框架搭建
gsearch3 = GridSearchCV(estimator = estimator, # 预测器
                       param_grid = param_test3, # 参数
                        scoring='roc_auc', # 评价准则
                        iid=False,
                        cv=5 ) # 交叉验证次数

# 拟合模型 开始漫漫调参路 针对训练集
gsearch3.fit(X_train, y_train)

# 查看调参结果
gsearch3.best_params_, gsearch3.best_score_, gsearch3.best_estimator_
({'min_samples_leaf': 10, 'min_samples_split': 50},
 0.9208079341741634,
 RandomForestClassifier(bootstrap=True, class_weight=None, criterion='gini',
             max_depth=9, max_features='sqrt', max_leaf_nodes=None,
             min_impurity_decrease=0.0, min_impurity_split=None,
             min_samples_leaf=10, min_samples_split=50,
             min_weight_fraction_leaf=0.0, n_estimators=20, n_jobs=None,
             oob_score=True, random_state=23, verbose=0, warm_start=False))
5.3.2.5 max_features做调参
最后我们再对最大特征数max_features做调参
# 设置要调参的参数
param_test4 = {'max_features': range(3,11,2)}

# 搭建模型
estimator = RandomForestClassifier(n_estimators=20, # 内部节点再划分所需最小样本数
                                   max_depth=9,
                                   min_samples_leaf=10,
                                   min_samples_split=50,
                                   oob_score=True,
                                   random_state=23)
# 网格调参框架搭建
gsearch4 = GridSearchCV(estimator = estimator, # 预测器
                       param_grid = param_test4, # 参数
                        scoring='roc_auc', # 评价准则
                        iid=False,
                        cv=5 ) # 交叉验证次数

# 拟合模型 开始漫漫调参路 针对训练集
gsearch4.fit(X_train, y_train)

# 查看调参结果
gsearch4.best_params_, gsearch4.best_score_, gsearch4.best_estimator_
({'max_features': 9},
 0.924027507693055,
 RandomForestClassifier(bootstrap=True, class_weight=None, criterion='gini',
             max_depth=9, max_features=9, max_leaf_nodes=None,
             min_impurity_decrease=0.0, min_impurity_split=None,
             min_samples_leaf=10, min_samples_split=50,
             min_weight_fraction_leaf=0.0, n_estimators=20, n_jobs=None,
             oob_score=True, random_state=23, verbose=0, warm_start=False))
5.3.2.6 最终结果
用我们搜索到的最佳参数,我们再看看最终的模型拟合
rf_final =  RandomForestClassifier(bootstrap=True, class_weight=None, criterion='gini',
             max_depth=9, max_features=9, max_leaf_nodes=None,
             min_impurity_decrease=0.0, min_impurity_split=None,
             min_samples_leaf=10, min_samples_split=50,
             min_weight_fraction_leaf=0.0, n_estimators=20, n_jobs=None,
             oob_score=True, random_state=23, verbose=0, warm_start=False)
rf_final.fit(X_train, y_train)
# 查看袋外误差
print('调参后模型袋外误差为: %.4f' % (rf_final.oob_score_))
# 查看测试集auc
CalAuc(rf_final, X_test, y_test)
调参后模型袋外误差为: 0.8350
模型在测试集上的AUC值为: 0.9127
截图贴上调参之前的oob和测试集auc

可以看到调参后比调参之前,无论是模型的袋外误差还是测试集上AUC均有提升!
5.4 Adaboost实现
5.4.1 未调参
from sklearn.ensemble import AdaBoostClassifier
from sklearn.tree import DecisionTreeClassifier

# 单颗树的参数
DTC = DecisionTreeClassifier(max_depth=2, min_samples_split=20, min_samples_leaf=5)

# 搭建模型
adb_clf = AdaBoostClassifier(DTC,
                             algorithm="SAMME",
                             n_estimators=200,
                             learning_rate=0.8)
# 拟合
adb_clf.fit(X_train, y_train)

# 查看预测结果
CalAuc(adb_clf, X_test, y_test)
模型在测试集上的AUC值为: 0.9128
可以看到没有调参的Adaboost在测试集上的auc就比调参之后的随机森林要好了!boosting牛逼!当然不同的数据集上表现肯定也会存在差异
5.4.2 开始调参
5.4.2.1 estimator调参
# 导入相应的库
from sklearn.model_selection import GridSearchCV

# 设置要调参的参数
param_test1 = {'n_estimators':range(200,500,100)} # 即[10, 20, 30, 40, 50, 60, 70]

# 搭建模型
estimator = AdaBoostClassifier(DTC,
                             algorithm="SAMME",
                             learning_rate=0.8)
# 网格调参框架搭建
gsearch1 = GridSearchCV(estimator = estimator, # 预测器
                       param_grid = param_test1, # 参数
                        scoring='roc_auc', # 评价准则
                        cv=5 ) # 交叉验证次数

# 拟合模型 开始漫漫调参路 针对训练集
gsearch1.fit(X_train, y_train)

# 查看调参结果
gsearch1.best_params_, gsearch1.best_score_, gsearch1.best_estimator_
({'n_estimators': 400},
 0.9391287966806948,
 AdaBoostClassifier(algorithm='SAMME',
           base_estimator=DecisionTreeClassifier(class_weight=None, criterion='gini', max_depth=2,
             max_features=None, max_leaf_nodes=None,
             min_impurity_decrease=0.0, min_impurity_split=None,
             min_samples_leaf=5, min_samples_split=20,
             min_weight_fraction_leaf=0.0, presort=False, random_state=None,
             splitter='best'),
           learning_rate=0.8, n_estimators=400, random_state=None))
# 查看效果
CalAuc(gsearch1.best_estimator_, X_test, y_test)
模型在测试集上的AUC值为: 0.9123
5.4.2.2 步长调参
# 设置要调参的参数
param_test2 = {'learning_rate': [0.5, 0.6, 0.7, 0.8]}

# 搭建模型
estimator = AdaBoostClassifier(DTC,
                             algorithm="SAMME",
                             n_estimators=400)
# 网格调参框架搭建
gsearch2 = GridSearchCV(estimator = estimator, # 预测器
                       param_grid = param_test2, # 参数
                        scoring='roc_auc', # 评价准则
                        iid=False,
                        cv=5 ) # 交叉验证次数

# 拟合模型 开始漫漫调参路 针对训练集
gsearch2.fit(X_train, y_train)

# 查看调参结果
gsearch2.best_params_, gsearch2.best_score_, gsearch2.best_estimator_
({'learning_rate': 0.8},
 0.9391284752443939,
 AdaBoostClassifier(algorithm='SAMME',
           base_estimator=DecisionTreeClassifier(class_weight=None, criterion='gini', max_depth=2,
             max_features=None, max_leaf_nodes=None,
             min_impurity_decrease=0.0, min_impurity_split=None,
             min_samples_leaf=5, min_samples_split=20,
             min_weight_fraction_leaf=0.0, presort=False, random_state=None,
             splitter='best'),
           learning_rate=0.8, n_estimators=400, random_state=None))
# 查看效果
CalAuc(gsearch2.best_estimator_, X_test, y_test)
模型在测试集上的AUC值为: 0.9123
感觉调参效果不是很理想哈~暂时这样,掌握方法就ok,可能不同数据集表现不一样!
5.5 GBDT实现
重要参数分为两类:
- 第一类是Boosting框架的重要参数
- 第二类是弱学习器即CART回归树的重要参数。
5.5.1 未调参
from sklearn.ensemble import GradientBoostingClassifier

# 拟合模型
gbm0 = GradientBoostingClassifier(random_state=23)
gbm0.fit(X,y)

# 查看预测结果
CalAuc(gbm0, X_test, y_test)
模型在测试集上的AUC值为: 0.9555
gbm0
GradientBoostingClassifier(criterion='friedman_mse', init=None,
              learning_rate=0.1, loss='deviance', max_depth=3,
              max_features=None, max_leaf_nodes=None,
              min_impurity_decrease=0.0, min_impurity_split=None,
              min_samples_leaf=1, min_samples_split=2,
              min_weight_fraction_leaf=0.0, n_estimators=100,
              n_iter_no_change=None, presort='auto', random_state=23,
              subsample=1.0, tol=0.0001, validation_fraction=0.1,
              verbose=0, warm_start=False)
- GBDT在测试集上AUC也太秀了吧!直接达到了0.95!让我不禁在图书馆大喊一声:“卧槽!牛逼!”(捂脸)
- 这还需要调参吗?
5.5.2 开始调参
5.5.2.1 步长+迭代次数调参
首先我们从步长(learning rate)和迭代次数(n_estimators)入手。一般来说,开始选择一个较小的步长来网格搜索最好的迭代次数。这里,我们将步长初始值设置为0.1。对于迭代次数进行网格搜索如下:
# 导入相应的库
from sklearn.model_selection import GridSearchCV

# 设置要调参的参数
param_test1 = {'n_estimators':range(80,300,20),
              'learning_rate': [0.1, 0.2, 0.3]} # 即[10, 20, 30, 40, 50, 60, 70]


# 搭建模型
estimator = GradientBoostingClassifier(
                                       min_samples_split=300,
                                       min_samples_leaf=20,
                                       max_depth=8,
                                       max_features='sqrt',
                                       subsample=0.8, # 子采样
                                       random_state=23
                                      )
# 网格调参框架搭建
gsearch1 = GridSearchCV(estimator = estimator, # 预测器
                       param_grid = param_test1, # 参数
                        scoring='roc_auc', # 评价准则
                        cv=5 ) # 交叉验证次数

# 拟合模型 开始漫漫调参路 针对训练集
gsearch1.fit(X_train, y_train)

# 查看调参结果
gsearch1.best_params_, gsearch1.best_score_, gsearch1.best_estimator_
({'learning_rate': 0.1, 'n_estimators': 180},
 0.9426413486391743,
 GradientBoostingClassifier(criterion='friedman_mse', init=None,
               learning_rate=0.1, loss='deviance', max_depth=8,
               max_features='sqrt', max_leaf_nodes=None,
               min_impurity_decrease=0.0, min_impurity_split=None,
               min_samples_leaf=20, min_samples_split=300,
               min_weight_fraction_leaf=0.0, n_estimators=180,
               n_iter_no_change=None, presort='auto', random_state=23,
               subsample=0.8, tol=0.0001, validation_fraction=0.1,
               verbose=0, warm_start=False))
# 查看预测结果
CalAuc(gsearch1, X_test, y_test) # 尴尬了 降了这么多。。。
模型在测试集上的AUC值为: 0.9134
5.5.2.2 决策树调参
现在我们开始对决策树进行调参。首先我们对决策树最大深度max_depth和内部节点再划分所需最小样本数min_samples_split进行网格搜索。
# 设置要调参的参数
param_test2 = {'max_depth': range(3,14,2),
              'min_samples_split': range(100,801,200)}

# 搭建模型
estimator = GradientBoostingClassifier(min_samples_leaf=20,
                                       learning_rate=0.1,
                                       n_estimators=180,
                                       max_features='sqrt',
                                       subsample=0.8, # 子采样
                                       random_state=23
                                      )
# 网格调参框架搭建
gsearch2 = GridSearchCV(estimator = estimator, # 预测器
                       param_grid = param_test2, # 参数
                        scoring='roc_auc', # 评价准则
                        iid=False,
                        cv=5 ) # 交叉验证次数

# 拟合模型 开始漫漫调参路 针对训练集
gsearch2.fit(X_train, y_train)

# 查看调参结果
gsearch2.best_params_, gsearch2.best_score_, gsearch2.best_estimator_
({'max_depth': 7, 'min_samples_split': 300},
 0.9423875377548085,
 GradientBoostingClassifier(criterion='friedman_mse', init=None,
               learning_rate=0.1, loss='deviance', max_depth=7,
               max_features='sqrt', max_leaf_nodes=None,
               min_impurity_decrease=0.0, min_impurity_split=None,
               min_samples_leaf=20, min_samples_split=300,
               min_weight_fraction_leaf=0.0, n_estimators=180,
               n_iter_no_change=None, presort='auto', random_state=23,
               subsample=0.8, tol=0.0001, validation_fraction=0.1,
               verbose=0, warm_start=False))
# 查看预测结果
CalAuc(gsearch2, X_test, y_test)
模型在测试集上的AUC值为: 0.9140
5.5.2.3 决策树继续调参
由于决策树深度7是一个比较合理的值,我们把它定下来,对于内部节点再划分所需最小样本数min_samples_split,我们暂时不能一起定下来,因为这个还和决策树其他的参数存在关联。下面我们再对内部节点再划分所需最小样本数min_samples_split和叶子节点最少样本数min_samples_leaf一起调参。
# 设置要调参的参数
param_test3 = {'min_samples_leaf':range(60,101,10),
              'min_samples_split': range(800,1900,200)}

# 搭建模型
estimator = GradientBoostingClassifier(
                                       max_depth=7,
                                       learning_rate=0.1,
                                       n_estimators=180,
                                       max_features='sqrt',
                                       subsample=0.8, # 子采样
                                       random_state=23
                                      )
# 网格调参框架搭建
gsearch3 = GridSearchCV(estimator = estimator, # 预测器
                       param_grid = param_test3, # 参数
                        scoring='roc_auc', # 评价准则
                        iid=False,
                        cv=5 ) # 交叉验证次数

# 拟合模型 开始漫漫调参路 针对训练集
gsearch3.fit(X_train, y_train)

# 查看调参结果
gsearch3.best_params_, gsearch3.best_score_, gsearch3.best_estimator_
({'min_samples_leaf': 70, 'min_samples_split': 800},
 0.9386033762893987,
 GradientBoostingClassifier(criterion='friedman_mse', init=None,
               learning_rate=0.1, loss='deviance', max_depth=7,
               max_features='sqrt', max_leaf_nodes=None,
               min_impurity_decrease=0.0, min_impurity_split=None,
               min_samples_leaf=70, min_samples_split=800,
               min_weight_fraction_leaf=0.0, n_estimators=180,
               n_iter_no_change=None, presort='auto', random_state=23,
               subsample=0.8, tol=0.0001, validation_fraction=0.1,
               verbose=0, warm_start=False))
# 查看预测结果
CalAuc(gsearch3, X_test, y_test)
模型在测试集上的AUC值为: 0.9221
5.5.2.4 调参max_features
# 设置要调参的参数
param_test4 = {'max_features': range(7,18,2)}

# 搭建模型
estimator = GradientBoostingClassifier(min_samples_leaf=70,
                                       min_samples_split = 800,
                                       max_depth=7,
                                       learning_rate=0.1,
                                       n_estimators=180,
                                       subsample=0.8, # 子采样
                                       random_state=23
                                      )
# 网格调参框架搭建
gsearch4 = GridSearchCV(estimator = estimator, # 预测器
                       param_grid = param_test4, # 参数
                        scoring='roc_auc', # 评价准则
                        iid=False,
                        cv=5 ) # 交叉验证次数

# 拟合模型 开始漫漫调参路 针对训练集
gsearch4.fit(X_train, y_train)

# 查看调参结果
gsearch4.best_params_, gsearch4.best_score_, gsearch4.best_estimator_
({'max_features': 13},
 0.9389232022433157,
 GradientBoostingClassifier(criterion='friedman_mse', init=None,
               learning_rate=0.1, loss='deviance', max_depth=7,
               max_features=13, max_leaf_nodes=None,
               min_impurity_decrease=0.0, min_impurity_split=None,
               min_samples_leaf=70, min_samples_split=800,
               min_weight_fraction_leaf=0.0, n_estimators=180,
               n_iter_no_change=None, presort='auto', random_state=23,
               subsample=0.8, tol=0.0001, validation_fraction=0.1,
               verbose=0, warm_start=False))
其余还可以继续调参的:
- 子采样的比例
5.6 XGBoost实现
import xgboost as xgb # 直接引用xgboost。接下来会用到其中的“cv”函数。
from xgboost.sklearn import XGBClassifier # 是xgboost的sklearn包。这个包允许我们像GBM一样使用Grid Search 和并行处理。
5.6.1 未调参
all_params = {'learning_rate': 0.1, # 学习速率
              'n_estimators': 500,  # 树的棵树
              'max_depth': 5,  # 最大深度
              'min_child_weight': 1, # 决定最小叶子节点样本权重和。这个参数用于避免过拟合。当它的值较大时,可以避免模型学习到局部的特殊样本。但是如果这个值过高,会导致欠拟合。这个参数需要使用CV来调整。
              'seed': 0, # 随机数的种子 默认为0
              'subsample': 0.8, # 和GBM中的subsample参数一模一样。这个参数控制对于每棵树,随机采样的比例。
              'colsample_bytree': 0.8, # 和GBM里面的max_features参数类似。用来控制每棵随机采样的列数的占比(每一列是一个特征)。
              'gamma': 0, # 在节点分裂时,只有分裂后损失函数的值下降了,才会分裂这个节点。Gamma指定了节点分裂所需的最小损失函数下降值。
              'reg_alpha': 0, # L1 regularization term on weights
              'reg_lambda': 1 # L2 regularization term on weights
             }

# 搭建模型
xgb_clf = xgb.XGBClassifier(**all_params)

# 拟合模型
xgb_clf.fit(X_train, y_train)

# 查看AUC
CalAuc(xgb_clf, X_test, y_test)
模型在测试集上的AUC值为: 0.9108
5.6.2 调参
5.6.2.1 n_estimators调参
from sklearn.model_selection import GridSearchCV

# 需要调整的参数
cv_params = {'n_estimators': [400, 500, 600, 700, 800]}

# 固定参数
other_params = {'learning_rate': 0.1, 'n_estimators': 500, 'max_depth': 5, 'min_child_weight': 1, 'seed': 0,
                'subsample': 0.8, 'colsample_bytree': 0.8, 'gamma': 0, 'reg_alpha': 0, 'reg_lambda': 1}
# 搭模型
model = xgb.XGBClassifier(**other_params)

# 网格搜索
optimized_GBM = GridSearchCV(estimator=model, param_grid=cv_params,
                             scoring='r2', cv=5, verbose=1, n_jobs=4)
# 拟合
optimized_GBM.fit(X_train, y_train)

optimized_GBM.best_estimator_
Fitting 5 folds for each of 5 candidates, totalling 25 fits


[Parallel(n_jobs=4)]: Using backend LokyBackend with 4 concurrent workers.
[Parallel(n_jobs=4)]: Done  25 out of  25 | elapsed:   18.5s finished


XGBClassifier(base_score=0.5, booster='gbtree', colsample_bylevel=1,
       colsample_bytree=0.8, gamma=0, learning_rate=0.1, max_delta_step=0,
       max_depth=5, min_child_weight=1, missing=None, n_estimators=400,
       n_jobs=1, nthread=None, objective='binary:logistic', random_state=0,
       reg_alpha=0, reg_lambda=1, scale_pos_weight=1, seed=0, silent=True,
       subsample=0.8)
# 查看AUC
CalAuc(optimized_GBM, X_test, y_test)
模型在测试集上的AUC值为: 0.9125
同理可以调试:
- min_child_weight以及max_depth
- gamma
- subsample以及colsample_bytree
- reg_alpha以及reg_lambda
- 最后就是learning_rate,一般这时候要调小学习率来测试
5.7 LightGBM实现
LightGBM,我们有核心参数,学习控制参数,IO参数,目标参数,度量参数,网络参数,GPU参数,模型参数,这里我常修改的便是:
- 核心参数
- 学习控制参数
- 度量参数
import lightgbm as lgb
from lightgbm.sklearn import LGBMClassifier # 是lightgbm的sklearn包。这个包允许我们像GBM一样使用Grid Search 和并行处理。
5.7.1 没有调参
# 搭建模型
model_lgb = lgb.LGBMClassifier(
                                 boosting_type='gbdt',
                                 objective = 'binary',
                                 metric = 'auc',
                                 verbose = 0,
                                 learning_rate = 0.01,
                                 num_leaves = 35,
                                 feature_fraction=0.8,
                                 bagging_fraction= 0.9,
                                 bagging_freq= 8,
                                 lambda_l1= 0.6,
                                 lambda_l2= 0
                               )

#  拟合模型
model_lgb.fit(X_train, y_train)
LGBMClassifier(bagging_fraction=0.9, bagging_freq=8, boosting_type='gbdt',
        class_weight=None, colsample_bytree=1.0, feature_fraction=0.8,
        importance_type='split', lambda_l1=0.6, lambda_l2=0,
        learning_rate=0.01, max_depth=-1, metric='auc',
        min_child_samples=20, min_child_weight=0.001, min_split_gain=0.0,
        n_estimators=100, n_jobs=-1, num_leaves=35, objective='binary',
        random_state=None, reg_alpha=0.0, reg_lambda=0.0, silent=True,
        subsample=1.0, subsample_for_bin=200000, subsample_freq=0,
        verbose=0)
# 查看AUC
CalAuc(model_lgb, X_test, y_test)
模型在测试集上的AUC值为: 0.9219
5.7.2 调参
parameters = {
              'max_depth': [15, 20, 25]
#               'learning_rate': [0.01, 0.02, 0.05, 0.1, 0.15],
#               'feature_fraction': [0.6, 0.7, 0.8, 0.9, 0.95],
#               'bagging_fraction': [0.6, 0.7, 0.8, 0.9, 0.95],
#               'bagging_freq': [2, 4, 5, 6, 8],
#               'lambda_l1': [0, 0.1, 0.4, 0.5, 0.6],
#               'lambda_l2': [0, 10, 15, 35, 40],
#               'cat_smooth': [1, 10, 15, 20, 35]
}
# 注:实际调参的时候可以把上述代码取消注释,因为测试本机跑太慢了 所以只保留一个

gbm = lgb.LGBMClassifier(boosting_type='gbdt',
                         objective = 'binary',
                         metric = 'auc',
                         verbose = 0,
                         learning_rate = 0.01,
                         num_leaves = 35,
                         feature_fraction=0.8,
                         bagging_fraction= 0.9,
                         bagging_freq= 8,
                         lambda_l1= 0.6,
                         lambda_l2= 0)

# 有了gridsearch我们便不需要fit函数
gsearch = GridSearchCV(gbm, param_grid=parameters, scoring='accuracy', cv=3)
gsearch.fit(X_train, y_train)
GridSearchCV(cv=3, error_score='raise-deprecating',
       estimator=LGBMClassifier(bagging_fraction=0.9, bagging_freq=8, boosting_type='gbdt',
        class_weight=None, colsample_bytree=1.0, feature_fraction=0.8,
        importance_type='split', lambda_l1=0.6, lambda_l2=0,
        learning_rate=0.01, max_depth=-1, metric='auc',
        min_child_samples=2..., silent=True,
        subsample=1.0, subsample_for_bin=200000, subsample_freq=0,
        verbose=0),
       fit_params=None, iid='warn', n_jobs=None,
       param_grid={'max_depth': [15, 20, 25]}, pre_dispatch='2*n_jobs',
       refit=True, return_train_score='warn', scoring='accuracy',
       verbose=0)
# 查看AUC
CalAuc(gsearch, X_test, y_test)
模型在测试集上的AUC值为: 0.9219
注:实际案例可以继续上述调参过程!本博客注重掌握方法,代码逻辑即可!
6 参考
- https://blog.csdn.net/colourful_sky/article/details/82082854
- https://www.jiqizhixin.com/articles/2017-07-31-3
- http://www.cnblogs.com/pinard/p/6131423.html
- https://www.cnblogs.com/pinard/p/6140514.html
- https://zhuanlan.zhihu.com/p/33700459
- http://djjowfy.com/2017/08/01/XGBoost的原理/
- https://blog.csdn.net/data_scientist/article/details/79022025
- https://www.jianshu.com/p/765efe2b951a
- https://marian5211.github.io/2018/03/12/【机器学习】gbdt-xgboost-lightGBM比较/
- 随机森林调参: https://www.cnblogs.com/pinard/p/6160412.html
- Adaboost调参:https://www.cnblogs.com/pinard/p/6136914.html
- GBDT调参:https://www.cnblogs.com/pinard/p/6143927.html
- XGBoost调参:https://cloud.tencent.com/developer/article/1080593
- LightGBM回归调参:https://www.cnblogs.com/bjwu/p/9307344.html
- LightGBM分类调参:https://juejin.im/post/5b76437ae51d45666b5d9b05
7 数据
- telecom_churn.csv数据


