吴恩达Deep Learning编程作业 Course4- 卷积神经网络-第二周作业:Residual Networks
Residual Networks 残差网络
在这一部分中我们将学习使用残差网络建立更深层的卷积网络。从理论上讲,越深层的神经网络模型越可以解决复杂的问题,但实际上深层的网络会很难训练。Residual Networks是被He等人提出的,能够让我们训练更深的网络。
在这一部分中我们要完成的是:
- 实现ResNets的基本构建块。
- 把这些模块放在一起,以实现和训练一个最先进的神经网络的图像分类。
- 完成任务我们将继续使用Keras。
需要使用的包:
import numpy as np
from keras import layers
from keras.layers import Input, Add, Dense, Activation, ZeroPadding2D, BatchNormalization, Flatten, Conv2D, AveragePooling2D, MaxPooling2D, GlobalMaxPooling2D
from keras.models import Model, load_model
from keras.preprocessing import image
from keras.utils import layer_utils
from keras.utils.data_utils import get_file
from keras.applications.imagenet_utils import preprocess_input
import pydot
from IPython.display import SVG
from keras.utils.vis_utils import model_to_dot
from keras.utils import plot_model
from Week4.Second.utils.resnets_utils import *
from keras.initializers import glorot_uniform
import scipy.misc
from matplotlib.pyplot import imshow

import keras.backend as K
K.set_image_data_format('channels_last')
K.set_learning_phase(1)
1. 深度神经网络的问题
近些年来,神经网络模型的深度不断提升,最先进的网络从几层(如AlexNet)发展到一百层以上。
深度网络的主要好处是它可以表示非常复杂的功能。它还可以学习许多不同抽象级别的特性,从边缘(在较低的层)到非常复杂的特性(在较深的层)。然而,使用更深层次的网络并不总是有用的。因为训练它们的一个巨大困难是梯度消失:非常深的网络通常有一个快速归零的梯度信号,因此梯度下降会变得非常慢。更具体地说,在梯度下降法中,从最后一层反向传播回到第一层,每一步乘以权重矩阵,梯度值可以迅速的指数式减少到0,或者在罕见的情况下,成倍增长迅速,产生梯度爆炸。
在训练过程中,我们会看到开始几层的梯度迅速下降到。。如下图所示:
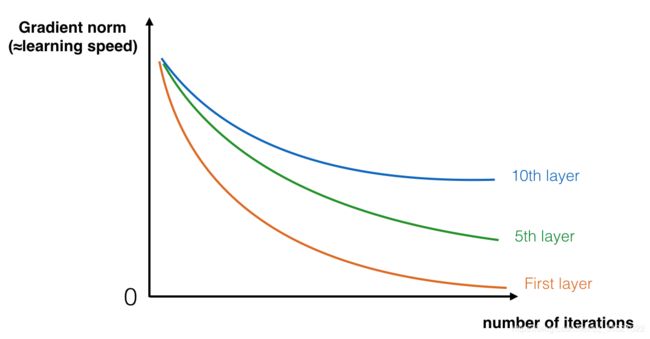
为了解决这个问题,我们构建残差网络。
2. 建立一个残差网络
在残差网络中,允许梯度直接反向传播到更浅的层,也称为“跳跃连接”,如下图:
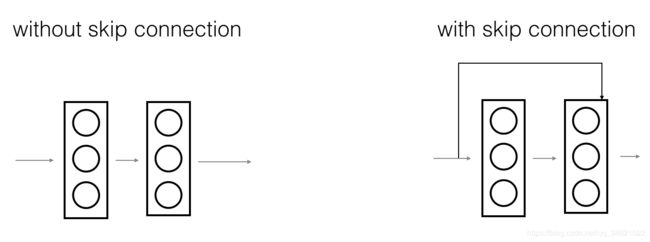
左边的图像显示了通过网络的“主路径”。右边的图像向主路径添加了一个“快捷”路经。通过将这些ResNet块堆叠在一起,可以形成一个非常深的网络。
在课程中我们学习到带有捷径的ResNet模块很容易学习到一个恒等函数。这意味着我们可以在不损害训练集性能,风险较低的情况下额外添加ResNet块。有一些证据表明学习一个恒等函数比跳过帮助消除梯度消失的连接更有效。
在ResNet中主要使用两种类型的块,主要取决于输入/输出维度是相同的还是不同的,这两个我们都要实现。
2.1 恒等块(The identity block)
恒等块是在残差网络中使用的标准块,对应的输入激活( a [ l ] a^{[l]} a[l])和输出激活( a [ l + 2 ] a^{[l+2]} a[l+2])有相同的维数。为了具象化残差网络中标准块的不同步骤,我们用一个图来展示:

图片中上面的路经我们称为“快捷路经”,下面的路经称为主路径,在这个图中我们也明确了每层中CONV2D和RELU的步骤。为了加快训练速度,我们还增加了一个BatchNorm步骤。BatchNorm在Keras中只需一行代码就可以实现。
在这个练习中,你将实现一个简单但是更强大的版本,直接越过三个隐藏层,如下图所示:
- 第一个Conv2D:过滤器F1的维数为(1,1),步长为(1,1)。padding是valid,它的名字应该是conv_name_base+‘2a’。使用0作为随机初始化的种子。
- 第一个BatchNorm是对通道轴进行归一化。它的名字应该是bn_name_base + ‘2a’。
- 然后使用ReLU激活函数。它没有名称,也没有超参数。
主路径第二个组成部分:
- 第二个Conv2D:过滤器F2的维数为(f,f),步长为(1,1)。padding为:“same”,它的名字应该是conv_name_base+‘2b’。使用0作为随机初始化的种子。
- 第二个BatchNorm是对通道轴进行归一化。它的名字应该是bn_name_base + ‘2b’
- 然后使用ReLU激活函数。它没有名称,也没有超参数。
主路径的第三个组成部分:
- 第三个Conv2D:过滤器F1的维数为(1,1),步长为(1,1)。padding是valid,它的名字应该是conv_name_base+‘2c’。使用0作为随机初始化的种子。
- 第三个BatchNorm是对通道轴进行归一化。它的名字应该是bn_name_base + ‘2c’。使用0作为随机初始化的种子。
最后一步:
- 快捷路经和输入加在一起。
- 使用ReLU激活函数,既没有命名也没有超参数。
练习:实现ResNet恒等块。我们已经实现了主路径的第一个组件。
- 实现Conv2D:参考文档
- 实现BatchNorm:参考文档
- 实现激活:使用
Activation('relu')(X) - 添加“快捷路径”传递的值:参考文档
def identity_block(X, f, filters, stage, block):
    """
    实现恒等块
    :param X:输入张量的维数(m, n_H_prev, n_W_prev, n_C_prev)
    :param f:整数,指定主路径的中间CONV窗口的维数
    :param filters:整数列表,定义主路径每层卷积层的过滤器数量
    :param stage:整数,根据每层的位置给每层命名,与block参数一起使用
    :param block:字符串,据每层的位置来命名每一层,与stage参数一起使用
    :return:
        X-卷积块的输出,tensor类型,维度为(n_H, n_W, n_C)
    """
    #定义命名规则
    conv_name_base = "res" + str(stage) + block + "_branch"
    bn_name_base = "bn" + str(stage) + block + '_branch'

    #获取过滤器数量
    F1, F2, F3 = filters

    #保存输入的数据
    X_shortcut = X

    #主路径第一个组成部分
    X = Conv2D(filters=F1, kernel_size=(1, 1), strides=(1, 1), padding='valid', name=conv_name_base + '2a', kernel_initializer=glorot_uniform(seed=0))(X)
    X = BatchNormalization(axis=3, name=bn_name_base + '2a')(X)
    X = Activation('relu')(X)

    #主路径第二个组成部分
    X = Conv2D(filters=F2, kernel_size=(f, f), strides=(1, 1), padding='same', name=conv_name_base + '2b', kernel_initializer=glorot_uniform(seed=0))(X)
    X = BatchNormalization(axis=3, name=bn_name_base + '2b')(X)
    X = Activation('relu')(X)

    #主路径第三个组成部分
    X = Conv2D(filters=F3, kernel_size=(1, 1), strides=(1, 1), padding='valid', name=conv_name_base + '2c', kernel_initializer=glorot_uniform(seed=0))(X)
    X = BatchNormalization(axis=3, name=bn_name_base + '2c')(X)

    #最后一步:将shortcut的值加入主路径中,通过relu激活函数处理
    X = Add()([X, X_shortcut])
    X = Activation('relu')(X)

    return X
调用:
if __name__ == "__main__":

    tf.reset_default_graph()

    with tf.Session() as test:
        np.random.seed(1)
        A_prev = tf.placeholder("float", [3,4,4,6])
        X = np.random.randn(3, 4, 4, 6)
        A = identity_block(A_prev, f=2, filters=[2, 4, 6], stage=1, block='a')
        test.run(tf.global_variables_initializer())
        #K.learning_phase()决定但花钱模式是在训练模式下还是测试模式下,训练模式为0,测试模式为1
        out = test.run([A], feed_dict={A_prev:X, K.learning_phase():0})
        print("out = " + str(out[0][1][1][0]))
2.2 卷积块
我们已经实现了残差网络的恒等块,接下来我们需要实现残差网络的卷积块,这是块的另一种形式。当输入输出维度不匹配时,你可以使用这种形式。与恒等块不同的是捷径种有一个Conv2D层,如下图所示:

捷径中的Conv2D层是用来将输入x重新调整维数的,这样在最后的添加中,维度就会匹配起来,以便将快捷键值添加回主路径。(作用和论文种提到的 W s W_s Ws作用相似)。例如:将激活值的宽度和高度减少一半,我们可以使用一个1*1的,步长为2的卷积来实现。在捷径种的Conv2D层没有使用任何非线性激活函数。它的主要作用是应用一个(已学习的)线性函数来减少输入的维数,从而使维数与后面的加法步骤相匹配。
卷积块的实现步骤如下所示:
主路径第一个分量:
- 第一个Conv2D,过滤器F1的维数为(1,1),步长为(s,s),padding为valid,命名规则为
conv_name_base + '2a'。 - 第一个BatchNorm是对通道轴进行归一化,命名为
bn_name_base + '2a'。 - 使用Relu激活函数。
主路径的第二个分量:
- 第二个Conv2D,过滤器F2的维数为(f,f),步长为(1,1),padding为valid,命名规则为
conv_name_base + '2b'。 - 第二个BatchNorm是对通道轴进行归一化,命名为
bn_name_base + '2b'。 - 使用Relu激活函数。
主路径的第三个分量:
- 第三个Conv2D,过滤器F3的维数为(1,1),步长为(1,1),padding为valid,命名为
conv_name_base + '2b'。 - 第三个BatchNorm是对通道轴进行归一化,命名规则为
bn_name_base + '2c'。 - 没有激活函数。
捷径:
- 捷径种的Conv2D,过滤器F3的维数为(1,1),步长为(s,s),padding为valid,命名为
bn_name_base + '1'。
最后一步:
- 将捷径和主路径的值加在一起。
- 应用Relu激活函数。
练习:实现卷积块,已经实现了主路径的第一个部分;接下来应该实现其余部分。和以前一样,总是使用0作为随机初始化的种子,以确保与我们分级器的一致性。
- 实现Conv2D:参考文档
- 实现BatchNorm:参考文档
- 实现激活:使用
Activation('relu')(X) - 添加“快捷路径”传递的值:参考文档
代码:
def convolutional_block(X, f, filters, stage, block, s=2):
    """
    实现卷积块
    :param X:输入,维度为( m, n_H_prev, n_W_prev, n_C_prev)
    :param f:整数,主路径中窗口维数
    :param filters:整数列表,定义主路径每层卷积的过滤器数量
    :param stage:整数,每层的位置来命名每一层
    :param block:字符串,根据每一层的位置命名
    :param s:整数,步长
    :return:返回最终输出X,维度为(n_H, n_W, n_C)
    """
    #定义命名
    conv_name_base = 'res' + str(stage) + block + '_branch'
    bn_name_base = 'bn' + str(stage) + block + '_branch'

    F1, F2, F3 = filters

    X_shortcut = X

    #主路径第一部分
    X = Conv2D(filters=F1, kernel_size=(1, 1), strides=(s, s), padding='valid', name=conv_name_base + '2a', kernel_initializer=glorot_uniform(seed=0))(X)
    X = BatchNormalization(axis=3, name=bn_name_base + '2a')(X)
    X = Activation('relu')(X)

    #主路径的第二部分
    X = Conv2D(filters=F2, kernel_size=(f, f), strides=(1, 1), padding='same', name=conv_name_base + '2b', kernel_initializer=glorot_uniform(seed=0))(X)
    X = BatchNormalization(axis=3, name=bn_name_base + '2b')(X)
    X = Activation('relu')(X)

    #主路径的第三部分
    X = Conv2D(filters=F3, kernel_size=(1, 1), strides=(1, 1), padding='valid', name=conv_name_base + '2c', kernel_initializer=glorot_uniform(seed=0))(X)
    X = BatchNormalization(axis=3, name=bn_name_base + '2c')(X)

    #捷径
    X_shortcut = Conv2D(filters=F3, kernel_size=(1, 1), strides=(s, s), padding='valid', name=conv_name_base + '1', kernel_initializer=glorot_uniform(seed=0))(X_shortcut)
    X_shortcut = BatchNormalization(axis=3, name=bn_name_base + '1')(X_shortcut)

    X = Add()([X, X_shortcut])
    X = Activation('relu')(X)

    return X
调用:
    tf.reset_default_graph()

    with tf.Session() as test:
        np.random.seed(1)
        A_prev = tf.placeholder("float", [3, 4, 4, 6])
        X = np.random.randn(3, 4, 4, 6)
        A = convolutional_block(A_prev, f=2, filters=[2, 4, 6], stage=1, block='a')
        test.run(tf.global_variables_initializer())
        out = test.run([A], feed_dict={A_prev: X, K.learning_phase(): 0})
        print("out = " + str(out[0][1][1][0]))
3. 建立一个50层的残差网络模型
了解完了残差网络的结构后,接下来我们就一起实现一个深层的残差网络,其结构如下图所示。其中ID Block表示身份块,“ID Block x3”意味着你应该把3个身份块堆在一起。

50层残差网络的组成:
- 对输入数据进行0填充,padding =(3,3)。
- stage1:
- 卷积层有64个过滤器,其维度为(7,7),步长为(2,2),命名为“conv1”。
- BatchNorm对输入数据进行归一化。
- 最大值池化层窗口为:(3,3),步长为(2,2).
- stage2:
- 卷积块使用三个大小为[64,64,256]的过滤器,f=3,s=1,block=“a”
- 2个恒等块使用三个大小为[64,64,256]的过滤器,f=3,block=“b”、“c”
- stages3:
- 卷积块使用3个大小为[128,128,512]的过滤器,f=3,s=2,block=“a”
- 3个恒等块使用三个大小为[128,128,512]的过滤器,f=3,block=“b”、“c”、“d”
- stage4:
- 卷积块使用3个大小为[256,256,1024]的过滤器,f=3,s=2,block=“a”。
- 5个恒等块使用三个大小为[256,256,1024]的过滤器,f=3,block=“b”、“c”、“d”、“e”、“f”。
- stage5:
- 卷积块使用f=3个大小为[512,512,2048]的过滤器,f=3,s=2,block=“a”
- 2个恒等块使用三个大小为[256,256,2048]的过滤器,f=3,block=“b”、“c”。
- 均值池化层使用维度为(2,2)的窗口,命名为“avg_pool”
- 展开操作
- 全连接层(密集连接)使用softmax激活函数,命名为
"fc" + str(classes)
帮助手册:
- 均值池化层:地址
- Conv2D:地址
- BatchNorm:地址
- zero 填充:地址
- 最大值池化层:地址
- 全连接层:地址
- 添加快捷方式传递的值:地址
代码:
def ResNet50(input_shape=(64, 64, 3), classes=6):
    """
    50层残差网络的结构:
    CONV2D -> BATCHNORM -> RELU -> MAXPOOL -> CONVBLOCK -> IDBLOCK*2 -> CONVBLOCK -> IDBLOCK*3
    -> CONVBLOCK -> IDBLOCK*5 -> CONVBLOCK -> IDBLOCK*2 -> AVGPOOL -> TOPLAYER
    :param input_shape:图像数据集维数
    :param classes:分类数
    :return:model - 模型
    """

    #定义输入
    X_input = Input(input_shape)

    #0填充
    X = ZeroPadding2D((3, 3))(X_input)

    #stage1
    X = Conv2D(64, (7, 7), strides=(2, 2), name='conv1', kernel_initializer=glorot_uniform(seed=0))(X)
    X = BatchNormalization(axis=3, name='bn_conv1')(X)
    X = Activation('relu')(X)
    X = MaxPooling2D((3, 3), strides=(2, 2))(X)

    #stage2
    X = convolutional_block(X, f=3, filters=[64, 64, 256], stage=2, block='a', s=1)
    X = identity_block(X, 3, [64, 64, 256], stage=2, block='b')
    X = identity_block(X, 3, [64, 64, 256], stage=2, block='c')

    #stage3
    X = convolutional_block(X, f=3, filters=[128, 128, 512], stage=3, block='a', s=2)
    X = identity_block(X, 3, [128, 128, 512], stage=3, block='b')
    X = identity_block(X, 3, [128, 128, 512], stage=3, block='c')
    X = identity_block(X, 3, [128, 128, 512], stage=3, block='d')

    #stage4
    X = convolutional_block(X, f=3, filters=[256, 256, 1024], stage=4, block='a', s=2)
    X = identity_block(X, 3, [256, 256, 1024], stage=4, block='b')
    X = identity_block(X, 3, [256, 256, 1024], stage=4, block='c')
    X = identity_block(X, 3, [256, 256, 1024], stage=4, block='d')
    X = identity_block(X, 3, [256, 256, 1024], stage=4, block='e')
    X = identity_block(X, 3, [256, 256, 1024], stage=4, block='f')

    #stage5
    X = X = convolutional_block(X, f=3, filters=[512, 512, 2048], stage=5, block='a', s=2)
    X = identity_block(X, 3, [512, 512, 2048], stage=5, block='b')
    X = identity_block(X, 3, [512, 512, 2048], stage=5, block='c')

    #均值池化
    X = AveragePooling2D(pool_size=(2, 2), padding='same')(X)

    #输出层
    X = Flatten()(X)
    X = Dense(classes, activation='softmax', name='fc' + str(classes), kernel_initializer=glorot_uniform(seed=0))(X)

    model = Model(inputs=X_input, outputs=X, name='ResNet50')

    return model
实现模型:
model = ResNet50(input_shape=(64, 64, 3), classes=6)
编译模型:
model.compile(optimizer='adam', loss='categorical_crossentropy', metrics=['accuracy'])
X_train_orig, Y_train_orig, X_test_orig, Y_test_orig, classes = load_dataset()

# Normalize image vectors
X_train = X_train_orig / 255.
X_test = X_test_orig / 255.

# Convert training and test labels to one hot matrices
Y_train = convert_to_one_hot(Y_train_orig, 6).T
Y_test = convert_to_one_hot(Y_test_orig, 6).T

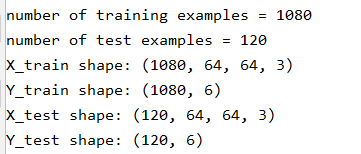
print("number of training examples = " + str(X_train.shape[0]))
print("number of test examples = " + str(X_test.shape[0]))
print("X_train shape: " + str(X_train.shape))
print("Y_train shape: " + str(Y_train.shape))
print("X_test shape: " + str(X_test.shape))
print("Y_test shape: " + str(Y_test.shape))
model.fit(X_train, Y_train, epochs=2, batch_size=32)
    preds = model.evaluate(X_test, Y_test)
    print("Loss = " + str(preds[0]))
    print("Test Accuracy = " + str(preds[1]))

作业只要求进行两轮训练,因此性能有些差。你可以继续迭代更多次,大概训练20次就可以获得比较好的结果,但是在CPU上可能需要1个小时的时间。
在这里我们就直接使用作业提供的已经训练好的参数,把它加载进来使用。
没有找到其参数文件,只放上代码,大家看一看吧。
model = load_model('ResNet50.h5')

preds = model.evaluate(X_test, Y_test)
print("Loss = " + str(preds[0]))
print("Test Accuracy = " + str(preds[1]))
4. 测试模型
代码:
    img_path = 'datasets//my_image.jpg'
    img = image.load_img(img_path, target_size=(64, 64))
    x = image.img_to_array(img)
    x = np.expand_dims(x, axis=0)
    x = preprocess_input(x)
    print('Input image shape:', x.shape)
    my_image = scipy.misc.imread(img_path)
    imshow(my_image)
    print("class prediction vector [p(0), p(1), p(2), p(3), p(4), p(5)] = ")
    print(model.predict(x))
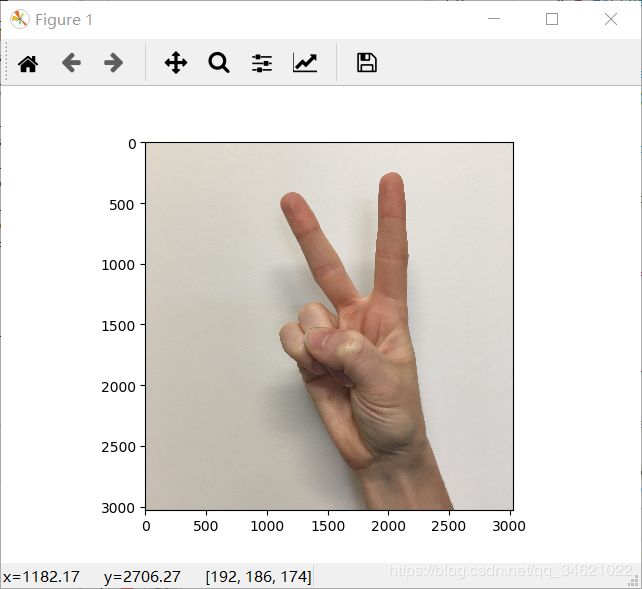

我的结果是有错误的,使用给定的参数应该输出[[1,0,0,0,0,0]].
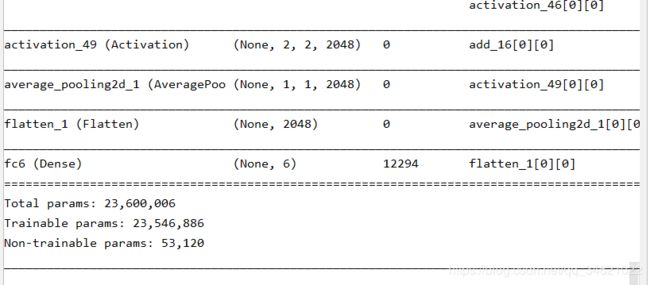
查看网络细节:
model.summary()
    plot_model(model, to_file='model.png')
    SVG(model_to_dot(model).create(prog='dot', format='svg'))
5. 工具代码
resnets_utils.py
import os
import numpy as np
import tensorflow as tf
import h5py
import math

def load_dataset():
    train_dataset = h5py.File('datasets/train_signs.h5', "r")
    train_set_x_orig = np.array(train_dataset["train_set_x"][:]) # your train set features
    train_set_y_orig = np.array(train_dataset["train_set_y"][:]) # your train set labels

    test_dataset = h5py.File('datasets/test_signs.h5', "r")
    test_set_x_orig = np.array(test_dataset["test_set_x"][:]) # your test set features
    test_set_y_orig = np.array(test_dataset["test_set_y"][:]) # your test set labels

    classes = np.array(test_dataset["list_classes"][:]) # the list of classes

    train_set_y_orig = train_set_y_orig.reshape((1, train_set_y_orig.shape[0]))
    test_set_y_orig = test_set_y_orig.reshape((1, test_set_y_orig.shape[0]))

    return train_set_x_orig, train_set_y_orig, test_set_x_orig, test_set_y_orig, classes


def random_mini_batches(X, Y, mini_batch_size = 64, seed = 0):
    """
    Creates a list of random minibatches from (X, Y)

    Arguments:
    X -- input data, of shape (input size, number of examples) (m, Hi, Wi, Ci)
    Y -- true "label" vector (containing 0 if cat, 1 if non-cat), of shape (1, number of examples) (m, n_y)
    mini_batch_size - size of the mini-batches, integer
    seed -- this is only for the purpose of grading, so that you're "random minibatches are the same as ours.

    Returns:
    mini_batches -- list of synchronous (mini_batch_X, mini_batch_Y)
    """

    m = X.shape[0]                  # number of training examples
    mini_batches = []
    np.random.seed(seed)

    # Step 1: Shuffle (X, Y)
    permutation = list(np.random.permutation(m))
    shuffled_X = X[permutation,:,:,:]
    shuffled_Y = Y[permutation,:]

    # Step 2: Partition (shuffled_X, shuffled_Y). Minus the end case.
    num_complete_minibatches = math.floor(m/mini_batch_size) # number of mini batches of size mini_batch_size in your partitionning
    for k in range(0, num_complete_minibatches):
        mini_batch_X = shuffled_X[k * mini_batch_size : k * mini_batch_size + mini_batch_size,:,:,:]
        mini_batch_Y = shuffled_Y[k * mini_batch_size : k * mini_batch_size + mini_batch_size,:]
        mini_batch = (mini_batch_X, mini_batch_Y)
        mini_batches.append(mini_batch)

    # Handling the end case (last mini-batch < mini_batch_size)
    if m % mini_batch_size != 0:
        mini_batch_X = shuffled_X[num_complete_minibatches * mini_batch_size : m,:,:,:]
        mini_batch_Y = shuffled_Y[num_complete_minibatches * mini_batch_size : m,:]
        mini_batch = (mini_batch_X, mini_batch_Y)
        mini_batches.append(mini_batch)

    return mini_batches


def convert_to_one_hot(Y, C):
    Y = np.eye(C)[Y.reshape(-1)].T
    return Y


def forward_propagation_for_predict(X, parameters):
    """
    Implements the forward propagation for the model: LINEAR -> RELU -> LINEAR -> RELU -> LINEAR -> SOFTMAX

    Arguments:
    X -- input dataset placeholder, of shape (input size, number of examples)
    parameters -- python dictionary containing your parameters "W1", "b1", "W2", "b2", "W3", "b3"
                  the shapes are given in initialize_parameters

    Returns:
    Z3 -- the output of the last LINEAR unit
    """

    # Retrieve the parameters from the dictionary "parameters"
    W1 = parameters['W1']
    b1 = parameters['b1']
    W2 = parameters['W2']
    b2 = parameters['b2']
    W3 = parameters['W3']
    b3 = parameters['b3']
                                                           # Numpy Equivalents:
    Z1 = tf.add(tf.matmul(W1, X), b1)                      # Z1 = np.dot(W1, X) + b1
    A1 = tf.nn.relu(Z1)                                    # A1 = relu(Z1)
    Z2 = tf.add(tf.matmul(W2, A1), b2)                     # Z2 = np.dot(W2, a1) + b2
    A2 = tf.nn.relu(Z2)                                    # A2 = relu(Z2)
    Z3 = tf.add(tf.matmul(W3, A2), b3)                     # Z3 = np.dot(W3,Z2) + b3

    return Z3

def predict(X, parameters):

    W1 = tf.convert_to_tensor(parameters["W1"])
    b1 = tf.convert_to_tensor(parameters["b1"])
    W2 = tf.convert_to_tensor(parameters["W2"])
    b2 = tf.convert_to_tensor(parameters["b2"])
    W3 = tf.convert_to_tensor(parameters["W3"])
    b3 = tf.convert_to_tensor(parameters["b3"])

    params = {"W1": W1,
              "b1": b1,
              "W2": W2,
              "b2": b2,
              "W3": W3,
              "b3": b3}

    x = tf.placeholder("float", [12288, 1])

    z3 = forward_propagation_for_predict(x, params)
    p = tf.argmax(z3)

    sess = tf.Session()
    prediction = sess.run(p, feed_dict = {x: X})

    return prediction


