7. springboot-----Druid + mybatis + SpringDataJPA + 事务
1. 整合 JDBC 实战
1. 创建项目
2. JDBC相关配置
<!--mysql驱动包-->
<dependency>
	<groupId>mysql</groupId>
	<artifactId>mysql-connector-java</artifactId>
	<scope>runtime</scope>
</dependency>
<!--jdbc启动器-->
<dependency>
	<groupId>org.springframework.boot</groupId>
	<artifactId>spring-boot-starter-jdbc</artifactId>
</dependency>
application.yml
spring:
	datasource:
		username: root
		password: root
		#使用 MySQL连接驱动是8.0以上,需要在Url后面加上时区, GMT%2B8代表中国时区,不然报时区错误
		url: jdbc:mysql://127.0.0.1:3306/jdbc?serverTimezone=GMT%2B8
		注意:mysql 8.x版本驱动包,要使用 com.mysql.cj.jdbc.Driver 作为驱动类
		driver-class-name: com.mysql.cj.jdbc.Driver
3. 测试类
@RunWith(SpringRunner.class)
@SpringBootTest
public class SpringBootDataApplicationTests {

	@Autowired
	DataSource datasource;

	@Test
	public void contextLoads() throws SQLException {
		// 默认采用的数据源连接池:com.zaxxer.hikari.HikariDataSource
		System.out.println("datasource: " + datasource.getClass());
		Connection connection = datasource.getConnection();
		System.out.println(connection);
		connection.close();
	}
}
2. 高级配置 Druid 连接池与监控管理
Hikari (默认)性能上比 Druid 更好,但是 Druid 有配套的监控安全管理功能
1. 引入 Driud 依赖
<dependency>
<groupId>com.alibaba</groupId>
<artifactId>druid</artifactId>
<version>1.1.12</version>
</dependency>
2. Druid 全局配置(不一定要配置这么多)
spring:
	datasource:
		# 数据源基本配置
		username: root
		password: root
		url: jdbc:mysql://127.0.0.1:3306/jdbc?serverTimezone=GMT%2B8
		# 8.x版本驱动包,要使用以下类作为驱动类
		driver-class-name: com.mysql.cj.jdbc.Driver
		# 指定 Druid 数据源
		type: com.alibaba.druid.pool.DruidDataSource
		# 数据源其他配置, DataSourceProperties中没有相关属性,默认无法绑定
		initialSize: 8
		minIdle: 5
		maxActive: 20
		maxWait: 60000
		timeBetweenEvictionRunsMillis: 60000
		minEvictableIdleTimeMillis: 300000
		validationQuery: SELECT 1 FROM DUAL
		testWhileIdle: true
		testOnBorrow: false
		testOnReturn: false
		poolPreparedStatements: true
		# 配置监控统计拦截的filters,去掉后监控界面sql无法统计,'wall'用于防火墙
		filters: stat,wall,logback
		maxPoolPreparedStatementPerConnectionSize: 25
		useGlobalDataSourceStat: true
		connectionProperties: druid.stat.mergeSql=true;druid.stat.slowSqlMillis=500
3. 自定义配置类, 将配置中属性与 DruidDataSource 属性绑定
/**
* Druid 配置类
* @Auther: 梦学谷
*/
@Configuration
public class DruidConfig {

	//绑定数据源配置
	@ConfigurationProperties(prefix = "spring.datasource")

	@Bean
	public DataSource druid() {
		return new DruidDataSource();
	}
}
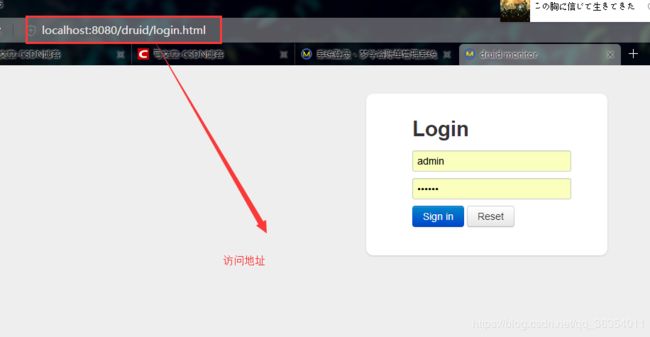
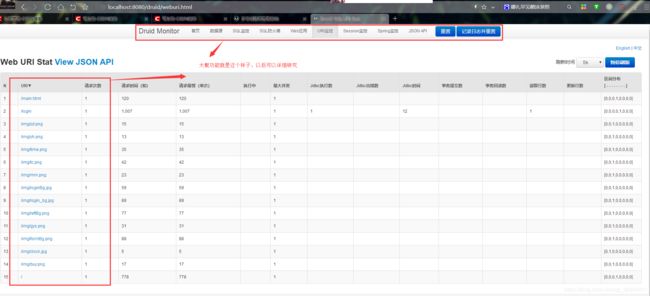
4. 配置Druid监控
/**
* Druid 配置类
* @Auther: 梦学谷
*/
@Configuration
public class DruidConfig {

//绑定数据源配置
@ConfigurationProperties(prefix = "spring.datasource")
@Bean
public DataSource druid() {
	return new DruidDataSource();
}

/**
* 配置Druid监控
* 1. 配置一个管理后台的Servlet
* 2. 配置一个监控的filter
*/

@Bean // 1. 配置一个管理后台的Servlet
public ServletRegistrationBean statViewServlet() {
	//StatViewServlet是 配置管理后台的servlet
	ServletRegistrationBean<StatViewServlet> bean =
	new ServletRegistrationBean<>(new StatViewServlet(), "/druid/*");
	//配置初始化参数
	Map<String, String> initParam = new HashMap<>();
	//访问的用户名密码
	initParam.put(StatViewServlet.PARAM_NAME_USERNAME, "root");
	initParam.put(StatViewServlet.PARAM_NAME_PASSWORD, "123");
	//允许访问的ip,默认所有ip访问
	initParam.put(StatViewServlet.PARAM_NAME_ALLOW, "");
	//禁止访问的ip
	initParam.put(StatViewServlet.PARAM_NAME_DENY, "192.168.10.1");
	bean.setInitParameters(initParam);
	return bean;
}

//2. 配置一个监控的filter
@Bean
public FilterRegistrationBean filter() {
	FilterRegistrationBean<Filter> bean = new FilterRegistrationBean<>();
	bean.setFilter(new WebStatFilter());
	//配置初始化参数
	Map<String, String> initParam = new HashMap<>();
	//排除请求
	initParam.put(WebStatFilter.PARAM_NAME_EXCLUSIONS, "*.js,*.css,/druid/*");
	//拦截所有请求
	bean.setUrlPatterns(Arrays.asList("/*"));
	return bean;
	}
}
3.1 整合 MyBatis3.x 注解版本实战
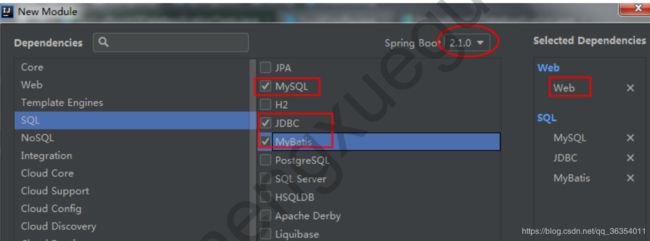
1.创建Module
2. 导入 Druid 数据源依赖, 创建后自动会引入 MyBatis 启动器,是由 MyBatis 官方提供的
<!--导入 mybatis 启动器-->
<dependency>
	<groupId>org.mybatis.spring.boot</groupId>
	<artifactId>mybatis-spring-boot-starter</artifactId>
	<version>1.3.2</version>
</dependency>
<!--druid数据源-->
<dependency>
	<groupId>com.alibaba</groupId>
	<artifactId>druid</artifactId>
	<version>1.1.12</version>
</dependency>
3. 配置 Druid 数据源(application.yml修改为mybatis库)与监控 [参考10.2章节 ]
package com.mengxuegu.springboot.config;

import com.alibaba.druid.pool.DruidDataSource;
import com.alibaba.druid.support.http.StatViewServlet;
import com.alibaba.druid.support.http.WebStatFilter;
import org.springframework.boot.context.properties.ConfigurationProperties;
import org.springframework.boot.web.servlet.FilterRegistrationBean;
import org.springframework.boot.web.servlet.ServletRegistrationBean;
import org.springframework.context.annotation.Bean;
import org.springframework.context.annotation.Configuration;

import javax.servlet.Filter;
import javax.sql.DataSource;
import java.util.Arrays;
import java.util.HashMap;
import java.util.Map;

/**
 * 绑定Druid相关信息
 * @Auther: 梦学谷
 */
@Configuration
public class DruidConfig {


    @ConfigurationProperties(prefix = "spring.datasource")
    @Bean
    public DataSource druid() {
        return new DruidDataSource();
    }

    /**
     * 配置一个druid的监控
     * 1. 配置一个druid的后台 管理servlet
     * 2. 配置一个druid的filter
     *
     */
    // 1. 配置一个druid的后台管理servlet
    @Bean
    public ServletRegistrationBean statViewServlet() {
        //注意:请求是 /druid/*
        ServletRegistrationBean<StatViewServlet> bean = new ServletRegistrationBean<>(new StatViewServlet(), "/druid/*");

        //设置初始化参数值
        Map<String, String> initParam = new HashMap<>();

        initParam.put(StatViewServlet.PARAM_NAME_USERNAME, "root");
        initParam.put(StatViewServlet.PARAM_NAME_PASSWORD, "123");
        //如果不写,则默认所有ip都可以访问
        initParam.put(StatViewServlet.PARAM_NAME_ALLOW, "");
        initParam.put(StatViewServlet.PARAM_NAME_DENY, "192.168.10.1");

        bean.setInitParameters(initParam);

        return bean;
    }

    //2. 配置一个druid的filter
    @Bean
    public FilterRegistrationBean webStatFilter() {
        FilterRegistrationBean<Filter> bean = new FilterRegistrationBean<>();
        bean.setFilter(new WebStatFilter());

        Map<String, String> initPrams = new HashMap<>();
        initPrams.put(WebStatFilter.PARAM_NAME_EXCLUSIONS, "*.js,*.css,/druid/*");
        bean.setInitParameters(initPrams);

        //设置拦截请求
        bean.setUrlPatterns(Arrays.asList("/*"));
        return bean;
    }

}
4. 创建 mybatis 库与导入表和数据、实体类
3.2 注解版 MyBatis 操作
1.sql语句
/**
* 使用Mybatis注解版本
* @Auther: 梦学谷
*/


//@Mapper //指定这是操作数据的Mapper
public interface ProviderMapper {
	@Select("select * from provider where pid=#{pid}")
	Provider getProvierByPid(Integer pid);
	//useGeneratedKeys是否使用自增主键,keyProperty指定实体类中的哪一个属性封装主键值
	@Options(useGeneratedKeys = true, keyProperty = "pid")
	@Insert("insert into provider(providerName) values(#{providerName})")
	int addProvider(Provider provider);
	@Delete("delete from provider where pid=#{pid}")
	int deleteProviderByPid(Integer pid);
	@Update("update provider set providerName=#{providerName} where pid=#{pid}" )
	int updateProvider(Provider provider);
}
注: 上面@Insert插入数据时, 使用 @Options 接收插入的主键值:
useGeneratedKeys是否自增主键, keyProperty指定实体中哪个属性封装主键
@Options(useGeneratedKeys = true, keyProperty = “pid”)
2. Controller层
@Controller
public class ProviderController {

	@Autowired
	ProviderMapper providerMapper;

	@ResponseBody
	@GetMapping("/provider/{pid}")
		public Provider getProvider(@PathVariable("pid") Integer pid) {
		Provider providerByPid = providerMapper.getProviderByPid(pid);
		return providerByPid;
	}

	@ResponseBody
	@GetMapping("/provider")
	public Provider addProvider(Provider provider) {
		providerMapper.addProvider(provider);
		return provider;
	}
}
3.自定义MyBatis配置类, 替代mybatis配置文件
- 开启驼峰命名方式, 使用,不然 provider_code 不会自动转成 providerCode
/**
* MyBatis注解版-配置类替换配置文件
* @Auther: 梦学谷
*/
@org.springframework.context.annotation.Configuration
public class MyBatisConfig {
	@Bean
	public ConfigurationCustomizer configurationCustomizer() {
		return new ConfigurationCustomizer(){
			@Override
			public void customize(Configuration configuration) {
				//开启驼峰命名方式
				configuration.setMapUnderscoreToCamelCase(true);
			}
		};
	}
}
- 使用 @MapperScan(“包名”) 自动装配指定包下所有Mapper, 省得在每个Mappe接口上写 @Mapper
//会自动装配指定包下面所有Mapper,省得在每个Mapper上面写@Mapper
@MapperScan("com.mengxuegu.springboot.mapper")
@SpringBootApplication
public class SpringBoot08DataMybatisApplication {
	public static void main(String[] args) {
		SpringApplication.run(SpringBoot08DataMybatisApplication.class, args);
	}
}
3.3 整合 MyBatis3.x 配置文件版实战
1.Mapper接口
/**
* MyBatis 配置文件版
* @Auther: 梦学谷
*/
//@Mapper 或 @MapperScan 扫描Mapper接口装配到容器中
public interface BillMapper {
	Bill getBillByBid(Integer bid);
	int insertBill(Bill bill);
}
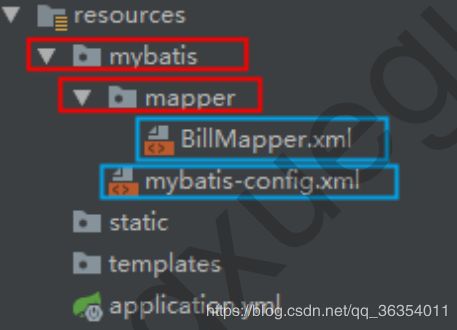
2. 在 resources 创建以下目录和核心配置文件与Mapper映射文件
3. mybatis 核心配置文件
<?xml version="1.0" encoding="UTF-8" ?>
<!DOCTYPE configuration
PUBLIC "-//mybatis.org//DTD Config 3.0//EN"
"http://mybatis.org/dtd/mybatis-3-config.dtd">
<configuration>
<!--mybatis核心配置文件-->

</configuration>
4. BillMapper 映射文件
<?xml version="1.0" encoding="UTF-8" ?>
<!DOCTYPE mapper
PUBLIC "-//mybatis.org//DTD Mapper 3.0//EN"
"http://mybatis.org/dtd/mybatis-3-mapper.dtd">

<mapper namespace="com.mengxuegu.springboot10datamybatis.entities">
	<select id="getBillByBid" resultType="com.mengxuegu.springboot10datamybatis.entities.Bill">
		select * from bill where bid = #{bid}
	</select>

	<insert id="addBill">
		insert into bill(bill_code, bill_name) values(#{billCode}, #{billName})
	</insert>
</mapper>
5.application.yml 中指定配置文件路径
# Mybatis相关配置
mybatis:
#核心配置文件路径
config-location: classpath:mybatis/mybatis-config.xml
#映射配置文件路径
mapper-locations: classpath:mybatis/mapper/*.xml
6.创建 BillController 来测试
@Controller
public class BillController {

	@Autowired
	BillMapper billMapper;

	@ResponseBody
	@GetMapping("/bill/{bid}")
	public Bill getBill(@PathVariable Integer bid) {
		return billMapper.getBillByBid(bid);
	}

	@ResponseBody
	@GetMapping("/bill")
	public Bill addBill(Bill bill) {
		billMapper.addBill(bill);
		return bill;
	}
}
访问 http://localhost:8080/bill/1 后 发现 billCode、billName等没有获取到,需要配置文件中开启驼峰命名
7. mybatis-config.xml 开启驼峰命名
<?xml version="1.0" encoding="UTF-8" ?>
<!DOCTYPE configuration
PUBLIC "-//mybatis.org//DTD Config 3.0//EN"
"http://mybatis.org/dtd/mybatis-3-config.dtd">
<configuration>
<!--mybatis核心配置文件-->
<settings>
<!--开启驼峰命名-->
<setting name="mapUnderscoreToCamelCase" value="true"/>
</settings>
</configuration>
8. 控制台打印sql语句
# 打印sql
logging:
level:
com.mengxuegu.springboot10datamybatis.mapper : debug
4.1 了解 Spring Data JPA
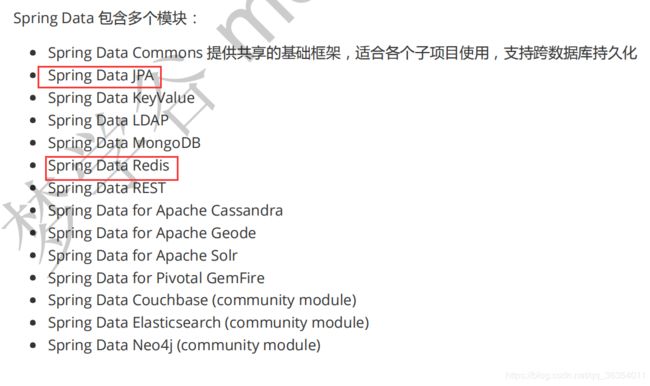
1. 什么是 Spring Data
Spring Data 是 Spring Boot 底层默认进行数据访问的技术 , 为了简化构建基于 Spring 框架应用的数据访问技术,
包括非关系数据库、Map-Reduce 框架、云数据服务等;另外也包含对关系数据库的访问支持。
2.Spring Data 特点
Spring Data 项目为大家提供统一的API来对不同数据访问层进行操作;
3. Spring Data 统一的核心接口
1. Repository :统一的根接口,其他接口继该接口
2. CrudRepository :基本的增删改查接口,提供了最基本的对实体类CRUD操作
3. PagingAndSortingRepository :增加了分页和排序操作
4. JpaRepository :增加了批量操作,并重写了父接口一些方法的返回类型
5. JpaSpecificationExecutor :用来做动态查询,可以实现带查询条件的分页(不属于Repository体系,支
持 JPA Criteria 查询相关的方法 )
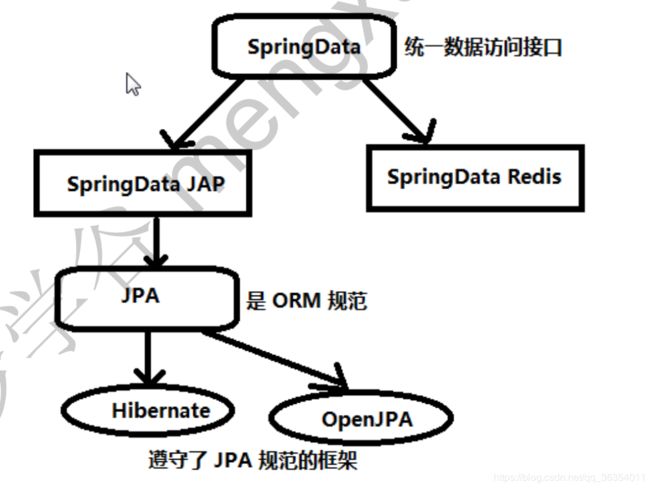
4. Spring Data JPA、JPA与Hibernate 关系
4.2 整合 Spring Data JPA 实战
JPA的底层遵守是ORM(对象关系映射)规范,因此JPA其实也就是java实体对象和关系型数据库建立起映射关系,通过面向对象编程的思想操作关系型数据库的规范。
1. 创建Module
2.添加数据源, 新建 jpa 数据库
spring:
	datasource:
		# 数据源基本配置
		username: root
		password: root
		url: jdbc:mysql://127.0.0.1:3306/jpa?serverTimezone=GMT%2B8
		# 8.x版本驱动包,要使用以下类作为驱动类
		driver-class-name: com.mysql.cj.jdbc.Driver
3. 创建实体类, 并使用JPA注解进行配置映射关系
类上使用 JPA注解 @Entity 标注,说明它是和数据表映射的类; @Table(name=“表名”) 指定对应映射的表
名,省略默认表名就是类名。
@Id 标识主键, @GeneratedValue(strategy = GenerationType.IDENTITY) 标识自增长主键
@Column 标识字段
import javax.persistence.*;

//使用JPA注解进行配置映射关系
@Entity //说明它是和数据表映射的类
@Table(name = "tbl_user") //指定对应映射的表名,省略默认表名就是类名
public class User {
	@Id //标识主键
	@GeneratedValue(strategy = GenerationType.IDENTITY) //标识自增长主键
	private Integer id;

	@Column(name = "user_name",length = 5) //这是和数据表对应的一个列
	private String userName;

	@Column //省略默认列名就是属性名
	private String password;

	setter/getter...
}
4. 创建 UserRepository 接口继承 JpaRepository , 就会crud及分页等基本功能
package com.mengxuegu.springboot.dao;

import com.mengxuegu.springboot.entity.User;
import org.springframework.data.jpa.repository.JpaRepository;

/**
* 自定义接口继承JpaRepository,就会crud及分页等基本功能
* @Auther: 梦学谷 www.mengxuegu.com
*/
//指定的泛型<操作的实体类,主键的类型>
public interface UserRepository extends JpaRepository<User, Integer> {
}
5. JPA 配置在全局配置文件中添加 ( spring.jpa.* 开头)
spring:
	datasource:
		# 数据源基本配置
		username: root
		password: root
		url: jdbc:mysql://127.0.0.1:3306/jpa
		# 8.x版本驱动包,要使用以下类作为驱动类
		driver-class-name: com.mysql.cj.jdbc.Driver

	# jpa相关配置 spring.jpa.*
	jpa:
		# 控制台显示SQL
		showSql: true
		hibernate:
			# 会根据就映射实体类自动创建或更新数据表
			ddl-auto: update
			# 默认创建表类型是MyISAM,是非事务安全的,所以无法实现事物回滚
			# 指定如下方言: 创建的表类型是Innodb,才可以进行对事物的回滚。
			database-platform: org.hibernate.dialect.MySQL5InnoDBDialect
6. 测试方法
@RestController
public class UserController {

	@Autowired
	UserRepository userRepository;

	@GetMapping("/user/{id}")
	public User getUserById(@PathVariable("id") Integer id) {
		return userRepository.findById(id).get();
	}

	@GetMapping("/user")
	public User addUser(User user) {
		return userRepository.save(user);
	}
}
5.1 Spring Boot中的事务管理
1. 强调 Hibernate 在创建表时(它帮我们创建的表需要额外配置一下)
默认创建表类型是MyISAM,是非事务安全的,所以无法实现事物回滚
jpa:
	# 控制台显示SQL
	showSql: true
	hibernate:
		# 会根据就映射实体类自动创建或更新数据表
		ddl-auto: update
	# 默认创建表类型是MyISAM,是非事务安全的,所以无法实现事物回滚
	# 指定如下方言: 创建的表类型是Innodb,才可以进行对事物的回滚。
	database-platform: org.hibernate.dialect.MySQL57Dialect
2.1 创建 Service 层(将在service层演示如何回滚事务)
public interface IUserService {
	Boolean addUser(User user);
}

---------------------------------------

import org.springframework.transaction.annotation.Transactional;

@Service
public class UserServiceImpl implements IUserService {

	@Autowired
	UserRepository userRepository;

	/*
	事务管理:
	1. 在启动类上 ,使用 @EnableTransactionManagement 开启注解方式事务支持
	2. 在 Service层方法上添加 @Transactional 进行事务管理
	*/

	@Transactional
	@Override
	public Boolean addUser(User user) {
		userRepository.save(new User("1","1"));
		userRepository.save(new User("12","2"));
		userRepository.save(new User("123","3"));
		userRepository.save(new User("1234","4"));
		userRepository.save(new User("12345","5"));
		//用户名长度大于5会报错,应该回滚事务的
		//userRepository.save(new User("123456","6"));
		//userRepository.save(user);
		return true;
	}
}
3. 事务管理步骤
- 在启动类上 ,使用 @EnableTransactionManagement 开启注解方式事务支持
- 在 Service层方法上添加 @Transactional 进行事务管理
package com.mengxuegu.springboot;

import org.springframework.boot.SpringApplication;
import org.springframework.boot.autoconfigure.SpringBootApplication;
import org.springframework.transaction.annotation.EnableTransactionManagement;

@EnableTransactionManagement //开启注解的事务管理
@SpringBootApplication
public class SpringBoot09DataJpaApplication {
	public static void main(String[] args) {
		SpringApplication.run(SpringBoot09DataJpaApplication.class, args);
	}
}
5.2 事务的隔离级别和传播行为
除了指定事务管理器之后,还能对事务进行隔离级别和传播行为的控制
1. 隔离级别
脏读:A事务执行过程中修改了id=1的数据,未提交前,B事务读取了A修改的id=1的数据,而A事务却回滚了,这样B事务就形成了脏读。
不可重复读:A事务先读取了一条数据,然后执行逻辑的时候,B事务将这条数据改变了,然后A事务再次读取的时候,发现数据不匹配了,就是所谓的不可重复读了。
幻读:A事务先根据条件查询到了N条数据,然后B事务新增了M条符合A事务查询条件的数据,导致A事务再次查询发现有N+M条数据了,就产生了幻读。
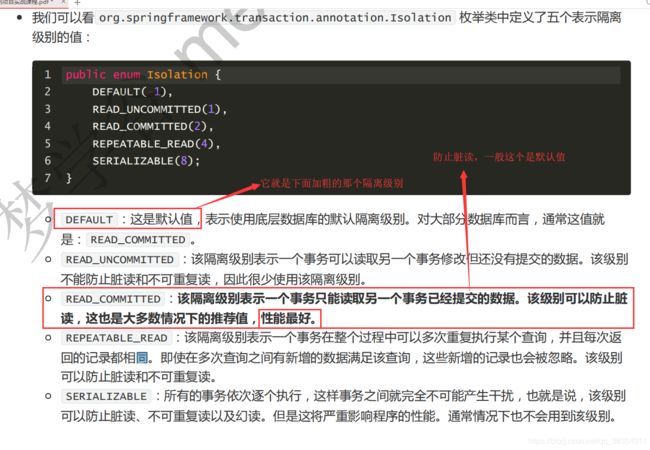
指定方式:通过使用 isolation 属性设置,例如:
@Transactional(isolation = Isolation.DEFAULT)
2. 传播行为
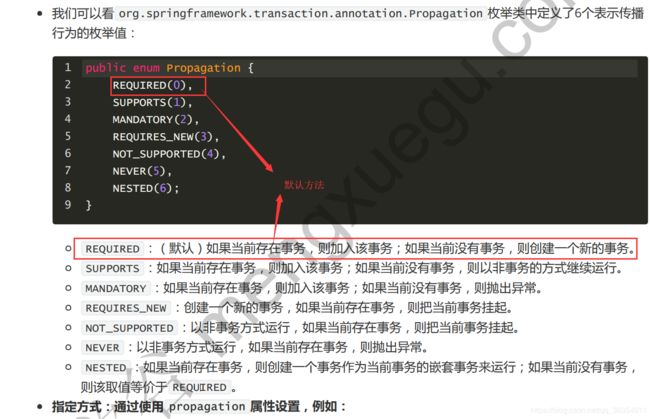
传播行为是指,如果在开始当前事务之前,已经存在一个事务,此时可以指定这个要开始的这个事务的执行行为。
指定方式:通过使用 propagation 属性设置,例如:
@Transactional(propagation = Propagation.REQUIRED)

