之前看了一篇用python爬取了微信朋友,就一直想自己试试。本来以为爬取微信好友信息要写好多代码,发现使用itchat只需要几行代码就能拿到微信好友的信息。不过就算是要写好多代码直接copy就好了。
1 获取
1.1 安装itchat包
通过命令来安装itchat
pip install itchat
1.2 登陆
import itchat
import pandas as pd
# hotReload=True 设置这个可以保存登陆状态,会生成一个文件itchat.pkl
itchat.auto_login(hotReload=True)
运行后会弹出二维码,扫描后,确认登陆。
1.3 获取并存储
friends = itchat.get_friends(update=True)
df_friends = pd.DataFrame(friends)
df_friends.to_excel('E:/python/weixin/friends.xlsx')
get_friends()返回的好友数据可以转化为pandas.DataFrame,使用pandas会简单很多。因为一开始是想练习excel的,所以把数据存储到excel。
2 分析
导包,设置
%matplotlib inline
import numpy as np
import pandas as pd
import matplotlib.pyplot as plt

from wordcloud import WordCloud
import jieba
import re
import PIL

import seaborn as sns
# 中文乱码设置
plt.rcParams['font.sans-serif'] = ['SimHei']
plt.rcParams['font.family']='sans-serif'
# 设置x, y轴刻度字体大小
plt.rcParams['xtick.labelsize'] = 16
plt.rcParams['ytick.labelsize'] = 16
plt.style.use('ggplot')
2.1 读取数据
从导出的excel获取数据,使用pandas读取excel还是很方便的。
df_friends = pd.read_excel('E:/python/weixin/friends.xlsx')
2.2 性别
sex_count = df_friends.groupby('Sex')['Sex'].count()
sex_count_order = sex_count.sort_values(ascending=False)
df_sex = pd.DataFrame(sex_count_order.values, index=['男', '女', '未设置'], columns=['Sex'])

ax = plt.figure(figsize=(8, 6)).add_subplot(111)
sns.barplot(df_sex.index, df_sex['Sex'], alpha=0.7)
ax.set_xlabel('')
ax.set_ylabel('')
ax.set_title('性别分布情况', size=26)
plt.show()
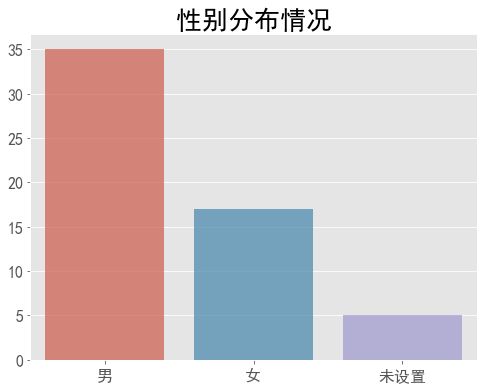
男的多,意料之中。除了男女之外还有其他的?肯定不是其他性别,毕竟微信也不可以设置其他的,应该是没有设置的。
2.3 备注
remarkname_count = df_friends.RemarkName.notnull().value_counts()
ax = plt.figure(figsize=(8, 6)).add_subplot(111)
sns.barplot(remarkname_count.index, remarkname_count.values, alpha=0.7)
ax.set_xticklabels(['没备注', '有备注'])
ax.set_title('好友备注情况', size=26)
plt.show()
才备注了几个,要是别人不让我看朋友圈,改图片和改昵称,这个人就是陌生人了。我还是很懒,主要是以前才加十几个人就没有备注的习惯。
2.4 城市分布
先来看看省份分布
friends_province = df_friends.fillna({'Province': '未设置'})
province_count = friends_province.groupby('Province')['Province'].count()
province_count_order = province_count.sort_values(ascending=False)

ax = plt.figure(figsize=(15, 8)).add_subplot(111)
sns.barplot(province_count_order.index, province_count_order.values, alpha=0.7)
ax.set_xlabel('')
ax.set_ylabel('')
ax.set_title('省份分布情况', size=26)
plt.show()
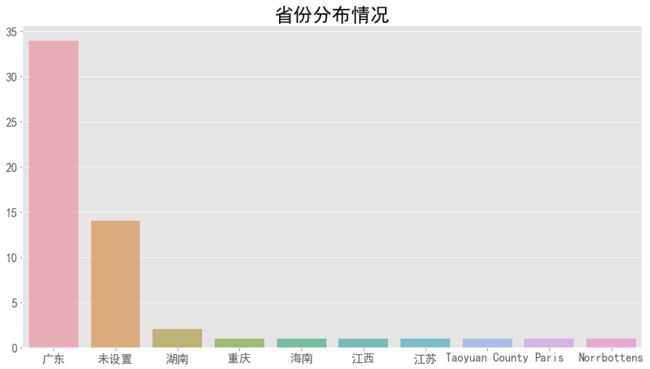
几乎都是广东的,没有设置还是挺过多的。英文的都是外国的吗?看不懂,还是看看城市分布。
friends_city = df_friends.fillna({'City': '未设置'})
city_count = friends_city.groupby('City')['City'].count()
city_count_order = city_count.sort_values(ascending=False)

ax = plt.figure(figsize=(12, 8)).add_subplot(111)
sns.barplot(city_count_order.index, city_count_order.values, alpha=0.7)
ax.set_xlabel('')
ax.set_ylabel('')
ax.set_title('城市分布情况', size=26)
plt.show()
城市未设置也是挺多的。主要还是集中在广州、珠海、深圳和汕尾。
2.5 签名设置
signature_x = df_friends['Signature'].isnull().value_counts().index
signature_y = df_friends['Signature'].isnull().value_counts().values

ax = plt.figure(figsize=(8, 6)).add_subplot(111)
sns.barplot(x=signature_x, y=signature_y, palette='hls', alpha=0.8)
ax.set_xticklabels(['未设置签名', '有设置签名'])
ax.set_title('签名设置情况', size=20)
plt.show()
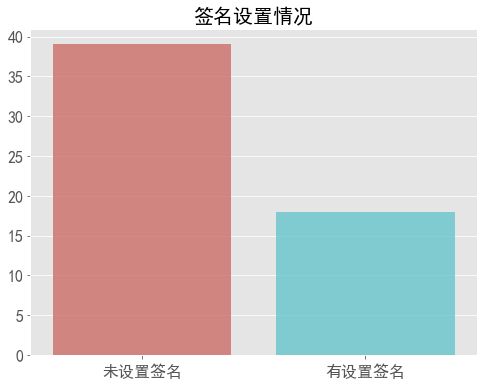
没有设置签名的远多于有设置签名,可能微信的签名不像QQ的签名那么明显。
2.6 签名词云图
首先要先处理一下签名的内容,毕竟签名可以有表情。表情保存后是html标签,要先去掉。
signature = df_friends[df_friends['Signature'].notnull()].Signature
regex = re.compile('')
signature = [regex.sub('', signature_) for signature_ in signature]

# 字体
font = r'C:\Windows\Fonts\simli.ttf'
# 使用jieba分词
wl_space_split = ''
for s in signature:
    wordlist_after_jieba = jieba.cut(s, cut_all = True)
    wl_space_split += ' '.join(wordlist_after_jieba)

# 画图
# 通过图片设置词云形状,字体颜色
coloring = np.array(PIL.Image.open("E:/python/weixin/wechat.jpg"))
my_wordcloud = WordCloud(background_color="white",
                         max_words=2000,
                         mask=coloring,
                         max_font_size=250,
                         random_state=42,
                         scale=2,
                         font_path=font).generate(wl_space_split)
plt.figure(figsize=(8, 8))
plt.imshow(my_wordcloud)
plt.axis("off")
plt.show()
没有多少签名,词频没什么好分析的,词云图看不出什么。
3 总结
其实也没什么好分析的,毕竟好友也太少了。只是之前一直想弄一下,当做练习数据处理和画图,感觉还是很不熟。不过本来目的是要练习excel,数据量不多,还是要练习一下的。
另外itchat还可以做更多,挺想做点其他的,只是现在什么都不会,还是要好好学。


