Android TabLayout 实现底部导航栏和顶部导航栏
Android TabLayout 实现底部导航栏和顶部导航栏
- 写在前面
- 底部导航栏的实现方法及代码
- 顶部导航栏的实现
- 总结
写在前面
做为一名刚入门的Android个人开发者,最近在学习如何实现一个简易的导航栏,下面是我的实现具体步骤(idea集成Android Studio)
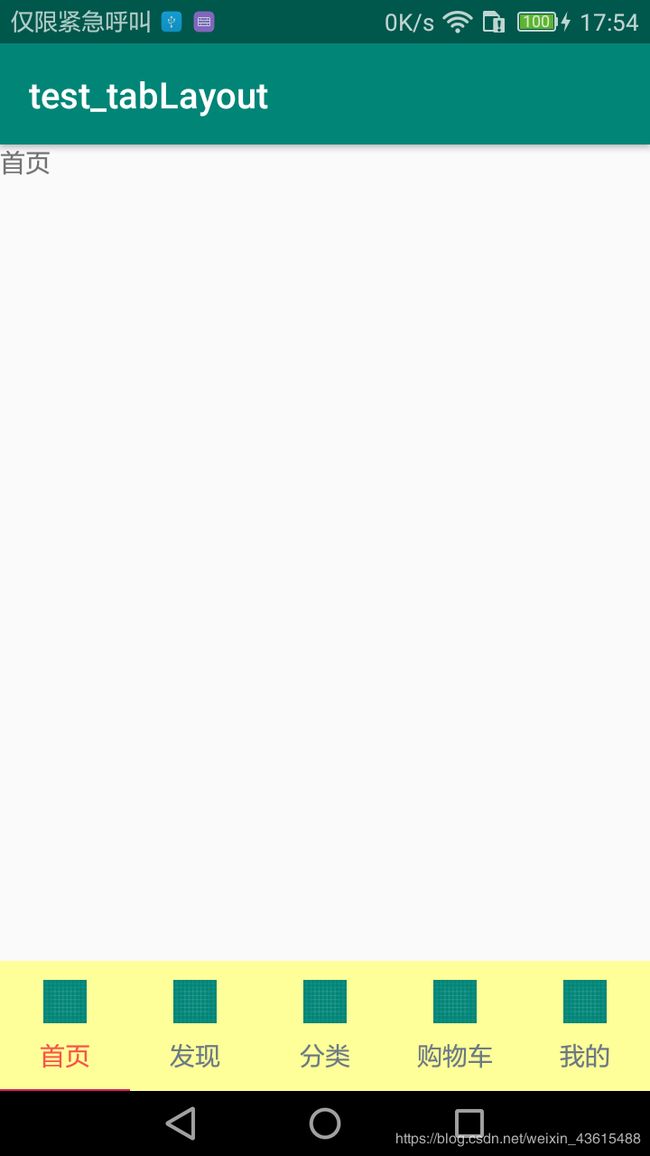
先来看看效果吧
底部导航栏的实现方法及代码
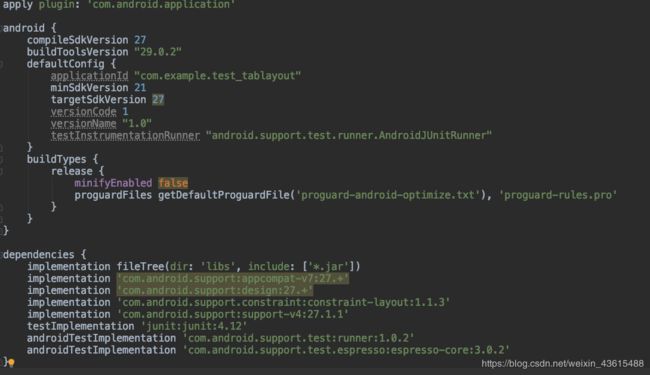
一、 配置 build.gradle (添加如下代码)
implementation 'com.android.support:appcompat-v7:27.+'
implementation 'com.android.support:design:27.+'
我的build.gradle截图如下:

二、在values文件夹下新建arrays.xml文件,主要是存放导航栏标题资源,内容如下:
<resources>
    <string-array name="tab_titles">
        <item>首页item>
        <item>发现item>
        <item>分类item>
        <item>购物车item>
        <item>我的item>
    string-array>
resources>
三、values文件夹下的colors.xml增加导航栏背景颜色,内容如下:
<resources>
    <color name="colorPrimary">#008577color>
    <color name="colorPrimaryDark">#00574Bcolor>
    <color name="colorAccent">#D81B60color>
    <color name="tab_background">#ff9color>
resources>
四、values文件夹下的styles.xml增减导航栏样式,代码如下:
<resources>
<style name="AppTheme" parent="Theme.AppCompat.Light.DarkActionBar">
- "colorPrimary"
>@color/colorPrimary
- "colorPrimaryDark">@color/colorPrimaryDark
- "colorAccent">@color/colorAccent
style>
<style name="MyCustomTabLayout" parent="Widget.Design.TabLayout">
- "tabIndicatorColor"
>?attr/colorAccent
- "tabIndicatorHeight"
>1dp
- "tabTextColor">#6b7984
- "tabSelectedTextColor">#f7554a
style>
resources>
五、新建五个Fragment,并会生成对应的xml布局文件,下面展示其中的一个Fragment及其对应的xml布局文件,其他类似(偷点懒,布局只有简单的textVIew)

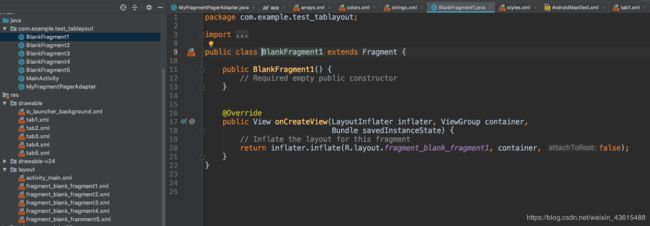
BlankFragment1代码如下,并没有特殊的功能代码
package com.example.test_tablayout;

import android.os.Bundle;
import android.support.v4.app.Fragment;
import android.view.LayoutInflater;
import android.view.View;
import android.view.ViewGroup;

public class BlankFragment1 extends Fragment {

    public BlankFragment1() {
        // Required empty public constructor
    }


    @Override
    public View onCreateView(LayoutInflater inflater, ViewGroup container,
                             Bundle savedInstanceState) {
        // Inflate the layout for this fragment
        return inflater.inflate(R.layout.fragment_blank_fragment1, container, false);
    }
}
BlankFragment1对应的fragment_blank_fragment1.xml代码如下:
<FrameLayout xmlns:android="http://schemas.android.com/apk/res/android"
             xmlns:tools="http://schemas.android.com/tools"
             android:layout_width="match_parent"
             android:layout_height="match_parent"
             tools:context=".BlankFragment1">


<TextView
        android:layout_width="match_parent"
        android:layout_height="match_parent"
        android:text="首页"/>

FrameLayout>
六、在res文件夹下的drawable文件下新建5个导航栏图标文件,这里偷懒了,用的都是系统自带的图标,一模一样的哈哈

其中tab1.xml代码如下,其他四个文件类似。
<selector xmlns:android="http://schemas.android.com/apk/res/android">
    <item android:drawable="@drawable/ic_launcher_background" android:state_selected="true" />

    <item android:drawable="@drawable/ic_launcher_background" />
selector>
七、新建MyFragmentPagerAdapter继承自FragmentPagerAdapter,实现页面滑动切换效果
package com.example.test_tablayout;

import android.support.v4.app.Fragment;
import android.support.v4.app.FragmentManager;
import android.support.v4.app.FragmentPagerAdapter;

import java.util.List;

public class MyFragmentPagerAdapter extends FragmentPagerAdapter {


    private List<Fragment>fragmentList;
    private String[] titles;


    public MyFragmentPagerAdapter(FragmentManager fragmentManager, List<Fragment> fragmentList, String[] titles){
        super(fragmentManager);
        this.fragmentList = fragmentList;
        this.titles = titles;
    }

    @Override
    public Fragment getItem(int position) {
        return fragmentList.get(position);
    }

    @Override
    public int getCount() {
        return fragmentList.size();
    }

    @Override
    public CharSequence getPageTitle(int position) {
        return titles[position];
    }

}
八、最后的mainActivity代码
package com.example.test_tablayout;

import android.graphics.drawable.Drawable;
import android.os.Bundle;
import android.support.design.widget.TabLayout;
import android.support.v4.app.Fragment;
import android.support.v4.view.ViewPager;
import android.support.v7.app.AppCompatActivity;
import java.util.ArrayList;
import java.util.List;

public class MainActivity extends AppCompatActivity {

    @Override
    protected void onCreate(Bundle savedInstanceState) {
        super.onCreate(savedInstanceState);
        setContentView(R.layout.activity_main);
        //初始化各控件
        initView();
    }

    private void initView(){

        //获取数据 在values/arrays.xml中进行定义然后调用
        String[] tabTitle = getResources().getStringArray(R.array.tab_titles);
        //将fragment装进列表中
        List<Fragment> fragmentList = new ArrayList<>();
        fragmentList.add(new BlankFragment1());
        fragmentList.add(new BlankFragment2());
        fragmentList.add(new BlankFragment3());
        fragmentList.add(new BlankFragment4());
        fragmentList.add(new BlankFragment5());
        //声明viewPager
        ViewPager viewPager = (ViewPager) findViewById(R.id.view_pager);
        //viewpager加载adapter
        viewPager.setAdapter(new MyFragmentPagerAdapter(getSupportFragmentManager(), fragmentList, tabTitle));
        //viewPager事件
        viewPager.addOnPageChangeListener(new ViewPager.OnPageChangeListener() {


            @Override
            public void onPageScrolled(int position, float positionOffset, int positionOffsetPixels) {

            }

            @Override
            public void onPageSelected(int position) {

            }

            @Override
            public void onPageScrollStateChanged(int state) {

            }
        });

        //定义TabLayout
        TabLayout tabLayout = (TabLayout) findViewById(R.id.tab);
        //TabLayout的事件
        tabLayout.addOnTabSelectedListener(new TabLayout.OnTabSelectedListener() {
            @Override
            public void onTabSelected(TabLayout.Tab tab) {
                //选中了tab的逻辑
            }

            @Override
            public void onTabUnselected(TabLayout.Tab tab) {
                //未选中tab的逻辑
            }

            @Override
            public void onTabReselected(TabLayout.Tab tab) {
                //再次选中tab的逻辑
            }
        });
        //TabLayout加载viewpager
        //一行代码和ViewPager联动起来,简单粗暴。
        tabLayout.setupWithViewPager(viewPager);
        Drawable d = null;
        for (int i = 0; i < tabLayout.getTabCount(); i++){
            TabLayout.Tab tab = tabLayout.getTabAt(i);
            switch (i){
                case 0:
                    d = getResources().getDrawable(R.drawable.tab1);
                    break;
                case 1:
                    d = getResources().getDrawable(R.drawable.tab2);
                    break;
                case 2:
                    d = getResources().getDrawable(R.drawable.tab3);
                    break;
                case 3:
                    d = getResources().getDrawable(R.drawable.tab4);
                    break;
                case 4:
                    d = getResources().getDrawable(R.drawable.tab5);
                    //tintManager.setStatusBarTintResource(R.color.colorAccent);
                    break;
            }
            tab.setIcon(d);
        }
    }
}
activity_main.xml代码如下:
<LinearLayout xmlns:android="http://schemas.android.com/apk/res/android"
              xmlns:app="http://schemas.android.com/apk/res-auto"
              android:layout_width="match_parent"
              android:layout_height="match_parent"
              android:orientation="vertical"
              android:clipToPadding="true">

    <android.support.v4.view.ViewPager
    android:layout_width="match_parent"
    android:layout_height="0dp"
    android:id="@+id/view_pager"
    android:layout_weight="1"/>

    <android.support.design.widget.TabLayout
            android:layout_width="match_parent"
            android:layout_height="wrap_content"
            android:id="@+id/tab"
            app:tabBackground="@color/tab_background"
            app:tabMode="fixed"
            app:tabGravity="fill"
            style="@style/MyCustomTabLayout" />


LinearLayout>
顶部导航栏的实现
顶部导航栏和底部导航代码是一样的,只需要改动activity_main.xml文件就好,把TabLayout放上面,ViewPager放在下面就好了
<LinearLayout xmlns:android="http://schemas.android.com/apk/res/android"
              xmlns:app="http://schemas.android.com/apk/res-auto"
              android:layout_width="match_parent"
              android:layout_height="match_parent"
              android:orientation="vertical"
              android:clipToPadding="true">


    <android.support.design.widget.TabLayout
            android:layout_width="match_parent"
            android:layout_height="wrap_content"
            android:id="@+id/tab"
            app:tabBackground="@color/tab_background"
            app:tabMode="fixed"
            app:tabGravity="fill"
            style="@style/MyCustomTabLayout" />

    <android.support.v4.view.ViewPager
            android:layout_width="match_parent"
            android:layout_height="0dp"
            android:id="@+id/view_pager"
            android:layout_weight="1"/>

LinearLayout>
总结
感觉Android自带的TabLayout还是很好用的,配合Fragment可以简单实现导航栏效果,要多少个导航栏就定义多少Fragment就好了。


