Gazebo与ros_control(1):让模型动起来


不久前,师弟问了我一个问题:“师兄,我要控制一个机器人在仿真环境下运动,需要学什么,或者从哪里入手呢?“
这个问题不是那么好回答,urdf——Gazebo——ros_control——MoveIt,这是我在很久后才能给出的一个答案。那么之前我是怎么做仿真的呢?
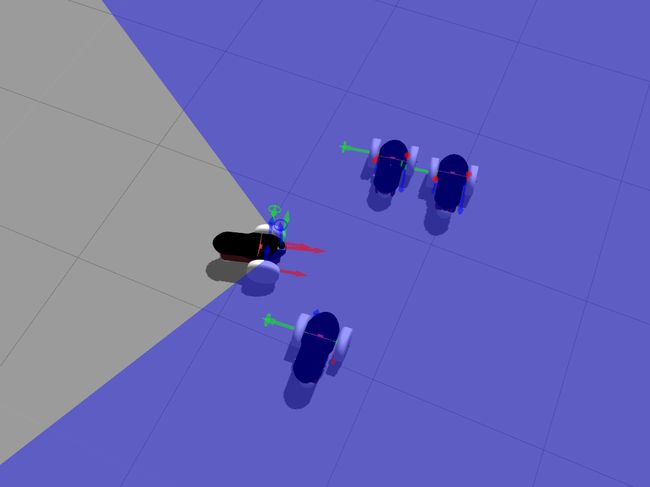
1. 借助Arbotix舵机接口来仿真
之前是在学习《ros by example volume 2 》的时候,接触到一个rbx2_bringup 的package,仿照着里面的https://github.com/pirobot/rbx2/blob/indigo-devel/rbx2_bringup/launch/pi_robot_with_gripper.launch 文件写了一个关于youbot的关节的,另外加上一些static_tf转换。
内容如下
         model: dualservo
         min_opening: 0.0
         max_opening: 0.009
         invert_left: false
         invert_right: false
         center_left: 0.0
         center_right: 0.0
         pad_width: 0.015
         finger_length: 0.04
         joint_left: gripper_finger_joint_l
         joint_right: gripper_finger_joint_r
它加载的yaml文件内容如下
port: /dev/ttyUSB0
baud: 115200
rate: 20
sync_write: True
sync_read: True
read_rate: 20
write_rate: 20

joints: {
#    wheel_joint_fl: {id: 1, neutral: 512, max_speed: 684, min_angle: 0, max_angle: 360, invert: False},
#    wheel_joint_fr: {id: 2, neutral: 512, max_speed: 684, min_angle: 0, max_angle: 360, invert: False},
#    wheel_joint_bl: {id: 3, neutral: 512, max_speed: 684, min_angle: 0, max_angle: 360, invert: False},
#    wheel_joint_br: {id: 4, neutral: 512, max_speed: 684, min_angle: 0, max_angle: 360, invert: False},

    wheel_joint_fl: {id: 1, neutral: 512, max_speed: 684, invert: False},
    wheel_joint_fr: {id: 2, neutral: 512, max_speed: 684, invert: False},
    wheel_joint_bl: {id: 3, neutral: 512, max_speed: 684, invert: False},
    wheel_joint_br: {id: 4, neutral: 512, max_speed: 684, invert: False},

    arm_joint_1: {id: 5, neutral: 512, max_speed: 684, min_angle: -169, max_angle: 169, invert: False},
    arm_joint_2: {id: 6, neutral: 512, max_speed: 684, min_angle: -65, max_angle: 90, invert: False},
    arm_joint_3: {id: 7, neutral: 512, max_speed: 684, min_angle: -151, max_angle: 146, invert: False},
    arm_joint_4: {id: 8, neutral: 512, max_speed: 684, min_angle: -102.5, max_angle: 102.5, invert: False},
    arm_joint_5: {id: 9, neutral: 512, max_speed: 684, min_angle: -167.5, max_angle: 167.5, invert: False},

    gripper_finger_joint_l: {id: 10,neutral: 512, max_speed: 684, invert: False},
    gripper_finger_joint_r: {id: 11,neutral: 512, max_speed: 684,  invert: False}
}
#http://wiki.ros.org/arbotix_python
controllers: {
   #  Pololu motors: 1856 cpr = 0.3888105m travel = 4773 ticks per meter (empirical: 4684) WheelRadius_[meter] = 0.0475 EncoderTicksPerRound = 4000
    base_controller: {type: diff_controller, base_frame_id: base_link, base_width: 0.38, ticks_meter: 4684, Kp: 50, Kd: 0, Ki: 20, Ko: 50, accel_limit: 1.0 },
    arm_controller: {type: follow_controller, joints: [arm_joint_1, arm_joint_2, arm_joint_3, arm_joint_4, arm_joint_5], action_name: arm_1/arm_controller/follow_joint_trajectory}
# rbx2/rbx2_dynamixels/config/arbotix/pi_robot_with_gripper.yaml
#    arm_controller: {type: follow_controller, joints: [right_arm_shoulder_pan_joint, right_arm_shoulder_lift_joint, right_arm_shoulder_roll_joint, right_arm_elbow_flex_joint, right_arm_forearm_flex_joint], action_name: arm_1/arm_controller/follow_joint_trajectory}
}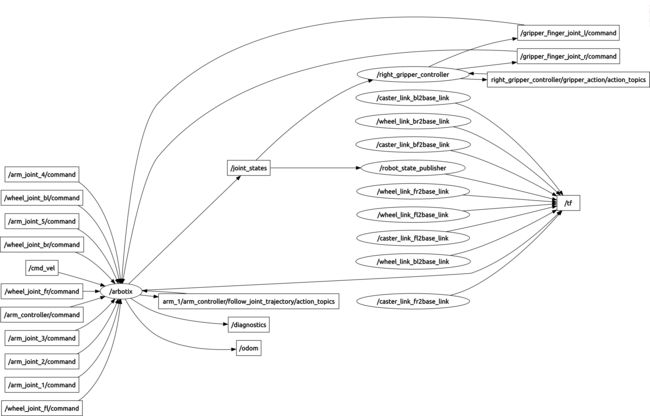
如果用这个仿真,很大程度上是有问题的,虽然也能够让模型动起来,主要是因为Arbotix是针对舵机的,而实际中很多的机器人不只是舵机,也有步进电机等等。我们的KUKA youBot机械臂是步进电机。以前的仿真中主要用的是follow_joint_trajectory action topics。而实际的youbot_driver也会启动这个topic,所以格式方面,仿真中能够用的,实际也可以直接用上,最大的问题是,仿真的参数与实际动作的相似度有有多少,这里是有个很大的问号的。
2. 借助Moveit
关于Moveit之前研究过一段时间,也总结成了三篇博客。点击打开链接
在利用命令roslaunch moveit_setup_assistant setup_assistant.launch 配置好一些config文件后。要控制实际的机器人,我们还得自己设置一个~/catkin_ws/src/moveit_youbot/config/controllers.yaml的配置文件,我的配置如下
controller_list:
  - name: arm_1/arm_controller
    action_ns: follow_joint_trajectory
    type: FollowJointTrajectory
    default: true
    joints:
      - arm_joint_1
      - arm_joint_2
      - arm_joint_3
      - arm_joint_4
- arm_joint_5- https://github.com/ros-planning/moveit_plugins/tree/c52c84dbb8764e8b995f10ab99654c4f65f8335b/moveit_ros_control_interface
- http://answers.ros.org/question/71824/gazebo-and-moveit-moveitsimplecontrollermanager-and-sending-joint-trajectory-messages/
- http://answers.ros.org/question/84806/using-moveit-to-actually-control-a-robot/
- https://groups.google.com/forum/#!topic/moveit-users/zNRG50tHuuY
其实根据youbot实际的Driver

我还尝试过这样的配置,为的是只使用/arm_1/arm_controller/position_command这个topic,而非action。也有网上的资料说那个type是ros_controller的type,而它又是与Gazebo相关的。在这里我设置的是topic 的type
controller_list:
  - name: arm_1/arm_controller/position_command
    type: brics_actuator/JointPositions
    default: true
    joints:
      - arm_joint_1
      - arm_joint_2
      - arm_joint_3
      - arm_joint_4
      - arm_joint_5
貌似也只能使用MoveItSimpleControllerManager了。根据这里的说明点击打开链接。它提供action的接口,绕了个路还是回到了action。也就是这种方式貌似是行不通。
3. Gazebo与ros_control
很久之前学习Gazebo的时候,那个官方tutorial的rrbot,2自由度连杆机器人,结合rqt的一些工具联合调pid,现在依然印象深刻,视频地址点击打开链接。不过当时没太深入,现在随着积累的东西多了,慢慢又会回头看看以前的东西,总有新的收获。而这次则主要是关于ros_control。这里我会先跑一遍官方的例子,然后结合youBot的相关文件来对比说明。
整理了一下,基本上按照这几个地方就好,按照顺序跑一遍:
- http://gazebosim.org/tutorials?tut=ros_roslaunch
- http://gazebosim.org/tutorials/?tut=ros_urdf
- http://gazebosim.org/tutorials?tut=ros_gzplugins
- http://gazebosim.org/tutorials/?tut=ros_control
其中涉及urdf的相关知识,具体参考查看roswiki, http://wiki.ros.org/urdf/XML。
官方package的目录结构如下
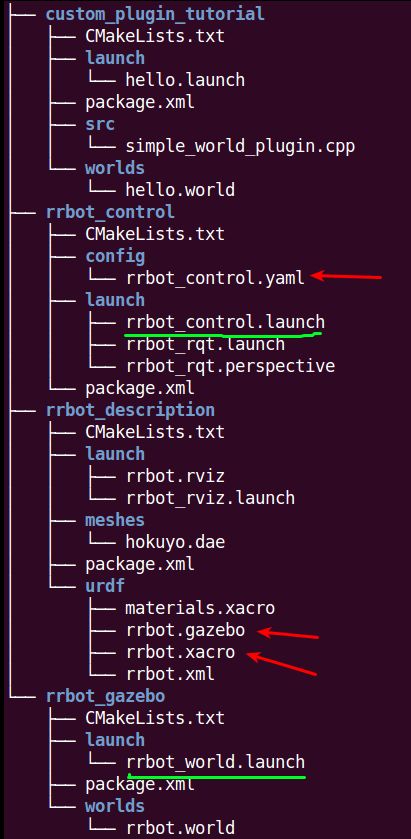
这里,我主要是想说说plugin和ros_control,介绍可以看看http://wiki.ros.org/ros_control,开头的那个PPT很不错,可以有个大概了解。

ros_control主要是提供各种controller和Hardware硬件抽象层,而实体机器人或者仿真部件就是其控制的资源,它用来连接它们

下面就结合具体的官方代码来分析下,是如何让仿真中的模型动起来的。首先~/catkin_ws/src/gazebo_ros_demos/rrbot_description/urdf/rrbot.xacro文件定义了两个运动关节的transmission,它的type是:transmission_interface/SimpleTransmission,它的hardwareInterface是:EffortJointInterface
    transmission_interface/SimpleTransmission

      EffortJointInterface


      EffortJointInterface
      1
接着~/catkin_ws/src/gazebo_ros_demos/rrbot_description/urdf/ rrbot.gazebo里有一些传感器的 plugin: libgazebo_ros_control.so, libgazebo_ros_gpu_laser.so, libgazebo_ros_camera.so。hokuyo激光雷达的如下,也就是说即使没有传感器,也可以仿真得到传感器的数据。
      0 0 0 0 0 0
      false
      40


            720
            1
            -1.570796
            1.570796


          0.10
          30.0
          0.01


          gaussian

          0.0
          0.01


        /rrbot/laser/scan
        hokuyo_link
      /rrbot
      gazebo_ros_control/DefaultRobotHWSim

Controllers:
- effort_controllers
- joint_effort_controller
- joint_position_controller
- joint_velocity_controller
- joint_state_controller
- joint_state_controller
- position_controllers
- joint_position_controller
- velocity_controllers
- joint_velocity_controllers
- joint Command Interfaces
- Effort Joint Interface
- Velocity Joint Interface
- Position Joint Interface
- Joint State Interfaces
- Actuator State Interfaces
- Actuator Command Interfaces
- Effort Actuator Interface
- Velocity Actuator Interface
- Position Actuator Interface
- Joint Pose Trajectory
- Differential Drive
- Skid Steering Drive(Pioneer 3AT for instance)
- Plannar Move plugin
- Bumper
- GPU Laser(e.g. Hokuyo)
- Block Laser(e.g. Velodyne)
- Force-torque sensor Interface
- IMU sensor Interface
依照官网的解释ros_control会去读取~/catkin_ws/src/gazebo_ros_demos/rrbot_description/urdf/rrbot.xacro中的transmisson条目,每个运动关节都需要一个transmission。
那么这些运动关节是以什么方式运动,或者pid参数是如何设定呢?因此就需要一个配置文件来配置这些。这里名叫~/catkin_ws/src/gazebo_ros_demos/rrbot_control/config/rrbot_control.yaml文件。Hardwareinterface的作用就在这个配置文件中体现了,注意Joint1和Joint2的type
rrbot:
  # Publish all joint states -----------------------------------
  joint_state_controller:
    type: joint_state_controller/JointStateController
    publish_rate: 50

  # Position Controllers ---------------------------------------
  joint1_position_controller:
    type: effort_controllers/JointPositionController
    joint: joint1
    pid: {p: 100.0, i: 0.01, d: 10.0}
  joint2_position_controller:
    type: effort_controllers/JointPositionController
    joint: joint2
pid: {p: 100.0, i: 0.01, d: 10.0}具体的关于启动的文件,都写在launch文件中了,具体来说就是rrbot_world.launch和rrbot_control.launch,内容分别如下
以下的这个lanuch文件是用来启动controller_manager和发布joint states
上面的这几个文件都是比较通用的,可以当作参考的模板。
以下的这个链接是总的一个关于ROS和Gazebo的系列教程。
http://gazebosim.org/tutorials?cat=connect_ros
=========================================
古月的教程:http://www.guyuehome.com/890