Springboot之 2.整合视图层技术
本材料整理自github https://github.com/lenve/javaboy-video-samples中的代码
2.整合视图层技术
2.1 freemarker
- 添加pom依赖
<dependency>
    <groupId>org.springframework.bootgroupId>
    <artifactId>spring-boot-starter-freemarkerartifactId>
dependency>
<dependency>
    <groupId>org.springframework.bootgroupId>
    <artifactId>spring-boot-starter-webartifactId>
dependency>
2.在application.properties文件中对freemarker进行设置
# 自定义Freemarker templates的加载classpath路径,默认为templates目录下
spring.freemarker.template-loader-path=classpath:/zjl
# 指定freemaker的编码为UTF-8
spring.freemarker.charset=UTF-8
# 指定freemarker的content-type
spring.freemarker.content-type=text/html
# 设置Freemarker的缓存策略
spring.freemarker.cache=false
#设置freemarker的后缀文件名,这样使用Controller跳转时可不指定后缀文件名
spring.freemarker.suffix=.ftl
3.编写实体类及controller
public class User {
    private Long id;
    private String username;
    private String address;
    private Integer gender;
    //get set 方法省略
    }
@Controller
public class UserController {
@GetMapping("/user")
public String user(Model model) {
List<User> users = new ArrayList<>();
Random random = new Random();
for (int i = 0; i < 10; i++) {
User user = new User();
user.setId((long) i);
user.setUsername("zjl>>>" + i);
user.setAddress("www.zjl.cn>>>" + i);
user.setGender(random.nextInt(3));//0 表示 男 1 表示 女 其他数字表示未知
users.add(user);
}
model.addAttribute("users", users);
model.addAttribute("hello", "hello
");
model.addAttribute("world", "world
");
return "user";
}
}
4.编写freemarker模板
header.ftl
<html lang="en">
<head>
    <meta charset="UTF-8">
    <title>Titletitle>
head>
<body>
<h1>欢迎学习 Spring Boot !h1>
body>
html>
user.ftl
<html lang="en">
<head>
    <meta charset="UTF-8">
    <title>Titletitle>
head>
<body>

<#noparse>

<#include './header.ftl'>
#noparse>

<#escape x as x?html>

    ${hello}
    ${world}
#escape>
<table border="1">
    <tr>
        <td>编号td>
        <td>用户名td>
        <td>用户地址td>
        <td>性别td>
    tr>
    <#list users as u>
        <#if u.id==4>
            <#break>
        #if>
        <tr>
            <td>${u.id}td>
            <td>${u.username}td>
            <td>${u.address}td>
            <td>
            <#--                <#if u.gender==0>
                                男
                            <#elseif u.gender==1>
                                女
                            <#else>
                                未知
                            #if>-->
                <#switch u.gender>
                    <#case 0>男<#break>
                    <#case 1>女<#break>
                    <#default>未知
                #switch>
            td>
        tr>
    #list>
table>
body>
html>
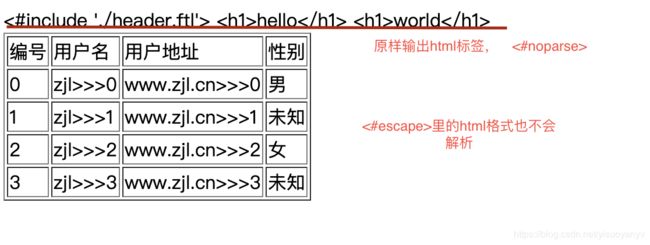
5.效果展示
2.2 jsp
- 添加相关pom依赖
<dependency>
    <groupId>org.apache.tomcat.embedgroupId>
    <artifactId>tomcat-embed-jasperartifactId>
dependency>
<dependency>
    <groupId>jstlgroupId>
    <artifactId>jstlartifactId>
    <version>1.2version>
dependency>
- 设置jsp为视图解析
@Configuration
public class WebMvcConfig implements WebMvcConfigurer {
    @Override
    public void configureViewResolvers(ViewResolverRegistry registry) {
        registry.jsp("/jsp/", ".jsp");
    }
}
3.编写jsp文件与配置Controller
hell.jsp
<%@ page contentType="text/html;charset=UTF-8" language="java" %>


    Title


${name}
@Controller
public class HelloController {
    @GetMapping("/hello")
    public String hello(Model model, String name) {
        model.addAttribute("name", name);
        return "hello";
    }
}
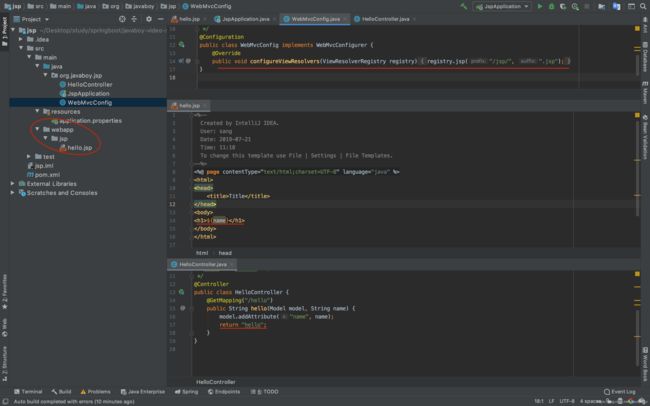
4.配置概览
2.3 thymeleaf
- 添加pom依赖
<dependency>
    <groupId>org.springframework.bootgroupId>
    <artifactId>spring-boot-starter-thymeleafartifactId>
dependency>
- 编写实体类及Controller类
public class Book {
    private Integer id;
    private String name;
    private String author;
    private Double price;
    //省略get与set
    }
@Controller
public class BookController {
    @GetMapping("/book")
    public String book(Model model) {
        List<Book> bookList = new ArrayList<>();
        for (int i = 0; i < 10; i++) {
            Book book = new Book();
            book.setId(i);
            book.setName("三国演义:" + i);
            book.setAuthor("罗贯中:" + i);
            book.setPrice(30.0);
            bookList.add(book);
        }
        model.addAttribute("books", bookList);
        return "book";
    }
}
3.编写thymeleaf模版页
book.html
<html lang="en" xmlns:th="http://www.thymeleaf.org">
<head>
    <meta charset="UTF-8">
    <title>Titletitle>
head>
<body>
<table border="1">
    <tr>
        <td>图书编号td>
        <td>图书名称td>
        <td>图书作者td>
        <td>图书价格td>
    tr>
    <tr th:each="book :${books}">
        <td th:text="${book.id}">td>
        <td th:text="${book.name}">td>
        <td th:text="${book.author}">td>
        <td th:text="${book.price}">td>
    tr>
table>
body>
html>
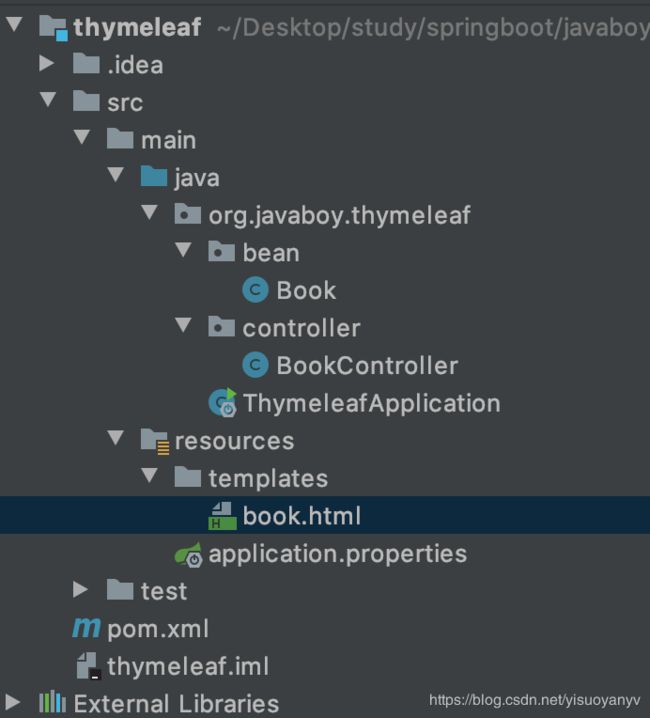
4.项目目录结构