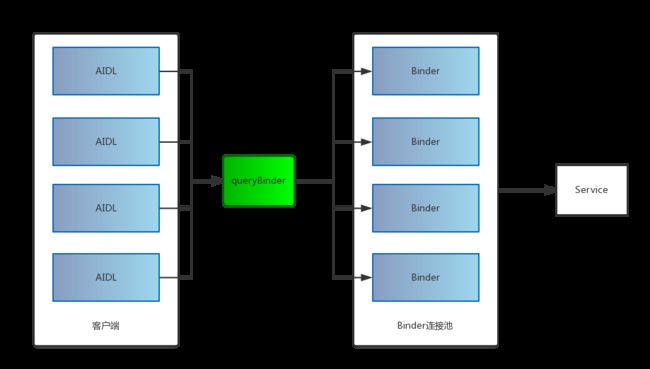
本文代码:Github
先说说问题吧,AIDL需要一个客户端和一个服务端,服务端往往是一个service,但是这样就会有问题,当团队多了,模块多了,每个模块自己一个service,显然这样是很坑爹的。所以,引入Binder连接池。
一、实现思路
对于每个AIDL接口,分别实现对应的Binder,统一一个service,然后每次bind service的时候,通过一个连接池来进行Binder分发,queryBinder里面通过请求的code来决定分配哪个Binder。这样,就可以避免随着项目模块的增多,service变多,每次有新模块接口增加的时候,只需要在queryBinder里的switch新加一个case判断即可,且能实现模块间的解耦和service与模块具体实现之间的解耦,一举两得。
二、从零开始实现Binder连接池
创建两个AIDL。
// IUser.aidl
package com.cm.mybinderpool;

interface IUser {
    boolean login(String username, String password);
}

// ICompute.aidl
package com.cm.mybinderpool;

interface ICompute {
    int add(int x, int y);
}
然后分别实现对应的Binder。
public class UserImpl extends IUser.Stub {
    @Override
    public boolean login(String username, String password) throws RemoteException {
        return true;
    }
}

public class ComputeImpl extends ICompute.Stub {
    @Override
    public int add(int x, int y) throws RemoteException {
        return x + y;
    }
}
现在还比较简单。接下来就是我们的BinderPool,先新建一个AIDL接口,里面只有一个queryBinder方法。
// IBinderPool.aidl
package com.cm.mybinderpool;

interface IBinderPool {
    IBinder queryBinder(int binderCode);
}
实现BinderPool。
首先,既然是个线程池,就应该是个单例模式。这里采用双重检查锁实现。单例获取的时候需要传入上下文context,主要是之后bind服务的时候,需要用到上下问信息。
private static volatile BinderPool sInstance;
private Context mContext;

private BinderPool(Context context) {
    mContext = context;
}

public static BinderPool getInstance(Context context) {
    if (sInstance == null) {
        synchronized (BinderPool.class) {
            if(sInstance == null) {
                sInstance = new BinderPool(context);
            }
        }
    }
    return sInstance;
}
实现binder分发,即IBinderPool的queryBinder接口,实现比较简单,就是switch-case判断。
//binder code
public static final int BINDER_USER = 0;
public static final int BINDER_COMPUTE = 1;

public static class BinderPoolImpl extends IBinderPool.Stub {
    @Override
    public IBinder queryBinder(int binderCode) throws RemoteException {
        switch (binderCode) {
            case BINDER_COMPUTE:
                return new ComputeImpl();
            case BINDER_USER:
                return new UserImpl();
            default:
                return null;
        }
    }
}
好了,接下来要创建对应的service了。这里返回IBinderPool的Binder。
public class BinderPoolService extends Service {
    public BinderPoolService() {
    }

    Binder binderPool = new BinderPool.BinderPoolImpl();

    @Override
    public IBinder onBind(Intent intent) {
        return binderPool;
    }
}
线程池作用除了进行binder的分发外,还有就是service的连接。
连接是在初始化的时候进行。
private BinderPool(Context context) {
    mContext = context;
    connectService();
}
connectService即完成连接。
这里会用到Java的CountDownLatch,CountDownLatch是通过一个计数器来实现的,计数器的初始值为线程的数量,每当一个线程完成了自己的任务后,计数器的值就会减1。当计数器值到达0时,它表示所有的线程已经完成了任务,然后在闭锁上等待的线程就可以恢复执行任务。与CountDownLatch的第一次交互是主线程等待其他线程。主线程必须在启动其他线程后立即调用CountDownLatch.await()方法。这样主线程的操作就会在这个方法上阻塞,其他线程完成后通知主线程,通过CountDownLatch.countDown()来使得值减1,因为binderservice回调之后主线程才能继续,所以这里用CountDownLatch来实现。
private CountDownLatch mConnectBinderPoolCountDownLatch;
private IBinderPool mBinderPool;

private void connectService() {
    mConnectBinderPoolCountDownLatch = new CountDownLatch(1);
    Intent intent = new Intent(mContext, BinderPoolService.class);
    mContext.bindService(intent, conn, Context.BIND_AUTO_CREATE);
    try {
        mConnectBinderPoolCountDownLatch.await();
    } catch (InterruptedException e) {
        e.printStackTrace();
    }
}

ServiceConnection conn = new ServiceConnection() {
    @Override
    public void onServiceConnected(ComponentName componentName, IBinder iBinder) {
        mBinderPool = IBinderPool.Stub.asInterface(iBinder);
        mConnectBinderPoolCountDownLatch.countDown();
    }

    @Override
    public void onServiceDisconnected(ComponentName componentName) {

    }
};
这里再为Binder设置一下死亡监听。在服务连接成功之后,得到binder,利用iBinder.linkToDeath(mBinderPoolDeathRecipient, 0),当连接池发现服务断开的时候,需要重新去连接服务,保持长连接。
private IBinder.DeathRecipient mBinderPoolDeathRecipient = new IBinder.DeathRecipient() {
    @Override
    public void binderDied() {
        mBinderPool.asBinder().unlinkToDeath(mBinderPoolDeathRecipient, 0);
        mBinderPool = null;
        connectService();
    }
};
然后,我们要在BinderPool中提供最重要的分发接口出去。
public IBinder queryBinder(int code) {
    if(mBinderPool == null) {
        return null;
    }
    try {
        return mBinderPool.queryBinder(code);
    } catch (RemoteException e){
        e.printStackTrace();
    }
    return null;
}
这里去掉用了service的queryBinder方法,然后具体实现还是在BinderPool当中,这样使用过程全部和BinderPool类打交道而不和service打交道了。
好了,这样就实现了我们的Binder连接池了,现在我们来使用一下它。
在我们的MainActivity中,调用的时候是一个耗时操作,所以需要另开一个线程进行,否则会阻塞UI线程,造成ANR。怎么开线程就不说了,直接线程具体调用的方法。
private void testBinderPool() {
    BinderPool mBinderPool = BinderPool.getInstance(MainActivity.this);
    //测试ICompute
    IBinder mComputeBinder = mBinderPool.queryBinder(BinderPool.BINDER_COMPUTE);
    ICompute mCompute = ICompute.Stub.asInterface(mComputeBinder);
    try {
        Log.i("chenming", "1+2 = " + mCompute.add(1, 2));
    } catch (RemoteException e) {
        e.printStackTrace();
    }

    //测试IUser
    IBinder mUserBinder = mBinderPool.queryBinder(BinderPool.BINDER_USER);
    IUser mUser = IUser.Stub.asInterface(mUserBinder);
    try {
        Log.i("chenming", "login " + mUser.login("user", "psd"));
    } catch (RemoteException e) {
        e.printStackTrace();
    }
}
运行一下,可以看见运行结果log。
05-30 16:38:28.964 32108 32132 I chenming: 1+2 = 3
05-30 16:38:28.965 32108 32132 I chenming: login true
三、回顾
整个过程其实客户端都是和BinderPool进行打交道的,BinderPool是个单例,主要是由于访问过程是个并发的过程,如果有两个BinderPool实例的话会出现非常多不可控的问题。BinderPool与Service打交道,BinderPool给客户端其实只提供了两个接口,一个是getInstance用以获取实例,一个是queryBinder进行binder分发。
getInstance的时候,如果实例还未初始化,则马上new一个实例,同时也开始了service的连接,连接service之后,保持连接状态,所以需要去监听Binder的死亡。
连接成功后,获取到对应IBinderPool的Binder实例。这个Binder类的具体实现还是在BinderPool当中。
下次要新模块添加AIDL的时候就很简单了,修改BinderPool里面增加一个code,然后在queryBinder中添加一个case分路进行实例化即可。
