核心动画:框架:CoreAnimation
都是基于 CALayer 图层
UIView 视图 -> 可以跟用户交互
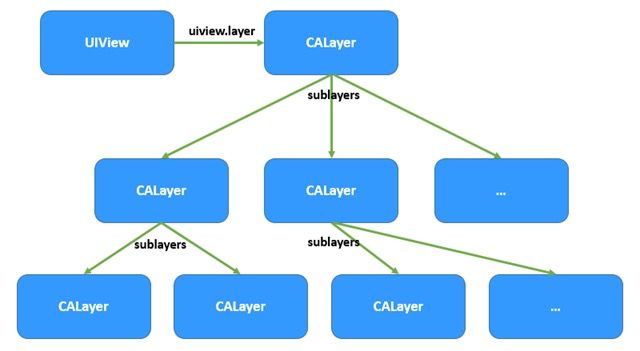
图层关系.jpg
CALayer -> 不可以跟用户交互 只能显示内容
UIView ->rootLayer 发生改变 子图层也会发生改变
button 不止有一个视图 改变的只是其中一个视图的rootLayer -> 显示 未被裁切的边框
CALayer 发生改变 子图层 不会跟随发生改变
CALayer ->自带动画效果(当改变属性值的时候)-> 隐示动画
                    bounds 边境范围
                    position 中心点 类似center
                    zPosition z轴中心点
                    anchorPoint 锚点 ✮✮✮✮✮
                      默认锚点 是与中心点重合
                      链点的最小值是0,0
                      最大值是 1,1
                      默认值是0.5,0.5
                      当试图改变的时候  是一链点为基准 去改变

                     锚点的值与位置
                      0.0 = 在图层的左上角
                      0,1 = 左下角
                      1,0 = 右上角
                      1,1 = 右下角
                     计算公式:锚点 = 锚点在视图上的位置.x.y/视图的宽高

                    anchorPointZ Z轴锚点
                    transform 转换形态
                    frame NO. Animatable 坐标
                    hidden 隐藏
                    doubleSided 图层背面是否显示
                    geometryFlipped 翻转 颠倒
                    masksToBounds 裁切边境
                    contents 内容  id类型
                    opaque 不透明度
                    allowsEdgeAntialiasing 是否使用 变形后的抗锯齿
                    backgroundColor 背景颜色
                    borderWidth 边框宽
                    borderColor 边框颜色
                    opacity 不透明度
                    shadowColor 阴影颜色
                    shadowOpacity 阴影不透明度
                    rasterizationScale 防止Retina屏幕像素化
                    shadowOffset 阴影偏移量
                    shadowRadius 阴影的半径
     CAAnimation:所有动画的父类,它是一个基类,不能直接使用
1、属性动画:CAPropertyAnimation 基类 -> 通过属性值的改变 产生动画效果
(1) 基础动画(CABasicAnimation)只能是两个点的变化
CASpringAnimation(弹簧动画)
(2)关键帧动画 (CAKeyframeAnimation)可以添加多个点的变化 或者 添加路径
2、动画组:CAAnimationGroup 可以同时添加多种动画 达到预期效果
3、转场动画:CATransition 给视图切换的时候 添加动画效果
CALayer 初始化:两种方式
CALayer *layer = [[CALayer alloc]init]//1
layer = [CALayer layer];//2
layer.frame = CGRectMake(0, 0, 100, 100);
    //    设置图层拐角的半径
    //    半径是 宽度的一半
    layer.cornerRadius = 100/2;

    layer.backgroundColor = [UIColor brownColor].CGColor;

    [self.view.layer addSublayer:layer];
-(void)touchesBegan:(NSSet *)touches withEvent:(UIEvent *)event{

    UITouch *touch = [touches anyObject];


    layer.position = [touch locationInView:self.view];
    CGFloat width = CGRectGetWidth(layer.bounds)!=100 ? 100:25;
    layer.bounds = CGRectMake(0, 0, width, width);
    CGColorRef color = [UIColor brownColor].CGColor != layer.backgroundColor ? [UIColor brownColor]
    .CGColor:[UIColor colorWithRed:1.000 green:0.183 blue:0.715 alpha:1.000].CGColor;

    layer.backgroundColor = color;
    layer.cornerRadius = layer.cornerRadius != 50 ? 50:0; layer.opacity = 0.2;
}
-(void)touchesEnded:(NSSet *)touches withEvent:(UIEvent *)event{
    layer.opacity = 1.0;
}
如图:

EAF24432-07BB-49EB-B1AA-0954C0C21203.png
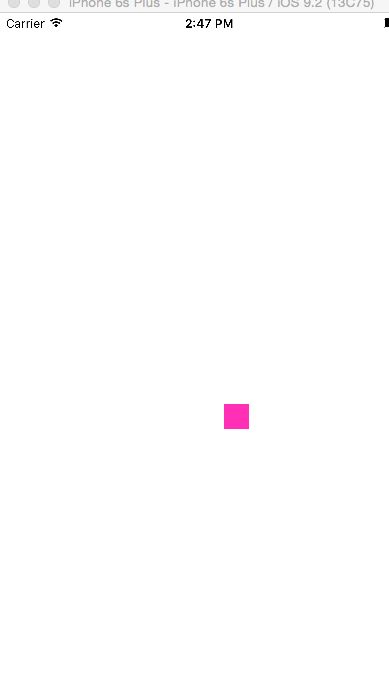
08C46804-F2DD-41F4-88B5-9635ECEF30E5.png
下面利用锚点设置:
#import "ViewController.h"
#define Angle(a)(a)*M_PI/180
#define sAngle 6 //每秒的度数
// sAngle*N秒*M_PI/180
@interface ViewController ()
{
    CALayer *layer;
}
@property (nonatomic,strong)CALayer *pointLayer;

@end

@implementation ViewController

- (void)viewDidLoad {
    [super viewDidLoad];
 UIImageView *imageView = [[UIImageView alloc]initWithFrame:CGRectMake(0, 0, CGRectGetWidth(self.view.bounds), CGRectGetWidth(self.view.bounds))];
    UIImage *image = [UIImage imageNamed:@"biaopan"];
    imageView.image = image;
    imageView.center = self.view.center;
    [self.view addSubview:imageView];
//    CALayer 初始化
//    添加到父视层 addSubLayer:

//    CALayer *layer = [[CALayer alloc]init]
    layer = [CALayer layer];
    layer.frame = CGRectMake(0, 0, 100, 100);
    //    设置图层拐角的半径
    //    半径是 宽度的一半
    layer.cornerRadius = 100/2;

    layer.backgroundColor = [UIColor brownColor].CGColor;

    [self.view.layer addSublayer:layer];

//    图层 不能跟用户交互 不可以添加响应事件

    NSLog(@"%@",self.pointLayer);


//    改变锚点
    self.pointLayer.anchorPoint = CGPointMake(0.5, 0.9);
    self.pointLayer.contents = (id)[UIImage imageNamed:@"shizhen"].CGImage;


    [NSTimer scheduledTimerWithTimeInterval:1 target:self selector:@selector(start) userInfo:nil repeats:YES];

}
-(void)start{
//    NSCalendar 日历表 可以通过日历类 获得到 年月日 时分秒
//    NSCalendar 日历
//    NSDateComponents 组件

//    当前的日历
    NSCalendar *calendar = [NSCalendar currentCalendar];
    NSDateComponents
//    components:需要的组件类型
//    fromDate:获得哪个日期的 组件
    *components =[calendar components:NSCalendarUnitHour|NSCalendarUnitMinute|NSCalendarUnitSecond fromDate:[NSDate date]];
    float s = components.second * sAngle;
//    Angle(s)
    self.pointLayer.transform = self.pointLayer.transform = CATransform3DMakeRotation(Angle(s), 0, 0, 1);


}
-(CALayer *)pointLayer{
    if (_pointLayer) {
        return _pointLayer;
    }
    _pointLayer = [CALayer layer];
    _pointLayer.bounds = CGRectMake(0, 0, 29, 236);
    _pointLayer.position = self.view.center;
    _pointLayer.backgroundColor = [UIColor whiteColor].CGColor;
    [self.view.layer addSublayer:_pointLayer];
    return _pointLayer;
}
-(void)touchesBegan:(NSSet *)touches withEvent:(UIEvent *)event{

//    锚点
//    self.view.transform =
//    self.pointLayer.transform  CATransform
//    旋转
    self.pointLayer.transform = CATransform3DMakeRotation(Angle(60), 0, 0, 1);


}
-(void)touchesEnded:(NSSet *)touches withEvent:(UIEvent *)event{

    //还原的方法
    self.pointLayer.transform = CATransform3DIdentity;
}

8CB0E9F8-502F-4199-8E77-FCC7E153054D.png

536AF7A2-EAF8-4B9E-95F6-13E52EA44EFF.png
这样就设计了一个相当于时钟的秒针。
粒子发送器图层
CAEmitterLayer:发送器
birthRate 每秒发送粒子的数量
 emittermode:发送的样式
kCAEmitterLayerPoints  默认点的形式发送
kCAEmitterLayerOutline 线的形式
kCAEmitterLayerSurface 面的形式
kCAEmitterLayerVolume 团的形式

emitterShape:发送形状的样式
kCAEmitterLayerPoint 点
kCAEmitterLayerLine 线
kCAEmitterLayerRectangle 矩形
kCAEmitterLayerCuboid  立方体
kCAEmitterLayerCircle 曲线
kCAEmitterLayerSphere 球体

rendermode:粒子出现的样式
 kCAEmitterLayerOldestFirst 最后的出生的粒子 在第一个
 kCAEmitterLayerOldestLast 最后的出生的粒子 在最后面
 kCAEmitterLayerBackToFront 把后面的 放到上面
 kCAEmitterLayerAdditive 叠加
 emitterCells;在粒子发生器上面 添加粒子

 CAEmitterCell:粒子
   contents:粒子的内容
  lifttime:存活时间
  lifttimeRange:存活时间的范围
  birthRate:每秒粒子生成的数量
emissionLatitude:散发的纬度(方向)->弧度->上下
 emissionLongitude:散发的经度(方向)->弧度->左右
velocity:发送的速度 -> 速度越快越远
  xAcceleration:X轴的加速度 惯性 动力
 yAcceleration:Y轴的加速度
 zAcceleration:Z轴的加速度
 emissionRange:散发的范围 -> 弧度 ->范围
 name:粒子的名字  可以通过名字 找到粒子
案例:
先声明一个属性:
@property (nonatomic,strong)CAEmitterLayer *emitterLayer;
self.emitterLayer.frame = CGRectMake(100, 100, 200, 200);

//    设置粒子发送器 每秒钟 发送粒子的 数量
  self.emitterLayer.birthRate = 1;
//    设置 粒子发送器的样式
  self.emitterLayer.renderMode = kCAEmitterLayerAdditive;

  //初始化
  CAEmitterCell *cell  =[CAEmitterCell emitterCell];
  cell.contents = (id)[UIImage imageNamed:@"2"].CGImage;
  //粒子的出生量
  cell.birthRate = 3;
  //存活时间->秒
  cell.lifetime = 5;

  //发送速度
  cell.velocity = 50;
  //设置粒子发送的 方向
  cell.emissionLatitude = 90*M_PI/180;
//    发送粒子的加速度
  cell.yAcceleration = 100;

//    把粒子的cell添加到 粒子发送器
  self.emitterLayer.emitterCells = @[cell];

}
//懒加载
-(CAEmitterLayer *)emitterLayer{
  if (_emitterLayer) {
      return _emitterLayer;

  }
  _emitterLayer = [CAEmitterLayer layer];
  [self.view.layer addSublayer:_emitterLayer];
  return _emitterLayer;
}

粒子发送器图层.png
渐变图层
CAGradientLayer 渐变图层
colors:渐变颜色的数组 -> id ->CGColor
locations: 颜色渐变的 百分比 数组
startPoint 颜色渐变的起始点
endPoint 颜色渐变的终点
颜色会根据 设置的两个点 去变化
 self.view.backgroundColor = [UIColor blackColor];
    UIImageView *imageView = [[UIImageView alloc]initWithFrame:CGRectMake(0, 0, CGRectGetWidth(self.view.frame), CGRectGetWidth(self.view.frame))];
    UIImage *img = [UIImage imageNamed:@"5.gif"];
    imageView.image = img;
    imageView.center = self.view.center;
    [self.view addSubview:imageView];


CAGradientLayer *layer = [CAGradientLayer layer];
    layer.frame = self.view.frame;
    layer.colors = @[(id)[UIColor greenColor].CGColor,(id)[UIColor blueColor].CGColor,(id)[UIColor colorWithRed:0.202 green:0.760 blue:1.000 alpha:1.000].CGColor];
    layer.opacity = 0.7;//透明度
    layer.startPoint = CGPointMake(0, 0);
    layer.endPoint = CGPointMake(1, 1);
    layer.locations = @[@0.2,@0.6,@0.2];
    [self.view.layer addSublayer:layer];

渐变图层.png
复制图层
首先要建一个继承与UIView的类 ,因为要想复制视图的图层,就必须 重写视图的layerClass
#import "CanReplicatorView.h"

@implementation CanReplicatorView
//要想复制视图的图层 就必须 重写视图的layerClass
//错误 -[CALayer setInstanceCount:]: unrecognized selector sent to instance 0x7fb111698450

+(Class)layerClass{
    return [CAReplicatorLayer class];
}

@end
CanReplicatorView *view = [[CanReplicatorView alloc]initWithFrame:CGRectMake(100, 100, 100, 100)];
    [self.view addSubview:view];

    UIImageView *imageView = [[UIImageView alloc]initWithFrame:CGRectMake(0, 0, 100, 100)];
    UIImage *img = [UIImage imageNamed:@"4"];
    imageView.image = img;
//    imageView.center = self.view.center;
    [view addSubview:imageView];

//    instanceCount :layer的实例化数量
//    instanceTransform:复制图层的变形的方法
//    transform:原有图层变形的方法

    CAReplicatorLayer *layer = (CAReplicatorLayer *)view.layer;
//    instanceCount :layer的实例化数量
    layer.instanceCount = 2;
//    改变复制图层 的 样式
    CATransform3D transform = CATransform3DMakeTranslation(0, 80, 0);
    layer.instanceTransform = CATransform3DRotate(transform, 180*M_PI/180, 1, 0, 0);
    layer.instanceRedOffset = -0.2;
    layer.instanceBlueOffset = -0.2;
    layer.instanceGreenOffset = -0.2;
    layer.instanceAlphaOffset = -0.4;

}

复制图层.png