gitlab runner使用教程
一、gitlab-runner安装注册
1.docker下使用gitlab-runner
Run GitLab Runner in a container – gitlab
1.1.安装docker
# 如果yum-config-manager不可用:yum -y install yum-utils
yum-config-manager --add-repo https://download.docker.com/linux/centos/docker-ce.repo
yum install -y docker-ce
1.2.安装gitlab-runner
docker run -d --name gitlab-runner --restart always \
  -v /srv/gitlab-runner/config:/etc/gitlab-runner \
  -v /var/run/docker.sock:/var/run/docker.sock \
  gitlab/gitlab-runner:latest
使用docker安装gitlab-runner,每次执行gitlab-runnber命令需要使用以下方式:
docker run --rm -t -i gitlab/gitlab-runner <command>
可以使用alias简化操作:
alias 'gitlab-runner-docker'='docker run --rm -t -i gitlab/gitlab-runner'
1.3.注册runner
- 执行注册命令
docker run --rm -t -i -v /srv/gitlab-runner/config:/etc/gitlab-runner gitlab/gitlab-runner register
Tip:不能使用
docker run --rm -t -i gitlab/gitlab-runner register进行注册,这样会因为无法成功写入配置文件导致注册失败:
ERROR: Failed to load config stat /etc/gitlab-runner/config.toml: no such file or directory builds=0
Please enter the gitlab-ci coordinator URL (e.g. https://gitlab.com )
https://gitlab.com

Please enter the gitlab-ci token for this runner
xxx

Please enter the gitlab-ci description for this runner
docker-runner

Please enter the gitlab-ci tags for this runner (comma separated):
docker

Please enter the executor: ssh, docker+machine, docker-ssh+machine, kubernetes, docker, parallels, virtualbox, docker-ssh, shell:
docker

Please enter the Docker image (eg. ruby:2.1):
alpine:latest
使用一条命令注册
docker run --rm -v /srv/gitlab-runner/config:/etc/gitlab-runner gitlab/gitlab-runner register \
  --non-interactive \
  --executor "docker" \
  --docker-image alpine:latest \
  --url "https://gitlab.com/" \
  --registration-token "PROJECT_REGISTRATION_TOKEN" \
  --description "docker-runner" \
  --tag-list "docker,aws" \
  --run-untagged="true" \
  --locked="false" \
  --access-level="not_protected"
查看注册信息
docker exec gitlab-runner cat /etc/gitlab-runner/config.toml
2.在linux上使用gitlab-runner
Install GitLab Runner using the official GitLab repositories
2.1.安装
- 添加gitlab的官方仓库
# For Debian/Ubuntu/Mint
curl -L https://packages.gitlab.com/install/repositories/runner/gitlab-runner/script.deb.sh | sudo bash

# For RHEL/CentOS/Fedora
curl -L https://packages.gitlab.com/install/repositories/runner/gitlab-runner/script.rpm.sh | sudo bash
- 下载安装
# For Debian/Ubuntu/Mint
sudo apt-get install gitlab-runner

# For RHEL/CentOS/Fedora
sudo yum install gitlab-runner


# 安装指定版本:
# for DEB based systems
apt-cache madison gitlab-runner
sudo apt-get install gitlab-runner=10.0.0

# for RPM based systems
yum list gitlab-runner --showduplicates | sort -r
sudo yum install gitlab-runner-10.0.0-1
2.2.注册runner
sudo gitlab-runner register
# 注册流程略(与前文使用docker安装的gitlab-runner注册方式一样)
查看注册信息
# 如果以root执行runner
cat /etc/gitlab-runner/config.toml

# 如果以非root执行runner
cat ~/.gitlab-runner/config.toml
3.windows下使用gitlab-runner
Install GitLab Runner on Windows
3.1.下载安装
- 在C盘创建文件夹
C:\GitLab-Runner - 下载x86或者amd64版本gitlab-runner for windows,并重命名为
gitlab-runner.exe - 注册runner
- 安装gitlab-runner
gitlab-runner install
gitlab-runner start

# 使用指定的用户install
gitlab-runner install --user ENTER-YOUR-USERNAME --password ENTER-YOUR-PASSWORD
可能遇到的问题:
Failed to start gitlab-runner: The system cannot find the path specified.
解决方法:新增一个特定的用户用于安装runner.
二、Runner Executors
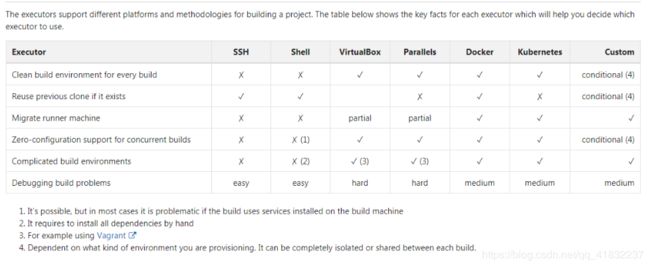
在注册Runner的时候,可以设置Executors选择以何种方式去执行Jobs,每种执行方式都有各自的特点:

1.Shell
Shell is the simplest executor to configure. All required dependencies for your builds need to be installed manually on the same machine that the Runner is installed on.
目前Shell的方式支持以下三种:
- Bash
- Windows Powershell
- Windows Batch
在config.toml中可以指定使用具体的哪种shell执行:
...
[[runners]]
  name = "shell executor runner"
  executor = "shell"
  shell = "powershell"
...
可以使用gitlab- runner run command --user指定以某个user身份执行。如果是使用.deb或者.rmp的方式安装的runner,其会默认使用gitbal_ci_multi_runner用户去执行,如果不存在该用户,就会自动创建gitlab-runner用户去执行,可以把这个用户加到特定的组获得相应的权限。
使用shell executor,项目将会被拉到以下目录:
<working-directory>/builds/<short-token>/<concurrent-id>/<namespace>/<project-name>

# example:
/home/gitlab-runner/builds/VSB3RmGD/0/ww/ci_test
项目的caches被存储到
/cache//
--working-directory指定的目录,默认是在/home/gitlab-runner/
2.Docker
A great option is to use Docker as it allows a clean build environment, with easy dependency management (all dependencies for building the project can be put in the Docker image). The Docker executor allows you to easily create a build environment with dependent services, like MySQL.
我们可以在.gitlab-ci.yml或config.toml中指定执行jobs所使用的image和services。当触发Gitbal Ci时, Docker executor就会为创建相应的容器用于执行。首先先检查本地有没有需要的镜像,没有的话就会去docker
hub上去找。
# 在.gitlab-ci.yml中指定默认所有jobs都会使用的image和services
image: ruby:2.2
services:
  - postgres:9.3
before_script:
  - bundle install

# 在.gitlab-ci.yml的中某个job内定义
test:2.1:
  image: ruby:2.1
  services:
  - postgres:9.3
  script:
  - bundle exec rake spec

# 使用私有仓库的镜像
image: registry.xxx.com:5555/namepace/image:tag

# 在config.toml中定义
[runners.docker]
  image = "ruby:2.1"
  services = ["mysql:latest", "postgres:latest"]
使用Docker executor执行jobs分为四个步骤:
- Prepare: Create and start the services.
- Pre-job: Clone, restore cache and download artifacts from previous stages.
- Job: User build.
- Post-job: Create cache, upload artifacts to GitLab.
- Docker executor会准备一个基于Apline Linux的镜像,其中包含了执行
Prepare,Pre-job和Post-job步骤所需要的工具。 - 执行
Job使用的镜像是用户定义的。
gitlab支持以下三种组合方式:
- 在
Windows上使用docker-windows在Windows Container内执行(这种方法有一些限制)。 - 在
Linux上使用docker在Linux Containers内执行。 - 在
Windows上使用docker在Linux Containers内执行。
如果涉及到有很多I/O相关的操作,config.toml配置支持把目录挂载到RAM:
[runners.docker]
  # For the main container
  [runners.docker.tmpfs]
      "/var/lib/mysql" = "rw,noexec"

  # For services
  [runners.docker.services_tmpfs]
      "/var/lib/mysql" = "rw,noexec"
3.Kubernetes
The Kubernetes executor allows you to use an existing Kubernetes cluster for your builds. The executor will call the Kubernetes cluster API and create a new Pod (with a build container and services containers) for each GitLab CI job.
The Kubernetes executor
目前还没有用过,待补充
4.Others
4.1.Virtual Machine executor
gitlab支持VirtualBox和Parallels,前提是需要创建好相应的虚拟机。
4.2.Docker Machine
类似通过Docker执行,不过创建container的时候是使用Docker Machine。
4.3.SSH
Runner需要通过SSH连接到一台外部的服务器去执行。gitlab不推荐使用这种方式执行。
4.4.Custom
gitlab支持使用自定义的执行方式。
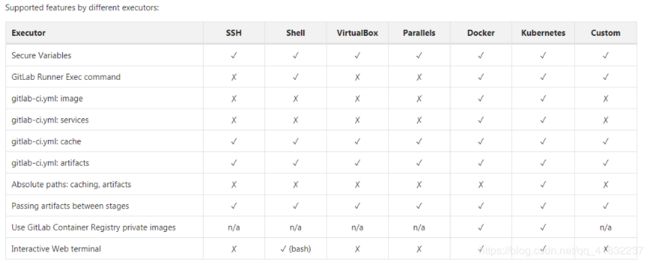
5.各个executors支持特性对比
参考文章
- gitbal-runner Install
- gitlab-runner Register

