基于springboot+thymeleaf+mybatis的员工管理系统 —— 登录与注册
员工管理系统 - 登录与注册功能
- 创建项目
- pom.xml
- 数据库表设计和环境准备
- 建表SQL
- application.properties
- 用户注册与登录功能
- entity
- dao
- service
- 生成验证码的工具
- controller
- IndexController
- UserController
- 前端页面
- 登录页面 login.html
- 注册页面 regist.html
- 启动项目
Github地址:https://github.com/szluyu99/ems_thymeleaf
这篇博客是登录与注册的功能,关于增删改查的功能在这里。
基于 springboot + thymeleaf + mybatis 的员工管理系统 —— 增删改查
创建项目
利用 Spring Initializr 快速创建一个项目:

这里填写一些项目名、描述、组织、包结构等;

这里主要是选择要引入的依赖,不选也可以,后面复制我的 pom.xml 代码即可。

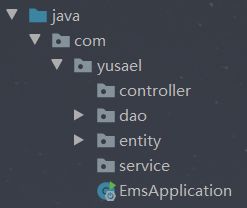
创建完项目以后,删除一些用不上的文件(比如 test 目录下的文件),项目结构如下:

pom.xml
然后检查一下 pom.xml 中的依赖:按上面的选择应该和我的 pom.xml 差不多,但是我做了一些删减,把用不上的去掉了。可以直接复制我的 pom.xml,复制后一定要刷新 Maven 项目!
<project xmlns="http://maven.apache.org/POM/4.0.0" xmlns:xsi="http://www.w3.org/2001/XMLSchema-instance"
	xsi:schemaLocation="http://maven.apache.org/POM/4.0.0 https://maven.apache.org/xsd/maven-4.0.0.xsd">
	<modelVersion>4.0.0modelVersion>

	<groupId>com.yusaelgroupId>
	<artifactId>emsartifactId>
	<version>0.0.1-SNAPSHOTversion>
	<name>emsname>
	<description>springboot + mybatis + thymeleaf 的 emsdescription>

	<properties>
		<java.version>1.8java.version>
	properties>


	<parent>
		<groupId>org.springframework.bootgroupId>
		<artifactId>spring-boot-starter-parentartifactId>
		<version>2.2.7.RELEASEversion>
	parent>

	<dependencies>

		<dependency>
			<groupId>org.springframework.bootgroupId>
			<artifactId>spring-boot-starter-webartifactId>
		dependency>

		<dependency>
			<groupId>org.springframework.bootgroupId>
			<artifactId>spring-boot-starter-thymeleafartifactId>
		dependency>

		<dependency>
			<groupId>org.mybatis.spring.bootgroupId>
			<artifactId>mybatis-spring-boot-starterartifactId>
			<version>2.1.2version>
		dependency>

		<dependency>
			<groupId>mysqlgroupId>
			<artifactId>mysql-connector-javaartifactId>
			<version>5.1.43version>
			<scope>runtimescope>
		dependency>

		<dependency>
			<groupId>com.alibabagroupId>
			<artifactId>druidartifactId>
			<version>1.1.12version>
		dependency>

		<dependency>
			<groupId>org.projectlombokgroupId>
			<artifactId>lombokartifactId>
			<optional>trueoptional>
		dependency>
	dependencies>

	<build>
		<plugins>
			<plugin>
				<groupId>org.springframework.bootgroupId>
				<artifactId>spring-boot-maven-pluginartifactId>
			plugin>
		plugins>
	build>

project>
数据库表设计和环境准备
需求分析:
- 既然做的员工管理系统,那肯定需要一个员工表(t_emp)来存储员工的信息,表的具体内容需要根据业务需求来决定,我们这里就做一个简易的管理系统,设的较为简单。
- 由于我们要做登录功能,因此我们需要一个用户表(t_user)来存储用户信息。
建表SQL
员工表的SQL:
CREATE TABLE `t_emp` (
  `id` varchar(40) NOT NULL,
  `name` varchar(60) DEFAULT NULL,
  `salary` double(7,2) DEFAULT NULL,
  `age` int(3) DEFAULT NULL,
  `bir` date DEFAULT NULL,
  PRIMARY KEY (`id`)
) ENGINE=InnoDB DEFAULT CHARSET=utf8;
用户表的SQL:
CREATE TABLE `t_user` (
  `id` varchar(40) NOT NULL,
  `username` varchar(40) DEFAULT NULL,
  `realname` varchar(40) DEFAULT NULL,
  `password` varchar(40) DEFAULT NULL,
  `sex` varchar(8) DEFAULT NULL,
  PRIMARY KEY (`id`)
) ENGINE=InnoDB DEFAULT CHARSET=utf8;
application.properties
数据库建完表以后,还需要在 application.properties 中配置:
server.port=8989
server.servlet.context-path=/ems

##mysql配置
#指定连接池类型
spring.datasource.type=com.alibaba.druid.pool.DruidDataSource
#指定驱动
spring.datasource.driver-class-name=com.mysql.jdbc.Driver
#指定url
spring.datasource.url=jdbc:mysql://localhost:3306/ems?characterEncoding=UTF-8
#指定用户名
spring.datasource.username=root
#指定密码
spring.datasource.password=1234

##配置thymleaf(下面注释的是默认配置, 可以不设置)
#spring.thymeleaf.prefix=classpath:/templates/
#spring.thymeleaf.suffix=.html
#spring.thymeleaf.encoding=UTF-8
#spring.thymeleaf.cache=false # 想让热部署生效必须配置这个
#spring.thymeleaf.servlet.content-type=text/html
# 默认无法直接访问templates下的页面, 需要设置
spring.resources.static-locations=classpath:/templates/, classpath:/static/

#指定mapper配置文件位置
mybatis.mapper-locations=classpath:/com/yusael/mapper/*.xml
#指定起别名了的类
mybatis.type-aliases-package=com.yusael.entity
在启动类中加上 @MapperScan("com.yusael.dao") 来扫描该目录。
package com.yusael;

import org.mybatis.spring.annotation.MapperScan;
import org.springframework.boot.SpringApplication;
import org.springframework.boot.autoconfigure.SpringBootApplication;

@SpringBootApplication
@MapperScan("com.yusael.dao")
public class EmsApplication {

	public static void main(String[] args) {
		SpringApplication.run(EmsApplication.class, args);
	}

}
用户注册与登录功能
entity
先在 com.yusael.entity 包下创建与数据库表对应的实体类 User.java:
package com.yusael.entity;

import lombok.AllArgsConstructor;
import lombok.Data;
import lombok.NoArgsConstructor;
import lombok.ToString;

@Data
@AllArgsConstructor
@NoArgsConstructor
@ToString
public class User {
    private String id;
    private String username;
    private String realname;
    private String password;
    private String sex;
}
dao
在 com.yusael.dao 包下创建 UserDAO.java:
package com.yusael.dao;

import com.yusael.entity.User;
import org.apache.ibatis.annotations.Param;

public interface UserDAO {
    void save(User user);
    User login(@Param("username") String name, @Param("password") String password);
}
在 resources/com/yusael/mapper 下创建 UserDAOMapper.xml,这里的路径要与 application.properties 中配置的一致。

<mapper namespace="com.yusael.dao.UserDAO">


    <insert id="save" parameterType="User">
        insert into t_user values (#{id}, #{username}, #{realname}, #{password}, #{sex})
    insert>


    <select id="login" resultType="User">
        select id, username, realname, password, sex from t_user
        where username=#{username} and password=#{password}
    select>

mapper>
service
在 com.yusael.service 包下创建 UserService.java 接口:
package com.yusael.service;

import com.yusael.entity.User;

public interface UserService {
    void register(User user);
    User login(String username, String password);
}
在 com.yusael.service 包下创建 UserServiceImpl.java:
package com.yusael.service;

import com.yusael.dao.UserDAO;
import com.yusael.entity.User;
import org.springframework.beans.factory.annotation.Autowired;
import org.springframework.stereotype.Service;
import org.springframework.transaction.annotation.Transactional;
import java.util.UUID;

@Service
@Transactional
public class UserServiceImpl implements UserService {
    @Autowired
    private UserDAO userDAO;

    @Override
    public void register(User user) {
        user.setId(UUID.randomUUID().toString());
        userDAO.save(user);
    }

    @Override
    public User login(String username, String password) {
        return userDAO.login(username, password);
    }
}
生成验证码的工具
在开发 com.yusael.controller 包的内容前,我们需要引入一个验证码功能的代码,将它放到 com.yusael.utils 下作为一个工具类:这个不需要我们自己写,直接拿过来用就可以了。
package com.yusael.utils;

import javax.imageio.ImageIO;
import java.awt.*;
import java.awt.image.BufferedImage;
import java.io.FileOutputStream;
import java.io.IOException;
import java.util.Arrays;
import java.util.Random;

public class ValidateImageCodeUtils {
    /**
     * 验证码难度级别 Simple-数字 Medium-数字和小写字母 Hard-数字和大小写字母
     */
    public enum SecurityCodeLevel {
        Simple, Medium, Hard
    };
    /**
     * 产生默认验证码,4位中等难度
     *
     * @return
     */
    public static String getSecurityCode() {
        return getSecurityCode(4, SecurityCodeLevel.Medium, false);
    }
    /**
     * 产生长度和难度任意的验证码
     *
     * @param length
     * @param level
     * @param isCanRepeat
     * @return
     */
    public static String getSecurityCode(int length, SecurityCodeLevel level, boolean isCanRepeat) {
        // 随机抽取len个字符
        int len = length;
        // 字符集合(--除去易混淆的数字0,1,字母l,o,O)
        char[] codes = {
                '0', '1', '2', '3', '4', '5', '6', '7', '8', '9',
                'a', 'b', 'c', 'd', 'e', 'f', 'g', 'h', 'i', 'j', 'k', 'l', 'm', 'n', 'o', 'p', 'q', 'r', 's', 't', 'u', 'v', 'w', 'x', 'y', 'z',
                'A', 'B', 'C', 'D', 'E', 'F', 'G', 'H', 'I', 'J', 'K', 'L', 'M', 'N', 'O', 'P', 'Q', 'R', 'S', 'T', 'U', 'V', 'W', 'X', 'Y', 'Z'
        };
        // 根据不同难度截取字符串
        if (level == SecurityCodeLevel.Simple) {
            codes = Arrays.copyOfRange(codes, 0, 10);
        } else if (level == SecurityCodeLevel.Medium) {
            codes = Arrays.copyOfRange(codes, 0, 36);
        }
        // 字符集和长度
        int n = codes.length;
        // 抛出运行时异常
        if (len > n && isCanRepeat == false) {
            throw new RuntimeException(String.format("调用SecurityCode.getSecurityCode(%1$s,%2$s,%3$s)出现异常," + "当isCanRepeat为%3$s时,传入参数%1$s不能大于%4$s", len, level, isCanRepeat, n));
        }
        // 存放抽取出来的字符
        char[] result = new char[len];
        // 判断能否出现重复字符
        if (isCanRepeat) {
            for (int i = 0; i < result.length; i++) {
                // 索引0 and n-1
                int r = (int) (Math.random() * n);
                // 将result中的第i个元素设置为code[r]存放的数值
                result[i] = codes[r];
            }
        } else {
            for (int i = 0; i < result.length; i++) {
                // 索引0 and n-1
                int r = (int) (Math.random() * n);
                // 将result中的第i个元素设置为code[r]存放的数值
                result[i] = codes[r];
                // 必须确保不会再次抽取到那个字符,这里用数组中最后一个字符改写code[r],并将n-1
                codes[r] = codes[n - 1];
                n--;
            }
        }
        return String.valueOf(result);
    }
	/**
     * 生成验证码图片

     * @param securityCode

     * @return

     */
    public static BufferedImage createImage(String securityCode){

        int codeLength = securityCode.length();//验证码长度

        int fontSize = 18;//字体大小

        int fontWidth = fontSize+1;

        //图片宽高

        int width = codeLength*fontWidth+6;
        int height = fontSize*2+1;
        //图片

        BufferedImage image = new BufferedImage(width, height, BufferedImage.TYPE_INT_RGB);

        Graphics2D g = image.createGraphics();

        g.setColor(Color.WHITE);//设置背景色

        g.fillRect(0, 0, width, height);//填充背景

        g.setColor(Color.LIGHT_GRAY);//设置边框颜色

        g.setFont(new Font("Arial", Font.BOLD, height-2));//边框字体样式

        g.drawRect(0, 0, width-1, height-1);//绘制边框

        //绘制噪点

        Random rand = new Random();

        g.setColor(Color.LIGHT_GRAY);

        for (int i = 0; i < codeLength*6; i++) {

            int x = rand.nextInt(width);

            int y = rand.nextInt(height);

            g.drawRect(x, y, 1, 1);//绘制1*1大小的矩形

        }

        //绘制验证码

        int codeY = height-10;

        g.setColor(new Color(19,148,246));

        g.setFont(new Font("Georgia", Font.BOLD, fontSize));
        for(int i=0;i<codeLength;i++){
        	double deg=new Random().nextDouble()*20;
        	g.rotate(Math.toRadians(deg), i*16+13,codeY-7.5);
            g.drawString(String.valueOf(securityCode.charAt(i)), i*16+5, codeY);
            g.rotate(Math.toRadians(-deg), i*16+13,codeY-7.5);
        }

        g.dispose();//关闭资源
        return image;
    }

    public static void main(String[] args) throws IOException {
        String securityCode = ValidateImageCodeUtils.getSecurityCode();
        System.out.println(securityCode);

        BufferedImage image = ValidateImageCodeUtils.createImage(securityCode);
        ImageIO.write(image,"png",new FileOutputStream("aa.png"));
    }

}
controller
IndexController
我们知道,resources/templates 下面放的是我们的页面文件(html),如果我们直接访问 templates 下的静态页面是无法获取 static 中的样式的。
我们需要用控制器进行去访问,该控制器没有其他作用,只是为了访问界面而已。
在 com.yusael.controller 下创建一个 IndexController.java:
package com.yusael.controller;

import org.springframework.stereotype.Controller;
import org.springframework.web.bind.annotation.GetMapping;

// 直接访问templates下的静态页面是无法获取static中的样式的
// 用该控制器进行去访问, 该控制器没有其他作用, 只是为了访问界面而已
@Controller
public class IndexController {
    @GetMapping("/index")
    public String toIndex() {
        return "ems/login";
    }

    @GetMapping("/toRegister")
    public String toRgsiter() {
        return "ems/regist";
    }

    @GetMapping("/toSave")
    public String toSaave() {
        return "ems/addEmp";
    }
}
UserController
在 com.yusael.controller 下开发 UserController.java:
package com.yusael.controller;

import com.yusael.entity.User;
import com.yusael.service.UserService;
import com.yusael.utils.ValidateImageCodeUtils;
import org.springframework.beans.factory.annotation.Autowired;
import org.springframework.stereotype.Controller;
import org.springframework.web.bind.annotation.GetMapping;
import org.springframework.web.bind.annotation.PostMapping;
import org.springframework.web.bind.annotation.RequestMapping;
import javax.imageio.ImageIO;
import javax.servlet.ServletOutputStream;
import javax.servlet.http.HttpServletResponse;
import javax.servlet.http.HttpSession;
import java.awt.image.BufferedImage;
import java.io.IOException;

@Controller
@RequestMapping("/user")
public class UserController {

    @Autowired
    private UserService userService;

    // 登录方法
    @PostMapping("/login")
    public String login(String username, String password, HttpSession session) {
        User login = userService.login(username, password);
        if (login != null) {
            session.setAttribute("user", login);
            System.out.println("登录成功");
            return "redirect:/emp/findAll"; // 跳转到查询所有
        } else {
            return "redirect:/index"; // 跳转回到登录
        }
    }

	// 注册方法
    @PostMapping("/register")
    public String register(User user, String code, HttpSession session) {
        String sessionCode = (String)session.getAttribute("code"); // 生成的验证码
        // 忽略大小写, 比较用户输入的验证码与生成的验证码
        if (sessionCode.equalsIgnoreCase(code)) { // 输入正确
            userService.register(user); // 注册
            System.out.println("注册成功");
            return "redirect:/index"; // 注册成功跳转到登录界面
        } else { // 输入错误
            return "redirect:/toRegister"; // 注册失败跳转到注册界面
        }
    }

	// 生成验证码
    @GetMapping("/code")
    public void getImage(HttpSession session, HttpServletResponse response) throws IOException {
        // 生成验证码
        String securityCode = ValidateImageCodeUtils.getSecurityCode();
        BufferedImage image = ValidateImageCodeUtils.createImage(securityCode);
        // 存入session作用域中
        session.setAttribute("code", securityCode);
        // 响应图片
        ServletOutputStream os = response.getOutputStream();
        ImageIO.write(image, "png", os);
    }
}
前端页面
这里就把 登陆页面login.html 和 注册页面regist.html 的文件放出来(能体会到后端效果即可),完整项目可以去 https://github.com/szluyu99/ems_thymeleaf。
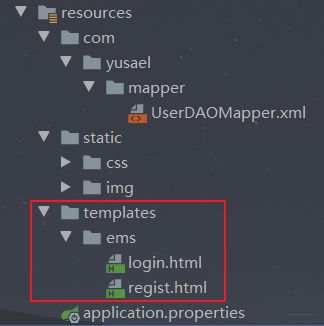
将 login.html 和 regist.html 放到 resources/templates/ems 下:(css、img这些请去GitHub获取,没有这些不影响项目功能)
登录页面 login.html
<html lang="en" xmlns:th="http://www.thymeleaf.org">

<head>
    <title>logintitle>
    <meta http-equiv="Content-Type" content="text/html; charset=UTF-8">
    <link rel="stylesheet" type="text/css" th:href="@{/css/style.css}"/>
head>

<body>
<div id="wrap">
    <div id="top_content">
        <div id="header">
            <div id="rightheader">
                <p>
                    2009/11/20
                    <br/>
                p>
            div>
            <div id="topheader">
                <h1 id="title">
                    <a href="#">maina>
                h1>
            div>
            <div id="navigation">
            div>
        div>
        <div id="content">
            <p id="whereami">
            p>
            <h1>
                login
            h1>
            <form th:action="@{/user/login}" method="post">
                <table cellpadding="0" cellspacing="0" border="0"
                       class="form_table">
                    <tr>
                        <td valign="middle" align="right">
                            username:
                        td>
                        <td valign="middle" align="left">
                            <input type="text" class="inputgri" name="username"/>
                        td>
                    tr>
                    <tr>
                        <td valign="middle" align="right">
                            password:
                        td>
                        <td valign="middle" align="left">
                            <input type="password" class="inputgri" name="password"/>
                        td>
                    tr>
                table>
                <p>
                    <input type="submit" class="button" value="Submit »"/>
                    <input type="button" class="button" onclick="location.href='/ems/toRegister'" value="Regist »"/>
                p>
            form>
        div>
    div>
    <div id="footer">
        <div id="footer_bg">
            [email protected]
        div>
    div>
div>
body>
html>
注册页面 regist.html
<html xmlns:th="http://www.thymeleaf.org">
	<head>
		<title>registtitle>
		<meta http-equiv="Content-Type" content="text/html; charset=UTF-8">
		<link rel="stylesheet" type="text/css" href="css/style.css" />
	head>
	<body>
		<div id="wrap">
			<div id="top_content">
					<div id="header">
						<div id="rightheader">
							<p>
								2009/11/20
								<br />
							p>
						div>
						<div id="topheader">
							<h1 id="title">
								<a href="#">maina>
							h1>
						div>
						<div id="navigation">
						div>
					div>
				<div id="content">
					<p id="whereami">
					p>
					<h1>
						注册
					h1>
					<form th:action="@{/user/register}" method="post">
						<table cellpadding="0" cellspacing="0" border="0"
							class="form_table">
							<tr>
								<td valign="middle" align="right">
									用户名:
								td>
								<td valign="middle" align="left">
									<input type="text" class="inputgri" name="username" />
								td>
							tr>
							<tr>
								<td valign="middle" align="right">
									真实姓名:
								td>
								<td valign="middle" align="left">
									<input type="text" class="inputgri" name="realname" />
								td>
							tr>
							<tr>
								<td valign="middle" align="right">
									密码:
								td>
								<td valign="middle" align="left">
									<input type="password" class="inputgri" name="password" />
								td>
							tr>
							<tr>
								<td valign="middle" align="right">
									性别:
								td>
								<td valign="middle" align="left">
									男
									<input type="radio" class="inputgri" name="sex" value="男" checked="checked"/>
									女
									<input type="radio" class="inputgri" name="sex" value="女"/>
								td>
							tr>

							<tr>
								<td valign="middle" align="right">
									验证码:
									<img id="num" th:src="@{/user/code}" />
									<a href="javascript:;" onclick="document.getElementById('num').src = '/ems/user/code?'+(new Date()).getTime()">换一张a>
								td>
								<td valign="middle" align="left">
									<input type="text" class="inputgri" name="code" />
								td>
							tr>
						table>
						<p>
							<input type="submit" class="button" value="Submit »" />
						p>
					form>
				div>
			div>
			<div id="footer">
				<div id="footer_bg">
				[email protected]
				div>
			div>
		div>
	body>
html>
启动项目
运行 EmsApplcation.java,浏览器中输入:http://localhost:8989/ems/index,进入登陆界面:
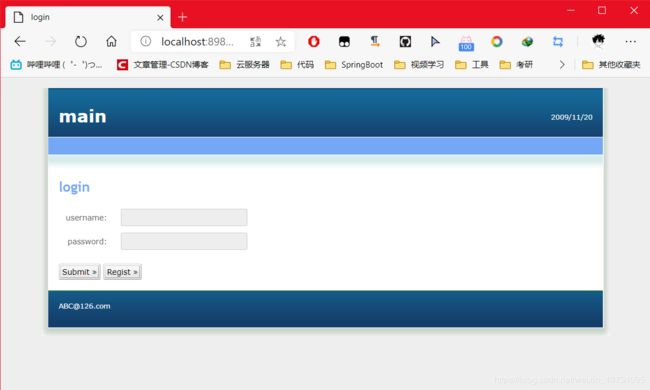
进入登陆界面,但是此时我们数据库中还没有信息,我们点击 Regist,先去注册一个账号。
点击 Regist,可以发现网址变为:http://localhost:8989/ems/toRegister,来到了注册界面。
我们输入要注册的账号的信息,点击 Submit。
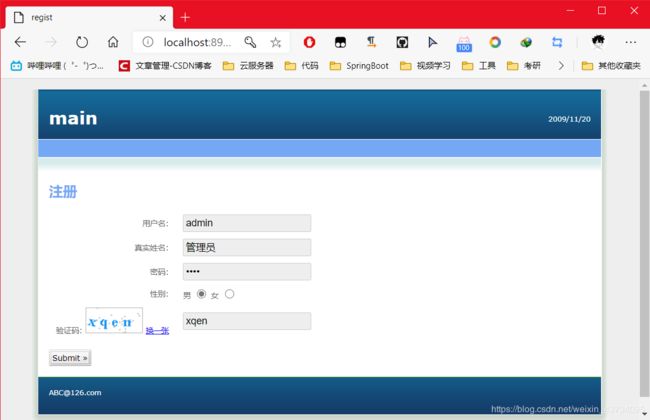
我们在 UserController.java 中设置的是注册成功跳回登陆界面,成功跳回登陆界面则说明注册成功。
数据库中也成功插入了数据。

此时我们就可以登录了,登录后应当跳到后台管理界面,但是我们还没有做,因此会报错。
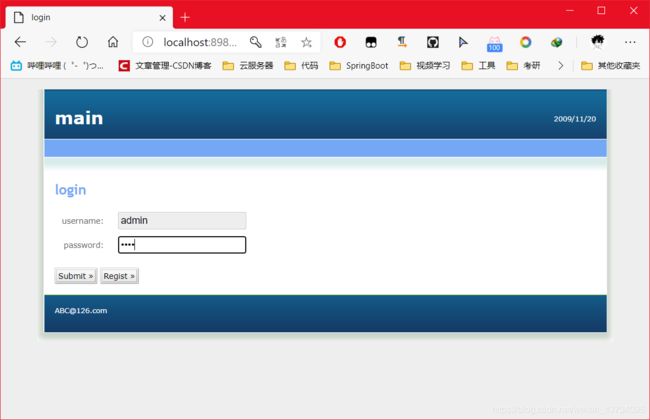

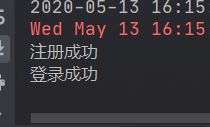
我们可以在 UserController.java 的 register 和 login 方法中分别加一句输出,可以验证我们注册和登录成功。
后续的增删改查请看:基于springboot+thymeleaf+mybatis的员工管理系统 —— 增删改查。
